
![]()
Model: ICR-240
INSTRUCTION MANUALwww.ices-electronics.com
READ THIS INSTRUCTION MANUAL BEFORE OPERATING THE APPLIANCE.AND SAVE IT FOR FUTURE REFERENCE.
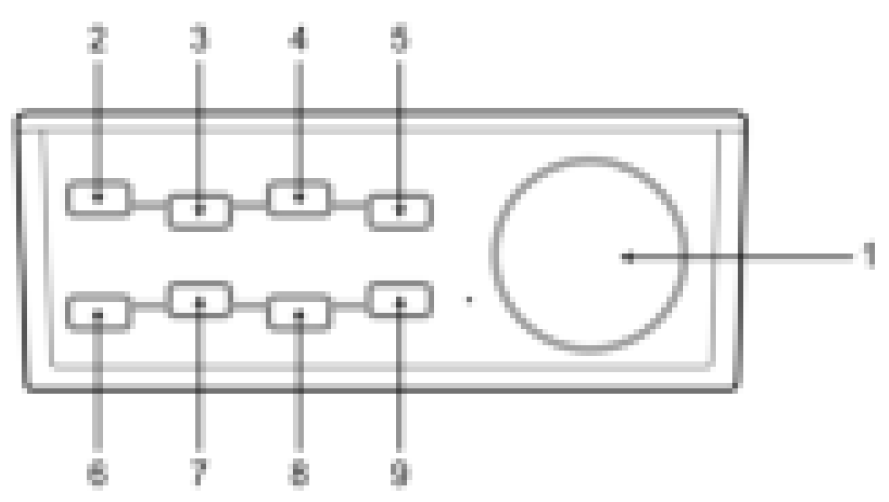
Top view
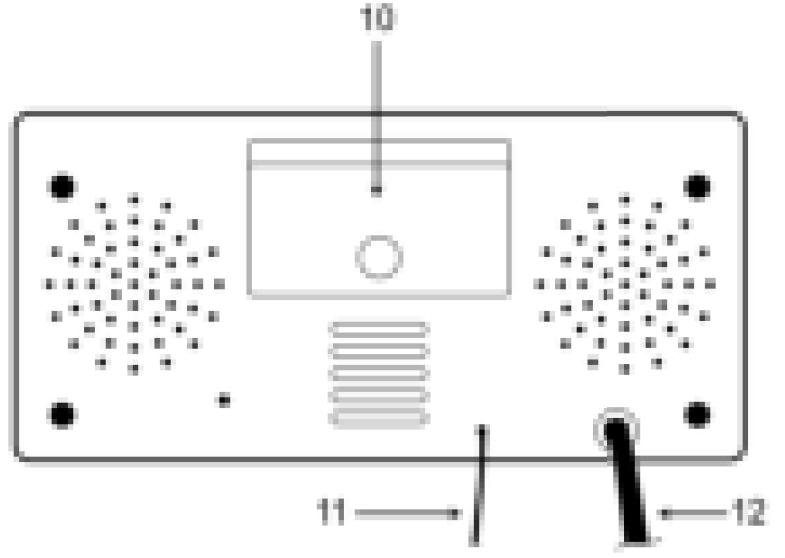
Back view
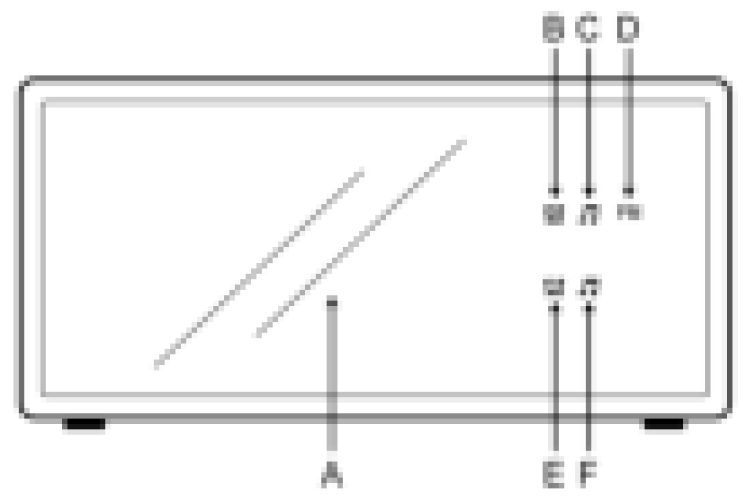
Front view
CONTROLS AND INDICATORS
1. – “SNOOZE / SLEEP / DIM” button2. – “ON / OFF / NAP” button3. – “P-“ button4. – “ALARM 1 / VOL –“ button5. – “HOUR / TUNING –“ button6. – “TIME / PRESET” button7. – “P+” button8. – “ALARM 2 / VOL +” button9. – “MIN / TUNING +” button10. – Battery compartment11. – FM antenna12. – AC plug
A. – Time and radiofrequency displayB. – Alarm 2 buzzerC. – Alarm 2 radio indicatorD. – FME. – Alarm 1 buzzerF. – Alarm 1 radio indicator
PREPARATION FOR USE
This clock radio includes a battery backup system that will maintain the time and alarm settings during a temporary power interruption. Insert two ‘AAA’ size batteries correctly by matching the polarity (+/-) markings in the battery compartment (10). If you experience a power failure while batteries are installed, the display will turn ‘off’ but the clock will continue to run and maintain your alarm settings. Please replace all batteries at the same time with only new batteries.
The clock radio has slip proof silicon feet. Place the clock radio only on protected furniture.Plug AC plug (12) into 230vac electrical outlet.
Unwind the FM antenna (11) on the back of the clock radio. Extend and reposition the antenna for best radio reception.
ALARM CLOCK OPERATION
SETTING THE TIMENote:
- You cannot set any function when the clock display is blinking after plug in, press the “TIME/PRESET” to stop blink and start setting.
- The time can only be set when the radio is turned off. Press the “ON / OFF / NAP” button (2) to turn radio on or off.
- When the clock display is blinking, you cannot power on radio by the “ON / OFF / NAP” button (2).1. -Press and hold down “TIME / PRESET” button (6) for approximately 3 seconds until the display flashes.2. -Press “HOUR / TUNING –“ button (5) repeatedly to change the hour setting.3. -Press “MIN / TUNING +“ button (9) repeatedly to change the minute setting.4. -Press “TIME / PRESET” button (6) to confirm at the time and the display will stop flashing.
SETTING THE ALARM TIMEThis clock radio has dual alarms that can be set and used independently. The procedure to set both alarms are the same. Both alarms can either sound the buzzer or wake up to radioNote: The alarm time can only be set when the radio is turned off. Press the “ON /
OFF / NAP” button (2) to turn radio on or off.
- For setting alarm time 1 with buzzer, press “ALARM 1 / VOL –“ button (4) and
 indicator (E) will flash. For setting alarm time 1 with radio, press “ALARM 1 / VOL –“ button (4) twice, and indicator (F) will flash.
 - When the digits are flashing, press “HOUR / TUNING –“ button (5) repeatedly to change the hour setting. Press “MIN / TUNING +“ button (9) repeatedly to change the minute setting.
- Press “ALARM 1 / VOL –“ button (4) to confirm.
- To cancel alarm, press “ALARM 1 / VOL –“ button (4) three times when the current time is showing. The alarm indicators will be off.
- When the alarm sounds, press any button to turn off alarm or press “SNOOZE / SLEEP / DIM” button (1) to enter snooze mode. or will blink during snooze mode. Alarm will sound again after 5 minutes. Alarm buzzer does not cut the radio sound. If alarm waken up by radio, volume control for radio is not available.
- Follow the same instructions for alarm 2 with “ALARM 2 / VOL +” button (8).
Note:
- You must make the time and alarm time adjustments while the display is flashing. The display will stop flashing after approximately 10 seconds if adjustments are not made.
- If two alarms are set together, for example alarm1 set to buzzer alarm and alarm2 set to radio alarm, when buzzer is activated by alarm1 and radio is activated by alarm2, the previous alarm does not stop automatically and has both buzzer and radio sound together.
RADIOGeneral Operations
- Press the “ON/OFF/NAP” button (2) to turn radio on and off.
- For manual tuning, press “HOUR / TUNING –“ button (5) or “MIN / TUNING +“ button (9) for increments of 0.1mHz.
- For automatic tuning, press and hold down “HOUR / TUNING –“ button (5) or “MIN / TUNING +“ button (9) for approximately 3 seconds. Depress the button and the radio will start to scan for the next available station.
- Press “ALARM 1 / VOL –“ button (4) or “ALARM 2 / VOL +“button (8) to adjust volume level. The display changes to show the volume level indication (00 to 14) during the volume adjustments, then changes back to the radio station frequency and then the current time.
- Press “HOUR / TUNING –“ button (5) or “MIN / TUNING +“ button (9) to show the radio station frequency.
Pre-set Station Memory
- The radio can store up to 20 FM stations.
- To store a station in memory, tune to the desired radio station. Press and hold down “TIME/PRESET” button (6) for approximately 3 seconds and “P01” on the display will flash. Press “P+” button (7) or “P-“ button (3) to the desired station memory (P01 to P20). Press “TIME/PRESET” button (6) once to confirm.
- Repeat the above steps for up to 20 stations.
- To recall the station, press “P+” button (7) or “P-“ button (3) until desired station is reached.
Sleep mode
- When the radio is on, press “SNOOZE / SLEEP / DIM” button (1) to enter sleep mode. “OFF” will be displayed. Press “SNOOZE / SLEEP / DIM” button (1) repeatedly for the duration of the “SLEEP” time. The range of “SLEEP” time is 90 minutes to 10 minutes, as displayed on the screen.
NAPSet the desired NAP time and the radio will turn on automatically after the preset time.
- When the radio is off, press and hold “ON / OFF / NAP” button (2) for approximate 4 seconds and the display and FM indicator (D) will flash.
- Press “P+” button (7) or “P-“ button (3) to set the desired nap time (45, 60, 90 or 120 mins)
- Press “ON / OFF / NAP” button (2) to confirm.
DIMMERWhen the radio is off and the current time showing, press “SNOOZE / SLEEP / DIM” button (1) to select the brightness of the display for high or low.
Service and support
For information: http://www.ices-electronics.com/ICES offers service and warranty in accordance to European law, which means that in case of repair (both during and after the warranty period), you should contact your local dealer.Please note: It is not possible to send products directly to ICES for repair.Important note: If this unit will be opened, or accessed in any way by a non-official service center, the warranty expires immediately.
![]() Products with the CE marking comply with the EMC Directive (2004/108/EC) and the Low Voltage Directive (2006/95/EC) issued by the Commission of the European Community.The declaration of conformity may be consulted at www.ices-electronics.com
Products with the CE marking comply with the EMC Directive (2004/108/EC) and the Low Voltage Directive (2006/95/EC) issued by the Commission of the European Community.The declaration of conformity may be consulted at www.ices-electronics.com
 This symbol indicates that the relevant electrical product or battery should not be disposed of as general household waste in Europe. To ensure the correct waste treatment of the product and battery, please dispose them in accordance to any applicable local laws of requirement for disposal of electrical equipment or batteries. In so doing, you will help to conserve natural resources and improve standards of environmental protection in treatment and disposal of electrical waste (Waste Electrical and Electronic Equipment Directive).®All rights reserved
References
[xyz-ips snippet=”download-snippet”]