iCOM VHF TRANSCEIVER

READ ALL INSTRUCTIONS carefully and completely before using the transceiver.SAVE THIS INSTRUCTION MANUAL This instruction manual contains basic operating instructions for the IC-V86. For advanced operating instructions, see the ADVANCED MANUAL on the Icom website.
EXPLICIT DEFINITIONS
| WORD | DEFINITION |
| R DANGER! | Personal death, serious injury or an explosion may occur. |
| R WARNING! | Personal injury, fire hazard or electric
shock may occur. |
| CAUTION | Equipment damage may occur. |
|
NOTE |
If disregarded, inconvenience only. No risk of personal injury, fire or electric shock. |
Icom is not responsible for the destruction, damage to, or performance of any Icom or non-Icom equipment, if the malfunction is because of:
- Force majeure, including, but not limited to, fires, earthquakes, storms, floods, lightning, other natural disasters, disturbances, riots, war, or radioactive contamination.
- The use of Icom transceivers with any equipment that is not manufactured or approved by Icom.
Icom, Icom Inc. and the Icom logo are registered trademarks of Icom Incorporated (Japan) in Japan, the United States, the United Kingdom, Germany, France, Spain, Russia, and/ or other countries.All other products or brands are registered trademarks or trademarks of their respective holders.
RECOMMENDATION
CLEAN THE TRANSCEIVER THOROUGHLY IN A BOWL OF FRESH WATER after exposure to saltwater, and dry it before operating. Otherwise, the transceiver’s keys, switches, and controllers may become unusable due to salt crystallization, and/or the charging terminals of the battery pack may corrode.NOTE: If the transceiver’s waterproof protection appears defective, carefully clean it with a soft, damp (fresh water) cloth, then dry it before operating.The transceiver may lose its waterproof protection if the case, jack cap, or connector cover is cracked or broken, or the transceiver has been dropped.Contact your Icom distributor or your dealer for advice.
FCC INFORMATION
This equipment has been tested and found to comply with the limits for a Class B digital device, pursuant to part 15 of the FCC Rules. These limits are designed to provide reasonable protection against harmful interference in a residential installation. This equipment generates, uses and can radiate radio frequency energy and, if not installed and used in accordance with the instructions, may cause harmful interference to radio communications. However, there is no guarantee that interference will not occur in a particular installation. If this equipment does cause harmful interference to radio or television reception, which can be determined by turning the equipment off and on, the user is encouraged to try to correct the interference by one or more of the following measures:
- Reorient or relocate the receiving antenna.
- I ncrease the separation between the equipment and receiver.
- Connect the equipment into an outlet on a circuit different from that to which the receiver is connected.
- Consult the dealer or an experienced radio/TV technician for help.
CAUTION: Changes or modifications to this device, not expressly approved by Icom Inc., could void your authority to operate this device under FCC regulations.
PRECAUTIONS
WARNING!
- NEVER use or charge Icom battery packs with non-Icom transceivers or non-Icom chargers. Only Icom battery packs are tested and approved for use with Icom transceivers or charged with Icom chargers. Using thirdparty or counterfeit battery packs or chargers may cause smoke, fire, or cause the battery to burst.
- NEVER hold the transceiver so that the antenna is very close to, or touching exposed parts of the body, especially the face or eyes, while transmitting.
- NEVER operate the transceiver with a headset or other audio accessories at high volume levels. The continuous high volume operation may cause a ringing in your ears. If you experience the ringing, reduce the volume level or discontinue use.
CAUTION:
- DO NOT short the terminals of the battery pack. Shorting may occur if the terminals touch metal objects such as a key, so be careful when placing the battery packs (or the transceiver) in bags, and so on. Carry them so that shorting cannot occur with metal objects. Shorting may damage not only the battery pack, but also the transceiver.
- DO NOT use harsh solvents such as Benzine or alcohol when cleaning. This could damage the equipment surfaces. If the surface becomes dusty or dirty, wipe it clean with a soft, dry cloth.
- DO NOT place or leave the transceiver in excessively dusty environments. This could damage the transceiver.NOTE: DO NOT place or leave the transceiver in areas with temperatures below –25°C (–13°F) or above +55°C (+131°F): ETS version, below –30°C (–22°F) or above +60°C (+140°F): TIA version, or in areas subject to direct sunlight, such as the dashboard.
KEEP the transceiver away from heavy rain, and never immerse it in the water. The transceiver meets IP54* requirements (Dust protection and splash resistance). However, once the transceiver has been dropped, dust protection and splash resistance cannot be guaranteed due to the fact that the transceiver may be cracked, or the waterproof seal damaged, and so on.Only when the battery pack or case, antenna, and jack cover are attached.
Battery caution (for the BP-264 Ni-MH BATTERY)
CAUTION:
- NEVER incinerate used battery packs. Internal battery gas may cause an explosion.
- DO NOT immerse the battery pack in water. If the battery pack becomes wet, be sure to wipe it dry BEFORE attaching it to the transceiver.
- Always use the battery within the specified temperature range, –5˚C ~ +60˚C (23˚F ~ 140˚F). Using the battery out of its specified temperature range will reduce the battery’s performance and battery life.
- Shorter battery life could occur if the battery is left completely discharged, or in an excessive temperature environment (above 55˚C: 131˚F) for an extended period of time. If the battery must be left unused for a long time, it must be detached from the radio after charging. Keep it safely in a cool dry place at the following temperature range:–20˚C ~ +45˚C (–4˚F ~ +113˚F) (up to a month)–20˚C ~ +35˚C (–4˚F ~ +95˚F) (up to six months)–20˚C ~ +25˚C (–4˚F ~ +77˚F) (up to a year*)We recommend charging the battery pack every 6 months. Clean the battery terminals to avoid rust or misscontact. Keep the battery terminals clean. It’s a good idea to occasionally clean them.If your Ni-MH battery pack seems to have no capacity, even after being charged, completely discharge it by leaving the power ON overnight. Then, fully charge the battery pack again. If the battery pack still does not retain a charge (or only very little charge), a new battery pack must be purchased.Prior to using the transceiver for the first time, the battery pack must be fully charged for optimum life and operation.
- Recommended temperature range for charging:between 10°C ~ 40°C (rapid charge: with BC-191) orbetween 0°C ~ 45°C (regular charge: with BC-192)
- Use the supplied charger or optional charger (BC-191 for rapid charging, BC-192 for regular charging) only. NEVER use other manufacturers’ chargers.The battery pack contains a rechargeable battery. Charge the battery pack before first operating the transceiver, or when the battery pack becomes exhausted.If you want to prolong the battery life, the following points should be observed:
- Avoid overcharging. The charging time by the BC-192 should be less than 48 hours.
- Use the battery pack until it becomes almost completely exhausted, under normal conditions. We recommend battery charging after transmitting becomes impossible.
Battery caution (for the BP-298/BP-299 Li-ion BATTERY)
Misuse of Li-ion batteries may result in the following hazards: smoke, fire, or the battery may rupture. Misuse can also cause damage to the battery or degradation of battery performance.
DANGER AND CAUTION
- NEVER solder the battery terminals, or NEVER modify the battery pack. This may cause heat generation, and the battery may burst, emit smoke or catch fire.
- NEVER place or leave battery packs in areas with temperatures above 60°C (140°F). High temperature buildup in the battery cells, such as could occur near fires or stoves, inside a sun-heated vehicle, or in direct sunlight for long periods of time may cause the battery cells to rupture or catch fire. Excessive temperatures may also degrade the battery pack’s performance or shorten the battery cell’s life.
- NEVER strike or otherwise impact the battery pack. Do not use the battery pack if it has been severely impacted or dropped, or if the pack has been subjected to heavy pressure. Battery pack damage may not be visible on the outside of the case. Even if the surface of the battery does not show cracks or any other damage, the cells inside the battery may rupture or catch fire.
- NEVER place battery packs near a fire. Fire or heat may cause them to rupture or explode. Dispose of used battery packs in accordance with local regulations.
- NEVER let fluid from inside the battery get in your eyes. This can cause blindness. Rinse your eyes with clean water, without rubbing them, and immediately go to a doctor.
- NEVER use deteriorated battery packs. They could cause a fire.
- NEVER put the battery pack in a microwave oven, high-pressure container, or in an induction heatingcooker. This could cause a fire, overheating, or cause the battery cells to rupture.
- NEVER Iet fluid from inside the battery cells come in contact with your body. If it does, immediately wash with clean water.
- DO NOT continue to use the battery pack if it emits an abnormal odor, heats up, or is discolored or deformed. If any of these conditions occur, contact your Icom dealer or distributor.
- DO NOT expose the battery pack to rain, snow, saltwater, or any other liquids. Do not charge or use a wet pack. If the pack gets wet, be sure to wipe it with a clean dry cloth before using.
- DO NOT use the battery pack out of the specified temperature range for the transceiver (–20°C~ +60°C (–4°F ~ +140°F)) and the battery itself (–20°C~ +60°C (–4°F ~ +140°F)). Using the battery out of its specified temperature range will reduce its performance and battery cell’s life. Please note that the specified temperature range of the battery may exceed that of the transceiver. In such cases, the transceiver may not work properly because it is out of its operating temperature range.
- DO NOT leave the pack fully charged, completely discharged, or in an excessive temperature environment (above 50°C, 122°F) for an extended period of time. If the battery pack must be left unused for a long time, it must be detached from the transceiver after discharging. You may use the battery pack until the remaining capacity is about half, then keep it safely in a cool and dry place at the following temperature range:–20°C ~ +50°C (–4°F ~ +122°F) (within a month)–20°C ~ +40°C (–4°F ~ +104°F) (within three months)–20°C ~ +20°C (–4°F ~ +68°F) (within a year)BE SURE to replace the battery pack with a new one approximately five years after manufacturing, even if it still holds a charge. The material inside the battery cells will become weak after a period of time, even with little use.The estimated number of times you can charge the pack is between 300 and 500. Even when the pack appears to be fully charged, the operating time of the transceiver may become short when:
- Approximately 5 years have passed since the pack was manufactured.
- The pack has been repeatedly charged.See “About the supplied battery charger” for the Extend Battery Life function.
Charging caution
DANGER AND CAUTION
- NEVER charge the battery pack in areas with extremely high temperatures, such as near fires or stoves, inside a sun-heated vehicle, or in direct sunlight. In such environments, the safety/protection circuit in the battery will activate, causing the battery to stop charging.
- NEVER charge the transceiver during a lightning storm. It may result in an electric shock, cause a fire or damage the transceiver. Always disconnect the power adapter before a storm.
- NEVER charge or leave the battery in the battery charger beyond the specified time for charging. If the battery is not completely charged by the specified time, stop charging and remove the battery from the battery charger. Continuing to charge the battery beyond the specified time limit may cause a fire, overheating, or the battery may rupture.
- Occasionally observe the battery pack condition while charging. If any abnormal condition occurs, discontinue using the battery pack.
- DO NOT insert the transceiver (battery attached to the transceiver) into the charger if it is wet or soiled. This could corrode the battery charger terminals or damage the charger. The charger is not waterproof.
- DO NOT charge the battery pack outside of the specified temperature range: 10˚C ~ 40˚C (50˚F ~ 104˚F). Otherwise, the charging time will be longer, but the battery will not reach a full charge. While charging, at a point after the temperature goes out of the specified range, the charging will automatically stop.
SPECIFICATIONS
- All stated specifications are subject to change without notice or obligation.
- Measurements made without an antenna.
General
| USA | RX: 136 ~ 174 MHz
TX: 144 ~ 148 MHz* |
| EXP | RX: 136 ~ 174 MHz
TX: 136 ~ 174 MHz 144 ~ 160 MHz* |
| Operating temperature range | –20°C ~ +60°C, –4ºF ~ +140ºF |
| Frequency stability | ±2.5 ppm
(–20°C ~ +60°C, –4ºF ~ +140ºF) at +25°C, +77ºF |
| Antenna Impedance | 50 Ω |
| Power supply | 7.5 V DC nominal |
| Number of Memory channels | 207 channels
(including 1 Call channel and 6 scan edges) |
| Frequency tuning steps | 5, 10, 12.5, 15, 20, 25, 30, and 50 kHz |
| Dimensions (projections not included) | 58.6 (W) × 112 (H) × 30.5 (D) mm
2.3 (W) × 4.4 (H) × 1.2 (D) in (with BP-298/BP-299) |
| 58.6 (W) × 112 (H) × 26 (D) mm
2.3 (W) × 4.4 (H) × 1 (D) in (with BP-264) |
|
| Weight (approximate) | 300 g, 10.6 oz
(with BP-298/BP-299 and FA-B57V) |
| 360 g, 12.7 oz
(with BP-264 and FA-B57V) |
| Transmitter | |
| Transmitting mode | F2D, F3E (FM, FM-N) |
| Modulation system | Frequency shift keying modulation |
| FM (wide) | ±5.0 kHz |
| FM (narrow) | ±2.5 kHz |
| Microphone Impedance | 2.2 kΩ |
| Spurious emissions | Less than –60 dB |
| Output power
(at 7.5 V DC) |
Extra High: 7.0 W,
High: 5.5 W, Mid: 2.5 W, Low: 0.5 W |
| Current drain
(at 7.5 V DC) typical |
Extra High: 1.6 A,
High: 1.4 A, Mid: 1.0 A, Low: 0.5 A |
| Receiver | |
| Receive system | Direct Conversion |
| Sensitivity | –124 dBm (at 12 dB SINAD) typical |
| Squelch sensitivity | –126 dBm (threshold) typical |
| FM (wide) | 75 dB typical |
| FM (narrow) | 70 dB typical |
| Intermodulation | 65 dB typical |
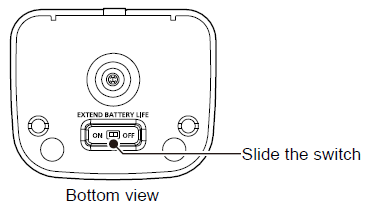
About the supplied battery charger (BC-240)
Turn the Extend Battery Life function ON or OFF. The BC-240 has the function switch on the bottom panel. (Default: OFF)
- OFF: The battery is fully charged. The operating time of the transceiver is maximum.
- ON: The battery is not fully charged to not shorten the battery life cycle.
The battery life cycle is extended. But the operating time of the transceiver becomes shorter.
PANEL DESCRIPTION
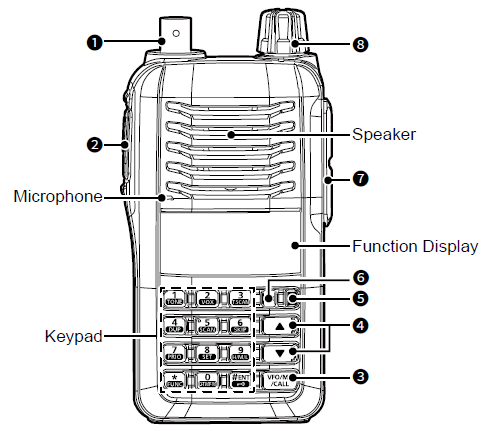
1 ANTENNA CONNECTORConnect the supplied or optional antenna here. Do not transmit without an antenna.
2 PTT SWITCH [PTT]Hold down to transmit, release to receive.
3 VFO/MEMORY/CALL KEY [VFO/MR/CALL]
- Push to sequentially select the VFO mode, Memory mode, a Call channel or a Weather Channel*.For only USA version.
- After pushing [FUNC](*), push to enter the Memory Programming mode.
- After pushing [FUNC](*), hold down for 1 second to transfer a channel contents to a memory channel, or to the VFO mode.
- Push to enter or send the DTMF code ‘D.’
4 UP/DOWN KEYS [Y]/[Z]
- Push to change the operating frequency.
- During Memory mode, push to select a memory channel.
- While scanning, push to change the scanning direction.
- W hile holding down [MONI], push to adjust the squelch level.
- While in the Set mode, or Initial Set mode, push to select a setting item.
- [Y]: Push to enter or send the DTMF code ‘B.’
- [Z]: Push to enter or send the DTMF code ‘C.’
5 POWER KEY [ ]Hold down for 1 second to turn the transceiver power ON or OFF.
6 MONITOR KEY [MONI]
- Hold down to temporarily open the squelch to monitor the operating frequency.
- While holding down this key, push [Y] or [Z] to adjust the squelch level.
- Push to enter or send the DTMF code ‘A.’
7 SPEAKER-MICROPHONE JACK [SP MIC]Connects an optional speaker-microphone or programming cable.CAUTION:
- DO NOT use the transceiver without the connector cover or the optional microphone attached. The transceiver meets IP54 requirements for dust protection and splash resistance only when the connector cover or the optional microphone is attached.
- BE SURE to turn OFF the power, before connecting or disconnecting optional equipment to or from the [SP MIC] jack. 8 CONTROL DIAL [VOL]
- Rotate to adjust the volume level.
- While in the Set mode, or Initial Set mode, rotate to select a desired option or value.
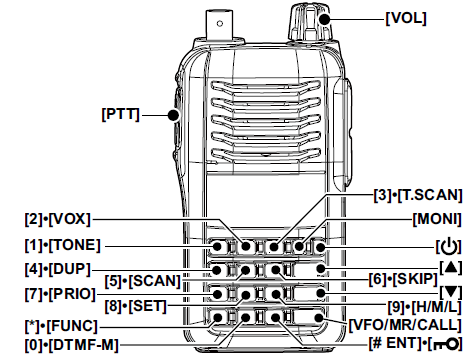
D Keypad
- While in the VFO mode, push to enter numbers for frequency input.
- While in the Memory mode, push to enter numbers to select a memory channel.
- Push to enter or send a DTMF code.
- To activate the second function of a key, first push [FUNC](*), and then push the key.
| Key | Numeric input/ DTMF code | Second function |
|
|
1 | Selects the Tone function. |
|
|
2 | Turns the VOX function ON or OFF*1. |
|
|
3 | Starts a Tone scan. |
|
|
4 | Selects minus duplex, plus duplex, or simplex operation. |
|
|
5 | Starts a scan. |
|
|
6 | Sets or cancels the skip setting. |
|
|
7 | Starts a Priority Watch. |
|
|
8 | Enters the Set mode. |
|
|
9 | Sets the output power to Extra High*2, High, Mid, or Low. |
|
|
0 | Enters the DTMF memory mode. |
|
|
* (Indication: E) | – |
|
|
#
(Indication: F) |
Hold down for 1 second to turn the Key Lock function ON or OFF. |
- Only when an optional headset and plug adapter are connected.When the “Extra High Power” is set to OFF in the Initial Set mode, Extra High (EXH) is not displayed.
- Push to access the second function of other keys.
- After entering a frequency, push to save it.
- Push to save and exit the Set mode or Initial Set mode.
Function Display
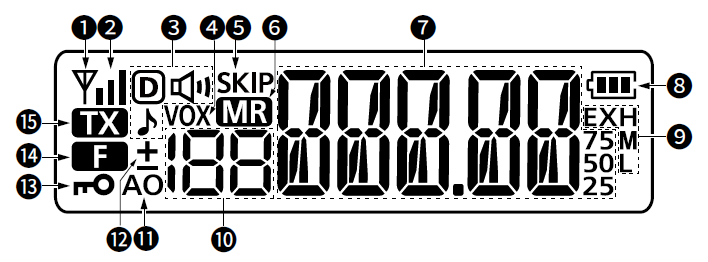
1 BUSY ICON•• Is displayed when a signal is being received, or the squelch is open.••Blinks while the Monitor function is ON.
2 SIGNAL ICONS•• Is displayed the strength of the received signal.••While transmitting, displays the output power level.Low Mid High/Extra High Power
3 TONE ICONSIs displayed when the Tone function is turned ON, and indicates which Tone function is in use.
| Icon | Function |
| “ ” | Repeater tone encoder |
| “ ” and “ ” | CTCSS Pocket Beep function |
| “ ” | CTCSS squelch function |
| “ D ” and “ ” | DTCS encoder (Only TX) |
| “ D ” and “ ” | DTCS Pocket Beep function |
| “ D ” | DTCS squelch function |
4 VOX ICONIs displayed when the VOX function is ON.
5 SKIP ICONIs displayed when the selected memory channel is set as a skip channel.
6 MEMORY ICONIs displayed when the Memory mode is selected.
7 FREQUENCY READOUT•• Displays the operating frequency, memory channel, Setmodes’ contents and a variety of other information.The smaller “75,” “50” or “25” to the right of the readout indicates 7.5, 5.0 and 2.5 kHz, respectively.The decimal point blinks during a scan.•• During Memory mode operation, the programmed memory name is displayed.
8 BATTERY ICONSDisplays the battery status.
| Indication | ||||
| Battery status | Full | Mid | Charging required | Battery exhausted |
9 POWER ICONS
- “ EXH*” is displayed when Extra High power is selected.
- “ H” is displayed when High power is selected.
- “ M” is displayed when Mid power is selected.
- “ L” is displayed when Low power is selected.* When the “Extra High Power” is set to OFF in the Initial Set mode, “EXH” is not displayed.
10 MEMORY CHANNEL NUMBER
- Displays the selected memory channel number.
- “C” is displayed when the Call channel is selected.
11 AUTO POWER OFF ICONIs displayed when the Auto Power-OFF function is ON.
12 DUPLEX ICONS
- “+” is displayed when plus duplex is selected.
- “–” is displayed when minus duplex is selected.No icon is displayed when simplex is selected.
13 KEY LOCK ICONIs displayed when the Key Lock function is ON.
14 FUNCTION ICONIs displayed when the second function is accessed.
15 TRANSMIT ICONIs displayed while transmitting.12 DUPLEX ICONS
BASIC OPERATION 
Turning power ON/OFFHold down [ ] for 1 second to turn the power ON or OFF.Mode selectionThe transceiver has 2 basic operating modes: VFO mode and Memory mode.Push [VFO/MR/CALL] several times to sequentially select the VFO mode, Memory mode, Call channel mode and Weather Channel mode. For only USA version.Setting a frequencyUsing [Y] or [Z]
- If necessary, push [VFO/MR/CALL] several times to select the VFO mode.
- Push [Y] or [Z] to set a frequency.
- The frequency changes according to the selected tuning step.
Using the keypad
- If necessary, push [VFO/MR/CALL] several times to select the VFO mode.
- To enter the desired frequency, enter 6 digits, starting from the 100 MHz digit.
- Entering two or three* to five digits, and then pushing [# ENT], also sets the frequency. (*Depending on the transceiver version)
- If the entered frequency is outside of the frequency range, the previously displayed frequency is automatically recalled.
Tuning step selection
The transceiver has 8 tuning step options; 5, 10, 12.5, 15, 20, 25, 30, and 50 kHz The tuning step can be selected in the Set mode.
- Push [FUNC](*), and then push [SET](8) to enter the Set mode.
- Push [Y] or [Z] to select the tuning step item (tS).
- Rotate [VOL] to select the desired tuning step.
- Push [# ENT] to exit the Set mode.
Key Lock functionUse the Key Lock function to prevent accidental frequency or channel change and unnecessary function access.
- Push [FUNC](*), and then hold down [ ](# ENT) for 1 second to turn the Key Lock function ON or OFF.
- “ ” is displayed while the Key Lock function is ON.
- [ ], [VOL], [MONI], [PTT] and [FUNC](*) + [ ](# ENT) are still operable while the Key Lock function is ON.
Monitor functionThis function is used to listen to weak signals, or to manually open the squelch. You can use it without disturbing the squelch setting, even when Mute functions such as the Tone squelch are in use.
- Hold down [MONI] to open the squelch.
- Release [MONI] to cancel the function.Adjusting the squelch level
- While holding down [MONI], push [Y] or [Z] several times to adjust the squelch level.
- “SqL 1” is loose squelch (for weak signals) and “SqL10” is tight squelch (for strong signals). “SqL 0” is open squelch.Selecting output powerSet the output power level to suit your operating requirements. Using lower output power during short-distance communications may reduce the possibility of interference to other stations, and will reduce current consumption.
- Push [FUNC](*), and then push [H/M/L](9) several times to select the output power.
- “EXH*,” “H,” “M,” or “L” are displayed, depending on the selected output power.
- When the “Extra High Power” is set to OFF in the Initial Set mode, “EXH” is not displayed.
REPEATER AND DUPLEX OPERATION
Duplex operationSetting the frequency offset
- Push [FUNC](*), and then push [SET](8) to enter the Set mode.
- Push [Y] or [Z] to select the frequency offset item.
- “±” and decimal point “.” blink, and the current frequency offset is displayed.
- Rotate [VOL] to set the desired frequency offset.
- The offset is set in the same step as the frequency tuning step.
- The unit of the frequency offset is “MHz.”
- Push [# ENT] to exit the Set mode. Setting the duplex direction
- Push [FUNC](*), and then push [DUP](4) to select the offset direction.
- The “–” (negative offset) or “+” (positive offset) icon is displayed to represent the frequency offset direction.
- “–” or “+” blinks when the Reverse Duplex function is ON.
For only USA version:The Auto Repeater function has priority over the manual duplex setting. If the transmit frequency changes after setting, the Auto Repeater function may have changed the duplex setting. Turn the Auto Repeater function OFF to prevent this. Reverse Duplex function When the Reverse Duplex function is ON, the receive and transmit frequencies are reversed.
- Push [FUNC](*), and then push [SET](8) to enter the Set mode.
- Push [Y] or [Z] to select the Reverse Duplex function item (REV).
- Rotate [VOL] to turn the function ON or OFF.
- Push [# ENT] to exit the Set mode.
- “–” or “+” blinks when the Reverse Duplex function is ON.
Subaudible tonesSome repeaters require subaudible tones to access. Subaudible tones are superimposed over your normal signal, and must be set in advance.
- Push [FUNC](*), and then push [SET](8) to enter the Set mode.
- Push [Y] or [Z] to select the repeater tone item. (rt)
- Rotate [VOL] to select the desired subaudible tone frequency.
- Push [# ENT] to exit the Set mode.
DTMF TONES
- While holding down [PTT], push the desired DTMF keys, [0] to [9], [MONI](A), [Y](B), [Z](C), [VFO/MR/CALL](D), [*](E), and [# ENT](F), to transmit their assigned DTMF codes.
1750 Hz TONETo access some European repeaters, the transceiver must transmit a 1750 Hz tone burst.
- While holding down [PTT], hold down either the [Y] or [Z] for 1 or 2 seconds.
MEMORY CHANNELS
Memory channel programming
- Push [VFO/MR/CALL] several times to select the VFO mode.
- Set the desired frequency.
- If desired, set other data (Example: frequency offset, duplex direction, tone squelch, and so on.).
- Push [FUNC](*), and then push [VFO/MR/CALL].
- “X” and the memory channel number blink.
- Select the Call channel mode to program the Call channel.
- Push [Y] or [Z] to select the memory channel to be programmed.
- Select “1A/1b” to “3A/3b” to program a scan edge channel.
- Push [FUNC](*), and then hold down [VFO/MR/CALL] for 1 second to program.
- 3 beeps sound.
- If you continue to hold down [VFO/MR/CALL] for 1 second after programming, the memory channel number automatically increases.NOTE: To cancel programming, push [VFO/MR/CALL] before doing step 5.
Selecting a memory channelUsing [Y] or [Z]
- Push [VFO/MR/CALL] several times to select the Memory mode.
- “X” is displayed.
- Push [Y] or [Z] to select the desired channel.
- Only programmed channels are displayed.
Using the keypad
- Push [VFO/MR/CALL] several times to select the Memory mode.
- “X” is displayed.
- To select the desired channel, enter the 3 digits of the channel number using the keypad.
- Blank channels are also selectable.
- Entering one or two digits, and then pushing [# ENT] also selects a 1 or 2 digit memory channel, respectively.Selecting the Call channel
- Push [VFO/MR/CALL] several times to select the Call channel.
- “C” is displayed instead of the memory channel number.
SCAN OPERATION
Programmed scanRepeatedly scans between two programmed frequencies (memory channels “xA” and “xb”). Used to check for frequencies within a specified range, such as repeater output frequencies, and so on. 3 pairs of scan edges are programmable.NOTE: Scan edge channels, 1A/b, 2A/b and 3A/b must be programmed in advance. Program them in the same manner as regular memory channels. If identical frequencies are programmed into the scan edge channels, the Programmed scan will not function.
- Push [VFO/MR/CALL] several times to select the VFO mode.
- Push [FUNC](*), and then push [SCAN](5) to start the scan.
- During the scan, push [FUNC](*), and then push [SET] (8) several times to select either the “P1,” “P2,” “P3” or “AL” scan.
- “AL” for band edge to band edge scan.
- “P1,” “P2” and “P3” for Programmed scan between the Programmed scan edge channels.
- To change the scan direction, push [Y] or [Z].
- To cancel the scan, push any key except [ ], [Y]/[Z], [MONI] or [FUNC](*).
Memory ScanRepeatedly scans memory channels, except those set as skip channels, described in the next scan topic.
- Push [VFO/MR/CALL] several times to select the Memory mode.
- “X” is displayed.
- Push [FUNC](*), and then push [SCAN](5) to start the scan.
- To change the scan direction, push [Y] or [Z].
- To cancel the scan, push any key except [ ], [Y]/[Z], [MONI] or [FUNC](*).
Setting skip channelsThe Memory Skip function speeds up scanning by not scanning those memory channels set as skip channels. Set skip channels as follows.
- Push [VFO/MR/CALL] several times to select the Memory mode.
- Push [Y] or [Z] to select the memory channel to be skipped.
- Push [FUNC](*), and then push [SKIP](6) to set the channel as skip channel.
- “SKIP” is displayed.
Scan resume settingVarious pause and timer options can be selected with the Scan Resume function. The selected resume option is also used for Priority Watch.
Priority watchMemory or Call channel watchWhile operating on a VFO frequency, Priority Watch checks for a signal on the selected memory or Call channel every 5 seconds.
- Select the VFO mode, and then set the operating frequency.
- Push [VFO/MR/CALL] several times to select the Memory mode or Call channel mode.
- For memory channel watch: Push [Y] or [Z] to select a desired memory channel.
- Push [FUNC](*), and then push [PRIO](7) to start the watch.
- The decimal point “.”, on the frequency readout blinks.
- When a signal is received on the channel, the watch resumes according to the selected scan resume option.
- To cancel the watch, push any key except [ ], [Y]/[Z], [MONI], [FUNC](*), or [PTT].
Memory scan watchWhile operating on a VFO frequency, Priority Watch sequentially checks for signals on each memory (except Skip) channel.
- Select the VFO mode, and then set the operating frequency.
- Push [VFO/MR/CALL] several times to select the memory mode.
- Push [FUNC](*), and then push [SCAN](5) to start the memory scan.
- Push [FUNC](*), and then push [PRIO](7) to start the watch.
- The VFO mode is selected, and the decimal point “.”, on the frequency readout blinks.
- When a signal is received on a channel, the watch resumes according to the selected scan resume option.
- To cancel the watch, push any key except [ ], [Y]/[Z], [MONI], [FUNC](*), or [PTT].
RESETTING
Partial resetIf you want to reset the VFO frequency, VFO settings and Set mode items to their default values, without clearing the memory contents, you can do a partial reset.
- Hold down [ ] for 1 second to turn OFF the power.
- While holding down [VFO/MR/CALL], hold down [ ] for 1 second to turn ON the power
SET MODES
Set mode programming
- Push [FUNC](*), and then push [SET](8) to enter the Set mode.
- Push [Y] or [Z] to select a desired item.
- Rotate [VOL] to select an option or value.
- Push [# ENT] to save and exit the Set mode.
Set mode items
Repeater tone frequency Select the subaudible tone needed to access the repeater.
LCD backlight Select the LCD Backlight function
Tone squelch frequency Select the CTCSS tone frequency for tone squelch.
TX permissionTurn the TX Inhibit function ON or OFF.
DTCS codeSet the DTCS code for DTCS squelch and DTCS encoder.
DTCS polarity Set the Transmit and Receive DTCS polarity
Frequency offsetSet the duplex frequency offset.
Reverse duplex functionTurn the Reverse Duplex function ON or OFF
Tuning step Select the VFO tuning step
Scan resume settingSelect the scan pause and resume setting.
Function key timer Set the time between when the Function mode is entered, and how long it remains activated after you push the keypad key to activate the second function.
Weather alert(For only USA version)Turn the Weather Alert function ON or OFF.
VOX gainSet the VOX gain. To turn OFF the VOX function, select “VOX.OF.”
MIC gain Set the microphone sensitivity.
VOX delaySet the VOX Delay.
VOX time-out timerSet the VOX time-out timer. To turn OFF the function, select “Vto.OF.”
DTMF TX key Select the method to transmit a DTMF code sequence.
ModeSet the Operating mode to FM or FM-N.NOTE: When the display type setting is set to “CH” in the Initial Set mode, and you access the Set mode from the Memory mode, most of the Set mode items are not displayed.
Initial Set mode programmingThe Initial Set mode is accessed at power ON, and allows you to set seldom-changed settings. In this way, you can “customize” the transceiver to suit your preference and operating style.
- While holding down [Y] and [Z], hold down [ ] for 1 second to enter the Initial Set mode.
- Push [Y] or [Z] to select a desired item.
- Rotate [VOL] to select an option or value.
- Push [# ENT] to save and exit the Initial Set mode.
Initial Set mode items
Extra High Power Select whether or not to display and select EXH (Extra High) as the highest power of the transceiver.
Key-touch beep Turn the key-touch beep ON (Set the beep level to between 1 and 3) or OFF.
Time-out timerInhibits continuous transmissions longer than the selected time period
Auto repeater (For only USA version)Turn the Auto Repeater function ON or OFF.
Auto power OFFAutomatically turns OFF the transceiver’s power.
LockoutTurn the Lockout function ON or OFF.
Squelch delaySet the squelch delay to Short or Long
DTMF speed Set the DTMF sending rate
Dial assignmentSelect whether or not to use [VOL] as the tuning control instead of [Y] and [Z].
Display typeSelect the display type for Memory mode operation
LCD contrastSelect the LCD contrast.
Power save Select the ratio of the power save time to the standby time.
Select speed Select whether or not to accelerate the step speed when rotating [VOL] rapidly
Microphone simple modeSelect the Microphone mode.
Voltage Indication Select whether or not to display the battery voltage when turning the transceiver ON.
Battery protection functionSelect the protection option according to your battery type.
Auto low power Turn the Auto Low Power function ON or OFF
Squelch burstTurn the Squelch Burst function ON or OFF.![]()
[xyz-ips snippet=”download-snippet”]