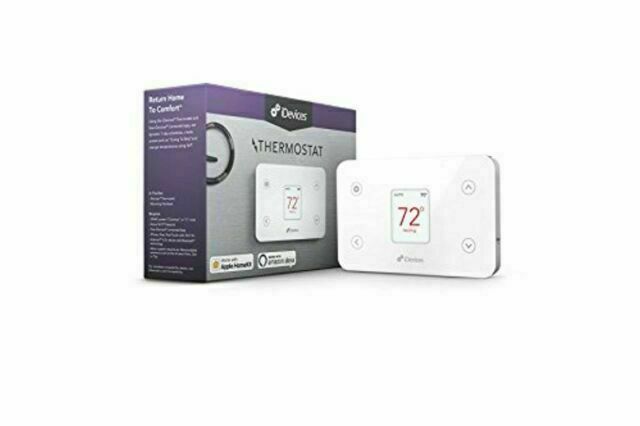

iDevices IDEV0005D5 thermostat
Introduction
From removing your old thermostat, to installing your new iDevices® Thermostat, this easy-to-follow guide will take you through the process, step by step.If at any time you require assistance, please contact our Customer Experience Team.Call: 888.313.7019Email: [email protected]Visit: iDevicesinc.com/Support
Please visit iDevicesinc.com/Compatibility to see if your HVAC system is compatible.
In The Box
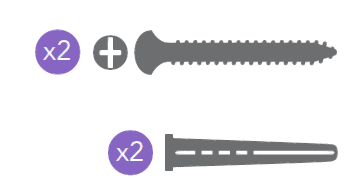
- iDevices® Thermostat
- Mounting Hardware
Requires
- Home Wi-Fi® Network
- Free iDevices® Connected App
- 24VAC Common Wire*
- Compatible Mobile Device (Visit iDevicesinc.com/Compatibility)
Tools
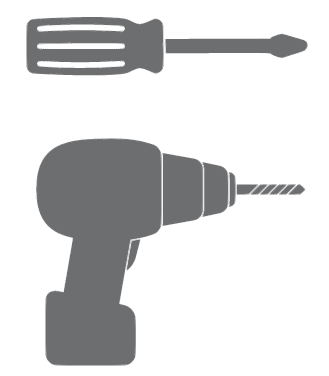
- Phillips Screwdriver
- Drill With 3/16” Bit
*Don’t have a 24V C-wire?No problem. The iDevices® Wire Adapter Kit may be your solution. Please contact our Customer Experience team to learn more.
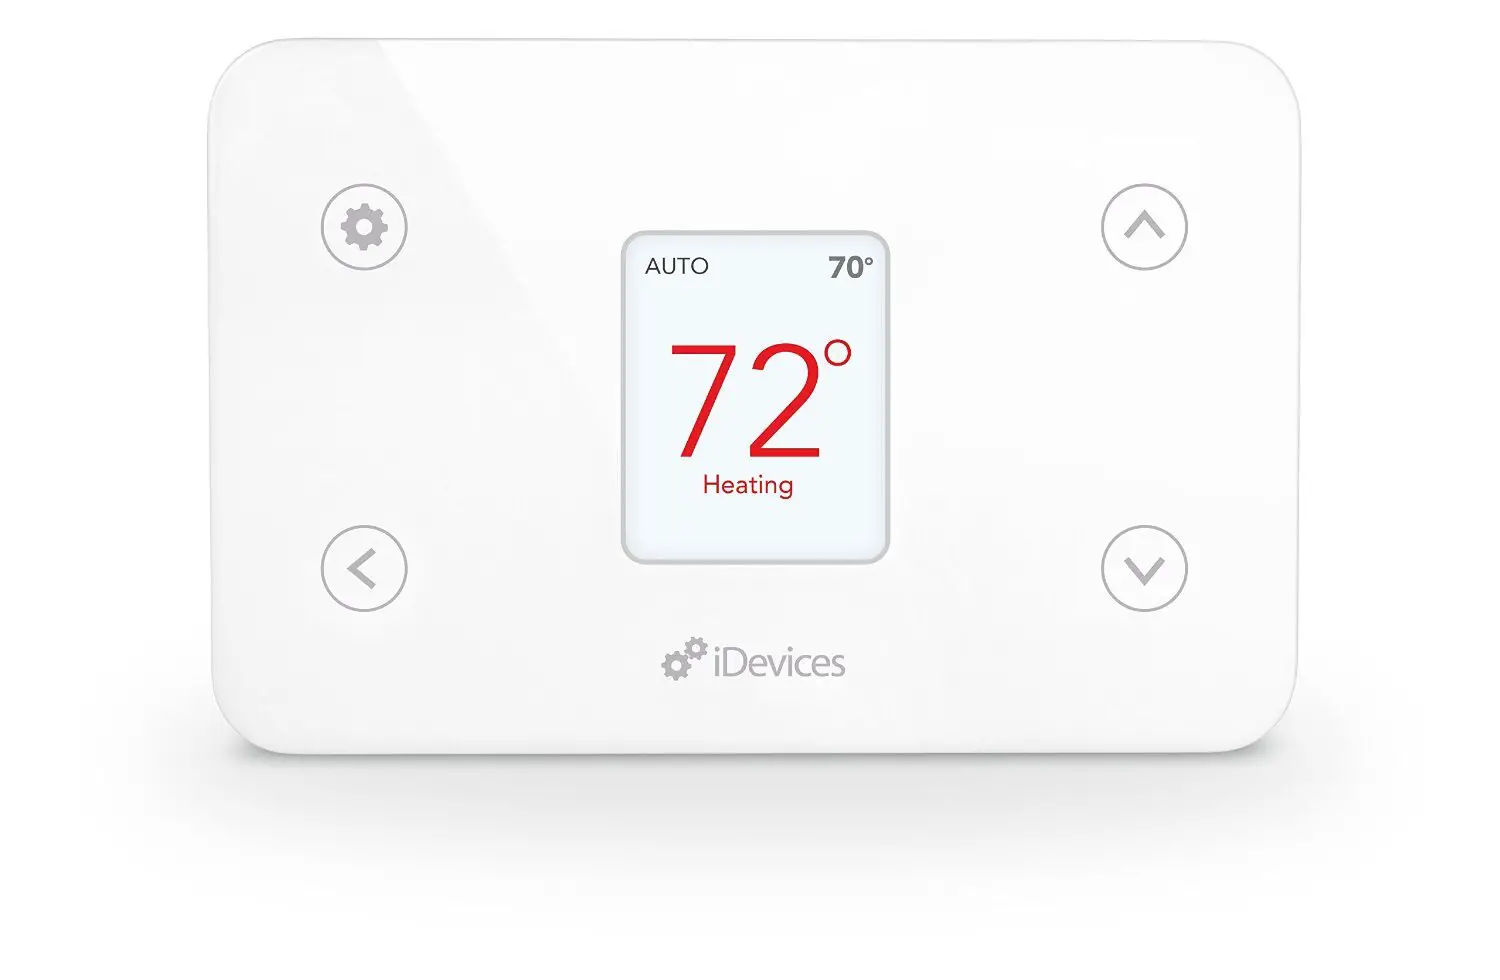
Getting to Know the iDevices Thermostat
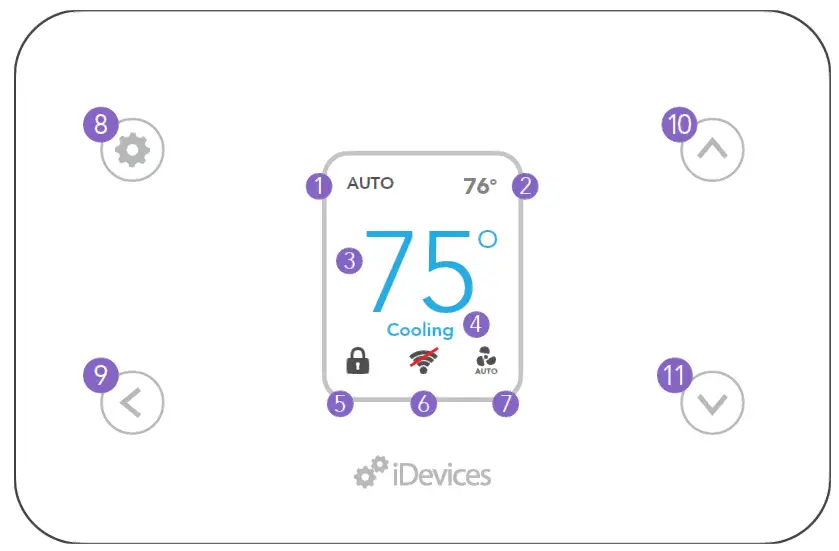
- System Mode
- Ambient Temperature
- Desired Temperature
- HVAC State
- Button Lock
- Connection Status
- Fan Mode
- Settings/Select
- Back
- Temp/Navigate Up
- Temp/Navigate Down
Before You Start
- Read through this Installation Guide in its entirety before starting installation of your iDevices® Thermostat or removal of your old thermostat. Incorrect installation can be dangerous and can damage your iDevices® Thermostat and HVAC system. If you’re not comfortable performing the installation, contact a local HVAC contractor.
- Turn the power to your HVAC system and old thermostat OFF!
- Ensure you do not have electric baseboard heating. The iDevices® Thermostat is not compatible with these systems.
- Check that your mobile device is compatible with the iDevices® Thermostat at iDevicesinc.com/Compatibility.
- If this is a new installation, you will need to install the iDevices® Thermostat 4 – 5 feet above the floor, in accordance with applicable building codes. It should be installed in an area with good airflow. Avoid areas behind doors, near corners, heating or cooling vents, heat generating devices or direct sunlight.
Installation Overview
- Turn the power to your HVAC system OFF!
- Remove the faceplate of your old thermostat and photograph the existing wiring configuration.
- Disconnect your old thermostat’s wall plate and secure the wires.
- Mount your iDevices® Thermostat mounting plate and attach wires to match your system’s configuration.
- Attach your iDevices® Thermostat to the mounting plate.
- Turn the power back ON.
- Configure the iDevices® Thermostat to work with your HVAC system type.
- Download the free iDevices® Connected app.
- Connect your iDevices® Thermostat to your home network and pair it to your iDevices® Connected app.
- Set up and customize your iDevices® Thermostat within the iDevices® Connected app.
Professional AssistanceYour safety comes first! If you don’t feel comfortable installing your iDevices® Thermostat, contact a local HVAC contractor.
Abbreviations
HVAC: Heating, Ventilation and Air Conditioning systemHP: Heat Pump System. This type of HVAC system uses a compressor with a reversing valve to provide both heating and cooling capability.HE: Electrically heated central heating system. This system uses an electric heating element along with a fan and ducting. Sometimes used as AUX/Emergency heat with a heat pump system. Electric baseboard heaters are not included in this system type.HG: Fuel-fired central heating system. This system uses a gas or oil burner along with a fan and ducting or a hot water baseboard system. Can be used as a standalone heating system or as AUX/Emergency heat with a heat pump system.O/B: This option selects the type of reversing valve for heat pump systems. An “O” reversing valve is energized when cooling and a “B” reversing valve is energized when heating. Most systems use an O type reversing valve. Rheem and Ruud typically use a B type reversing valve. If you are unsure, contact your Heat Pump manufacturer.
Terminal Assignments
For reference, standard wiring assignments for typical HVAC systems are provided below.
| Terminal (HP) | Terminal (Non-HP) | Heat Pump System (HP) | Conventional System (Non-HP) |
| C | C | 24VAC common for control circuit and thermostat power input | |
| L | L | System monitor | Not used |
| G | G | Fan | |
| Y1 | Y1 | 1st stage
compressor |
1st stage cooling |
| Y2 | Y2 | 2nd stage
compressor |
2nd stage cooling |
| RC | RC | 24VAC power supply for cooling side | |
| RH | RH | 24VAC power supply for heating side | |
| O/B | W1 | Changeover valve | 1st stage heating |
| E | W2 | AUX/
Emergency heat |
2nd stage heating |
Installation Details
- Gather the tools you will need and check that your iDevices® Thermostat came with the necessary components (see page 4).Warnings And Safety InformationDo not select COOL mode if the outside temperature is below 50ºF (10ºC). This could damage the cooling system.
- Test your existing system. Using your old thermostat, turn on the heating/cooling functions (if applicable) to verify everything is functioning normally.
- If you have a heat pump system, check the settings on your old thermostat and make a note whether you have an “O” or “B” type reversing valve.
- Turn the power to your HVAC system OFF at the breaker box or the main switch controlling your heating/cooling system.
- Confirm that the power is OFF by adjusting the temperature on your old thermostat and waiting to ensure your system doesn’t turn on.
- Carefully remove the faceplate of your old thermostat.
- Take a picture of your old thermostat’s wire arrangement to reference later on.
- Make note of the current locations of each colored wire by filling out the Wiring Chart below. Note: If you see any of the following wires, please contact our Customer Experience Team to check system compatibility: A, X or PWiring Chart
|
Label |
Old Thermostat | Typical Wire Color |
Description |
| HUM | Humidifier | ||
| NC | Not used | ||
| W2/E | Brown | 2nd stage heat | |
| W1/ O/B | White/ Orange/ Blue | 1st stage heat/HP
reversing valves |
|
| RH | Red | Power from heat, 24VAC transformer | |
| RC | Red | Power from cooling, 24VAC transformer | |
| Y2 | Gray | Stage 2 compressor
relay |
|
| Y1 | Yellow | Stage 1 compressor
relay |
| Label | Old Thermostat | Typical Wire Color | Description |
| G | Green | Fan relay | |
| L | System monitor | ||
| C | Black/Blue | Common of 24VAC transformer | |
| AUX | Auxiliary Heat | ||
| W3 | 3rd Stage Heat |
9. Make sure you don’t have any 120/240V wires (look for thick black wires with wire nuts.) If you do, the iDevices® Thermostat is not compatible with your system. If you are not sure, call us at 888.313.7019.10. Record the locations of any jumpers and note whether there is a wire connected to RC and/or RH.11. Disconnect the wires from the existing mounting plate (ensure the wires don’t fall back into the wall by gently wrapping them around a pen). Remove the mounting plate HVAC TypeStage: Non-HP | Type: HE for electric, HG for gas/oil systemsfrom the wall.12. Line up the iDevices® Thermostat mounting plate on the wall in the desired location. Check that it is level and the wires are in a position to fit through the hole on the mounting plate. Use a pencil to mark anchor locations on the wall.13. Set the mounting plate aside. Drill two holes (3/16” diameter) at the locations you have marked. 14. Install the provided anchors into the wall, line up the mounting plate to the holes and install with the provided screws.15. Head to the Wiring Configuration section, starting on page 18, to find the configuration that is closest to your old thermostat and note which system you have for later reference.16. Connect the wires to the mounting plate based on the information you gathered in the chart on pages 11-12, photos you took earlier and wiring configuration you noted for step 15.17. To prevent electrical shorts and damage to your iDevices® Thermostat or home, ensure all of the wire connections are secure and there are no bare wires in contact with another. Insulate bare wires with electrical tape as necessary. Push any excess wire back into the wall cavity.18. Attach your iDevices® Thermostat to the mounting plate.19. Turn your power on at the breaker box or switch that controls your heating/cooling system.
Configuring The Thermostat For Your HVAC System
- When it powers up, the Thermostat will take you to a Welcome screen. Press the to begin setup.
- Select HVAC system type (Heat Pump or Conventional) and press the to continue.
- If you have a conventional system, set the fuel type (Electric or Oil/Gas) and press the to continue.
- If you have a heat pump, select the reversing valve type (O or B) and press the to continue.
Configuring the HUM Relay
The Terminal labeled “HUM” serves as multipurpose relay to allow for Humidification, Dehumidification, W3 (3rd Stage Heat) or AUX heat (for heat pumps). Follow these steps to set up the Thermostat to work with your system:
- Select the ‘Relay Type’ for your system using the buttons.
- Press the Setting to continue.
- The Thermostat will display a summary of the settings you’ve selected. Press the Setting to finish the setup, or < to make changes.
Connecting To The App And Wi-Fi® Network
- Download and launch the free iDevices® Connected app on your mobile device.
- From the device setup screen on the Thermostat, press the setting to start the pairing process
- Select the OS of your mobile devices (iOS or Android)
- From the iDevices® Connected app, add the Thermostat by tapping on the menu bar in the upper right-hand corner or select the Thermostat from the list of available devices.
- Follow the instructions in the app to complete the connection process.
Set In-App Preferences
In your iDevices® Connected app, select the Thermostat on the home screen to view product details. You can access additional settings and information by tapping ‘Edit’ on the right hand side, selecting ‘View All Options’ in the Advanced section or by tapping the menu button in the upper right corner.
Warnings And Safety Information
Do not short across terminals on the gas valve or at the heating or cooling system control board to test the thermostat installation. This could damage the thermostat and void the warranty.Do not select COOL mode if the outside temperature is below 50ºF (10ºC). This could damage the cooling system.
Testing Your System
- Set your iDevices® Thermostat to HEAT mode. Adjust the temperature set point above the ambient temperature in the room, and verify that the heat turns on.
- Set your iDevices® Thermostat to COOL mode (if outside temperature is above 50ºF). Adjust the temperature set point below the ambient temperature in the room, and verify that the cooling turns on.
- If your system has dual fuel sources (heat pump plus electric or fuel-fired emergency heat), set your iDevices® Thermostat to EMERGENCY HEAT mode. Adjust the temperature set point above the ambient temperature in the room and verify that the heat turns on.
- Note: If you have a heat pump or air conditioner, the iDevices® Thermostat is designed to prevent damage to your compressor by waiting 5 minutes between restarts of your air conditioner or heat pump. If you are testing the operation of your air conditioner or heat pump, wait at least 5 minutes after changing the temperature setting for the system to turn on.
- If all of the available system modes function properly, the test is complete.
Wiring Configurations
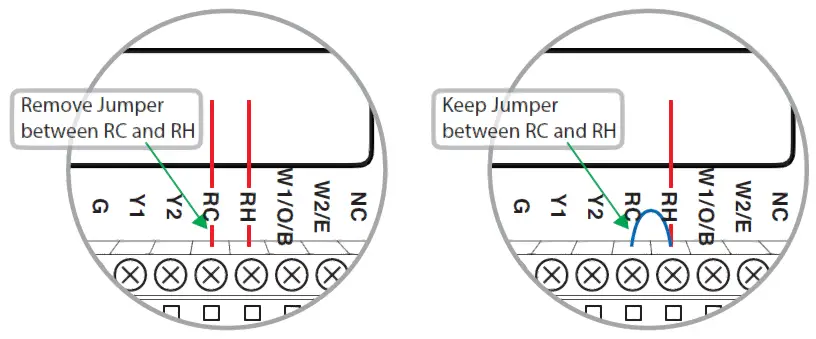
The following section provides the various wiring configurations compatible with the iDevices® Thermostat. Find the configuration that matches closely to your old thermostat and note which system type you have for later reference.Check your old thermostat to see if it has one or two Red/R wires. If you have one R wire, connect it to RH and leave the jumper in place. If you have two, connect RC to RC and R/RH to RH and remove the jumper.
If your system has two R wires, either RC and RH, or R and RC:If your system has one R wire:
A. Heat (One, Two or Three Stages) HVAC TypeStage: Non-HP | Type: HE for electric, HG for gas/oil systems | Fan wire G optional for HG type
G wire is not required for hot-water baseboard or steam radiator systems. If G wire is not connected for a warm air heating system, Fan On mode will not be available. Connect W2 wire (2nd Stage Heat) if available. The HUM relay can be used for Humidification, Dehumidification or as a W3 (3rd Stage Heat) relay. See page 15 for more information.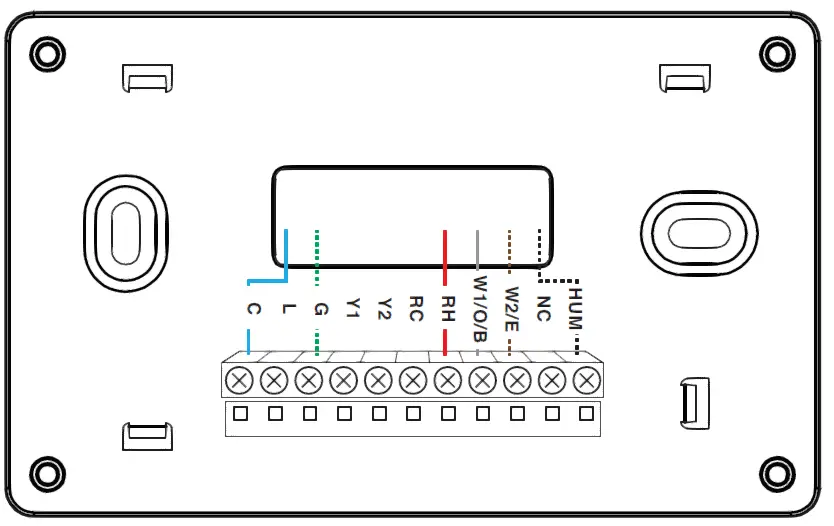
Dotted lines indicate an optional wire.
B. Cool Only (One or Two Stages)
HVAC TypeStage: Non-HP | Type: HE
Connect Y2 wire (2nd Stage Cooling) is optional if available. The HUM relay can be used for Humidification, Dehumidification or as a W3 (3rd Stage Heat) relay. See page 15 for more information.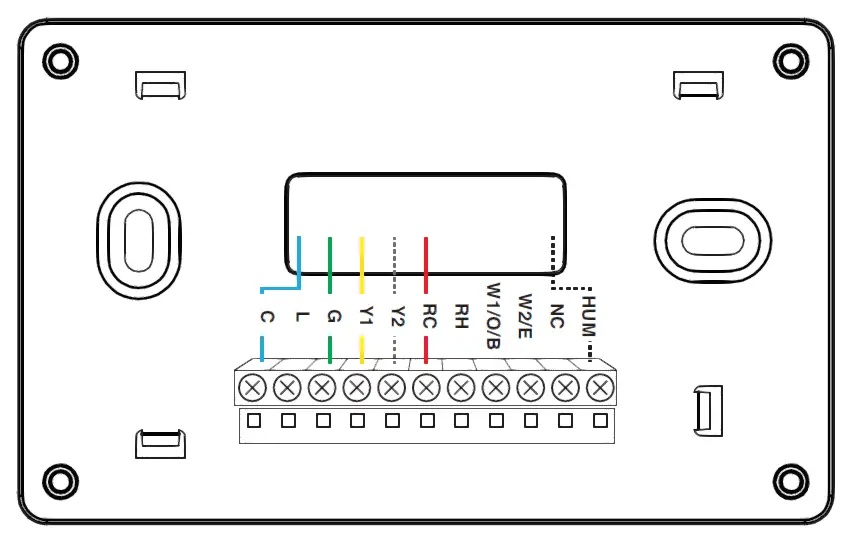
Dotted lines indicate an optional wire.
C. Heat (One, Two or Three Stages) and Cool (One or Two Stages)
HVAC TypeStage: Non-HP | Type: HE for electric, HG for gas/oil systems
Connect Y2 wire (2nd Stage Cooling) is optional if available. Connect W2 wire (2nd Stage Heating) is optional if available. The HUM relay can be used for Humidification, Dehumidification or as a W3 (3rd Stage Heat) relay. See page 15 for more information.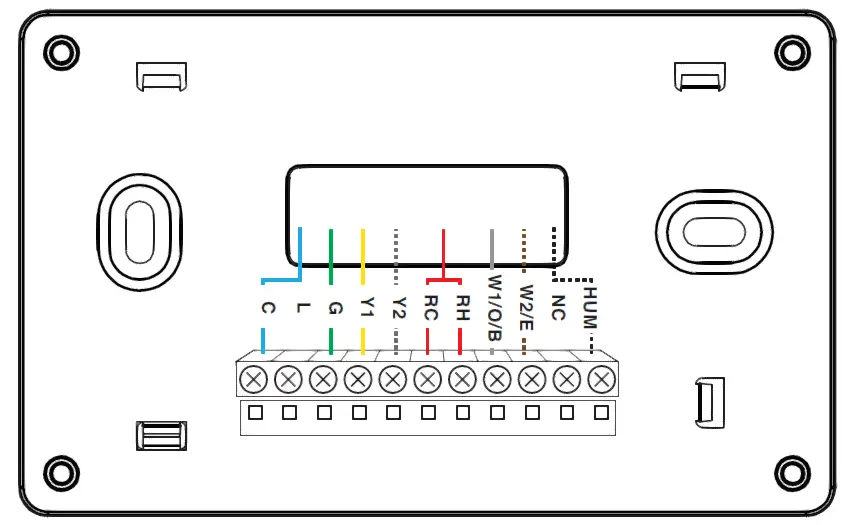
D. Heat Pump (One or Two Stages with AUX/Emergency Heat)
HVAC TypeStage: HP | Type: HE for electric, HG for gas/oil systems | O/B Type: According to previous thermostat setting
Connect system Indicator (L), 2nd Stage (Y2) and Emergency Heat (E) are optional if available. The HUM relay can be used for Humidification, Dehumidification or as an Aux (Auxiliary Heat) relay. See page 15 for more information.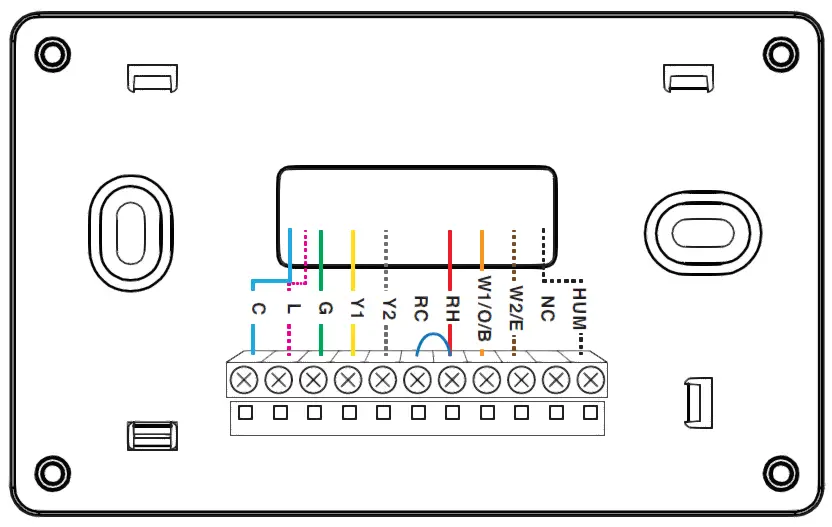
Dotted lines indicate an optional wire.
Troubleshooting & Support
 report this ad
For a full list of troubleshooting articles, visit iDevicesinc.com/SupportCall or email the iDevices® Customer Experience Team with questions.Call: 888.313.7019Email: [email protected]Visit: iDevicesinc.com/Support
References
[xyz-ips snippet=”download-snippet”]