iHOME iUVW3 360° UV-C Sanitizer with Wireless Charging User Guide
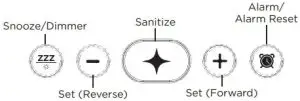
FRONT PANEL
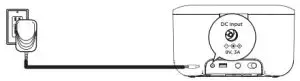
BACK PANEL
- DC input

- usb charging
- time set
- DST set


BOTTOM PANEL
TOP PANEL

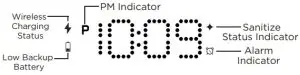
DISPLAY
USING THE SANITIZER
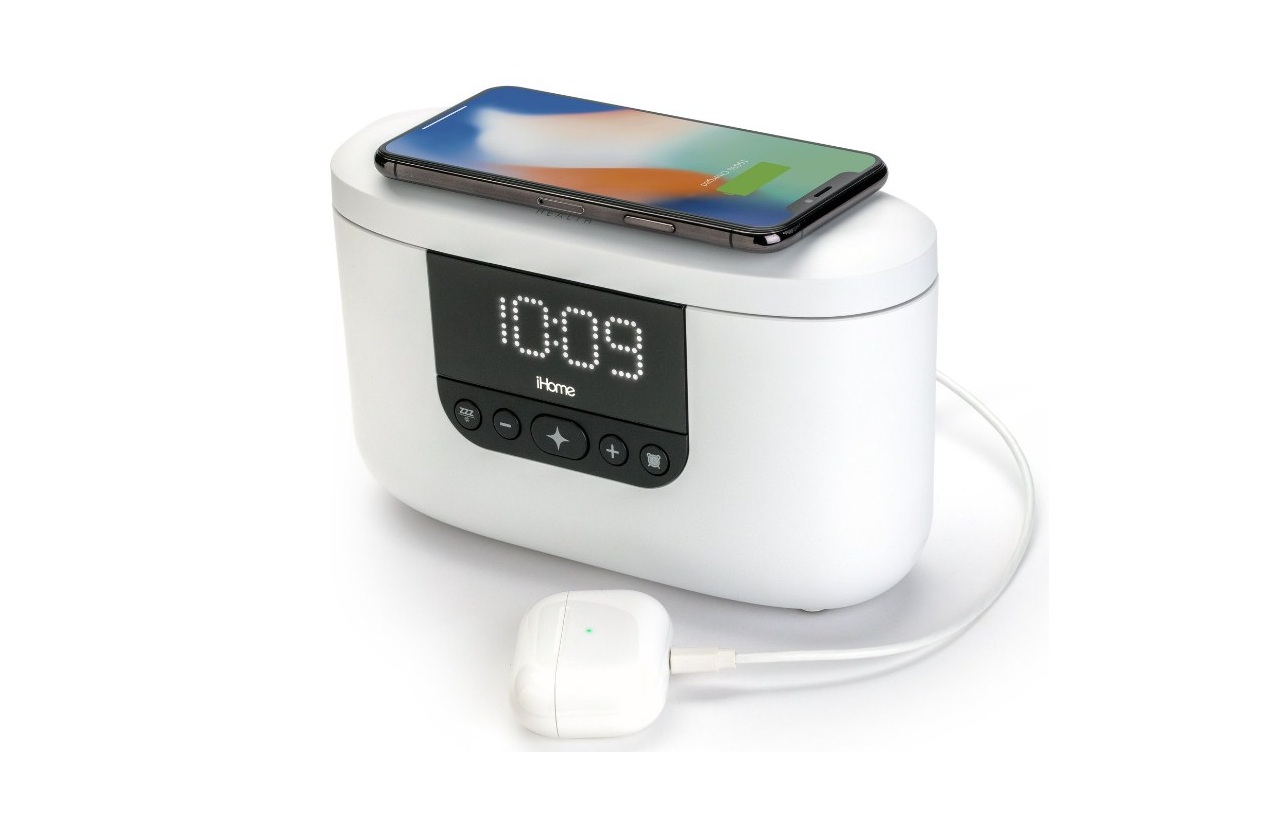
This superior quality UV-C LED light safely kills up to 99.9% of surface germs in under 3 minutes, without using harmful chemicals. The iUVW3 is safe to use on everyday essentials including eyeglasses, smartphones, cosmetic tools, toothbrushes, and more.
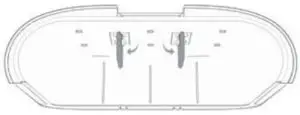
USING THE UV BRACKETS
Brackets are provided to ensure optimal spacing between your objects and the UVC LEDs. Swing brackets to a perpendicular position to provide adequate space.
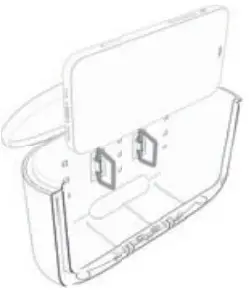
SANITIZING ITEMS
- Make sure the iUVW3 is plugged into a working wall outlet not controlled by a light switch. Lift the lid of the unit and place items inside, making sure not to overlap items. Close the lid.
- Press and release the Sanitize Button to begin a UV sanitizing cycle. A countdown timer will display the remaining cycle time, the Sanitize status indicator will appear on the display, and a beep will sound when the cycle is complete.
- To extend to the current cleaning cycle, press and release the Sanitize Button again. Each press adds 180 seconds to the cycle, with a maximum cleaning time of 900 seconds. When the cleaning cycle is over, ‘End’ will appear on the clock display for 2 seconds, and then the display will show the current time.
NOTES
- Features a built-in safety switch that will shut off the UV light whenever the lid is opened. Do not attempt to defeat the safety function and operate the unit with an open lid.
- If the lid is opened during the UV sanitizing cycle, the timer will pause. Closing the lid within 1 minute will resume the cycle.
- We recommend leaving the brackets in place while sanitizing your items. If items are too large, the brackets may be removed. In those cases we recommend flipping the items over and sanitizing a second time foroptimal effect.
- To cancel a sanitizing cycle, press and hold the Sanitize Button for 2 seconds. The clock time will appear on the display.
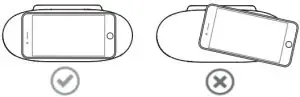
WIRELESS CHARGING
Supports: Qi compatible phones (also works with plastic cases up to 3mm thick*)
Place Qi compatible device facing up on the charging rest located on the top of the unit. Charging status will be indicated by the lightning icon on the display:
- Rapid blinking icon: Device is not charging (reposition device)
- Slow blinking icon: Device is charging
- Solid icon: Device is fully charged
Note: Qi status LED may continue to blink slowly (indicating charging) for iOS devices that are fully charged.
CAUTION: Not all cases are Qi compatible. Remove phone’s metal protective case before charging. Do not place magnetic or metal objects on charger during charging.
* Some larger size phone cases may not be able to charge. (Please remove case to charge phone properly.).
CLOCK SETUP
Step One: Connecting the Unit
Connect the included AC adapter to the DC jack on the back of the unit and connect the other end to a working wall outlet not controlled by a light switch.
Step Two: Setting Your Clock
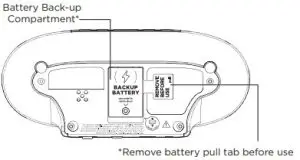
Remove battery pull tab from the bottom of the unit.
- Press and hold the Time Set Button (on the back of the unit) for 2 seconds until the clock display flashes and a beep sounds. Release the Time Set Button.
- Press the – or + Buttons to adjust the clock to the current time (hold for rapid setting). Make sure you set the correct AM/PM time. The PM indicator appears to the left of the display. (There is no AM indicator.)
- Press and release the Time Set Button to confirm the current time setting. The YEAR will flash on the display. Press the – or + Buttons to set the year.
- Press and release the Time Set Button to confirm the current year setting. The month will flash on the display. Press the – or + Buttons to set the month.
- Press and release the Time Set Button to confirm the current month setting. The day will flash on the display. Press the – or + Buttons to set the day.
- Press and release the Time Set Button to confirm settings. 2 beeps will sound to indicate time setting mode is complete.
Daylight Savings Time: By default, the DST Switch is set to Auto and will automatically adjust the time in March/November.
Tip: Press the Alarm Button during clock setting to toggle between 12/24 hour display modes.
SETTING THE ALARM
- Press and hold the Alarm Button for 2 seconds until the display flashes. A beep sounds. Release the Alarm Button.
- Press the – or + Buttons to adjust the alarm time to the desired time (hold for rapid setting). Make sure you set the correct AM/PM alarm time. The PM indicator appears to the left of the display. (There is no AM indicator.)
- Press the Alarm Button to confirm the alarm time setting. The alarm schedule will flash: 7 (every day),
- (weekdays) or 2 (weekend only). Press the – or + Buttons to select an alarm schedule.
- Press the Alarm Button to confirm the alarm settings and exit alarm setting mode. 2 beeps will confirm alarm setting is complete. The alarm icon will remain on the display, to show the alarm is armed.
To Preview: Press and release the Alarm Button to view the current alarm time.
Turning Alarm ON/OFF: Press and release the Alarm Button twice within 5 seconds to toggle the alarm ON and OFF, indicated by the related white alarm indicator.
When the alarm sounds, press the Alarm Button to disable the alarm and reset it to come on at the same time the next day.
SNOOZE / DISPLAY DIMMER
Snooze: When the alarm is sounding, press the ZZZ/Dimmer Button to snooze for 9 minutes.
Dimmer: Press the ZZZ/Dimmer Button (when alarm is NOT sounding) to adjust display brightness. (Display can be dimmed during Snooze mode.)
PROGRAMMABLE SNOOZE
To adjust the snooze duration:
- Press and hold the ZZZ/Dimmer Button.
- Use the + or – Buttons to adjust the snooze duration from 1-29 minutes. Press the ZZZ/Dimmer Button again to confirm.
CHARGING DEVICES VIA USB
There is a 1A USB charging port on the iUVW3. To charge your device, connect a standard USB cable (not included) to the USB port on the unit, and plug the other end into the charging port on your device.Note: Unit must be plugged into a working outlet in order to charge devices.
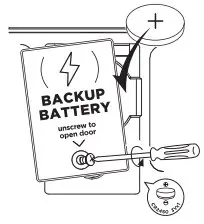
Battery Back-Up
The unit comes with a CR2450 back-up battery installed to provide continuous alarm operation and clock settings in the event of a temporary power failure. Remove the battery pull tab before use. When the battery icon on the clock display is flashing, it is time to replace the back-up battery. The battery compartment is located on the bottom of the unit.
- Make sure the AC adapter is connected, or you will lose your time and alarm settings during battery replacement.
- Use a Phillips screwdriver to open the battery compartment door.
- Remove exhausted battery from compartment and insert new 1CR-2450 battery, checking that the + side is facing you. Replace compartment door. Do not overtighten.
RESET
If you are experiencing abnormal operation, try to reset the unit. To do so:Disconnect the AC adapter and remove the backup battery from the compartment on bottom of the unit. Wait 2 minutes, then re-install the battery and re-connect the AC adapter.
WARNING
- This product contains a button/coin cell battery. Do not ingest the battery, Chemical Burn Hazard. If the button/coin cell battery is swallowed or placed inside any part of the body, it can cause severe or fatal internal chemical burn injuries in 2 hours or less.
- If you think batteries might have been swallowed or placed inside any part of the body, seek immediate medical attention.
- Keep new and used batteries away from children.
- Do not dispose of batteries in the household trash or fire.
- Dispose of used batteries immediately. Attention should be drawn to the environmental aspects of battery disposal. Many electronics retailers now recycle batteries and other electronic components at no charge. To find a drop-off location near you, visit www.call2recycle.com
- If the battery compartment does not close securely, stop using the product and keep it away from children.
- CAUTION – RISK OF EXPLOSION IF BATTERY IS REPLACED BY AN INCORRECT TYPE. DISPOSE OF USED BATTERIES ACCORDING TO THE INSTRUCTIONS.
Maintenance + Caring For Your Device
- Place the unit on a level surface away from sources of direct sunlight or excessive heat.
- Remove the plastic protective film from the clock display.
- Protect your furniture when placing your unit on a natural wood and lacquered finish. A cloth or other protective material should be placed between it and the furniture.
- Should the casing of your device become soiled, you may wipe down with a moist cloth.
- Do not immerse the device into water or any cleaning solvents.
- Do NOT use gasoline, benzene, thinner, harsh cleaners, etc on and/or in the unit while cleaning, as they may damage the product. NEVER use alcohol or other solvents.
IMPORTANT SAFETY INSTRUCTIONS
Please heed all warnings, read and follow all instructions and keep these instructions handy for future reference.
WARNING – DO NOT ATTEMPT TO OPERATE THIS DEVICE WITH THE LID/TOP OPEN. The device was designed to shut off automatically when the lid/top is open. It is important NOT to defeat or tamper with this safety feature as UVC light can cause damage to eyesight and skin.
All users should be alerted to the potential hazards indicated by the product safety labeling on the unit and these instructions.WARNING – Use this device only for its intended use as described in this manual.If the device is not used in the manner specified, the protection provided by the equipment may be compromised. Always place device on a flat, smooth surface, in a horizontal position for operational use.WARNING – KEEP OUT OF REACH OF CHILDREN. This device is not a toy and is not intended to be used by children.
WARNING – To reduce the risk of fire or electric shock, do not expose this product to rain or moisture.ATTENTION: Use only the supplied power adapter. This product must only be supplied at safety extra low voltage corresponding to the marking on the appliance.The mains plug of power adaptor is used as the disconnect device, it shall remain readily operable.ATTENTION: Prolonged or excessive exposure to UV-C light may degrade and discolor fabrics, plastics and other non-metallic materials.Keep operation away from strong magnetic fields
- Device is intended for indoor use only, do not use outdoors or on wet surfaces.
- Device should be protected from the elements and from temperatures below freezing.
- Do not operate/drop near water or while bathing or swimming, do not handle the device with wet hands.
- Only use as intended. Use according to this manual’s instructions without tampering or modifying the device in any way.
- Do not alter the construction or design. Do not remove safety labels, markings or devices.
- Do not use device for other than its intended purpose, as described in the manual.
- Do not operate if any damage to the unit is visible or suspected, such as after being dropped.
- Do not use if charging cable/cord is damaged.
- Keep the cable/cords and device away from heated surfaces.
- Close supervision is necessary when any appliance device is used by or near children and people with special needs.
- Do not operate in the presence of explosives and/or flammable fumes, smoke or liquids.
- Do not use this product near water.
- Unplug unit and clean only with damp cloth. Stronger cleaning agents, such as Benzene, thinner or similar materials can damage the surface of the unit.
- Heat – This product should be situated away from heat sources such as radiators, heat registers, stoves or other appliances (including amplifiers) that produce heat.
- Only use attachments/accessories specified by the manufacturer.
- Unplug this product during lightning storms or when unused for long periods of time.
- Damage Requiring Service – This product should be serviced by qualified service personnel when:
- Plug has been damaged.
- objects have fallen into or liquid has been spilled into the enclosure.
- the unit has been exposed to rain.
- the unit has been dropped or the enclosure damaged.
- the unit exhibits a marked change in performance or does not operate normally.
- No naked flame sources, such as lighted candles, should be placed on thisproduct.
- Attention should be drawn to the environmental aspects of battery disposal.
- This product is suitable for use in tropical and/or moderate climates.”
Disclaimer: This product is not intended to diagnose, treat, cure or prevent any disease or medical condition. The information provided herein is not to be construed as a medical diagnosis or medical advice. No medical claims are implied or intended with the sale of this device. Purchaser accepts responsibility for correct and proper use of device.
1 Year Limited WarrantyFor warranty and full instructions, visit ihome.com/support
FCC Information
This equipment complies with FCC RF radiation exposure limits set forth for an uncontrolled environment.This device complies with Part 15 of the FCC Rules, operation is subject to the following two conditions:
- This device may not cause harmful interference, and
- this device must accept any interference received, including interference that may cause undesired operation.
- Warning: Changes or modifications to this unit not expressly approved by the party responsible for compliance could void the user’s authority to operate the equipment.
- NOTE: This equipment has been tested and found to comply with the limits for a Class B digital device, pursuant to Part 15 of the FCC Rules.These limits are designed to provide reasonable protection against harmful interference in a residential installation. This equipment generates, uses and can radiate radio frequency energy and, if not installed and used in accordance with the instructions, may cause harmful interference to radio communications.However, there is no guarantee that interference will not occur in a particular installation.If this equipment does cause harmful interference to radio or television reception, which can be determined by turning the equipment off and on, the user is encouraged to try to correct the interference by one or more of the following measures:
- Reorient or relocate the receiving antenna.
- Increase the separation between the equipment and receiver.
- Connect the equipment into an outlet on a circuit different from that to which the receiver is connected.
- Consult the dealer or an experienced radio/TV technician for help.
This equipment should be installed and operated with minimum distance 20cm between the radiator & your body.
ISED information
This equipment complies with IC RSS-102 radiation exposure limits set forth for an uncontrolled environment.This device contains licence-exempt transmitter(s)/receiver(s) that comply with Innovation, Science and Economic Development Canada’s licence-exempt RSS(s).Operation is subject to the following two conditions:
- This device may not cause interference.
- This device must accept any interference, including interference that may cause undesired operation of the device.
 report this ad
The device comply with ISED RF exposure requirement, users can obtain Canadian information on RF exposure and compliance.This equipment should be installed and operated with a minimum distance of 20 cm between the radiator and your body.Any Changes or modifications not expressly approved by the party responsible for compliance could void the user’s authority to operate the equipment.
References
[xyz-ips snippet=”download-snippet”]