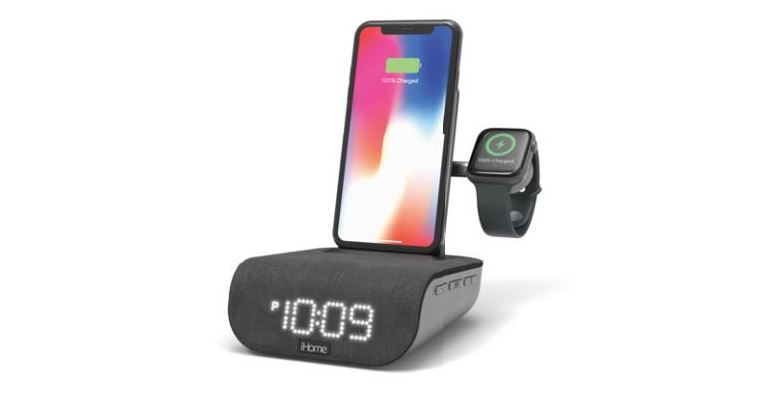
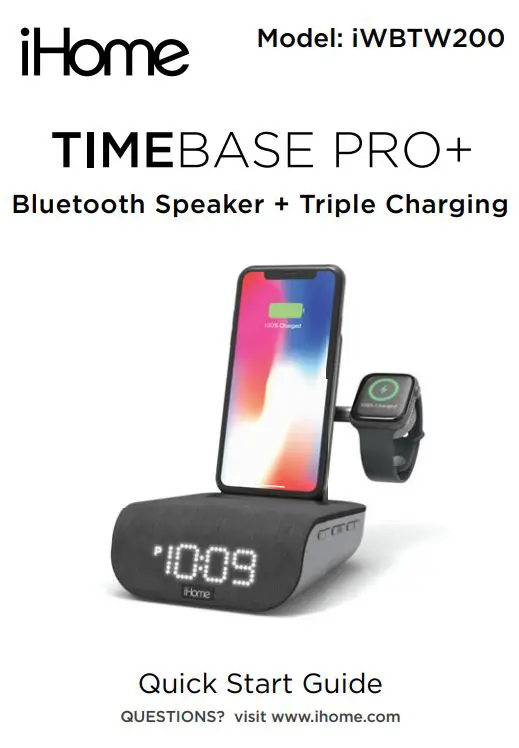
iHome TIMEBASE PRO+ iWBTW200 User Guide
FEATURES & FUNCTIONS
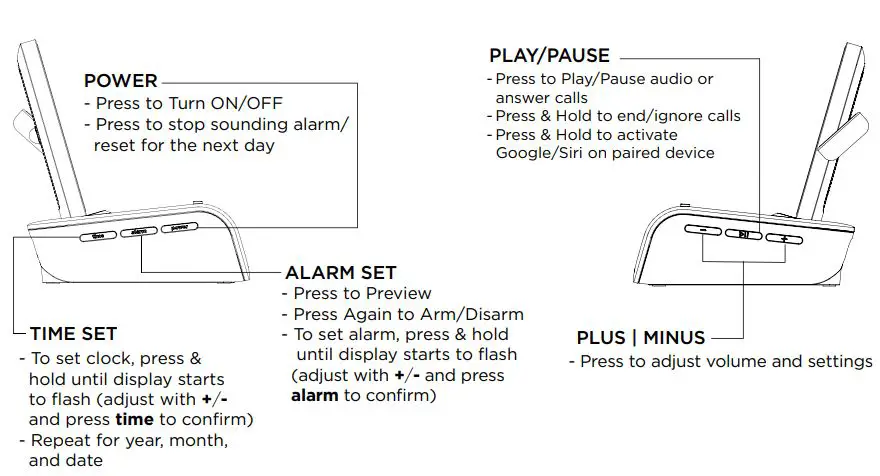
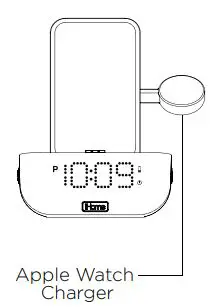
FRONT PANEL
 BOTTOM PANEL
 BOTTOM PANEL
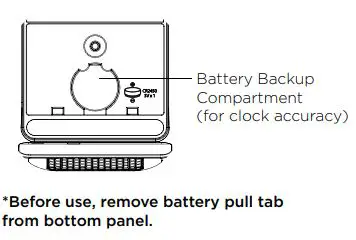
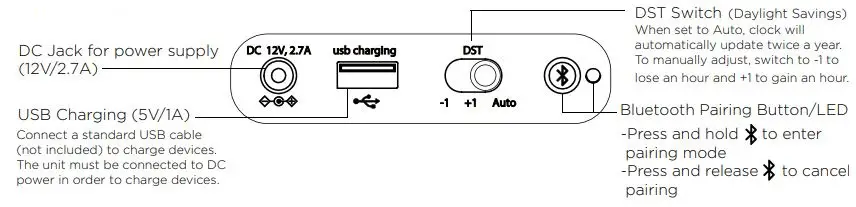
BACK PANEL
DISPLAY ICONS
![]()
GETTING STARTED
Step One
Connecting the Unit
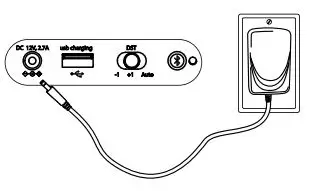
Before use, remove the battery pull tab from the bottom of the unit. Connect the included AC adapter to the DC jack located on the back of the unit and connect the other end to a working wall outlet.
Step Two
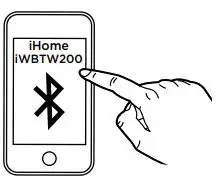
Connecting to Bluetooth
- Turn on your Bluetooth device and make it `discoverable’ by turning on Bluetooth mode.
- Press and hold the Bluetooth Pairing Button on the TIMEBASE PRO+ to enter pairing mode.
- Select `iHome iWBTW200′ on your device’s Bluetooth menu to connect!
Step Three
Setting the Time
- Press and hold the Time Button until the clock display begins to flash.
- Use the +/- Buttons to adjust the time.
- Press the Time Button to confirm the time.
- The year will flash on the display. Use the +/- Buttons to adjust the year, and press the Time Button again to confirm.
- The month will flash on the display. Use the +/- Buttons to adjust the month, and press the Time Button again to confirm.
- The date will flash on the display. Use the +/- Buttons to adjust the date, and press the Time Button again to confirm all settings.

SETTING THE ALARM
Each step must be completed while display is flashing or setting will time-out without any changes saved.
- Press and hold the Alarm Button for 2 seconds until the alarm time display and alarm icon flash.
- Press the - or + Buttons to adjust the alarm time to the desired time (hold for rapid setting). Make sure you set the correct AM/PM alarm time. The PM indicator appears to the left of the display.
- Press the Alarm Button to confirm the alarm time setting. The alarm schedule will flash: 7 (every day), 5 (weekdays) or 2 (weekend only). Press the – or + Buttons to select the desired alarm schedule.
- Press the Alarm Button to confirm the alarm schedule. Now use the – or + Buttons to set the wake to source: Tones: Wake to built-in tones. Press the or + Buttons to cycle through tones. Bluetooth: Wake to audio from a connected Bluetooth device. Beep: Wake to beeping sound.
- Press the Alarm Button to confirm. Now use the – or + Buttons to control the alarm volume and press the Alarm Button once more to confirm all settings. 2 beeps will confirm alarm setting is complete. The alarm icon will remain on the display, indicating the alarm is armed.
- To turn off a sounding alarm and reset it to come on the next day at the same time, press the Alarm Button to reset alarm.
PREVIEWING THE ALARM
Press and release the Alarm Button as needed to preview the alarm and to toggle the alarm ON (indicated by the alarm icon) or OFF (no alarm icon).
PROGRAMMABLE SNOOZE
- To program Snooze, press and hold the ZZZ Button during normal operation (when no alarm is sounding).
- Press the + or – Buttons to select a snooze time between 1-29 minutes.
- Press the ZZZ Button to confirm Snooze setting. When the alarm is sounding, press down on the ZZZ Button to temporarily silence the alarm (9 minutes is the default).
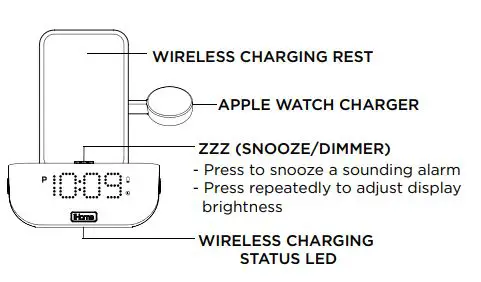
WIRELESS CHARGING
Supports:
- Qi compatible phones (also works with plastic cases up to 3mm thick*) Place Qi compatible device face up on the charging rest as pictured below:
Check the Wireless Charging LED under the iHome badge for charging status:
Slow blinking LED: Device is charging properly.Solid LED: Device is charged.Rapid blinking LED: Device is not charging properly. Reposition device.(LED may continue to blink slowly when iOS devices are fully charged.)
CAUTION: Remove metal protective or magnetic case from phone before charging. When charging phone, do not place magnetic-striped or other metal objects on the charger. Doing so could damage the object or this unit. Qi compatible phones with metallic looking finishes will charge normally.
APPLE WATCH CHARGING
The Apple Watch Magnetic Charging Module works with Apple Watch, Apple Watch Sport and Apple Watch Edition. Place your watch on the charger with the watch face turned upward until the battery indicator on the watch shows it is charged.
(You can deactivate `Nightstand Mode’ in the settings of your Apple Watch to eliminate a
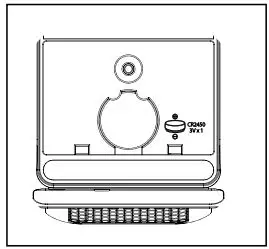
BATTERY BACK-UP
The unit comes with a CR-2450 back-up battery installed to provide continuous alarm operation and clock settings in the event of a temporary power failure. Remove the battery pull tab before use. When the battery icon on the clock display is flashing, it is time to replace the back-up battery. The battery compartment is located on the bottom of the unit.
- Make sure the AC adapter is connected, or you will lose your time and alarm settings during battery replacement.
- Use a Phillips screwdriver to open the battery compartment door.
- Remove the exhausted battery from the compartment and insert 1 CR-2450 battery, checking that the + side is facing you. Replace the compartment door. Do not overtighten.
WARNING: Lithium batteries can explode or cause burns if disassembled, shorted, recharged, exposed to water, fire, or high temperatures. Do not place loose batteries in a pocket, purse, or other container containing metal objects, mix with used or other battery types, or store with hazardous or combustible materials. Store in cool, dry, ventilated area. Follow applicable laws and regulations for transport and disposal.
![]()
- Do not ingest the battery, Chemical Burn Hazard. This product contains a coin/button cell battery. If the coin/button cell battery is swallowed, it can cause severe internal burns in just 2 hours and can lead to death.
- Keep new and used batteries away from children. If the battery compartment does not close securely, stop using the product and keep it away from children. If you think batteries might have been swallowed or placed inside any part of the body, seek immediate medical attention.
- Attention should be drawn to the environmental aspects of battery disposal.
IMPORTANT SAFETY INSTRUCTIONS
When used in the directed manner, this unit has been designed and manufactured to ensure your personal safety. However, improper use can result in potential electrical shock or fire hazards.Please read and follow all safety and operating instructions carefully before installation and use, and keep these instructions handy for future reference. Take special note of all warnings listed in these instructions and on the unit.
- Water and Moisture The unit should not be used near water. For example: near a bathtub, washbowl, kitchen sink, laundry tub, swimming pool or in a wet basement.
- Ventilation The unit should be situated so that its location or position does not interfere with its proper ventilation. For example, it should not be situated on a bed, sofa, rug or similar surface that may block ventilation openings. Also, it should not be placed in a built-in installation, such as a bookcase or cabinet, which may impede the flow of air through the ventilation openings.
- Heat The unit should be situated away from heat sources such as radiators, heat registers, stoves or other appliances (including amplifiers) that produce heat.
- Power Sources The unit should be connected to a power supply only of the type described in the operating instructions or as marked on the appliance. Only use the AC adapter that came with the unit. 5
- Power-Cable Protection Power supply cables should be routed so that they are not likely to be walked on or pinched by items placed upon or against them. It is always best to have a clear area from where the cable exits the unit to where it is plugged into an AC socket.
- Cleaning Clean only with dry cloth.
- Objects and Liquid Entry Care should be taken so that objects do not fall and liquids are not spilled into any openings or vents located on the product.
- Attachments Do not use attachments not recommended by the product manufacturer.
- Lightning and Power Surge Protection Unplug the unit from the wall socket and disconnect the antenna or cable system during a lightning storm or when it is left unattended and unused for long periods of time. This will prevent damage to the product due to lightning and power-line surges.
- Overloading Do not overload wall sockets, extension cords, or integral convenience receptacles as this can result in a risk of fire or electric shock.
- Damage Requiring Service The unit should be serviced by qualified service personnel when:A. the power supply cable or plug has been damaged.B. objects have fallen into or liquid has been spilled into the enclosure.C. the unit has been exposed to rain.D. the unit has been dropped or the enclosure damaged.E. the unit exhibits a marked change in performance or does not operate normally.
- Periods of Nonuse If the unit is to be left unused for an extended period of time, such as a month or longer, remove batteries before storage
- Servicing The user should not attempt to service the unit beyond those methods described in the user manual. Service methods not covered in the operating instructions should be referred to qualified service personnel.
- Magnetic Interference: This product’s speakers contain powerful magnets which could cause interference or damage to sensitive equipment such as hard drives, CRT televisions and monitors, as well as medical, scientific, and navigational devices. Keep this unit away from these products at all times.
- Only use attachments/accessories specified by the manufacturer. This product is suitable for use in tropical and/or moderate climates.
- The unit should be serviced by qualified service personnel when the enclosure damaged or does not operate normally.
- No naked flame sources, such as lighted candles, should be placed on the apparatus.
- WARNING: To reduce the risk of fire or electric shock, do not expose this product to rain or moisture.
- CAUTION Danger of explosion if battery is incorrectly replaced. Replace only with the same or equivalent type.
- Do not dispose of batteries in the household trash or fire
- The mains plug of power adaptor is used as the disconnect device, it shall remain readily operable.
LIMITED ONE YEAR WARRANTY
iHome Products, a division of SDI Technologies Inc. (hereafter referred to as SDI), warrants this product to be free from defects in workmanship and materials, under normal use and conditions, for a period of one (1) year from the date of original purchase. Should this product fail to function in a satisfactory manner, it is best to first return it to the store where it was originally purchased. Should this fail to resolve the matter and service still be required by reason of any defect or malfunction during the warranty period, SDI will repair or, at its discretion, replace this product without charge. This decision is subject to verification of the defect or malfunction upon delivery of this product to the Factory Service Center authorized by Customer Service. If service is required, please visit ihome.com/support/contact to obtain a Return Authorization Number. A copy of the sales receipt is required to validate in-warranty coverage.
Disclaimer of WarrantyNOTE: This warranty is valid only if the product is used for the purpose for which it was designed. It does not cover (i) products which have been damaged by negligence or willful actions, misuse or accident, or which have been modified or repaired by unauthorized persons; (ii) cracked or broken cabinets, or units damaged by excessive heat; (iii) damage to digital media players, CD’s or tape cassettes (if applicable); (iv) the cost of shipping this product to the Factory Service Center and its return to the owner.
 report this ad
This warranty is valid only in the United States of America and does not extend to owners of the product other than to the original purchaser. In no event will SDI or any of its a ligates, contractors, resellers, their ochers, directors, shareholders, members or agents be liable to you or any third party for any consequential or incidental damages, any lost profits, actual, exemplary or punitive damages. (Some states do not allow limitations on implied warranties or exclusion of consequential damages, so these restrictions may not apply to you.) This warranty gives you specific legal rights, and you may also have other rights which vary from state to state. Your acknowledgment and agreement to fully and completely abide by the above mentioned disclaimer of warranty is contractually binding to you upon your transfer of currency (money order, cashier’s check, or credit card) for purchase of your SDI product.
© 2019 SDI Technologies, Inc. All rights reserved Questions? Visit www.ihome.com
References
[xyz-ips snippet=”download-snippet”]