USER MANUAL
LED Lighting for TViHoment_H611x
Welcome iHomentLED Lighting for TVModel:MT001
For FAQs and more information, please visit: www.ihoment.com
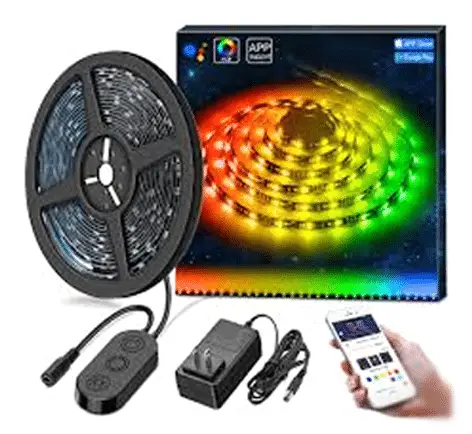
Package list
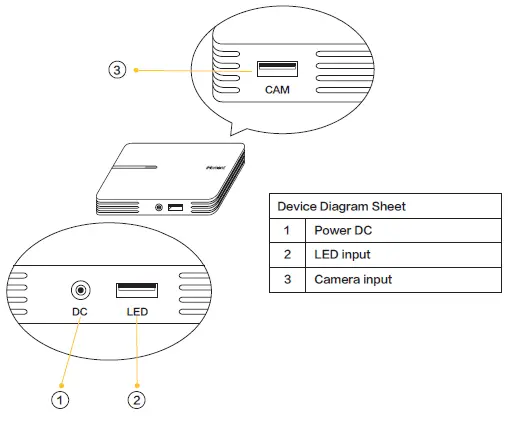
Device diagram
Before install
- Turn off the TV
- Turn on the light
Begin to install
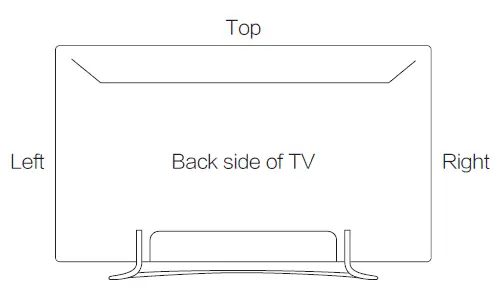
1. Install strip light
Install the strip light as follows, make sure these three strip lights are put in the correct position and installed in the right order.
1.1. The strip light with USB port should be put on the right back side of TV, and the strip light without USB port should be put on the left side, and the longest strip light should be put on the top back side of TV.
1.2. Peel off the 3M adhesive tape of the longest strip light and stick it to the top back side of TV.
1.3. Peel the 3M adhesive tape of the strip light with USB port and stick it to the right back side of TV.
1.4. Peel off the 3M adhesive tape of the strip light without USB port and stick it to the left back side of TV.
2. Install camera
Install the camera as follows, make sure to put the camera on the top center of the TV and keep it parallel to the ground.
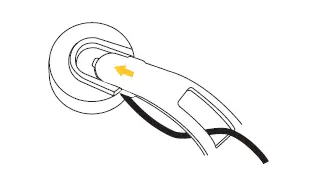
2.1. Plug the camera into camera holder.
2.2. To find out the top middle point of your TV, you could use the paper rule in the package to measure the top width of the TV and mark it properly.
2.3. Make sure the surface of camera is facing down and parallel to the ground. Peel off the adhesive tape of the camera and stick it to the marked position.
3. Sticker for calibration
3.1. Peel off the adhesive tape of four stickers, and stick them to those four corners of the front screen.
3.2. Stick them firmly and smoothly to the surface in case of falling off or peeling off.
Note: The stickers are electrostatic sticker used for alignment during calibration process, and they won’t leave any mark after removing them.
4. Connection
Complete the connections as follows, make sure the strip light, camera and adapter are plugged into the control box correctly.
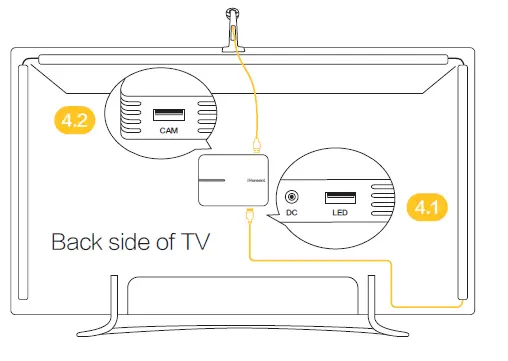
4.1. Plug the USB port of the LED strip light into the slot of the control box for the strip light.
4.2. Plug the USB port of the camera into the slot of the control box for the camera.
4.3. Plug the power adapter into the slot of the control box for the adapter .
4.4. Plug the adapter into an electrical outlet.
Opening recognition
Calibrated the strip light as follows. Calibration process needs 60 seconds.
- When you first turn on the strip light, the control box will calibrate automatically. During the calibration process, the strip light will be red color.
- When calibration is completed, the strip light will be green color.
- If the strip light is keeping in red color, please check if the installation is correct.
Installation complete
- After calibration, you need to remove the stickers on the front side of the TV.
2. Peel off the adhesive tape for the control box, Stick the control box with sticky side to the back side of TV.
3. Installation complete.
Usage
- Download the app“iHoment light”
2. Open APP and Bluetooth
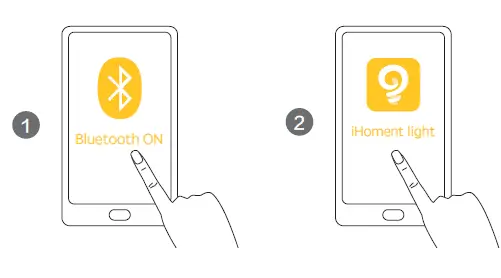
3. Scan and Connect
4. Complete
Note:
- Don’t pull out the camera during usage
- When you turn on the TV, it will take several seconds for strip light to initialize. After that, the strip light will turn on.
- It will take several seconds for strip light to go off when you turn off the TV.
This device complies with part 15 of the FCC Rules. Operation is subject to the condition that this device does not cause harmful interference (1) this device may not cause harmful interference, and (2) this device must accept any interference received, including interference that may cause undesired operation
©Ihoment Technology Co. Limited, All rights reserved. Ihoment light and the iHoment light logo are trademarks of Ihoment Technology Co. Limited, registered in the United States and other countries. All other trademarks are the property of their respective owners.
FCC ID:2AOEP-MT001Shenzhen ihoment Technology Co., Ltd.Building 9, Room 401 YunGu phase II, Nan Shan, Shenzhen, China
FCC WARNING
This device complies with part 15 of the FCC Rules. Operation is subject to the following two conditions: (1) this device may not cause harmful interference, and (2) this device must accept any interference received, including interference that may cause undesired operation.
Any changes or modifications not expressly approved by the party responsible for compliance could void the user’s authority to operate the equipment.NOTE: This equipment has been tested and found to comply with the limits for a Class B digital device, pursuant to Part 15 of the FCC Rules. These limits are designed to provide reasonable protection against harmful interference in a residential installation. This equipment generates, uses and can radiate radio frequency energy and, if not installed and used in accordance with the instructions, may cause harmful interference to radio communications. However, there is no guarantee that interference will not occur in a particular installation.
If this equipment does cause harmful interference to radio or television reception,which can be determined by turning the equipment off and on, the user is encouraged to try to correct the interference by one or more of the following measures:
- Reorient or relocate the receiving antenna.
- Increase the separation between the equipment and receiver.
- Connect the equipment into an outlet on a circuit different from that to which the receiver is connected.
- Consult the dealer or an experienced radio/TV technician for help.
To maintain compliance with FCC’s RF Exposure guidelines, This equipment should be installed and operated with minimum distance between 20cm the radiator your body: Use only the supplied antenna.
FCC ID: 2AOEP-MT001
report this adQuestions about your Manual? Post in the comments!
[xyz-ips snippet=”download-snippet”]