
NEDDRAGEN
Please refer to the last page of this manual for the full list of IKEA appointed After Sales Service Pro- vider and relative national phone numbers.
IMPORTANT SAFETY INFORMATION
Read all instructions before using this appliance. This manual contains important safety symbols and instructions. Please pay atten- tion to these symbols and follow all instructions given.Do not attempt to install or operate your appliance until you have read the safety precautions in this manual. Safety items throughout this manual are labeled with a WARNING or CAUTION statement based on the risk type.Warnings and important instructions appearing in this guide are not meant to cover all possible conditions and situations that may occur. Common sense, caution, and care must be exercised with installing, maintaining, or operating your appliance.
DEFINITIONS
![]() This is the safety alert symbol. It is used to alert you to potential personal injury hazards. Obey all safety messages that fol- low this symbol to avoid possible injury or death.
This is the safety alert symbol. It is used to alert you to potential personal injury hazards. Obey all safety messages that fol- low this symbol to avoid possible injury or death.
Important Safety Information
Remove all tape and packaging before using the appliance. Destroy the carton and plastic bags after unpacking the appliance. Never allow children to play with packaging material. Do not remove the wiring label and other literature attached to the appliance. Do not remove model/serial number plate.
Cold temperatures can damage the electronic control. When using this appliance for the first time, or when the appliance has not been used for an extended period of time, be sure the appliance has been in temperatures above 32ºF (0ºC) for at least 3 hours before turning on the power to the appliance.
Never modify or alter the construction of the appliance by removing the leveling legs, panels, wire covers, anti-tip brackets/ screws, or any other part of the appliance. Be sure to have an appropriate foam-type fire extinguisher available, visible, and easily accessible located near the appliance.
Proper Installation
Be sure your appliance is properly installed and grounded by a qualified technician. In the United States, install in accordance with the National Fuel Gas Code ANSI Z223.1/NPFA No. 54, latest edition and National Electrical Code NFPA No. 70 latest edition, and local electrical code requirements.
In Canada, install in ac- cordance with CAN/CGA B149.1 and CAN/ CGA B149.2 and CSA Standard C22.1, Canadian Electrical code, Part

latest editions and local electrical code requirements. Install only per installation instructions provided in the literature package for this appliance.
For personal safety, this appliance must be properly grounded. For maximum safety, the power cord must be securely connected to an electrical outlet or junction box that is the correct voltage, is correctly polarized and properly grounded, and protected by a circuit breaker in accordance with local codes.
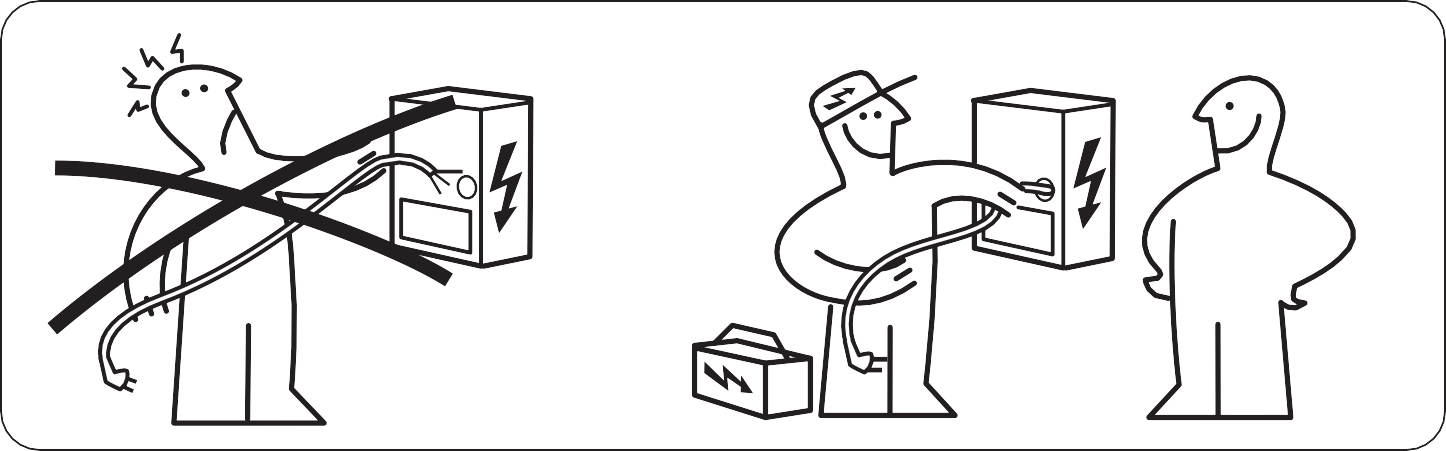
It is the personal responsibility of the consumer to have the appropriate outlet or junction box with the correct, properly grounded wall receptacle installed by a qualified electrician. It is the responsibility and obligation of the consumer to contact a qualified installer to assure that the electrical installation is adequate and is in conformance with all local codes and ordinances.
CAUTION
When heating fat or grease, watch it closely. Grease may catch fi re if it becomes too hot.
Do not use water or fl our on grease fi res. Smother fi re or fl ame or use dry chemical or foam-type extinguisher. Cover the fi re with a pan lid or use baking soda. Use dry potholders. Moist or damp potholders on hot surfaces may result in burns from steam. Do not let potholders touch hot cooking areas. Do not use towels or other bulky cloths.
Do not heat unopened food containers – Build-up of pressure may cause container to burst and result in injury. Wear proper apparel – Loose-fi tting or hanging garments should never be worn while using the appliance. Do not let clothing or other flammable materials contact hot surfaces.
Do not touch surface burners or elements, areas near these burners or elements, interior surfaces of the oven, or the warmer drawer (if equipped). Surface burners and elements may be hot even though they appear cool. Areas near surface burners and elements may become hot enough to cause burns. During and after use, do not touch, or let clothing or other flammable materials touch these areasuntil they are cool. These areas may include the cooktop, surfaces facing the cooktop, oven vent areas, oven door, and oven window.
IMPORTANT INSTRUCTIONS FOR USING YOUR RADIANT COOKTOP
Know which knob or key controls each surface heating area. Place cookware with food on the cooking area before turning it on. Turn the cooking area off before removing the cookware.
Cookware handles should be turned inward and not extend over adjacent surface elements — To reduce the risk of burns, ignition of flammable materials, and spillage due to unintentional contact with the utensil, the handle of the cookware should be positioned so that it is turned inward, and does not extend over other cooking areas.
Use proper pan size – This appliance is equipped with one or more surface units of different sizes. Select cookware with flat bottoms that match the surface unit size. Using the proper cookware on the cooking area will improve efficiency.
Glazed cooking utensils— Only certain types of glass, glass/ceramic, ceramic, earthenware, or other glazed utensils are suitable for cooktop service without breaking due to the sudden change in temperature. Check the manufacturer’s recommendations for cooktop use. Improper cookware may break due to sudden changes in temperature. Check the cookware manufacturer’s recommendations for cooktop use.
Never leave surface elements unattended. Boil-overs may cause smoking and greasy spills that may ignite. A pan that has boiled dry could be damaged and may damage the cooktop. Do not use a searing grill meant for use with a broiler pan on the cooktop. The searing grill is not designed for use on the cooktop. Doing so may result in a fire. When you are flaming foods under a ventilating hood, turn on the fan.
IMPORTANT INSTRUCTIONS FOR GLASS AND CERAMIC COOKTOPS
Do Not Clean or Operate a Broken Cooktop. If cooktop should break, cleaning solutions and spillovers may penetrate the broken cooktop and create a risk of electric shock. Contact a qualified technician immediately.
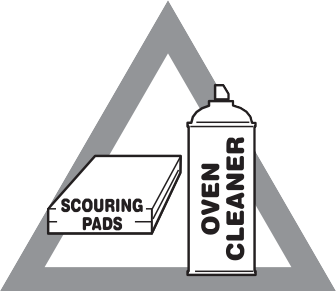
Clean cooktop glass with caution. If a wet sponge or cloth is used to wipe spills on a hot cooking area, be careful to avoid a steam burn. Some cleaners can produce harmful fumes if applied to a hot surface. Avoid scratching the cooktop glass with sharp objects.
IMPORTANT INSTRUCTIONS FOR CLEANING YOUR APPLIANCE
Clean the appliance regularly to keep all parts free of grease that could catch fire. Do not allow grease to accumulate. Greasy deposits in the fan could catch fire. Always follow the manufacturer’s recommended directions for use of kitchen cleaners and aerosols. Be aware that excess residue from cleaners and aerosols may ignite causing damage and injury.
Clean ventilating hoods frequently – Grease should not be allowed to accumulate on hood or filter. Follow the manufacturer’s instructions for cleaning vent hoods.
IMPORTANT INSTRUCTIONS FOR SER- VICE AND MAINTENANCE
Do not repair or replace any part of the appliance unless specifically recommended in the manuals. All other servicing should be done only by a qualified technician. This re- duces the risk of personal injury and dam- age to the appliance. Always contact your dealer, distributor, service agent, or manufacturer about problems or conditions you do not understand.
Ask your dealer to recommend a qualified technician and an authorized repair service. Know how to disconnect the power to the appliance at the circuit breaker or fuse box in case of an emergency.
BEFORE SETTING SURFACE CONTROLS
Using Proper Cookware
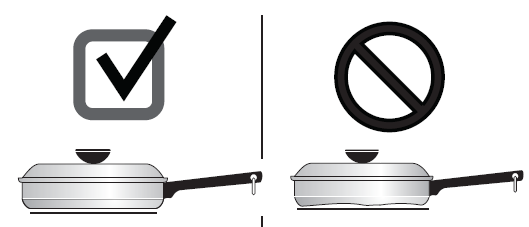
The size and type of cookware used will influence the heat setting needed for best cooking results. Be sure to follow the recommendations for using proper cookware as illustrated in Figure 1 and Figure 2.
Cookware Material Types
The cookware material determines how evenly and quickly heat is transferred from the surface element to the pan bottom. The most popular materials available are:
- Aluminum – Excellent heat conductor. Some types of food will cause it to darken (Anodized aluminum cookware resists staining and pit- ting). If aluminum pans slide across the ceramic cooktop, they may leave metal marks which will resemble scratches. Remove these marks immediately.
- Copper – Excellent heat conductor but discolors easily (see Aluminum).
- Stainless – Slow heat conductor with uneven cooking results. Is durable, easy to clean and resists staining.
- Cast Iron – A slow heat conductor that will retain heat very well. Cooks evenly once cooking temperature is reached. If cast iron pans slide across the ceramic cooktop, they may leave metal marks which will resemble scratches. Re- move these marks immediately.
- Porcelain-enamel on metal – Heating characteristics will vary depending on base material. Porcelain-enamel coating must be smooth to avoid scratching ceramic cooktops.
- Flat bottom and straight sides.
- Tight fitting lids.
- Weight of handle does not tilt pan. Pan is well balanced.
- Pan sizes match the amount of food to be prepared and the size of the surface element.
- Made of material that conducts heat well.
- Easy to clean.
- Always match pot diameter to element size.
- Curved and warped pans.
- Heavy handle tilts pan.
- Pan is smaller than the heating area marked on cooktop.
- Glass – Slow heat conductor. Not recommended for ceramic cooktop surfaces because it may scratch the glass.
BEFORE SETTING SURFACE CONTROLS
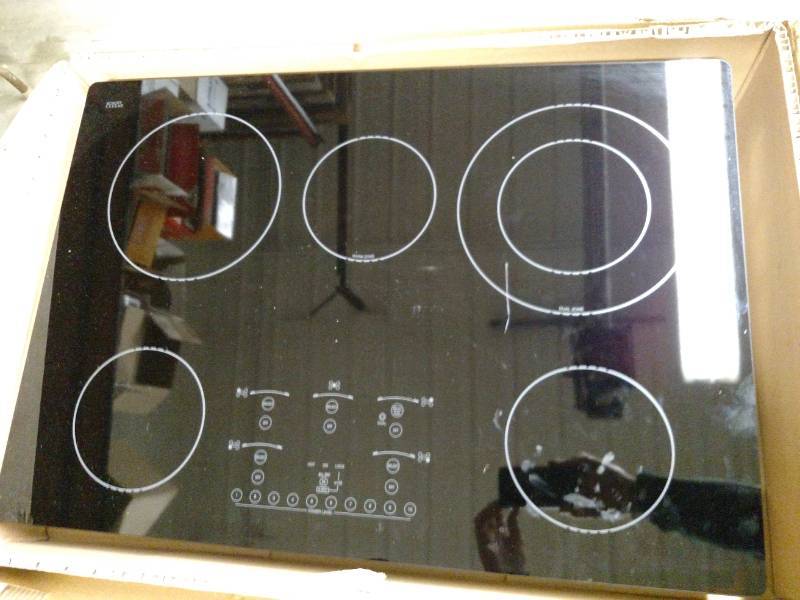
About the Ceramic Glass Cooktop
The ceramic glass cooktop has heating elements below a smooth glass surface. The designs on the ceramic cooktop outline the areas of the surface el- ements underneath. Always match the pan size with the diameter of the element outline on the cooktop. Only flat-bottomed cookware should be used.
Prior to using your cooktop for the first time, apply a ceramic cooktop cleaning cream (available in most hardware, grocery and department stores) to the ceramic surface. Clean and buff with a clean paper towel. This will make cleaning easier when soiled from cooking. Cooktop cleaning creams leave a protective finish on the glass to help prevent scratches and abrasions.
The type and size of cookware, the number of sur- face elements in use, and their settings will all affect the amount of heat that will spread to areas beyond the surface elements. The areas surrounding the elements may become hot enough to cause burns.
About the Radiant Surface Elements
The element temperature rises gradually and even- ly. As the temperature rises, the element will glow red. To maintain the selected setting the element will cycle on and off. The heating element retains enough heat to provide a uniform and consistent heat during the off cycle.
For efficient cooking, turn the element off several minutes before cooking is complete. This will allow residual heat to complete the cooking process.
Types of ceramic cooktop elements
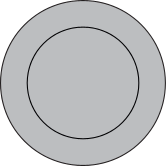
The circles on the ceramic glass cooktop outline the size and type of element underneath. The elements on your cooktop depend on the model.
- A single radiant element has one circle.
- A dual radiant element has two circles. The dual radiant element may be set using only the smaller inner element or both inner and outer elements may be set to heat together for a larger surface.

- Dual elements allow more flexibility with the size of cookware.
Figure 3: Element On

A quick glance at this indicator light when cooking is finished is an easy check to be sure all surface elements are turned off.
The HOT SURFACE indicator light will turn on when the burner is hot enough to cause burns and will remain on after the burner is turned off until the surface has cooled to a safe temperature.
Locations of the Radiant Surface Elements
Your cooktop is equipped with radiant surface radiant elements with different wattage ratings. The ability to heat food quicker and in larger volumes increases as the element wattage increase.
SETTING SURFACE CONTROL
Single radiant surface elements
To operate the single radiant element:
- Place correctly sized cookware on surface element.
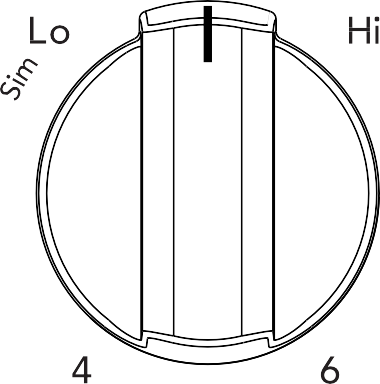
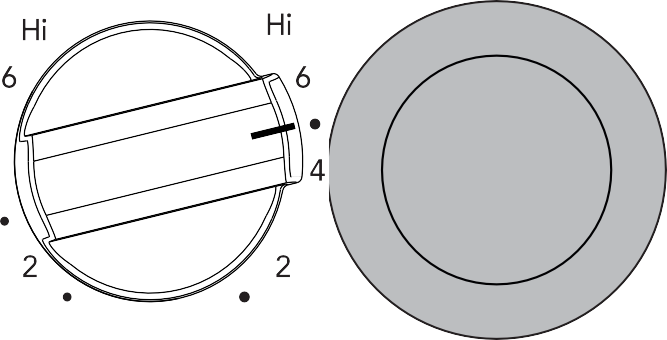
- Push in and turn the surface control knob in either direction (Figure 1) to the desired setting (refer to the “Suggested radiant surface element settings” in Table 1).
- When cooking is complete, turn the radiant surface element OFF before removing the cook- ware.
Start most cooking operations on a higher setting and then turn to a lower setting to finish cooking. The surface control knobs do not have to be set ex- actly on a particular spot. Use the graphics provided as a guide and adjust the control knob as needed.
A glowing red surface heating area extending be- yond the bottom edge of the cookware indicates the cookware is too small for the surface heating area.
Suggested radiant surface element settings
The suggested settings found in Table 1 below are based on cooking with medium-weight aluminum pans with lids. Settings may vary when using other types of pans.
|
Settings |
Type of Cooktop |
|
High (HI – 9) |
Start most foods, bring water to a boil, pan broil- ing |
|
Medium High (7 – 8) |
Continue a rapid boil, fry, deep fat fry |
|
Medium (5 – 6) |
Maintain a slow boil, thicken sauces and gra- vies or steam vegetables |
|
Medium Low (2 – 4) |
Keep foods cooking, poach, stew |
|
Low (1) |
Low temperature cooking |
|
Low (LO) |
Keep warm, melt |
Dual radiant surface elements
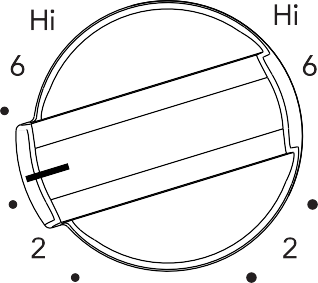
Symbols on the blackguard will help choose which portion of the dual radiant element to set. The symbol indicates a setting for the inner element only. The symbol indicates a setting for both inner and outer elements.
To operate a dual radiant element:
- Place correctly sized cookware on the surface element.
- Push in and turn the surface control knob clock- wise to begin heating both the inner and outer elements. If only the inner element is needed for smaller cookware, push in and turn the knob counter-clockwise (see Figure 10)
- When cooking is complete, turn the knob to OFF before removing the cookware.
Start most cooking operations on a higher setting and then turn to a lower setting to finish cooking. The surface control knobs do not have to be set ex- actly on a particular mark. Use the marks as a guide and adjust the control knob as needed.
A glowing red surface heating area extending be- yond the bottom edge of the cookware indicates the cookware is too small for the surface heating area. You may switch from either single or dual element setting at any time during cooking. See “Suggested radiant surface element settings”

![]()
NOTE:
- The size and type of utensil used and the amount and type of food being cooked will influence the setting needed for best cooking results.
- The Element ON indicator lights will glow when one or more elements are turned ON. A quick glance at these indicator lights when finished cooking is an easy check to be sure all control knobs are turned OFF. The Hot Surface indicator light will remain on AFTER the control knob is turned to the “OFF” position and will stay on until the heating surface area has cooled sufficiently.
Caution:
- Radiant surface elements may appear to have cooled after they have been turned off. The element may still be hot and burns may occur if the element is touched before it has cooled sufficiently.
- Do not place flammable items such as plastic salt and pepper shakers, spoon holders, or plastic wrappings on top of the range when it is in use. These items could melt or ignite. Potholders, towels, or wooden spoons could catch fi re if placed too close to the surface elements.
- Do not use aluminum foil to line surface drip bowls or reflector pans. Improper installation of these liners may result in risk of electric shock or fire.
Important: Do not allow aluminum foil or ANY material that can melt to make contact with the ceramic glass cooktop. If these items melt on the cooktop, they will damage the ceramic cooktop.
Home Canning
Be sure to read and observe all the following points when home canning with your appliance. Check with the USDA (United States Department of Agriculture) Web site and be sure to read all the information they have available as well as follow their recommendations for home canning procedures.
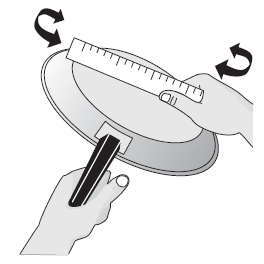
- Use only a completely flat bottom canner with no ridges that radiate from the bottom center when home canning. Heat is spread more evenly when the bottom surface is flat. Use a straight- edge to check canner bottom.
- Make sure the diameter of the canner does not exceed 1 inch beyond the surface element markings or burner.
- It is recommended to use smaller diameter canners on electric coil and ceramic glass cooktops and to center canners on the burner grates.
- Start with hot tap water to bring water to boil more quickly.
- Use the highest heat setting when first bringing the water to a boil. Once boiling is achieved, re- duce heat to lowest possible setting to maintain that boil.
- Use tested recipes and follow instructions care- fully. Check with your local Cooperative Agricultural Extension Service or a manufacturer of glass jars for the latest canning information.
- It is best to can small amounts and light loads.
- Do not leave water bath or pressure canners on high heat for an extended amount of time.
Care And Cleaning
Cooktop Maintenance
Consistent and proper cleaning is essential to maintaining your ceramic glass cooktop.
Prior to using your cooktop for the first time, apply a ceramic cooktop cleaning cream (available in most hardware, grocery, and department stores) to the ceramic surface. Clean and buff with a clean paper towel. This will make cleaning easier when soiled from cooking. Cooktop cleaning creams leave a protective finish on the glass to help prevent scratches and abrasions.
Sliding pans on the cooktop can cause metal markings on the cooktop surface. These marks should be removed immediately after the cooktop has cooled using cooktop cleaning cream. Metal marks can be- come permanent if not removed prior to future use.
Cookware (cast iron, metal, ceramic, or glass) with rough bottoms can mark or scratch the cooktop surface.
Do not:
- Slide anything metal or glass across the cooktop.
- Use cookware with dirt or dirt build up on the bottom; always use clean cookware.
- Use your cooktop as a cutting board or work surface in the kitchen.
- Cook foods directly on the cooktop surface with- out a pan.
- Drop heavy or hard objects on the ceramic glass cooktop; they may cause it to crack.


For light to moderate soil:
Apply a few drops of cooktop cleaning cream directly to the cooktop. Use a clean paper towel to clean the entire cooktop sur- face. Make sure the cooktop is cleaned thoroughly, leaving no residue. Do not use the towel you use to clean the cooktop for any other purpose.
For heavy, burned on soil:
Apply a few drops of cooktop cleaning cream directly to the soiled area. Rub the soiled area using a non-abrasive cleaning tool, applying pressure as needed. Do not use the pad you use to clean the cooktop for any other purpose.
If soils remain, carefully scrape soils with a metal razor blade scraper, holding scraper at a 30 degree angle to the surface. Remove loosened soils with cooktop cleaning cream and buff the surface clean.
Before you Call
Solutions to Common Problems
Before you call for service, review the following list. It may save you time and expense. Possible solutions are provided with the problem listed
|
Problem |
Cause / Solution |
|
Entire appliance does not operate |
Appliance not connected. Make sure power cord is plugged properly into out- let. Check your fuse box or breaker box to make sure the circuit is active. Electrical power outage. Check house lights to be sure. Call your local electric company for service outage information. |
Cooktop Problems
|
Cooktop Problems |
|
|
Problem |
Cause / Solution |
|
Surface element is too hot or not hot enough. |
Incorrect surface control setting. Adjust power level setting. |
|
Surface element does not heat or does not heat evenly. |
Be sure the correct surface control knob is turned on for the element needed. Cookware is light weight or warped. Use only flat, evenly balanced, medium or heavyweight cookware. Flat pans heat better than warped pans. Cookware materials and weight of the material affect heating. Heavy and medium- weight pans heat evenly. Because lightweight pans heat unevenly, foods may burn easily. |
|
Areas of discoloration with metallic sheen on cooktop surface. |
Mineral deposits from water and food. Remove them using cooktop clean- ing creme applied to the ceramic surface. Buff with a non-abrasive cloth or sponge. |
|
Scratches or abrasions on cooktop surface. |
Coarse particles such as salt or hardened soils between cooktop and utensils can cause scratches. Be sure the cooktop surface and bottoms of utensils are clean before use. Small scratches do not affect cooking and will become less visible with time. Cleaning materials not recommended for ceramic-glass cooktop have been used. Apply cooktop cleaning creme to the ceramic surface. Buff with a non- abrasive cloth or sponge. Cookware with a rough bottom was used. Use smooth, flat-bottomed cook- ware. |
|
Metal marks on the cooktop. |
Sliding or scraping of metal utensils on cooktop surface. Do not slide metal utensils on the cooktop surface. Apply cooktop cleaning creme to the ceramic surface. Buff with a non-abrasive cloth or sponge. For more information, see “Cooktop Maintenance” on page 16. |
|
Brown streaks or specks on cooktop surface. |
Boil overs are cooked onto the surface. When cooktop is cool, use a razor blade scraper to remove soil. For more information see “Cooktop Mainte- nance” on |
Limited Guarantee
How long is the IKEA guarantee valid?
This guarantee is valid for five (5) years from the original date of purchase of Your appliance at IKEA, un- less the appliance is named LAGAN or TILLREDA in which case two (2) years of guarantee apply. The origi- nal sales receipt is required as proof of purchase. If service work is carried out under guarantee, this will not extend the guarantee period for the appliance.
Who will execute the service?
IKEA “Service Provider” will provide the service through its own service operations or authorized service partner network.
What does this guarantee cover?
The guarantee covers faults of the appliance which have been caused by faulty construction or material faults from the date of purchase from IKEA. This guarantee applies to domestic use only. Some exceptions not guaranteed are specified under the headline “What is not covered under this guarantee?” Within the guarantee period, the costs to remedy the fault (e.g., repairs, parts, labour and travel) will be covered, pro- vided that the appliance is accessible for repair without special expenditure. On these conditions the local regulations are applicable. Replaced parts become the property of IKEA.
What will IKEA do to correct the problem?
IKEA appointed Service Provider will examine the product and decide, at its sole discretion, if it is covered under this guarantee. If considered covered, IKEA Service Provider or its authorized service partner through its own service operations, will then, at its sole discretion, either repair the defective product or replace it with the same or a comparable product.
What is not covered under this guarantee?
- Normal wear and tear.
- Deliberate or negligent damage, damage caused by failure to observe operating instructions, incorrect installation or by connection to the wrong voltage, damage caused by chemical or electrochemical reac- tion, rust, corrosion or water damage including but not limited to damage caused by excessive lime in the water supply, damage caused by abnormal environmental conditions.
- Consumable parts including batteries and lamps.
- Non-functional and decorative parts which do not affect normal use of the appliance, including any scratches and possible color differences.
- Accidental damage caused by foreign objects or substances and cleaning or unblocking of filters, drain- age systems or soap drawers.
- Damage to the following parts: ceramic glass, accessories, crockery and cutlery baskets, feed and drainage pipes, seals, lamps and lamp covers, screens, knobs, casings and parts of casings. Unless such damages can be proved to have been caused by production faults.
- Cases where no fault could be found during a technician’s visit.
- Repairs not carried out by our appointed service providers and/or an authorized service contractual partner or where non-original parts have been used.
- Repairs caused by installation which is faulty or not according to specification.
- The use of the appliance in a non-domestic environment i.e. professional use.
- Transportation damages. If a customer transports the product to his home or another address, IKEA is not liable for any damage that may occur during transport. However, if IKEA delivers the product to the customer’s delivery address, then damage to the product that occurs during this delivery will be covered by IKEA.
- Cost for carrying out the initial installation of the IKEA appliance. However, if an IKEA appointed Service Provider or its authorized service partner repairs or replaces the appliance under the terms of this guar- antee, the appointed Service Provider or its authorized service partner will reinstall the repaired appliance or install the replacement, if necessary.
How country law applies
The IKEA guarantee gives you specific legal rights, and you may also have other rights which vary from state to state or jurisdiction to jurisdiction. However these conditions do not limit in any way consumer rights described in the local legislation.
Area of validity
For appliances which are purchased in United States or Canada, or moved to one of the mentioned coun- tries, the services will be provided in the framework of the guarantee conditions normal in the specified country. An obligation to carry out services in the framework of the guarantee exists only if the appliance complies and is installed in accordance with:
- the technical specifications of the country in which the guarantee claim is made;
- the Assembly Instructions and User Manual Safety Information.
The dedicated AFTER SALES for IKEA appliances
Please don’t hesitate to contact IKEA appointed After Sales Service Provider to:
- make a service request under this guarantee
- ask for clarifications on installation of the IKEA appliance in the dedicated IKEA kitchen furniture;
- ask for clarification on functions of IKEA appliances.
To ensure that we provide you with the best assistance, please read carefully the Assembly Instructions and/or the User Manual before contacting us.
How to reach us if you need our service
In order to provide you a quicker service, we recommend to use the specific phone numbers listed on this manual. Always refer to the numbers listed in the booklet of the specific appliance you need an assistance for.
Please also always refer to the IKEA article number (8 digit code) placed on the rating plate of your appliance.
SAVE THE SALES RECEIPT!
It is your proof of purchase and required for the guarantee to apply. The sales receipt also reports the IKEA name and article number (8 digit code) for each of the appliances you have purchased.
Do you need extra help?
For any additional questions not related to After Sales of your appliances please contact your nearest IKEA store call center. We recommend you read the appliance documentation carefully before contacting us.
IKEA FORVALLA User Manual – IKEA FORVALLA User Manual –
[xyz-ips snippet=”download-snippet”]