GRILLSKÄR
GRILLSKÄR side burner
LIST OF FEATURES
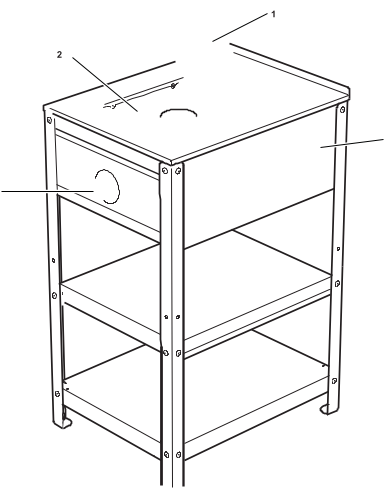
The numbering of the product features shown refers to the illustration of the side burner on the graphic page
- Top lid
- Burner
- Control knob
- Side burner body
SAFETY SYMBOLS
The safety symbols and their meanings are explained below. Read and follow the instructions in this manual carefully.
WARNING
Failure to read and follow these instructions could result in serious injury or damage to property.
![]() Installation must conform to local codes or in the absence of local codes with either the National Fuel Gas Code, ANSI Z223.1/NFPA 54 or Propane and storage handling code B149.2.This product is for OUTDOOR USE ONLY. Shall not be used in a building. NEVER use in an enclosed space such as a carport, garage, veranda, covered patio, or under an overhead structure of any kind.
Installation must conform to local codes or in the absence of local codes with either the National Fuel Gas Code, ANSI Z223.1/NFPA 54 or Propane and storage handling code B149.2.This product is for OUTDOOR USE ONLY. Shall not be used in a building. NEVER use in an enclosed space such as a carport, garage, veranda, covered patio, or under an overhead structure of any kind.
![]()
![]()
![]()
![]()
ADDITION always leak test the side burner annually, when dismantled, when parts are replaced, or if the gas cylinder is removed or replaced.FAILURE TO DO THIS COULD CAUSE SERIOUS INJURY, OR DAMAGE TO THE SIDE BURNER. Always keep the cylinder vertical.
Important – Ensure the unit is positioned on flat, level ground to aid with fat/grease run off.
![]()
![]()
![]()
![]()
![]()
![]()
![]()
![]()
![]()
![]()
![]()
![]()
![]()
![]()
![]()
![]()
![]()
![]()
![]()
![]()
![]()
![]()
![]()
![]()
![]()
![]()
![]()
Never use an adjustable regulator with this unit. This side burner will become very hot when in use take care when touching.
![]()
![]()
![]()
![]()
![]()
![]()
![]()
![]()
![]()
![]()
![]()
![]()
![]()
![]()
![]()
![]()
![]()
![]()
![]()
![]()
![]()
![]()
![]()
![]()
![]()
![]()
![]()
![]()
![]()
![]()
![]()
![]()
![]()
![]()
![]()
![]()
![]()
![]()
![]()
![]()
![]()
![]()
![]()
![]()
![]()
![]()
![]()
![]()
![]()
![]()
![]()
![]()
![]()
![]()
![]()
![]()
![]()
![]()
![]()
![]()
![]()
![]()
![]()
![]()
![]()
![]()
![]()
![]()
![]()
![]()
![]()
![]()
![]()
![]()
![]()
![]()
![]()
![]()
![]()
![]()
![]()
![]()
![]()
![]()
![]()
![]()
![]()
![]()
![]()
![]()
![]()
![]()
![]()
![]()
![]()
![]()
![]()
![]()
![]()
![]()
![]()
![]()
![]()
![]()
![]()
![]()
![]()
![]()
![]()
![]()
![]()
![]()
![]()
![]()
![]()
![]()
![]()
![]()
![]()
![]()
![]()
![]()
![]()
![]()
![]()
![]()
![]()
![]()
![]()
![]()
![]()
![]()
![]()
![]()
![]()
![]()
![]()
![]()
![]()
![]()
![]()
![]()
![]()
![]()
![]()
![]()
![]()
![]()
![]()
![]()
![]()
![]()
![]()
![]()
![]()
![]()
![]()
![]()
![]()
![]()
![]()
![]()
![]()
![]()
![]()
![]()
![]()
![]()
![]()
![]()
![]()
![]()
![]()
![]()
![]()
![]()
![]()
![]()
![]()
![]()
LEAK TESTS
IMPORTANT – PERFORM LEAK TESTS BEFORE USE
Always leak test the unit – annually, when dismantled, when parts are replaced, or if the gas cylinder is removed or replaced.
- Never use an open flame to check for leaks at anytime. DO NOT IGNITE THE SIDE BURNER DURING LEAK TESTING.
- To be performed in a well-ventilated area.
- Be sure all control knobs are in the ‘OFF’ position.
- Check for leaks by brushing a solution of 1/2 water and 1/2 soap over all the gas system joints, including all valve connections, hose connections and regulator connections.
- Ensure the soap solution has been applied to all connections – connect the regulator to the gas cylinder, open the gas control valve on the regulator allowing gas to flow.
- OBSERVE – if bubbles form over any part of the joints there is a leak.
- Turn off the gas and tighten all joints
- Repeat test. If bubbles form again, do not use the side burner. Please contact your local dealer for assistance.
GAS AND REGULATOR INSTRUCTIONS
- This side burner is only for use with cylinders marked propane.
- The cylinder should be positioned underneath the main barbecue body and stored upright.
- Gas cylinders should never be stored or laid on their side.
- Before each use inspect the gas hose to ensure it is free of any twisting or tension
User instructions
GRILLSKÄR side burner is only to be used together with GRILLSKÄR gas barbecue. Before assembling your side burner, remove all protective packaging from each part. Do not store a spare LP gas cylinder under or near this appliance. Cylinder used must include a collar to protect the cylinder valve.
Never fill the cylinder beyond 80% full. Failure to follow these instructions exactly may result in fire causing serious injury or death. Place dust cap on cylinder valve outlet whenever the cylinder is not in use. Only install the type of dust cap on the cylinder valve outlet that is provided with the cylinder valve. Other types of caps or plugs may result in leakage of propane.
The gas cylinder must have a connection compatible with the regulator supplied with the side burner and have a minimum capacity of 4kg / 9lbs.
SIDE BURNER USER INSTRUCTIONS
Before proceeding, make certain that you understand the warning statements in this manual.
BEFORE USING THIS APPLIANCE
- Please read all of these instructions and appliance owners manual prior to installation and use.
- FOR OUTDOOR USE ONLY!
- Appliance and tank must be in open, well ventilated outdoor area prior to connection and use. Make sure tank valve is fully closed and not leaking prior to moving or connecting.
- NEVER USE IN A GARAGE OR UNDER OVERHANGS!
- NEVER STORE A SPARE CYLINDER OR ANY FLAMMABLE LIQUID OR GAS UNDER OR NEAR THIS APPLIANCE OR ANY OTHER HEAT SOURCE.
- Be sure tank valve and regulator are proper mating types, with correct threads or fittings, see manual.
- Inspect tank valve, regulator, hose and fittings to be sure they are clean, free of dirt, debris, not plugged and not damaged. If damaged replace before use. See local LP dealer for repairs.
- Prior to connection, turn all control valves to the OFF position.
- Connect regulator to tank valve according to appliance owners manual. Handle cylinder with care – the contents are under high pressure.
- If good connection has been made, slowly open tank valve to full open. Use a soapy water solution to check all gas connections for leaks before lighting appliance.
- NEVER TEST WITH OPEN FLAME!
- IF YOU SMELL GAS OR A LEAK IS FOUND:
- SHUT OFF GAS AT THE TANK VALVE IMMEDIATELY.
- EXTINGUISH ANY OPEN FLAME, OR OTHER POTENTIAL IGNITION SOURCE.
- DO NOT USE APPLIANCE UNTIL REPAIRS ARE MADE BY QUALIFIED LP GAS DEALER.
- DO NOT ATTEMPT TO MAKE REPAIRS YOURSELF!
- DO NOT USE ANY APPLIANCE, OR PARTS, EXPOSED TO OR DAMAGED BY FIRE!
- If not leaking, carefully light appliance and use according to the instructions in this manual. This appliance regulator and tank valve connection may contain two or more important safety features such as Excess Flow Control and High Temperature Activated Shutoff.
- FAILURE TO FOLLOW THESE INSTRUCTIONS MAY RESULT IN AN EXPLOSION OR FIRE THAT MAY CAUSE PROPERTY DAMAGE, SERIOUS INJURY OR DEATH!
- NEVER LEAVE THIS APPLIANCE UNATTENDED WHILE IN USE! NOT TO BE USED BY CHILDREN!
Lighting the side burner
- Open the side burner lid.
- Ensure the control knob is in the “OFF” position.


- Turn on the gas supply at the gas cylinder.
- Push control knob down and turn to ignition position.
- Hold control knob in for at least 10 seconds to ensure the burner stays lit.
- If ignition does not occur in 5 seconds, turn the burner control off, wait 5 minutes and repeat the lighting procedure. Do not continuously hold the control knob in as you may cause a build up of gas.
- In windy conditions shield from wind to ensure easy lighting.
- Turn control knob to alter burner settings as required.
Manual Lighting Instructions
- Place a lit match beside the burner (at the same location as the sparker shield).
- Push and turn the control knob to the high position.
Always protect your hands when handling anything near cooking surface of the side burner.
Turning off your side burner
Push the control knob in and turn to the “OFF” position. Turn the gas off and disconnect the cylinder when not in use. The regulator must be disconnected when the side burner is not in use.
FOOD SAFETY
Please read and follow this advice when cooking on your side burner:
- Always wash your hands before and after handling uncooked meat and before eating.
- Always keep raw meat away from cooked meat and other foods.
- Before cooking, ensure side burner surfaces and tools are clean and free of old food residue.
- Do not use the same utensils to handle cooked and uncooked foods.
- Ensure all meat is cooked thoroughly before eating.
![]()
![]()
![]()
![]()
![]()
![]()
![]()
![]()
- To reduce the risk of undercooked meat, cut open to ensure it is cooked all the way through internally.
![]()
![]()
![]()
![]()
![]()
![]()
![]()
![]()
![]()
![]()
- After cooking on your side burner always clean the cooking surfaces and utensils.
CARE AND MAINTENANCE
- Regularly clean your side burner between uses and especially after extended periods of storage.
- Ensure the side burner and its components are sufficiently cool before cleaning.
- Do not leave the unit exposed to outside weather conditions or stored in damp, moist areas.
- Never douse the unit burner with water when its surfaces are hot.
- Never handle hot parts with unprotected hands.
- In order to extend the life and maintain the condition of your side burner, we strongly recommend that the unit is covered when left outside for any length of time, especially during the winter months.
![]()
![]()
![]()
![]()
- Keep outdoor cooking area with gas appliance clear and free from combustible materials, gasoline and other flammable vapors and liquids.
- Do not obstruct the flow of combustion and ventilation air.
Burner (2) Maintenance
- In normal usage, burning off the residue after cooking will keep the burners clean.
- The burners should be cleaned annually, or whenever heavy build-up is found, to ensure that there are no signs of blockage (debris, insects) in either the burner portholes or the venturi tubes of the burners fitted over the valve outlets. A blocked burner can lead to a fire beneath the grill.
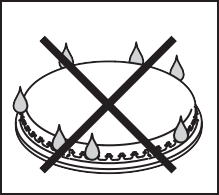
- Visually inspect the operation of the burners. See figure below showing correct burning.
There should be flame from all portholes
.


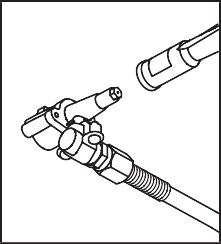
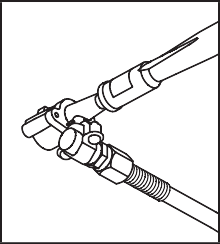
See figures below showing correct burner installation with respect to the burner orifice.


STORAGE
Do not leave your side burner uncovered when not in use. Store your side burner in a cool dry place like a shed or garage when not in use to protect against the effects of extreme weather conditions, particularly if you live near coastal areas.Prolonged exposure to sunlight, standing water, sea air/saltwater can all cause damage to your appliance. (A cover may not be sufficient to protect your appliance in some of these situations).
- Cover the burners with aluminium foil in order to prevent insects or other debris from collecting in burner holes.
- If the side burner is to be stored indoors, the gas cylinder must be disconnected and left outside. The gas cylinder should always be stored outside, in a dry, well-ventilated area, away from any sources of heat or ignition. Do not let children tamper with the cylinder.
- Cylinders must be stored out of the reach of children and must not be stored in a building, garage or any other enclosed area.


DANGER
Do not put side burner in storage or travel mode immediately after use. Allow the side burner to cool to touch before moving or storing. Failure to do so could result in fire resulting in property damage, personal injury or death.
TECHNICAL INFORMATION
This side burner is designed for outdoor use only using propane gas. Please read all accompanying documentation carefully.
Type of gas: Propane RegulatorPressure: 11″ per W.CHeat input: 10000BTU/HR*1 Injector Size: 0.9mmCountries intended for: U.S.A / C.A Model nr: 40490006
The pressure regulator and hose assembly supplied with the outdoor cooking gas appliance must be used. Replacement pressure regulators and hose assemblies must be those specified by the outdoor cooking gas appliance manufacturer. The cylinder used must include a collar to protect the cylinder valve.
- Do not store a spare LP gas cylinder under or near this appliance;
- Never fill the cylinder beyond 80 percent full; and
- If the information in 1 and 2 is not followed exactly, a fire causing death or serious injury may occur.
Inspect the hose before each use of the outdoor cooking gas appliance. If it is evident there is excessive abrasion or wear, or the hose is cut, it must be replaced prior to the outdoor cooking gas appliance being put into operation. The replacement hose assembly shall be that specified by the manufacturer.
HOW TO REACH US IF YOU NEED OUR SERVICE
Contact your local IKEA store. You will find the address and phone number in the IKEA catalogue or at www.IKEA.com To ensure that we provide you with the best assistance, please read carefully the Assembly Instructions and/or the User Instruction section of this manual before contacting us.
TROUBLESHOOTING


|
PROBLEM |
POSSIBLE CAUSE |
SOLUTION |
|
Burner will not light using the ignition system |
LP gas cylinder is empty |
Replace with full cylinder |
|
Faulty regulator |
Have regulator checked or replace |
|
|
Obstructions in burner |
Clean burner |
|
|
Obstructions in gas jets or gas hose |
Clean jets and gas hose |
|
|
Electrode wire is loose |
Reconnect wire |
|
|
Electrode or wire is damaged |
Change electrode and wire |
|
|
Low flame or flashback (fire in burner tube – a hissing or roaring noise may be heard) |
LP gas cylinder too small |
Use larger cylinder |
|
Obstructions in burner |
Clean burner |
|
|
Obstructions in gas jets or gas |
Clean jets and gas hose |
|
|
Windy conditions |
Use BBQ in a more sheltered position |
|
|
Gas valve knob difficult to turn |
Gas valve jammed |
Replace gas valve |
IKEA GRILLSKAR User Manual – IKEA GRILLSKAR User Manual –
[xyz-ips snippet=”download-snippet”]


