![]() ILIFE V80Robotic Vacuum CleanerUser Manual
ILIFE V80Robotic Vacuum CleanerUser Manual
For more detailed information, please visit: www.iliferobot.com
Important Tips
AV80 contains electronic parts. Do Not submerge the robot or spray it with water. Clean with a dry cloth only.
For Best Usage
- Place the charging dock against the wall in a wide open area. Do not put the charging dock near a door or stairs.
- Remove excess clutter on floor before cleaning (e.g. electrical cords, cables, small objects, etc..)
- Choose MAX mode to clean an area of highly concentrated dirt and dust.
Maintain Peak Performance
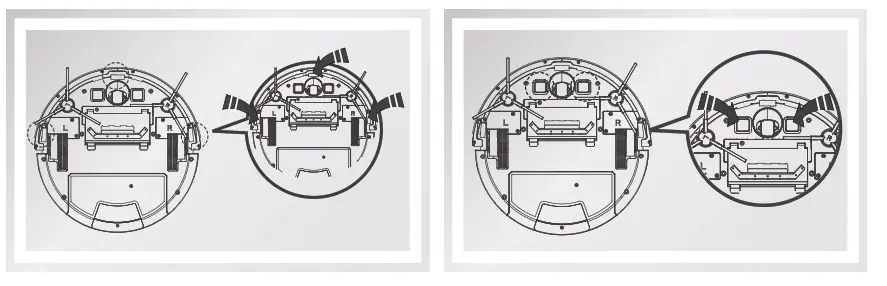
- Clean the side brush and ventilation unit when they become dirty and replace them if they become damaged. (See figure 1)
- Remove the nose wheel and holder by pulling the wheel straight up. Clean the debris and hair from the wheel cavity as well as the axle that holds the wheel in place. This should be done once a month.
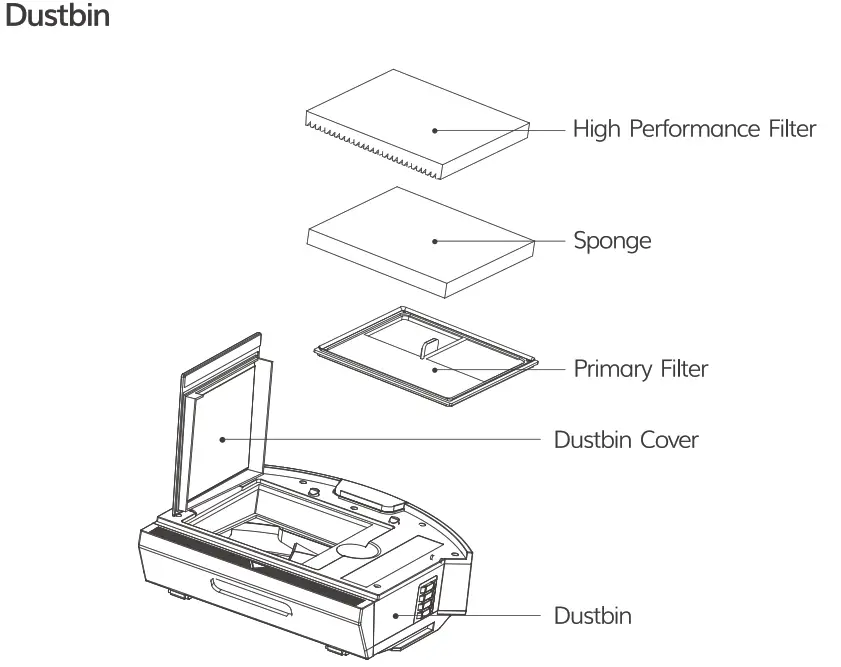
- Empty dustbin and clean filter after each use. Replace a new filter every month.

Safety Instructions
Before using this product, please read the following safety instructions and follow all normal safety precautions.
- Read this user manual thoroughly and carefully before using this product.
- Keep this user manual.
- Any operation or use of this product in any way other than that described in this manual may lead to serious injury or product damage.
WARNING
- Only certified technicians may disassemble the product. Users are not allowed to disassemble or repair the product.
- Only use the AC adapter provided by the factory. Using other AC adapters may cause electric shock, fire or product damage.
- Do not touch the power cord, plug or adapter when your hands are wet.
- Keep loose clothing and fingers away from being drawn into the product’s wheels.
- Keep the robot vacuum away from all flammables.
- Never clean the robot while it is on the charging dock or plugged in directly. Unplug the robot and turn off power switch when cleaning.
- Keep the AC power cord tucked away from becoming damaged in any way.
- This product is to be used only indoors. Not intended for outdoor use.
- Do not sit on top of the product or attach an object on the top of it.
- Do not use this product in wet or moist environments.
- Before use, remove all the objects that could get caught in the brushes or suction passage.
- Do not place this product on furniture or platforms where it can fall and be damaged.
- Turn the power switch off when not in use for a long period of time or when transporting the unit.
- To avoid battery damage please check whether adapter and outlet are properly connected.
- To avoid any tripping hazards or injuries please inform all the people in the house when this product is in use.
Product Operation
List of Accessories
| Serial Number | Description | Q’ty |
| 1 | Main Body (battery included) | 1 |
| 2 | Charging Dock | 1 |
| 3 | Remote Control (battery not included) | 1 |
| 4 | Power Adapter | 1 |
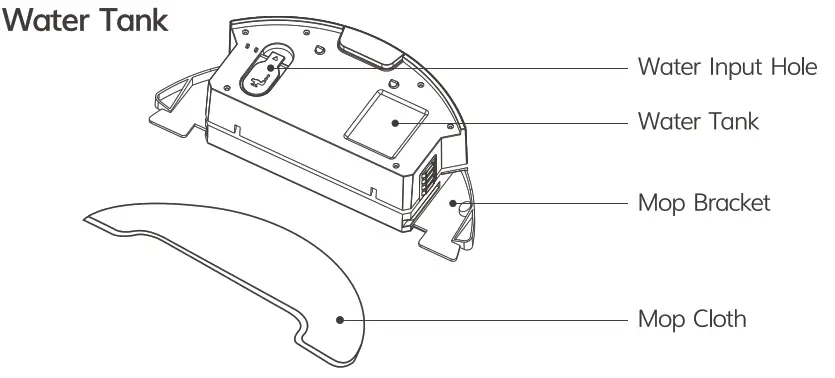
| 5 | Water Tank | 1 |
| 6 | Mop Cloth | 1 |
| 7 | Cleaning Tool | 1 |
| 8 | User Manual | 1 |
| 9 | Extra Side Brushes | 1 for each |
| 10 | High Performance Filter | 1 |

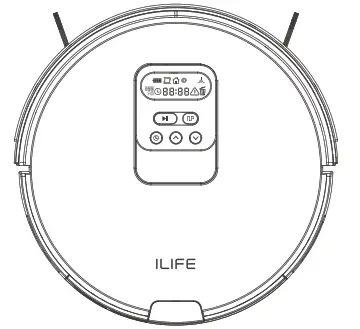
Robet Panal Function
| Icons on Display Panel | Icon Description |
 |
Battery |
| Trouble Alerts | |
| Side Brush Malfunction | |
| Dustbin Malfunction | |
| Edge Mode | |
| Self-charge | |
| Spot Mode | |
| Time Display | |
| 12hour Format | |
| Timer | |
| Button Icons | Icon Description |
 |
Clean / Pause Button |
| Path Mode | |
| Timer | |
| Up | |
| Down |
Product parameters
| Classification | Rem | Detail |
| Mechanical Specifications | Diameter | 330mm |
| Height | 80mm | |
| Net weight | 2.7kg | |
| Electrical Specifications | Voltage | 14.4V-14.8V |
| Battery | Li-ion 2600mAh | |
| Power | 22W | |
| Charging type | Auto Charging / Manual Charging | |
| Cleaning Specifications | Capacity of dustbin | 0.75 L |
| Capacity of water tank | 0.3 L | |
| Cleaning mode | Classical/Spot/Edge/Daily Schedule | |
| Duration per recharge | <300 mins | |
| Duration per cleaning | 80 mins | |
| Button Types | Mechanical Buttons | |
| Display Panel | LCD Screen |
Reminder :The Company reserves the right of final decision on the interpretation of theseTerms and Conditions.
Remote Control Operation
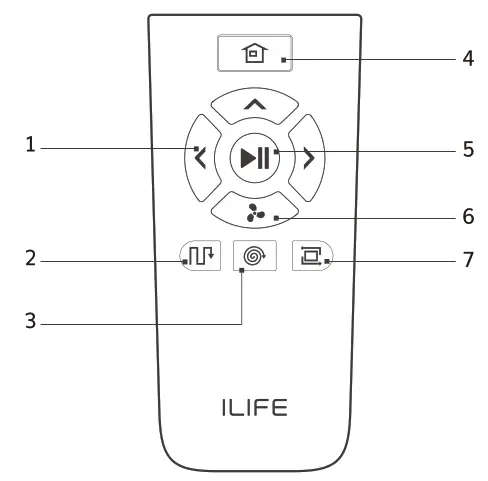
- Direction Buttons
- Path Mode
- Spot Mode
- Self-charge Button
- Clean/Pause Button
- Max Mode
- Edge Mode
1. Clean/Pause Button![]()
- Press the button to switch the robot from Sleep Mode to Select Mode.
- Press the button when in Select Mode to start cleaning.
- Press the button to Pause the robot during its operation.
2. Direction ButtonsA. “∧” Forward
- Press the button to move the robot forward.
Attention: The Forward button doesn’t work during the operation of the robot.B. “![]() ” MAX Mode
” MAX Mode
- Under the Cleaning Mode, to clean dust traffic area, please press “
 ” to increase the suction level and then vacuum will go to deep cleaning mode, “Hi” will be shown on the display panel. Press “” again to switch back to normal cleaning mode. “Lo” will be shown up on the display panel.
 - Under the Mopping Mode, the speed of water dropping can be changed according to the actual environment. Press “ to change different levels and each level will be shown on the display panel as 1(low), 2(middle), 3(high). The default level is middle.
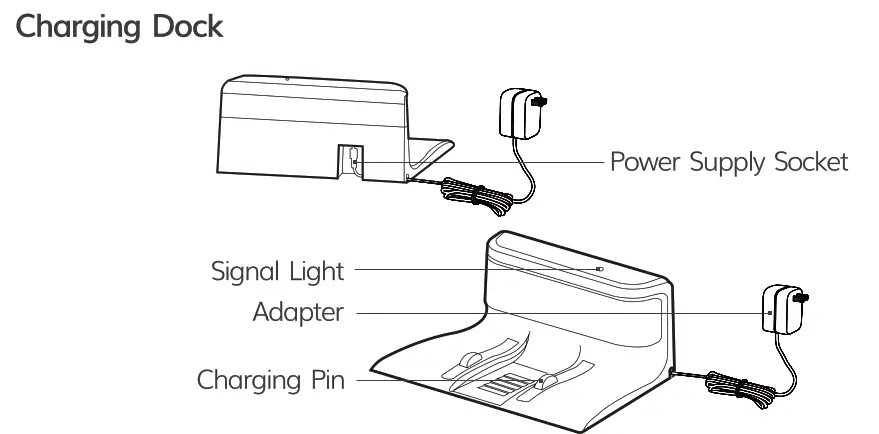
1. Placement of Charging Dock
- Connect the adapter with the charging dock.
- Placement of the charging dock: place the charging dock against the wall horizontally and there must be no object on the left and right side within one meter and in the front within two meters. There must also be no reflective object such as a mirror around the dock.
- Connect the power.* Reminder: When the charging dock is connected to the adapter, the signal light of the dock will light up.

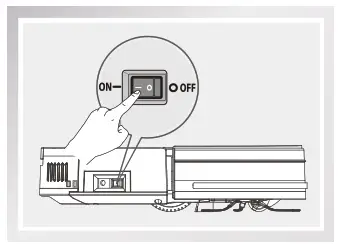
2. Turn on The Robot
- Turn on the power button on the side, “— ” for ON, ” 0 ” for OFF.*Reminder: After the robot finishes its work, please do not turn it oft, keep it recharged for next run.
START/PAUSE/SLEEPSleeping mode: the power button is ON, the main switch and display panel does not light up, and the robot is in the pause status.Selected mode: the power button is ON, the main switch pulses and the display panel lights up, and the robot is in the pause status.Claeaning mode: the robot is the status of operation, the green light is on, and the display panel displays the status of operation.1. START
- Make sure that the power switch on the side of the robot is “ON”.
- Press button or button to start operation.
- Press button or on the remote control to start operation.
* Reminder. If the robot is in the Sleep Mode, press button ![]() to wake up the robot and enter the Select Mode, then press button
to wake up the robot and enter the Select Mode, then press button ![]() once again, and the robot will automatically start operation.
once again, and the robot will automatically start operation.2. PAUSE
- “Pause” will switch the robot from Cleaning Mode to Select Mode, and it can be enabled by pressing button on the remote control or button on the robot.* Reminder. You can operate the machine again after it’s paused.
3. SLEEP
- To enter the Sleep Mode:A: Press button for three seconds.B: The machine will automatically enter the Sleep Mode if no action is taken for 3 minute.
Schedule Cleaning Mode• Create a schedule and let it work automatically everyday.1. ![]() Clock Time SetupA. When the vacuum is turned on, it will beep while pressing the button
Clock Time SetupA. When the vacuum is turned on, it will beep while pressing the button ![]() for 2 seconds, and the Hour part on the display screen will blink, showing that it has entered the state of time setting. Button ∧and ∨ are used to adjust the time numbers. Press button
for 2 seconds, and the Hour part on the display screen will blink, showing that it has entered the state of time setting. Button ∧and ∨ are used to adjust the time numbers. Press button ![]() to switch between hour, minute, 12/24 hour and week,B. 12/24 Hour Format Setup: Press button
to switch between hour, minute, 12/24 hour and week,B. 12/24 Hour Format Setup: Press button ![]() to switch between 12/24 hour format, and the display screen will show ON\OFF respectively.C. When time setting is completed, press button
to switch between 12/24 hour format, and the display screen will show ON\OFF respectively.C. When time setting is completed, press button ![]() to save the setup.Reminder
to save the setup.Reminder
- The robot will exit the setting mode automatically after 15 seconds without any operation, and the setup will not be saved.
- The current setup will not succeed if button isn’t pressed.
2. ![]()
![]() Schedule Cleaning Timer Setup Once the schedule is set up successfully, the robot will work on time every day at the certain time. If the power switch at the side of the robot is turned off, the schedule will be lost and need to be reset. A. When the vacuum is turned on, quickly press the button
Schedule Cleaning Timer Setup Once the schedule is set up successfully, the robot will work on time every day at the certain time. If the power switch at the side of the robot is turned off, the schedule will be lost and need to be reset. A. When the vacuum is turned on, quickly press the button ![]() , it will beep and the signs of “
, it will beep and the signs of “![]() ” and ” DAY ” on the display screen will blink, showing that it has entered the state of schedule setting mode. Press button
” and ” DAY ” on the display screen will blink, showing that it has entered the state of schedule setting mode. Press button ![]() and & to switch from Monday to Sunday. Press button
and & to switch from Monday to Sunday. Press button ![]() to switch between hours and minutes. Press button ∧and ∨ to adjust the time numbers.B. when the schedule setting is completed, press button
to switch between hours and minutes. Press button ∧and ∨ to adjust the time numbers.B. when the schedule setting is completed, press button ![]() to save the setup.Attention:
to save the setup.Attention:
- The robot will exit the setting mode automatically after 15 seconds without any operation, and the setup will not be saved.
- The current setting will not succeed if button isn’t pressed.
3. Cancel The ScheduleWhen the machine is turned on, quickly press the button ![]() , it will beep and the signs of “
, it will beep and the signs of “![]() ” and ” DAY ” on the display screen will blink, showing that it has entered the state of schedule setting mode. Press button ∧ and ∨ to switch from Monday to Sunday. Press button
” and ” DAY ” on the display screen will blink, showing that it has entered the state of schedule setting mode. Press button ∧ and ∨ to switch from Monday to Sunday. Press button ![]() to cancel the day schedule, and the display screen will show “–:–“. If the button
to cancel the day schedule, and the display screen will show “–:–“. If the button ![]() is pressed again, the schedule will be opened, and the display screen will show the previous schedule time.
is pressed again, the schedule will be opened, and the display screen will show the previous schedule time.
Robet Operation
- Clean/Pause ButtonA. Press the button to switch the robot from Sleep Mode to Select Mode.B. Press the button when in Select Mode to start cleaning.C. Press the button to Pause the robot during its operation.
- Path Mode A. Press the button to switch the robot from Sleep Mode to Select Mode.B. Press the button under the Select Mode to start cleaning in the Path Mode.C. Press the button to Pause the robot during its operation.
- Direction ButtonsA. Press the button to increase the number under the “∧” mode or Clock Mode.B. Press the button to decrease the number under the “∨” mode or Clock Mode.
Mode SelectionThere are several cleaning modes to fit various floor conditions for deep cleaning. You can make a choice with the remote control.
- You can use the remote control to switch between various modes.
- You need to make sure that the robot is awake before starting any of the following modes. The power is on, the button light is green. The display panel is on, and the robot is paused.
1. Auto Mode
- Auto cleaning mode cleans home automatically and does a clean to places it can reach.*Reminder: Press the button on the robot or button on the remote control to enter Auto Mode.
2. Spot Mode Place the robot near the required area, and then press button ![]() on the remote control to start cleaning in Spot Mode.
on the remote control to start cleaning in Spot Mode.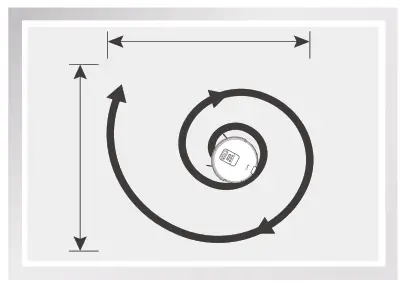
3. Edge ModePlace the robot near the required area, and then press button ![]() on the remote control to start cleaning in Edge Mode.
on the remote control to start cleaning in Edge Mode.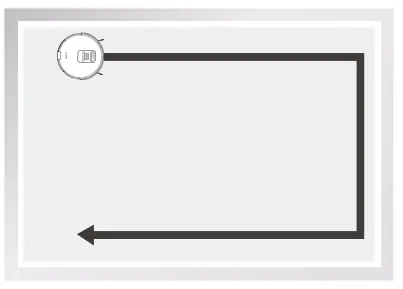
4. MAX ModeIf there is heavy dust during the cleaning process, please press the button![]() on the remote control and “Hl” will show up on the display panel to enhance the vacuum power for deep cleaning; press again to switch back to normal vacuum power, and “LO” will show up on the display panel.
on the remote control and “Hl” will show up on the display panel to enhance the vacuum power for deep cleaning; press again to switch back to normal vacuum power, and “LO” will show up on the display panel.
5. Path ModeThe robot start cleaning in path mode, automatically calculates the missing area during the cleaning process, cleaning more efficient.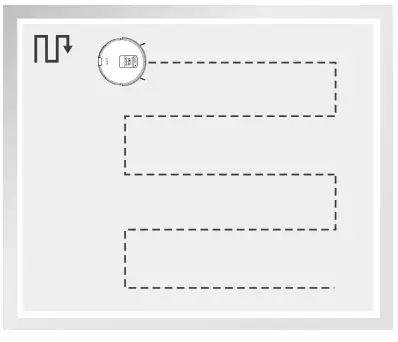
6. Mopping ModeUnder the mopping mode, the robot will start mopping from the first 7m*7m small areas in front of the start position. During the process of mopping, press button ![]() on the remote control to switch the speed of water dropping.
on the remote control to switch the speed of water dropping.
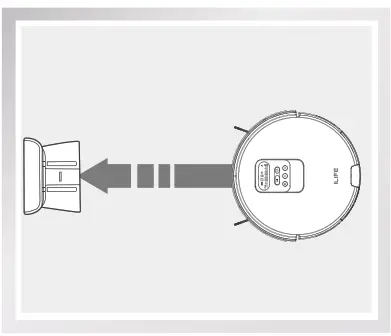
7. Self-charge Mode
- The robot can sense lower power during the cleaning process and automatically activate Self-charge Mode and search for the charging dock.
- You can also use on the remote control to command the robot to activate the mode.
Regular Maintenance
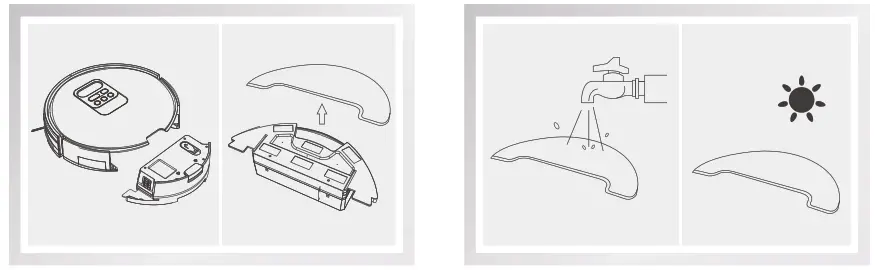
Cleaning of Water Tank Components
- Clean The Mop ClothRemove: after mopping, please remove the water tank components and the mop cloth.Maintenance: rinse and air dry the mop cloth.
- Clean The Water TankRemove: after mopping, remove the mop cloth and the components, drain the remaining water in the water tank.Maintenance: dry the water tank by hand and then air dry it.
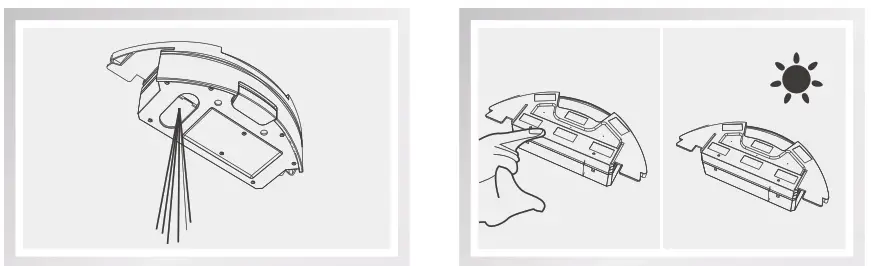
Sensors and Charging Pins Cleaning
- Please use a cleaning tool or soft cloth to clean the sensors or charging pins as illustrated below.
*Reminder:The charging pins should be cleaned in a timely manner if it’s contaminated.
 Frront wheel:Make sure the front wheel housing is not jammed by debris, otherwise the robot’s cleaning performance will be affected.
- Pull the wheel up and out vertically and clean the wheel, wheel holder and wheel housing.

Troubleshooting
Replace Accessories Regularly
| ACCESSORIES | MAINTENANCE | REPLACEMENT |
| Dustbin | After each use | N/A |
| High Performance Filter | Weekly
(Twice a week for families with pets) |
Bimonthly |
| Spinning Side Brush | Weekly | Depends |
| Charging Dock | Weekly | N/A |
Warning Code Table on Display PanelWhen a problem happens, the red light will be on and short prompt tones will sound.( • numbe of alert sounds )
| Serial Number | Alert | Error Message | Cause | Solution |
| 01 | • | E11 |
Left wheel malfunction | Check left wheel |
| 02 | • | E12 |
Right wheel malfunction | Check right wheel |
| 03 | • | E13 |
Left side brush malfunction | Check left side brush |
| 04 | • | E14 |
Right side brush malfunction | Check right side rush |
| 05 | • | E21 |
Robot suspended | Put the robot on the floor |
| Serial Number | Alert | Error Message | Cause | Solution |
| 06 | • • | E22 |
Lower view component malfunction | Clean the lower view sensor |
| 07 | • • | E23 |
Bumper malfunction | Check thebumper |
| 08 | • • • | E31 |
The robot is trapped | Move the robot to an open space and restart it |
| 09 | • • • | E32 |
Dustbin malfunction | Check the dustbin |
| 10 | • • • | E33 |
Woter container malfunction | Check the water container |
| 11 | ••• • • | E41 |
Battery malfunction | Restart the robot |
| 12 | •• •• • • | E42 |
Front view component malfunction | Check the front view component |
| 13 | •• •• • • • | E43 |
Gyro module malfunction | Restart the robot |
| 14 | The dustbin is full or the fitter needs to be cleaned | Clean the dustbin or the fitter | ||
| 15 | LO |
Low Battery | Recharge |
* Reminder:If the problem remains unresolved, please try the following:
- Switch the power button on the side of the robot off and on and restart it.
- If the problem remains unresolved after restart, please contact !LIFE Customer Service listed at end of manual.
 report this ad
For more Detailed information ,Please visit: www.liferobot.com
[xyz-ips snippet=”download-snippet”]