iLuv TB100 Buttonless True Wireless Stereo Earbuds with Charging Case User Manual![]()
WHAT’S INCLUDED
POWER ON AND PAIRING
1. Before Using
Please charge your Bubble Gum True Wireless Air before use . .. Featured with minimalistic buttonless tap control, simply take the earbuds out of the charging case and wear to startusing. Bubble Gum True Wireless Air will be automatically powered on shortly and wait to be paired.
IPX6 rated Bubble Gum True Wireless Air can resist high pressure of heavy water spray but must not be merged inside water long time.
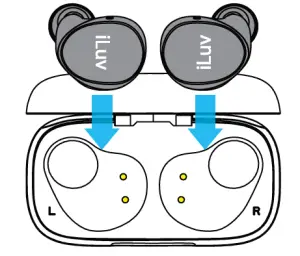
2. Wear Earbuds
Each earbud is marked with L for the left and R for the right ear, and differently angled for each ear shape. Insert them into your ears and adjust to snug comfortably. To choose thebest fit, try different sizes of ear tips too.
3. Power On and Pairing
Bubble Gum True Wireless Air earbuds will be automatically turned on when removed from the charging case while you put them into your ears.A. While power-on takes place automatically in the first few seconds, “Poweron”will be heard and the earbuds will be ready to be paired.B. When previously paired device is not found, you will hear “Please pair to your device”.
C. Turn on Bluetooth on your device
Once paired, open music app on your mobile device to play/ control music and adjust volume to your desired level. Earbudvolume buttons are removed to provide IPX6 water proof.
DOUBLE TAP (Music/Hands-Free Calling)
To play/pause your music or answer/hang up the call, simply tap twice either earbud:

Note. Tapping sensitivity has been tuned to accept wide range of patterns of individuals. Please try your tapping style with a little bitmore speed and pressure to be familiarized with better recognition.
CHARGING
- To charge your earbuds To keep the earbuds charged, put them in the case while not using .
- To charge your case Plug the micro USB cable into the micro USB connector on your case. Then plug the other end of the cable into a standard USB charger or port.

- Checking the Charge StatusA. Earbuds• Earbud LEDs will show charge status while being charged in the case• When fully charged, earbud LEDs will be turned offB. Charging case• LED will show the charge level of the case while connected to charger• All LEDs will light on solid when charging is completed• LED will show the battery level of the case for 8 seconds when the earbud is put back in the case.
BATTERY LIFE
Use all day with 20 hours battery life. Get up to 6 hours of battery on a single charge, and up to 20 hours in total with the included compact charging case. For a quick charge, just put earbuds back in the case for 20 minutes and get more than 2 hours of listening time.
**Ona single charge at 80% volume
POWER ON/OFF
1. Power On the Earbuds Take the earbuds out of the charging case and ·,• ·. ‘., they will automatically turn on and connect tothe previously paired device.
2. Power Off the Earbuds
Simply put the earbuds in the charging case and close the lid.
3. Auto Power Off
A. To conserve battery, earbuds will be automatically powered off when it is out of range of your device for 5 minutes.B. To power on the earbuds again, put them in the charging case and take them out.
TROUBLESHOOTING
As a simple tweak to resolve any problems including L/R channel disconnection or pairing/connectivity issues with the mobile device, place the earbuds to the charging case andleave the lid closed for 15 seconds, and take them out.
FAQ (FREQUENTLY ASKED QUESTIONS)
- How can I turn on or off the buttonless earbuds? Earbuds will be automatically turned on when removed from the charging case and turned off when placed back to the charging case.
- How can I play/pause music or receive a call on earbuds? Simply double tap either earbud to play/pause music while it’s playing, or take a call while ringing or hang up during the call.
- How can I control volume on music playback or a call? Use the volume+ – buttons on your mobile device to control volume.
- What will affect to the playtime? Specified playtime is measured at 80% volume in the lab condition. Actual playtime can be varied by the volume level and acoustics of thecontent. Connection status with the device can also affect.
NOTE: This equipment has been tested and found to comply with the limits for a Class B digital device, pursuant to part 15 of the FCC Rules. These limits are designed to provide reasonable protection against harmful interference in a residential installation. This equipment generates uses and can radiate radio frequency energy and, if not installed and used in accordance with the instructions, may cause harmful interference to radio communications. However, there is no guarantee that interference will not occur in a particular installation. If this equipment does cause harmful interference to radio or television reception, which can be determined by turning the equipment off and on, the user is encouraged to try to correct the interference by one or more of the following measures:
– Reorient or relocate the receiving antenna.– Increase the separation between the equipment and receiver.-Connect the equipment into an outlet on a circuit different from that to which the receiver is connected.-Consult the dealer or an experienced radio/TV technician for help
Changes or modifications not expressly approved by the party responsible for compliance could void the user’s authority to operate the equipment.This device complies with Part 15 of the FCC Rules. Operation is subject to the following two conditions:(1) this device may not cause harmful interference, and(2) this device must accept any interference received, including interference that may cause undesired operation.Hereby, iluv Creative Technology declares that the radio equipment type Bubble Gum Air is in compliance with Directive 2014/53/EU. Thefull text of the EU declaration of conformity is available at the follow internet address: www.iluv.com
report this adTROUBLE SHOOTING: When the battery is completely drained while not in use for a long period of time, try charging it a few times as it will resume its normal charging process. Restart the charging process if the charging indicator does not respond or is turned off after a few minutes.
Read More About This Manual & Download PDF:
[xyz-ips snippet=”download-snippet”]