![]() Quick Start GuideCruiserwww.imoulife.com
Quick Start GuideCruiserwww.imoulife.com
Welcome
Thank you for choosing IMOU.We are devoted to providing you easy smart home products.If you have problems using the product, please contact our service team before returning your product.Our service mail: [email protected]Frequently asked questions can be found at imoulife.com/support/help
 www.imoulife.com/web/support/help
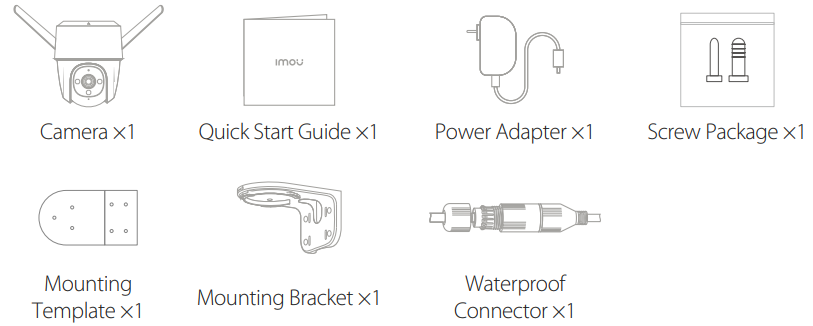
Package content
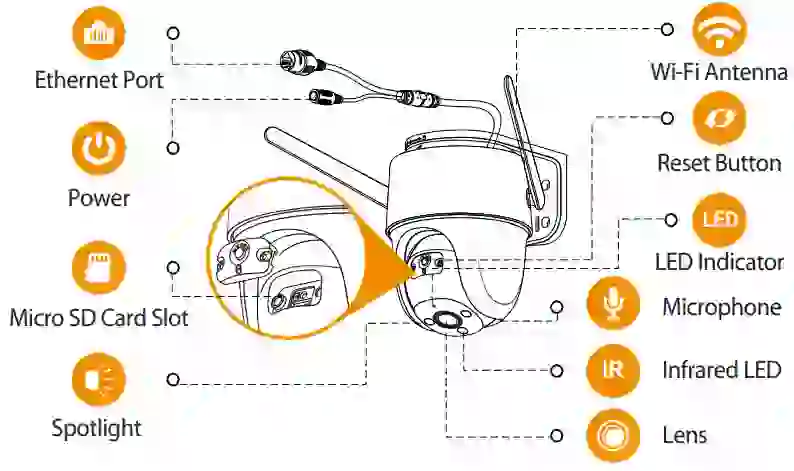
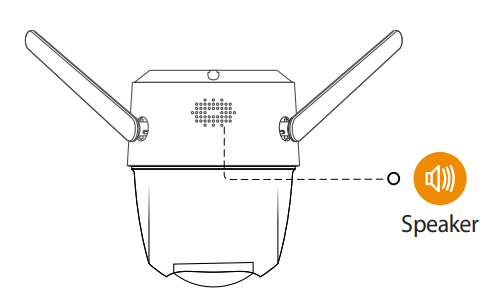
Camera introduction
![]() Note: Disconnect the camera from the power before installation or taking out its SD card.
Note: Disconnect the camera from the power before installation or taking out its SD card.
![]() Note:
Note:
- Press and hold the reset button for 10 s to reset the camera.
- Double-press the reset button to enable the camera’s hotspot.
See the table below for definitions of the camera’s LED behaviors.
| LED Indicator Status | Device Status |
| off | • Power off/LED turned off• Rebooting after reset |
| Solid red | •Booting• Device malfunction |
| Flashing red | • Network connection failed• Pairing failed |
| Flashing green | • Ready for network configuration• Ready to pair |
| Solid green | • Operating properly |
| Flashing green and red alternately | • Updating firmware |
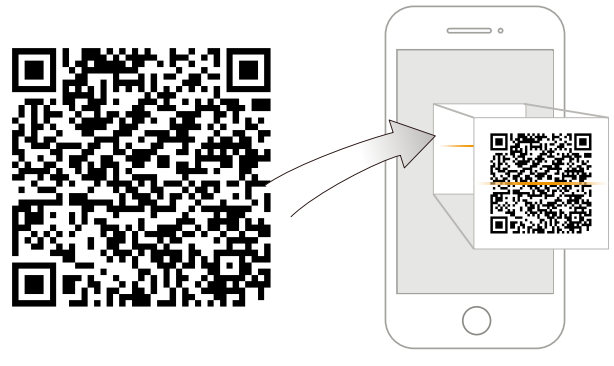
Download the APP

Tips
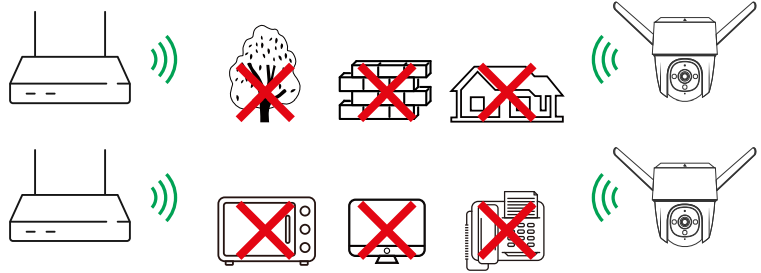
To ensure the best possible wireless performance, please make sure there are no obstacles and electromagnetic interference between the camera and router.
Add device to the APP

Installing Camera
![]() Note:Make sure that the mounting surface is strong enough to hold at least three times the weight of the camera and the bracket.
Note:Make sure that the mounting surface is strong enough to hold at least three times the weight of the camera and the bracket.
Ceiling Mount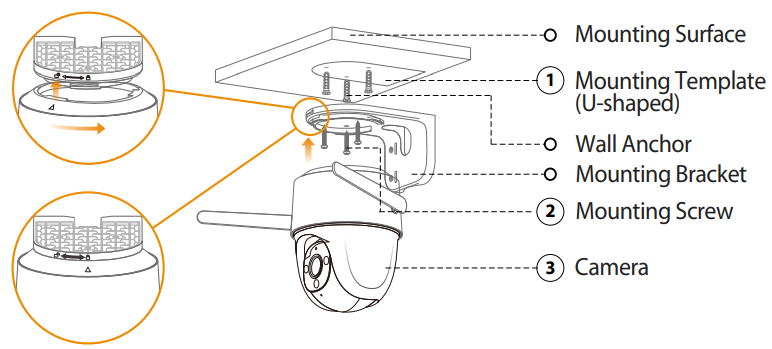
- Peel off the U-shaped mounting template and stick it to the desired installation area.
- Drill holes into the mounting surface as the mounting template marks and then insert wall anchors as needed.
- Secure the mounting bracket to the surface with included mounting screws.
- Align
 on the top of the camera with on the bracket, then fit the two parts together.
 - Rotate the camera counterclockwise until it is locked. Make sure align with.
- Power on the camera and then adjust its angle properly.
Wall Mount
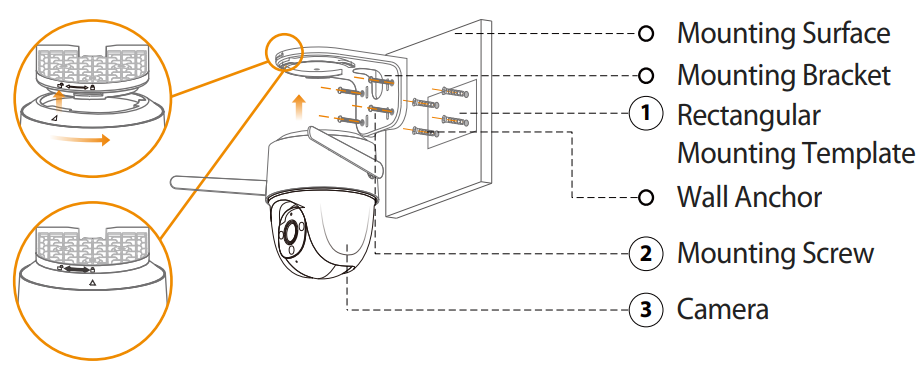
- Peel off the rectangular mounting template and stick it to the desired installation area.
- Drill holes into the mounting surface as the mounting template marks and then insert wall anchors as needed.
- Secure the mounting bracket to the surface with included mounting screws.
- Align on the top of the camera with on the bracket, thenfit the two parts together.
- Rotate the camera counterclockwise until it is locked. Make sure align with.
- Power on the camera and then adjust its angle properly.
![]() Note:
Note:
- Make sure that the pole is strong enough to hold at least three times the weight of the camera and the bracket.
- The hoops are not provided. Please prepare them in advance.
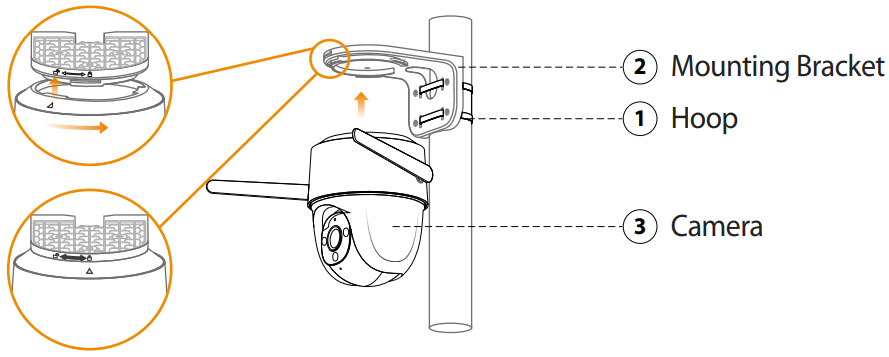
- Thread the hoop through the mounting holes on the bracket, then attach the bracket to the pole.
- Align on the top of the camera withon the bracket, then fit the two parts together.
- Rotate the camera counterclockwise until it is locked. Make sure align with.
- Power on the camera and then adjust its angle properly.

Troubleshooting
| Question | Answer |
| The device cannot boot up or work as expected? | •Check the LED indicator status. If the light is not in green, press and hold the reset button for 10 s to reset the camera. |
| How to connect the camera to another Wi-Fi network? | •If the camera is online, select Device Details > Network Config to change the Wi-Fi connection on the app.•If the camera is offline, reset the camera, and then configure the camera again. |
| Connection takes too long? | •Check if the distance between the camera and the router, and that between the camera and the smartphone is both within 5 m (16.4 ft) during the connection.•Check the Wi-Fi configuration of the router: Select the channel to auto, and the mode to 11 bgn mixed. |
| When the micro SD card is full, how is the recorded video saved? | •When the micro SD card is full, the system will overwrite the previously recorded videos. Save the important information in time. |
| Where are the recorded videos saved? | •If you have activated the cloud storage and installed a micro SD card, \ the recordings will be both saved to the card and cloud. If the cloud storage is deactivated, the recordings are saved to the SD card. Videos recorded during live view or playback is saved on your phone. |
| The device is offline? | Check the indicator status:•Solid green: Check whether the router can connect to the Internet. If the network is connected, restart the camera.•Flashing red: Reset the camera, and then configure the camera again.•Solid red: The camera is faulty. |


![]() @imouglobal
@imouglobal![]() [email protected]
[email protected]![]() www.imoulife.com
www.imoulife.com
References
[xyz-ips snippet=”download-snippet”]