![]()
USER MANUAL • MANUAL DE USUARIO • MODE D’EMPLOI1.7 CU. FT. Compact RefrigeratorModel RC-1176
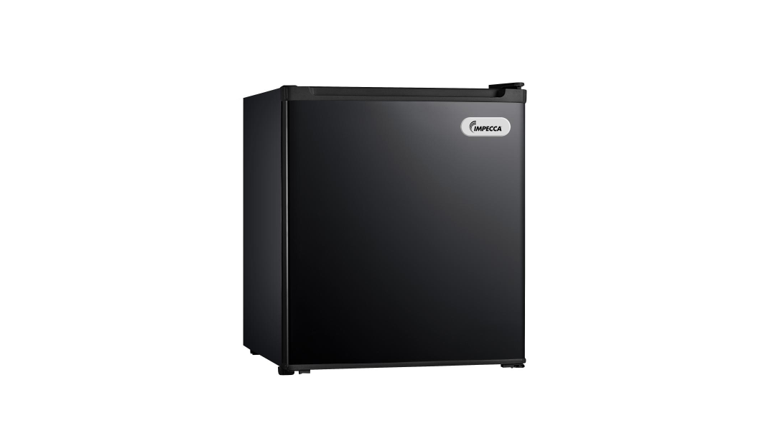
RC-1176W (White / Blanco / Blanc) RC-1176K (Black / Negro / Noir)www.impecca.com
PLEASE READ ALL OF THESEINSTRUCTIONS,AS THEY MAY NOT ALLBE OBVIOUS
INITIAL SAFETY GUIDELINES
- This refrigerator must be properly installed and located in accordance with the installation instructions in this guide before it is used.
- Turning the temperature control dial to the “0” position will stop cooling, but it does not cut off power to the refrigerator.
- Do not allow children to climb, stand or hang on the shelves in the refrigerator. They could damage the refrigerator and seriously injure themselves.
- Do not allow children to hang on the doors, as the refrigerator may be tipped over, causing serious injury. Children should be supervised to ensure that they do not play with the appliance.
- Keep fingers out of the space between the door and refrigerator cabinet. Be careful closing the door when children are present.
- Unplug the refrigerator before any cleaning or repairs.
- If the power cable is damaged, it should be replaced by the manufacturer or a qualified service technician. Do not use the appliance if the cable is damaged.
- Do not leave the refrigerator in extremely cold or warm temperatures.
- Make sure that any ventilation openings on the unit are free of obstruction at all times.
- Do not clean the unit with industrial-grade solvents, or abrasive chemicals. Clean the unit before first use, using the instructions in this guide.
- Do not place heavy items on top of the refrigerator.
- Never install the refrigerator where there is a lot of moisture, or in areas where water can splash.
- Never eat food that may have spoiled because it was stored too long before eating, or if the refrigerator has lost power or malfunctioned.
- Do not use sharp metal tools inside the refrigerator (such as an ice pick to remove ice), as damage may occur.
- If the refrigerator is not used for a long period of time, empty it completely and unplug it.
- This appliance is not intended for use by persons (including children) with reduced physical, sensory or mental capabilities that may lead to improper use or injury from operating the appliance.
 RISK OF ELECTRIC SHOCK
 - This appliance should only be serviced by an authorized technician using genuine spare parts only. To avoid the risk of electric shock, do not attempt to repair the unit yourself. FLAMMABLE REFRIGERANT GAS
- Do not puncture the refrigerant tubing.
- Do not use any electrical devices anywhere inside the unit unless they are recommended by the manufacturer. This includes devices kept in the food storage compartment, or to aid in defrosting.
- Do not store or use gasoline or other flammable vapors and liquids in the vicinity of this or any other appliance.
- Do not place the refrigerator near any heat sources or open flames.
CAUTION: DO NOT USE AN EXTENSION CORD WITH THIS APPLIANCEFOR INDOOR USE ONLYSAVE THESE INSTRUCTIONS
GETTING STARTED
GROUNDING INSTRUCTIONSThis appliance must be grounded. This is accomplished by ensuring the plug is inserted into a properly grounded outlet. The appliance is equipped with a cord that has a grounding wire and plug. When grounded, the risk of electric shock is reduced by providing an escape wire for the electrical current.WARNING: Improper use of the grounding plug can result in electric shock. Consult a qualified electrician or service person if the grounding instructions are not completely understood, or if there is any doubt that the appliance or outlet is not properly grounded.
POWER SUPPLYYou must plug the appliance into a 110V-120V (60Hz) 3-pronged, grounded outlet.
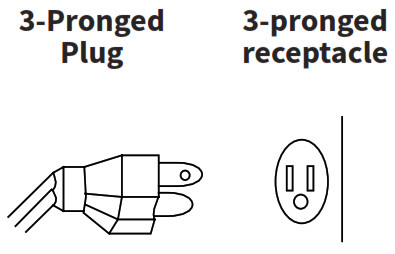
Note: This appliance should have its own dedicated outlet.
BEFORE DISCARDING YOUR OLD REFRIGERATOR:
Remove the door(s), leave the shelves in place (to help prevent children from crawling in), and have it removed from your premises by a qualified technician, in accordance with the instructions provided with the old unit.
- Confirm with your retailer if they’ll remove and responsibly dispose of (or recycle) your old refrigerator.
- Visit www.epa.gov/rad for more information on responsible appliance disposal.
INSTALLING YOUR APPLIANCE
MOVING THE APPLIANCE CAUTION:To avoid serious injury, always ensure that any relocation of the unit is always performed by two people. Use caution when moving the unit to ensure that the refrigeration circuit is not damaged. Never allow the unit to be tilted more than 45°, as this will damage the appliance. Handle the unit around its sides and base. Never lift the unit by holding the edges of the top surface.
INSTALL LOCATIONWhen selecting a location for your unit, ensure the floor is a flat, level surface (indoors) and that the room is well ventilated. Avoid locating your unit near a heat source, such as an oven, stovetop, broiler, or radiator. Avoid exposure to direct sunlight as this may increase electrical consumption. This unit is not designed for use in a garage, or for outdoor installation. Extremely cold ambient temperatures may also prevent the unit from operating effectively. This appliance is intended to be used in household and similar applications, such as individual use in hotel rooms. in kitchen areas inside shops and offices, or for catering and other non-retail applications.
When installing the unit, ensure that there is adequate space for the front door to fully open. Ensure that a minimum of 4 inches of free space is left at the sides, front and rear. At the top of the unit, ensure there is a minimum of 8 inches of free space. This will allow cold air to circulate around the refrigerator and improve the efficiency of the cooling process. Do not place any covering such as a drape or sheet on the unit. Clean the appliance before first use.
LEVELING THE UNITIt’s very important to keep the unit level to prevent unnecessary movement and vibration. This also helps to ensure that the door closes properly. If the door does not close securely, this will prevent effective cooling and possibly damage the refrigerator. To level the unit, turn the adjustable feet at the front of the re- refrigerator clockwise or counterclockwise to raise or lower the corner respectively.
Having a second person push carefully against the top of the refrigerator will relieve some weight off of the leveling legs and make them easier to adjust. However, ensure that the unit has a wall to rest against so that it does not tip over and cause damage or injury.
SERIAL AND MODEL NUMBER
Please record your model number and serial number below. You can find the serial number on a sticker on the back of the refrigerator, or on the product box.Model Number: RC-1176Serial Number: ______________________________Date of Purchase: ____________________________
UNIT OVERVIEW AND FEATURES
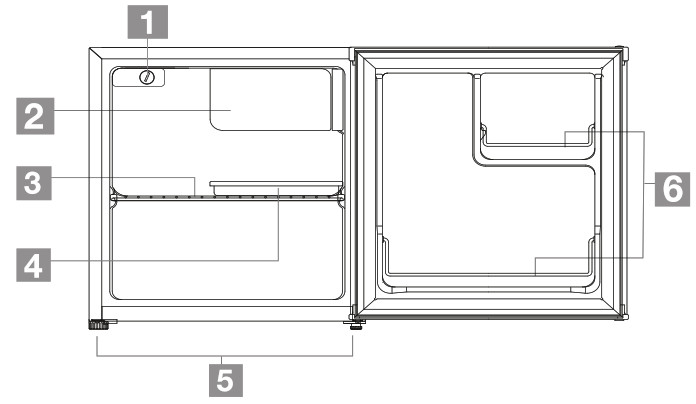
1. Thermostat Control Knob2. Chiller Compartment3. Removable Wire Shelf4. Drip Tray5. Adjustable Leveling Feet (front legs)6. Door Racks
The images in this instruction manual are for illustrative purposes. The physical appearance and options on your particular model may vary.
OPERATION
Clean the unit before first use (see the next section for cleaning instructions). Plug the unit into its power source. Do not turn on the unit if it has been moved within the past 2 hours, as the coolant fluid needs time to settle.The thermostat control knob for the refrigerator and the chiller is located near the chiller compartment. (see picture above).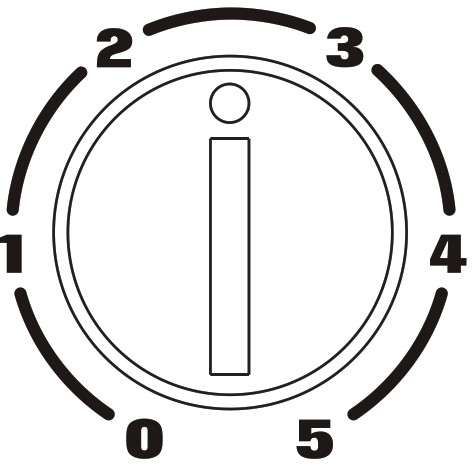 The first time you turn the unit on, adjust the thermostat control knob to the middle setting and give your refrigerator time to cool down completely before adding food; a full 24 hours is recommended. After it is fully cooled, adjust the knob to best suit your needs. “1” is the least cool and “5” is the coolest setting. However, a setting of “3” should be appropriate for home or office refrigerator use. Warmer environments may be more likely to require higher settings (4 or 5). Cooler or winter environments are likely to use a lower setting.
NOTE: Turning the thermostat control knob to the “0” or “OFF” position will stop the cooling cycle but does not shut off the power to the unit.
CLEANING & CARING FOR YOUR APPLIANCE
CLEANINGA clean, damp cloth with mild detergent (or a weak solution of water and baking soda) should be used to clean the interior of the unit after it is defrosted or before initial use. Go over once more with a damp cloth (without soap) to ensure there is no residue left inside after cleaning. For best performance, carefully clean the door gasket/seal as well.Do not splash water on the outside or inside of the unit when cleaning it.
DEFROSTINGYour refrigerator may require manual defrosting. It should be defrosted in the following scenarios:
- The refrigerator will not be used for an extended period of time.
- An ice layer is built up around the chiller compartment of than 1/4 inch.To Defrost:1. Turn the thermostat knob to the “OFF” position and leave the door open.2. Unplug the unit.3. Remove all food. Ideally, the food should be placed in another refrigerator.4. Place a towel or two under the refrigerator to collect the water from the melting frost.5. Leave the door open until all the frost is melted. Usually, several hours (or overnight) will suffice.6. Clean and wipe out the interior of the unit using the instructions in the “cleaning” section above
 1. Turn the thermostat knob to the “OFF” position and leave the door open.2. Unplug the unit.3. Remove all food. Ideally, the food should be placed in another refrigerator.4. Place a towel or two under the refrigerator to collect the water from the melting frost.5. Leave the door open until all the frost is melted. Usually, several hours (or overnight) will suffice.6. Clean and wipe out the interior of the unit using the instructions in the “cleaning” section above
DOOR REVERSAL
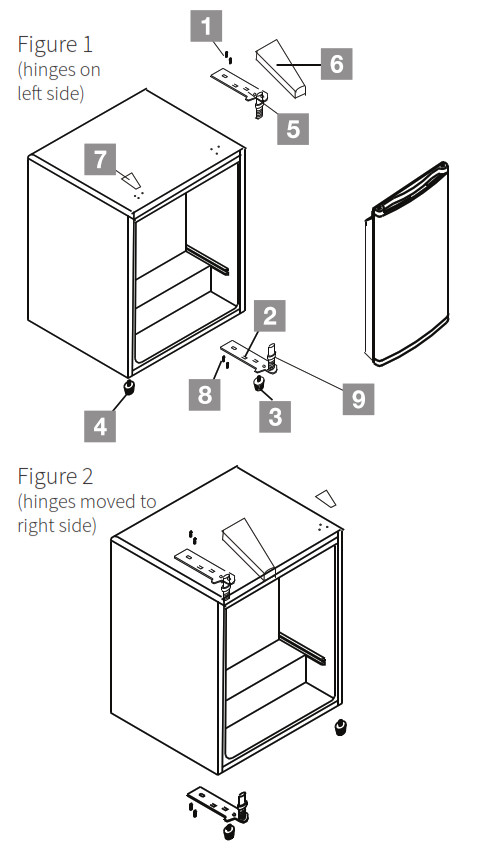
This refrigerator has been built with the door hinges on the right. It is recommended to contact a qualified technician to reverse the door. Do not reverse the door unless you feel you are qualified to do so.
CAUTION:To avoid injury to yourself and/or property, a second person should assist you during the door reversal process.
- Ensure the appliance is unplugged and empty.
- Do not lay the refrigerator on its back or tilt it more than 45° when reversing the door, as this damages the cooling system.
- Make sure to have a second person available, and a strong, solid surface/wall against which to lean the appliance so that it does not slip. This will be necessary when taking off the door.
WARNING: As stated above, ensure that the refrigerator is powered off and unplugged before reversing the door.To reverse the side on which the door opens, follow these instructions:
- Remove the upper hinge cover (6).
- Remove the top screws (1) that hold the upper hinge (5) to the frame. Take away the upper hinge (5).
- Lift the door to remove it. Place it on a padded surface to prevent any scratching.
- Remove the two bottom screws (8) and right front leg (3) that secure the bottom hinge(2), then remove the bottom hinge (2).
- Remove the bolt-pin (9) from the bottom hinge (2) and then insert it back into the same hole, but through the other side of the hole (the hinge will be flipped for the other side).
- Remove the left front leg (4). This will be reversed with the right front leg (3).
- Move the hole cover plate (7) to the other side.
- Install the bottom hinge (2) onto the left side of the low- er frame, securing it with the two bottom screws (8). The bolt pin should be facing up and ready for the door to be placed on it.
- Screw the front legs (3 and 4) back in. Make sure they are now on the opposite side.
- Set the door in place, making sure the door is seated at the bottom hinge. If the door has a hole cover, move it to the other side of the door.
- While holding the door in the closed position, Secure the upper hinge (5) to the top frame of the left side with top screws (1). DO NOT tighten the top screws (1) until the top of the door is completely level.
- Install the upper hinge covers (6) on the upper hinge (5).
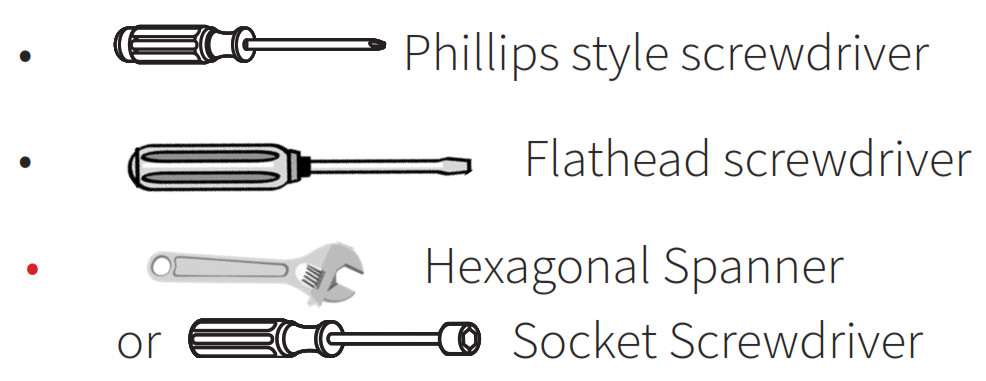
TOOLS REQUIRED:
PRE-INSTALLED PARTS YOU’LL BE WORKING WITH :
• Upper Hinge Cover (plastic)• Upper Hinge Bracket (metal)• Adjustable Leveling Foot / Leg (x2)• Bolt Pin (x1)• Socket Screws (x5)• Bottom Hinge Bracket (metal)
ADDITIONAL TIPS AND SUGGESTIONS
- Do not let any fats come into contact with the plastic parts of the refrigerator.
- Glass and plastic bottles should not be placed in the chiller compartment unless recommended by the product manufacturer.
- Freeze fresh foods by packaging them correctly and placing them in the chiller compartment, but do not place carbonated beverages here.
- Many whole foods such as radishes, bananas, pumpkins, and onions are not necessary to refrigerate.
- During a power outage, do not open the refrigerator unless absolutely necessary.
- Do not store canned items, as they can expand and burst.
- The chiller compartment is not cold enough to keep frozen treats such as ice cream or popsicles. Those items require a freezer.
- Do not overfill the refrigerator, as this blocks proper circulation and increases consumption of energy. Leave space around the food to allow proper air circulation.
- Keep foods well-sealed to prevent them from drying out and to keep odors from mixing together.
- Store raw meat and fish on the lowest shelf to prevent contamination.
- When purchasing chilled food, store all chilled food together while transporting it back from the store. Place it in the fridge as soon as possible, before the other items.
- Food that has been left at room temperature for a prolonged period can cause the food to develop bacteria.
- To maintain temperature, only open the fridge door to put food in or take food out. Allow hot food to cool down before putting it into the refrigerator.
- Ensure that bottles and food containers are clean and dry before storing them in the refrigerator.
- Turning the temperature control dial to the “0” position will stop cooling but it does not cut off power to the refrigerator.
- When the appliance is not in use for a long period of time, turn it off and disconnect it from the power supply.Empty all food items and clean them using the instructions in this manual.
TROUBLESHOOTING
| PROBLEM | SOLUTION |
| The refrigerator is not getting any power (no hum, etc.) | Make sure that the plug is in all the way |
| Make sure that the thermostat knob is not set to 0 (off) | |
| Check that the fuse hasn’t blown, or that a household fuse or circuit breaker hasn’t tripped. | |
| Food in the refrigerator is freezing when it shouldn’t. | Lower the number of the thermostat (higher numbers are colder). |
| The food in the refrigerator is not cold enough. | Make sure that the door to the refrigerator is closed all the way and that the refrigerator is level. |
| Check the ambient temperature of the room. If it’s very warm, this may be expected. | |
| If you recently put very warm food in the refrigerator, this is normal. | |
| The temperature inside the refrigerator is too warm. | Make sure that the gasket/seal around the door is free of debris. If the seal is not tight, warm air from the environment may seep in. |
| This is also normal when the unit is turned on after being off for an extended time. | |
| If food is tightly packed, make sure the food is more evenly distributed. Do not over-pack the fridge unit. | |
| Make sure that the temperature setting is at the desired selection. See “Using Your Appliance” for more details. | |
| This could be caused by opening the door too frequently and letting in too much warm air. | |
| This can be caused by warm food. | |
| It can take at least four hours for your refrigerator to get to its target temperature setting if it is being used for the first time or has been off for an extended period of time. | |
| The outside of the unit is warm. | This is normal and expected behavior. Warmth prevents the formation of moisture. |
| There are many different noises heard emanating from the refrigeratorat different times. This includes loud sounds when it is first turned on, fans running, popping, boiling, gurgling, or cracking sounds | All of these noises are typical during normal operations and cycles, especially when the door has been opened. These noises are caused by the compressor motor and the refrigerant which is circulated through the system. |
| There are vibrating or rattling sounds when the unit runs. | Make sure the unit is level and that is not touching a wall. See the “Leveling the Unit” section above. Check that the drip tray is placed properly, as seen in the diagram. |
| There is moisture appearing on the inside of the refrigerator walls. | This can be caused by debris in the door gasket/seal preventing a tight seal. As well, it is a normal occurrence if the ambient air is humid. This can also occur if the door is opened very frequently. |
| There is moisture appearing on the outside of the refrigerator walls. | Make sure that your door is closing properly and that there is no debris in the door gasket/seal. This may also be due to a fluctuation in room temperature. Wipe the residue away. If this continues to happen, contact a qualified technician for assistance. |
| The door will not close completely. | Make sure that the unit is not overstuffed with food. |
| Make sure that the shelves are in properly in position. | |
| Make sure the door gasket/seal is clean. |
CUSTOMER SUPPORT
Before contacting customer support, please see the troubleshooting section on the previous page.
Visit our website to contact us, find answers to Frequently Asked Questions, and for other resources which may include an updated version of this user’s manual.
If you wish to contact us by phone, please be sure to have your model number and serial number ready and call us between 9:00am and 6:00pm ET, at +1 866-954-4440.Keep tabs on Impecca’s newest innovations & enter contests via our social network feeds:

![]() @impeccausa
@impeccausa
![]() APPLIANCE ONE-YEAR LIMITED WARRANTY (US)
APPLIANCE ONE-YEAR LIMITED WARRANTY (US)
Impecca™ warrants this product against defects in material and workmanship to the original purchaser as specified below.PARTS AND LABOR– if the product is determined to have a manufacturing defect, within a period of one year from the date of the original purchase, Impecca™, at its own discretion, will repair or replace the product parts at no charge to you in the Continental U.S.A.
To obtain warranty service by an authorized Impecca™ service center, please email us at: [email protected] to obtain a Repair and Maintenance Authorization (RMA) number and received instructions on how the repair and/or replacement procedure will take place.Any glass materials included with the appliance will be covered for a period of 60 days from purchase (where applicable).
Impecca™ specifically excludes from this warranty any non-electric/mechanical attachments, accessories, and disposable parts including but not limited to outside case, connecting cables, batteries, and AC adaptors. Impecca™ reserves the right to repair or replace defective products with the same, equivalent, or newer models.We reserve the right to either repair or replace the product at our discretion. The replacement may be either new or refurbished and while every endeavor will be made to ensure it is the same model, if not possible it will be an equal or higher specification.
Normal “Wear and Tear” is not covered by this warranty. Further, Impecca™ hereby reserves the right to determine “Wear and Tear” on any and all products. Tampering or opening the product casting or shell will void this warranty in its entirety.Exclusions: This warranty does not cover the following:
- Any product that has a defaced or covered serial number.
- Products that have been transferred to a second owner.
- Rust on the interior or exterior of the unit.
- Products listed as “As-Is” or “Refurbished.”
- Food loss due to any product failure.
- Window air conditioners are installed in a wall.
- The product is used in a commercial setting.
- Service calls that do not involve product malfunction.
- Service calls for a product ruined by not following the provided instructions.
- Service calls to correct improper installation.
- Costs associated with making the product accessible for servicing (including but not limited to removal of trim/molding/cabinetry, etc.) 1
- Service calls to replace any consumables such as light bulbs, filters, etc.
- Surcharges that may apply to service calls on weekends, nights, holidays. Damages to the finish of appliance or household furnishings due to the installation of the appliance.
- Damages caused by any of the following: Acts of God; fires; misuse; accidents; incorrect power supply; service performed by unauthorized persons; use of non-genuine Impecca parts, etc.
ALL IMPLIED WARRANTIES, INCLUDING IMPLIED WARRANTIES OF MERCHANTABILITY AND FITNESS FOR A PARTICULAR PURPOSE, ARE LIMITED IN DURATION TO 1 YEAR FROM THE DATE OF THE ORIGINAL RETAIL PURCHASE OF THIS PRODUCT. THESE WARRANTIES AND REMEDIES ARE THE SOLE AND EXCLUSIVE WARRANTIES AND REMEDIES IN CONNECTION WITH THE SALE AND USE OF THE PRODUCT. NO OTHER WARRANTIES, ORAL OR WRITTEN, EXPRESSED OR IMPLIED, ARE GIVEN. IMPECCA™ IS NOT RESPONSIBLE OR LIABLE FOR ANY DAMAGE, WHETHER SPECIAL, INCIDENTAL, CONSEQUENTIAL, DIRECT OR OTHERWISE, OR WHETHER KNOWN OR SHOULD HAVE BEEN KNOWN TO IMPECCA™, INCLUDING LOST PROFITS, GOODWILL, AND PROPERTY AND PERSONAL INJURY RESULTING FROM ANY BREACH OF WARRANTY, THE INABILITY TO USE THE PRODUCT OR UNDER ANY LEGAL THEORY IN CONTRACT OR TORT. IMPECCA LIABILITY IS LIMITED TO THE ACTUAL PURCHASE PRICE PAID TO THE RETAIL SELLER OF THE DEFECTIVE PRODUCT. No
Impecca™ dealer, agent or employee is authorized to make any modification, extension, change, or amendment to this warranty without the written consent and authorization from Impecca™. Some states do not allow the exclusion or limitation of implied warranties or liability for incidental or consequential damages or do not allow a limitation on how long an implied warranty lasts, so the above limitations or exclusions may not apply to you. This warranty gives you specific legal rights, and you have other rights, which vary from state to state.
Note: Our Warranty center services only to Continental U.S.A.
Impecca™ USA • Wilkes-Barre, PA • www.impecca.com • 866.954.4440*Do not send any returns to this address, as it might get lost and this will delay your repair and service process.
References
[xyz-ips snippet=”download-snippet”]