
imperii High Definition Car Video Recorder Instructions Manual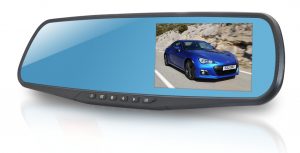
Paclcanging Acceuories
- User’s Manual
- Car charger
- USB Cable
- Silicone band
Product Overview
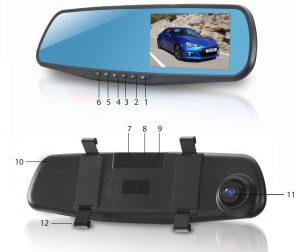
- OK/confirmation
- Up key
- Down key
- Mode selection kry/MODE
- Menu key
- Power supply key
- TF card slot
- USB data interface
- REST
- Horn
- Lens
- Back clip fixation hook
After power on, press Menu Key to enter settings interface. Select the settings item using Up/Down key; press OK Key to enter next level menu and select specific function item, and then press OK Key to confirm. After confirmation, press Menu Key to exit. When enters system menu settings interface, press Menu Key Twice continuously.
| Video mode sub-menu | |||
| Items | Sub-menu | Descriptions | Functions |
| 1 | Size | 720P/1080PNGA | 1280″720 (default)/640″480 |
| 2 | Time stamp | On Off | Display time and date in the video
files |
| 3 | Motion
direction |
On/Off | Video in motion detection On and
Off |
| 7 | Loop
recording |
Off/1 Min/3 Min. (default)/5 Min. | A single video file segment length of
time |
| 5 | Voice Record | On/Off | Voice record On and Off |
| Camera mode sub-menu | |||
| 1 | Size | 3M/2M/1,3MNGA. | Choose output size of the photo |
| Repl1y mode sub-menu | |||
| 1 | Delete | Cancel/Execute | Format memory card |
| 2 | Thumbnail | Cancel/Execute | Thumbnail view |
| 3 | Volume | 0/1 /2/3/4/S(default)/6 | Adjust volume of the built-In
loudspeaker |
| System setting menu | |||
| 1 | Format | Cancel/Execute | Format the memory card |
| 2 | Languages | English/Traditional Chinese/ Simplified
Chinese/ Japanese/French/German/Korean /1talian/Portuguese/Russian/Spani5hArabic |
Display the selected language |
| 3 | Auto Power Off | Off/1 min/3 minJ5 min. | Set automatic shutdown time when
No operation |
| 4 | Screen saver | 1 min/3minJ5mlnJOff | Set automatic the screen saver time
Or off screensaver. |
| 5 | System Reset | Cancel/Execute | Restore default settings |
| 6 | Light
frequency |
SO Hz | Most European power frequency |
| 6O Hz | Most power frequency in the United States | ||
| 7 | Date Settings | Adjustment year, month, day and time. | |
| 8 | ll.;B | Pc camera | Connect with USB for PC CAMERA |
| Disk drive | Connect USB and date can be read |
Note: When DVR turns off that the last settings will be saved.
Operating Instructions
DVR has the function of video recording, photographing, preview, screen saver and network camera, select the function by oneself according to needs during use, please insertTF card before use.
- Record ModeAfter pressing Power Switch Key or connecting to the charger, DVR automatically enters Record Mode and starts recording, at this time, blue indicator light is flickering. During video recording, press OK Key to stop video recording, at this time, blue indicator light is always on.When the charger is working, ifpov,,er supply of charger is disconnected, DVR shuts of automatically after delaying 5 seconds.Under turn on mode, long press the OK key to turn on or off the screen saver function.
- Camera ModeAfter power on, press Mode Key and select to enter camera mode, press OK Keyto take a photo.
- review ModeAfter power on, press Mode Key and select to enter Preview Mode, press Up/Down Key to select the video files or photo files, press OK Keyto play or pause, press Mode Key to exit Preview Mode.
- Motion Detection FunctionSet up Motion Detection” item of video mode menu as “On”, start up motion detection function. Whenmoving object is detected, the system will record the video for one minute and save the video clip. If theobject is still moving after one minute, the system will record for another one minute and save the video clip. It will stop recording and enter the detection mode again till the object stops moving.When exits the motion detection, it automatically turns off the motion detection function.This file will not be overwritten and deleted in the loop when recording.
- Screen SaverIn the system settings menu <Screen Saver Settings> item, set automatic the screen saver time or off screen saver.
- ChargingIt can change after DVR is connected to charger, red indicator light is always on during charging, after fully charged, red indicator light is off.
- Connect the computer1. U disk function: Confirmation that the <USB> options ofin the system menu is the disk drive, useUSB cable connect the computer and there will appear a movable disk and the device enter in theU disk mode. Under U disk mode, you can copy or cut the recorded files into computer for playing,and you canalsotakeouttheTFcardand read the data in card with card reader.2. PC Camera function: Confirmation that the <USB> options ofin the system menu is the PC Camera, Use USB cable to connect computer, and there will appear standard video device in the screen of the computer, meanwhile, which can be used for PC Camera.
- Date and Time SettingsSelect “Date Settings” in the system menu interface, press OK Keyto enter date and time settings interface.In the date and time settings interface, press OK Keyto select year, month, day, hour and minute, use Up/Down Keyto adjust the year, month, day, hour and minute, after all the settings are done, press OK Key to confirm exit.
- System ResetIf abnormal condition occurs to the device during use, use a small stick of diameter 1 mm to press the Reset key, the system will reset automatically.
Technical Parameters
Sensor: CMOS sensorImage resolution: 720P: 1280×720 / 1080P: 1920×1080 /VGA: 640×480Visual angle: wide-angleLCD: 2.6/2.8/3.0/3.6/4.0/4.2/4.3″TFr HD Display ScreenVideo Format: AVI 30fpsPhoto format: JPEGMemory card: TF card 1GB-32GBUSB interface: USB2.0Operating System: Windows2000/me/xp/2003;Vista;macos;linuxTV output: NTSC/PALBattery capacity: 250mAHCharging time: About 2 hoursStorage consumption: VGA—about 45MB/minute 720P—about 105MB/minuteOperating Temperature: -10(0 -60(0Storage Temperature: -20<>C- 70″CWeight: 277g/600gDimension: 300x74x12mm

imperii High Definition Car Video Recorder Instructions Manual – imperii High Definition Car Video Recorder Instructions Manual – imperii High Definition Car Video Recorder Instructions Manual –
[xyz-ips snippet=”download-snippet”]