TE.03.0261
Please refer to this manual before using the product
1. Notes
1.1 The company reserves the right to modify the contents of this manual without any further notification. It is normal that some functions may vary in certain versions of software.1.2 Please charge this product with the configured charger for no less than 2 hours before using it.1.3 Please turn off the watch before installing SIM card. Please open the small case at the back of watch, and push the built-in metal sheet to “OPEN” before installing SIM card. After installing the SIM card, then push the built-in metal sheet to “LOCK”.1.4 This Android watch supports 3G WCDMA850/2100 frequency band and 2G GSM850/900/1800/1900 frequency band.1.5 To ensure longer battery life, it is recommended to close high power consumption functions if they are needless for you such as Wake-up gesture, GPS, WiFi, BT. It is normal that the watch temperature may increase mildly while it is connecting with WIFI or 3G network because of higher power consumption.
2. Product Overview
2.1 Basic Operating1. Hold the power button to turn on the watch, it might be slower to enter into the Android OS the first time you use the watch:I) language settings.II) Set personal information, such as your body height, weight, daily work-out goal.III) Scan the QR code with your phone to download and install the app for getting synchronization information from the watch. Connect the watch to your phone via Bluetooth. The app will not bring cellular data consumption, and you can get synchronization notice from your phone. For more details, please refer to Synchronization Software Use Manual.
2. Once the watch is working, you can enter into the selection page by pressing the button for around 2 seconds:I) Power Off: Turn off the watch.II) Reboot: Restart the watch.III) Power Save: Shift to the power save mode then only the digital clock is working. Press the blue button to cancel the power save function.IV) Recent Task: Check the working apps and turn them off by swiping to left/right.V) Full/Small: Adjust the screen in the round (Full) or square (Small) according to your need.
3. Menu Operating1) Slide to the left to enter into the main function menu2) Slide to the right to enter into the notification menu.3) Slide down to enter into the status bars and short-cut settings:I) the First page: telephone signal status, BT connecting status, time and dateII) Second page: Vibrator switch, Wake-up gesture switch, : Brightness, flight mode, BT switch, WIFI switch, GPS switch, etc.III) Third page: pedometer 4) Slide up to view the weather information (network is requested) 5) Slide right to return to the previous menu.
2.2 Watch Dial Setting
 Hold pressing the dial for around 1 second to enter into the watch dial selection pages, slide to choose any dial.Note: you can download the new dials:1. The network is needed (WI-FI)2. Click “+” to enter into the dial selection pages3. Preview the dials and click to download You can also click “-” to delete the dial you have downloaded.
3.Detailed Use Instructions
3.1 Download Wiiwatch3.1.1 When you turn on the watch for the first time, please choose the platform of your phone, then click “NEXT” to complete. ( Figure 1 )3.1.2 Scan the QR code with your phone, or search “Wiiwatch” on the App Store or Google play store and download it. ( Figure 2 )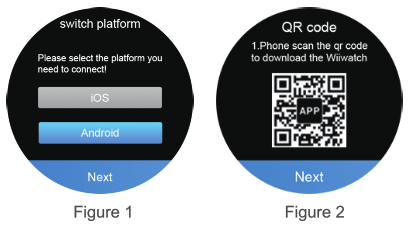 3.1.3 Android Phone connection guides:1. Turn on the Bluetooth of your phone, and open the WiiWatch app. ( Figure 3 )
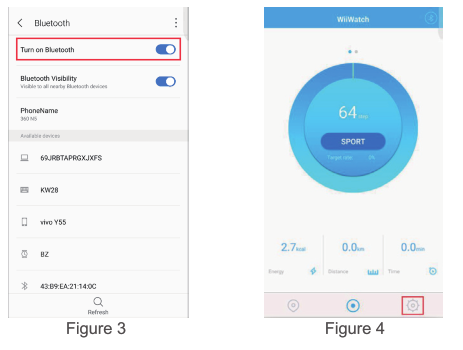
2.Ensure both your phone’s and the watch’s Bluetooth is switched on. Then open the WiiWatch, click![]() to enter the setting function.( Figure 4 )3.Then click
to enter the setting function.( Figure 4 )3.Then click ![]() to enter the device management interface and automatically search for a device, the first search will take 30S.( Figure 5 )4.Click the device name that needs to be connected. ( Figure 6 )
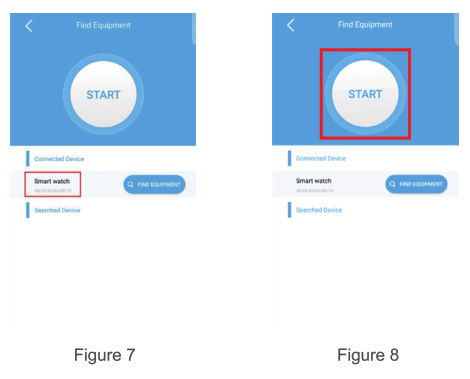
to enter the device management interface and automatically search for a device, the first search will take 30S.( Figure 5 )4.Click the device name that needs to be connected. ( Figure 6 )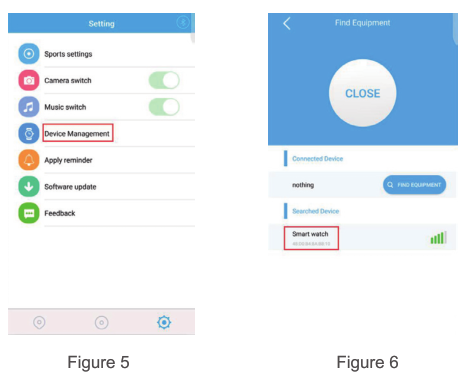 5.When the device name displays under Connected Device, meaning the phone connects the watch successfully. The phone synchronizes the data and the watch can function accordingly. Click the device name to disconnect. ( Figure 7 )6.To search new device, please click the “Start” button. Click the “Close” button to cancel the search. ( Figure 8 )
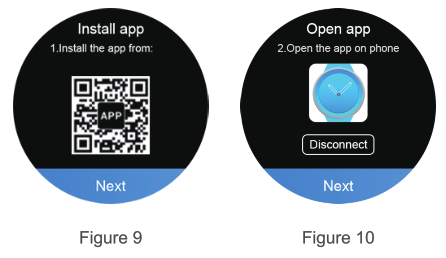
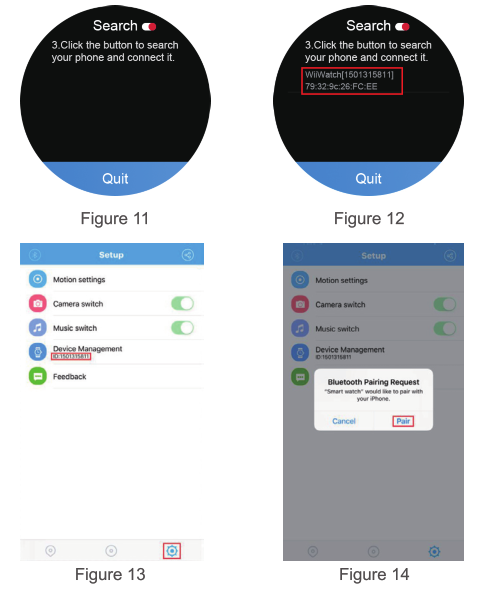
 3.1.4 iPhone connection guides:1.Turn on the Bluetooth on both the phone and watch. Then follow the steps of “Connect Phone” to connect Bluetooth.(Figure 9, Figure 10, Figurell )1.1 Install the Wiiwatch App;1.2 Open Wiiwatch on your phone;1.3 Click the Search button to search your phone and connect it; (Figure 12, Figure 13)1.4 When the Bluetooth pairing request pops up on your phone, please click “Pair”. (Figure 14)
 2.After completing the connection of two devices, the phone can synchronize the data from the watch, and the watch can operate corresponding functions. ( Figurel5 )
 Note:1. Data synchronization between App and watch will not consume network traffic.2. The installation and update of mobile Apps require the Internet, so please operate in WIFI mode.3. Please ensure the download in the environment with sufficient light and fine network.4. Keep the Bluetooth open on both your phone and watch when connected synchronously.5. When the phone pops up the notification of the watch’s read permission, please allow it for receiving notifications.6. Some Android smartphones will not be able to install the app, so please enter the “secure and privacy” setting on your phone and open the “unknown source” in order to complete the installation.7. If you have downloaded the relevant app from other channels, please check the app version and make sure it is the latest version of the app. Please update the app to the latest version when there are new version updates.
4. Functions introduction
4.1 After inserting the SIM card, contacts, phone, message, and other local functions can be used.4.2 Bluetooth Phone CallWhen the phone and the watch are connected via Bluetooth, the Bluetooth phone call, contact, and synchronous phone call records can be realized.4.3 Remote Capture When the watch is connected to the phone’s sync app, the phone camera can be controlled and photographed on the watch. The remote photograph requires turning the camera of the phone on first. The photos will be saved on the phone, and the android phone will be saved in the third-party application photo folder.4.4 Music Control When the watch is connected to the phone’s sync app, you can switch songs and control the play of music with your watch.4.5 Health The data of the Pedometer and Heart rate can be Synchronized to the phone via the sync app.4.6 Find My Device When the watch is connected to the phone’s sync app, open “Find my device” and click “Start” to find the phone, the phone will alert.
5.Precautions for Use
5.1 Please charge the watch completely before use. Charging time is 1-2 hours.5.2 Please use a charger adaptor with 5V 1A to connect our standard magnetic cable to charge the watch, Please make sure that the cable is well connected during charging.(Most of the charger adapters of the cellphones are compatible, check if the specification of the adapter is 5V 1A)5.3 Anti-lost function is standby only while the Bluetooth is well connected.5.4 If when the watch is connected to the phone’s sync app, some functions still cannot be used, please delete the matched Bluetooth connection and reconnect again.
6.Troubleshooting
In case there’s a problem during the use of the watch, please solve it accordingly in the following ways. If the problem still exists, please contact the seller or designated maintenance personnel.
6.1 The watch cannot be turned on1. Press the power button for a longer time2. Make sure there is enough battery3. Please recharge the watch and start it again.
6.2 The watch shut down automaticallyIt is possible the battery is used up. Please recharge the watch and start it again.
6.3 Short battery performance1.Make sure the battery has been completely charged. 2.Turn off the needless functions which are high-power consumption such as GPS, WIFI, walk-up gesture, etc.6.4 Watch cannot be charged1.Check if the battery can be used. The performance of the battery will be reduced after several years using.2.Check if the charger is working properly, (both the adapter and cable), if not, try another one. 3.Check the connection of the watch and cable during charging.TECHNICAL SERVICE: http://www.imperiielectronics.com/contactenosImportado por:B85947513www.imperiielectronics.comPol. Ind. Neisa SurAvd. Marconi, Bloque 1, Nave 1328021 MadridMade in PRC
imperii RR FIRRRO SmartWatch WiFi GPS Gun Dark Instruction manual – imperii RR FIRRRO SmartWatch WiFi GPS Gun Dark Instruction manual – imperii RR FIRRRO SmartWatch WiFi GPS Gun Dark Instruction manual –
[xyz-ips snippet=”download-snippet”]

