
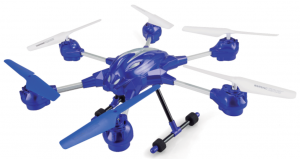
imperii Video Camera Infiltrator Hexa Drone
R/C UFO MAIN TECHNICAL INDEX
UFO: L:320MM XW: 280MM X H: 115MMFuselage weight: 156GFlight area: 30-100 metersCharging time: 90 Minutes (more or less)Flying time: about 5-7 mins
Using Battery/charger
- UFO’s battery (built-In): 3.7Vlfl50 mAh LI-poly
- Remote controller battery: 4×1.5 “AA” (LR6) (Not included)
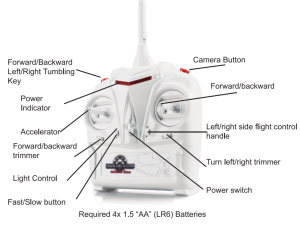
2.4G REMOTE CONTROLLER INSTRUCTION
Tall Blade Exchange Matters·
- Take out to replace the tall blade, according to the figure change corresponding to the tall blade. If change error. will not be able to control
- Tail blade tum counterclockwise direction. Tail blade B tum clockwise direction.
Assembly RIC battery Instruction
- Install batteries: open the cover of battery “””” (Pie. 1)
- According to the indication of pole on battery box, place 4×1.5 “M”(LR6) alkaline batteries into the box (battery to be purchased otherwise).
- Fasten the cover of battery. (Pic. 2)Tips: When the power Indicator of remote control twinkles, please replace battery as per the above steps.
Notes:
- Recommended to Install or replace the battery under the parental guidance
- Avoid replace the battery only when the products weakened.
- Keep the instruction for future reference.
- Use this product In strict accordance with the instruction.
- In a static environment, the product may cause malfunction
- Recommended to use new batteries to play the best features.
Warning:
- Non-chargeable battery can not be charged
- Rechargeable battery can only be charged under the supervision of adults
- Rechargeable battery shall be taken out from the tool before charging. [only applicable for remote controller).
- Batteries with deferent types or new and used batteries can not be used together.
- Only same or suggested batteries can be used
- Install battery with correct polarity.
- Take exhausted battery out of the tool.
- Avoid short circuit at terminals of battery.
- Before charging, check If the charger ls damaged; and If It Is damaged, please use It after repair all damages.
- Do not contact the rotating propeller directly with hand. or it may cause Injury.
- When playing flying tool, please keep your hair and loose clothes away from the propeller
- Please check the wire, plug, shell and other parts of charger periodically, and If there Is any damage, stop using it till is repaired.
THE LANDING GEAR INSTALLATION INSTRUCTIONS
Landing gears (image 1) install lo support frame A & B (image 2). Thenscrew them tightly. As shown ,in Image 3.
DRONE BATTERY INSTALLATION
- The battery button clockwise 90 degrees (Image 5). The battery lo the diction of the arrow are gently pull the battery door, can be remove
- Connected the battery plug to the drone plug Put the battery cover{C) to the drone (D). Put the battery cover In direction of arrow nudgepast. The battery button counterclockwise rotation of 90 degrees can be closed. (Image 7)


THE CAMERA INSTALLATION INSTRUCTIONS
The four pillars of camera module corresponding to image 9 (E) are Installed, screw it. Connect the plug (F) to 3 pin socket (Image 10).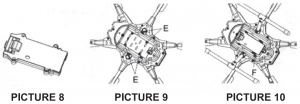
USING THE ON-SOARD VIDEO CAMERA
- Pressing the camera button, the UFO starts aerial photographing.Pressing the button &gain to stop aerial photographing. If want to restart aerial photographing, please repeat the steps above. (See pic.11)
- A light under the video camera will grow green when in stand-by mode and the light will flash red when camera is recording video. (See pic 12).
- Light will flash red color before red light and green light extinguish when a Micro SD Gard memory is full. The video recordings (AVI files) must be removed in order to make room for new recordings.
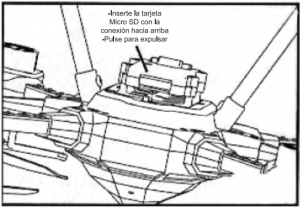
- To view recording remove the Micro SD card from the rear of the video camera ( See pic.12 ) by slightly depressing the Micro SD card and allowing it to then spring out enough to grab it and pull it out of the slot.
- Micro SD Card c:an now be used as a Flash Drive
- Go to “NO NAME” drive, go into the DCIM Folder, Go into the 100DSCIM Folder, AVI files can be played on several , media players such as “QuickTime.
- HAVE FUN!!!


- H you have trouble playing the files with Quicklime try your other media players. You can also look online for recommended free downloadable AVI players.
- Video camera does not record sound.
- Micro SD Card should be placed with the little cooper connections facing as show in. (See pie. 13).
- All files on the Micro SD Card can be removed or erased without compromising the video camera. The video camera will regenerate the DCIM and 100DSCIM folders if necessary.
BATTERY CHARGING USING INSTRUCTIONS
- When playing, remove the battery cover. Battery plugs corresponding excuse to positive and negative direction inserted in the battery boxThen put the battery into the battery box. Put the battery buckle counterclockwise to lock the battery cover. (figure 1)
- When charging. open the battery cover to take out the battery. Connect the USB lo computer and drone. (figure2}. PS. When charging, LED light be red color. When fully charging, LED light will extinguish. Charging time 90 mins
Notes:
- Before are charging the UFO shall be slopped for 10-15 minutes lo ensure inbuilt Li-poly battery is cooling completely.
- Before continuous fight, the UFO shall be stopped for 10-15 minutes to ensure the inbuilt motor is cooling cornple1ely.
Warning on Lo-Poly battery:
- Do not put the battery into fire or heat source
- Keep the battery away from heat source and do not use it by 100 side of heal source.
- Do not piece the battery on the surface of hot matter.
- Do not soak the battery In water and keep It In a dry and low-temperature environment.
- Only the charger specified for the product can be used for charging the battery.
- Do not over-charge the battery.
- Do not connect the battery with other circuit.
- Do not place the battery with bolt or any sharp matter.
- Do not place the battery together with metal parts or jewelry.
- Do not disassemble the battery.
- Charge the battery at least once per sue months
- Turn off the power of products immediately altar using.
- After use the battery, please use PE bag to wrap or use insulation sheet to isolation battery positive and negative
ENVIRONMENT FOR FLIGHT
- Fly on a sunny day, without wind
- Do not fly in extreme temperature. Do not fly in temperature above 113 degrees Fahrenheit/45 degrees centigrade, or below 50 degrees Fahrenheit/10 degrees centigrade. Flying in extreme heat and/of cold will affect performance and may damage the model
- Do not fly in strong wind. Windy conditions will limit. or disturb the flying control. In very windy conditions, your UFO may become loss and/or damaged.
- Select large, wide-open area for flying and make sure there is no obstacles, animals or people nearby.
NOTICEWhen we move the accelerator handle upward, then downward to the bottom. If the red Indictor keeps to flash. 11 shows the battery has no enough power. You should replace with new batteries
Safety warning:To parents· This product is only applicable for children over 14 years old. For your children’s safety during playing, please read this ins1n.ictions together with your children’s firstly. Do not pick up moving tool to avoid injury. When tum on the power of tool, please keep hair and clothes away from it. (Any modification to the products without authorization will damage your rights on the product)
- Warning: It contains small parts and It id not applicable for children under 14 year old.
12.4G FREQUENCY FOR INSTRUCTIONS
- Put the power into the UFO slot, open the UFO power switch and placed on level ground smoothly and the open the remote controller switch. The remote controller indicator light will flash frequency for the state. After the frequency of state succeed, the controller’s indicator light will be bright The UFO head lights will be bright after fleshing 2-3 times and the black lights will flash all the time. Al this time, you can control the UFO fly.
- Put the power into the UFO slot, open the UFO power switch and placed in level ground smooth and than open the remote controller switch, push the acceleration handle and the forward/backward, left7right side flight control handle to the bottom right at the same time. The light will close automatically, the light will flash automatically, meanwhile “‘lease the handle. It means the manual check successfully.
- When the UFO is flying beyond remote control distance, and is control distance out of state. As long as the UFO is in the receiving signal, then refuels the throttle, the UFO can fly again.
OPERATING METHOD
Control Notes:
When push the controller’s handle, couldn’t push too much force to the and, you end adjust slowly when you push the hand la and had the leafing to feel the mange of the flight trajectory. For beginners 8 after finish trimmer procedures, the most Important point is need to be familiar with the control of handle UFO maybe turn around by itself, but it doesn’t matter. At first, we need learning how to control the left handle to let the UFO keep the distance from the ground about 1M for suspension flight highly. Then. try to master the direction of light control tips. For beginners, we suggest to keep marching slowly training tips, familiar with c:an master until after the try to fast forward.
Operating Note:Don’t pasta on the UFO or bound to any name, to avoid affect the UFO’s balance or overweigh can~ afford to fly.
Ascend: When you push upward of the left handle, the main blades speed ,increases, the UFO ascendDescend When push downward of the left handle, the main blades speed slow down, the UFO Descends
Change direction: When push the left hand to left. the UFO”s head tum to left. When push the left handle to right, the UFO’s head tum to right Forward: When push upward of the right handle, the UFO’s head down and moving forward.
Backward: When push downward of the right handle, the UFO’s head up and moving backward Side to side fly: When the light operating rod is pushed towards to left, the left side UFO down and forward. When the righlopera6ngrod is pushed toward to right the right side of UFO down and forward
Forward tumbling key-: When the UFO stop spinning in the air, pressthe key button on the top left comer, then control !he forward handle, n will turn forward 360 degrees
Backward tumbling key: When the UFO stop spinning in the air press the key button on the top left corner then control the backward handle, it will turn backward 360 degree
Left tumbling key: When the UFO stop spinning in the air, press the key button on the top left corner then control the backward handle, it will turn left side 360 degrees
Left tumbling key: When the UFO stop spinning In the air, press the key button on the top left comer, then control the left side fly handle, It will tum left side 360 degrees
NOTICE
- When the UFO falling down, please push down the throttle lever to the button quickly.
- Don’t paste label or paper on the UFO, I may make UFO loo weight to fly.
- Before implementing different direction rolling demo, you must first click the remote control on the upper left comer of the front/back/left/right tumbling bond.
SPECIAL PROMPT
1. Trimmer adjust the description
- If not to push the direction handle when flying, UFO still spinning, you can press the Fine-tuning switch key to adjust controller trimmer, until UFO fly stable and does not spin.
- When the UFO stop spinning, it’s head counterclockwise spin, continuous pressing the left fine–tuning switch, press the “R” directionuntil the UFO fly stable.
- When the UFO stop spinning, it’s head clockwise spin, continuous pressing the left fine–tuning switch, press the “L” direction until the UFO fly salable
- When the UFO stop spinning, you want to move the left side flying, can continuous pressing the side fly fine-tuning switch from right, press the “R’ direction until the UFO fly ~table
- When the UFO stop spinning, you want to move the right side flying, can continuous pressing the side fly fine-tuning switch from right, press the “L” direction until the UFO fly stable.
- When the UFO stop spinning, you want to move the forward flying, can continuous pressing forward backward fine-tuning switch from right, press the upward direction until the UFO fly stable
- When the UFO stop spinning, you want to move the backward flying, can continuous pressing forward/backward fine-tuning switch from right, press the backward direction until the UFO fly stable
NOTICEWhen the UFO is about 30cm from the ground, UFO will be affected by their own blades vortex and become unstable, it is called the ground effect reaction. When 1he UFO’s weight mom and mom lighter, the ground effect reaction influence will be greater.
Warning: 1. Please do not touch the high-speed rotatingpropeller: 2. When playing the UFO, please keep the UFO 2 meters safe distance with other people. 3. Ba guided by adults when operating.
TROUBLESHOOTING
| PROBLEM | CAUSE | SOLVE |
| Controller does not | 1.Controller·s power switch is “OFF”2. Insert batteries into controller improperly3.Batterles lack of power | 1 Tum power switch ~\’”2. Check and make sure the battery is in accordance with the instruction of the positive and negative pole in the battery box3. Charge new batteries Instead |
| Cannot control the UFO | 1.You havan1 operated the controller2. Haven’t turned on controller’s power switch3. You play the UFO In strong winds weather. | 1.Tum controller power switch “ON” 2 Tum UFO’s power switch “ON”3. Do not play the UFO in winds, which can confu88 your control |
| UFO cannot Rise | 1.Main motor blades rotate too slowly2.Doesn’t fully charge UFO battery | 1.Pull up the acceleration stick 2 Full charge UFO battery. (See instructions above) |
| UFO landing too fast | You lose the acceleration stick or pull it loo fast | Slowly pull down the accelerator stick till! the UFO lands smoothly |
NOTICE:
- When the UFO or controller is lack of power, remote control distance Would be affected and become shorter
- If the power of UFO is low, there will be can’t fly high or difficult to take-off.
- If the UFO appeared to breakage, deformation, please repair it timely serious situation It will case such as blades fracture, broken, at this time, couldn’t make UFO fly, otherwise it will cause Injury.
- Please pull out the power plug if you don’t play the UFO for a longtime, that can avoid battery leakage caused by damage to this product.
- Don’t make UFO flight crash or serious collision, it will damage theUFO or shorten Its lifetime.
- Modal UFO with a variety of alloy components, when kids play UFOshould be careful, avoid to be cutted by alloy pieces
Warning: Do not stab any sharp matter such as needle or I snail into the body of UFO: it may damage the inbuilt lithium battery.
MAINTENANCE & REPAIR
If the product Is not used for a long time, the battery shall be taken out: use clean and soft cloth to clean the productAvoid insolating or heating the tool under sunshine; do not soak it in water, as the parts oft may be damaged.
Limited Warranty
✓ This product is guaranteed for 2 years from the date of purchase.✓ Warranty is effective since the commercial invoice duly is filled and sealed settlement.✓ If there is any problem with the product, the user should contact us in the address:[email protected]. Once received, the doubts, incidents and problems will be resolved by email. If this is not possible and the problem persists, the guarantee will be processed in accordance with current law.✓ The warranty is extended for two years, referring only to manufacturing defects✓ The expedition to the nearest service center or our central office to be made prepaid. The item must arrive well packed and with all its components.✓ Assume no liability for damages arising from misuse of the product✓ The warranty does not apply in the following cases:
- If you have not been followed this manual correctly
- If the product has been tampered
- If it has been damaged by improper use
- If the defects have arisen as a result of power failures
PRODUCT__________________________MODEL____________________________SERIES_____________________________
TECHNICAL SERVICE : http://imperiielectronics.com/index.php?controller=contact
![]()
imperii Video Camera Infiltrator Hexa Drone User’s Manual – imperii Video Camera Infiltrator Hexa Drone User’s Manual – imperii Video Camera Infiltrator Hexa Drone User’s Manual –
[xyz-ips snippet=”download-snippet”]