
imperii Video Camera Sunglasses
Thank you for choosing our line of optical products design. This product has an ultra-portable design, can be used in various fields and provides comfort, safety and color in your daily life.
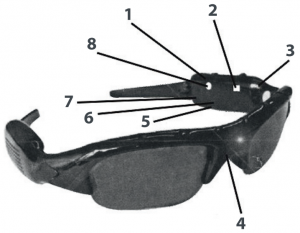
Product Overview
- ON/OFF
- Video camera
- Indicator
- Camera
- MicroSD Slot
- LED Indicator
- USB
- Reset

Product Features
- Mini design with protection, fashionable and resistant to abrasion, has a series of portable tools.
- Supports webcam and video conferencing with internet. Supports AVI format.
- You can get high definition picture in low light conditions.
- Supports up to 30 frames per second of 640×480.
- Supports MicroSD cards up to 16GB.
- The internal lithium battery allows uninterrupted use of the camera for 60 100 minutes.
User Guide
- ChargeBuilt-in rechargeable lithium battery. When using the product for the first time, please fully charge your MINI DV glasses following these methods:1.1) Connect them to the computer using the USB cable to charge them1.2) Connect them to the wall charger with the USB cable, and then plug in the charger. When charging, the red light will blink.Note: When the battery is low, the MINI OVs go directly into save mode and can not be used. In this case, please load them immediately.
- Turn on and videoPlease confirm that the TF card is inserted. Press and hold the ON / OFF button, the red light will come on and it will go into standby mode. Press and hold the VIDEO/ CAMERA button, the blue light will blink and the camera will start recording. Press the VIDEO/ CAMERA button to pause and save the previous recording. If you need to continue with the video, press VIDEO/ CAMERA again to resume recording. The video resolution is 640 x 480, with a frame rate of 25-30 fps.Notes:a. Please confirm that you have inserted the T-flash or MicroSD card, otherwise the product will turn off automatically after 15 seconds.b. The maximum capacity of the supported MicroSD is 16GB.c. Saving the files takes time, do not press Button to save. This could prevent a correct and complete saving of the file.d. Under the right light conditions the lens will focus on the image as long as it remains more than 50cm away. This will give you a firm, dear image and natural colors.
- PhotosPress and hold the ON / OFF button, the red light will come on and it will go into standby mode. Quickly press VIDEO/ CAMERA and the blue light will blink once and a picture will be taken. Repeating this process will take new photographs. The image resolution is 1280 x 720.
- Sound RecordingIn standby mode, press ON / OFF briefly, the red light will turn blue, and when the blue light flashes, recording will start. Press the button again to stop and save the recording.
- Time settingsPlease copy the lower TXT file to the root directory of the MicroSD card. When connected to the PC, the time will be synchronized with the TXT time.Proceed as follows:5.1) Create a new file named time.txt in the root directory of the MicroSD.5.2) Open the file and enter the sync time before saving. For example, by December 12, 2012 at 12:12:12 you must write 2012-12-12-12-12-12.
- OffWhen paused, press and hold ON / OFF. The indicator will turn off, and so will the product.
- Connecting to the computerConnect the device to the PC with the USB cable. The device will be automatically recognized as an external disk. You can download, delete, copy or paste files between your computer and your device.Notice:a. Connect the device to the PC. If the PC does not recognize the disk or a disk ID does not appear within 30 seconds, please remove it and try again.b. It is better to copy or paste the video files on the PC to run them. If you run them from the same device the playback will be slow and choppy due to the weight of the files and the low transmission speed.
- ResetWhen the device does not operate properly due to improper use or any other unknown reason, it must be reset.The method to do this is to use a very thin bar (like a needle) to press the reset button.
- Charging the batteryMake sure the battery is fully charged before use, and charge it again after each use for 5 hours, thus allowing the battery to perform with maximum efficiency.When the rapid charging starts, the red light will blink, it will be fixed when full. Continue charging between 4 and 5 hours.
NOTICE: Proper use: Please comply with the applicable local regulations. This product is not designed for any unlawful purpose, from the results of which you will be solely responsible.
UPGRADE
For our products to always offer the best service, we constantly improve and update the software, which you can update yourself. Please ask your local distributor for the latest software version and upgrade method.
Temperature of use:please use this product under normal temperatures, and never in temperatures that would be harmful to the human body.
Humidity:Use this product only under normal conditions of humidity. Do not use in humid environments or in water, it is not a waterproof product. Always keep it dry and do not expose it to rain.
Recording Lighting:Please use the product in an environment with sufficient natural light. Do not point directly into a powerful spotlight, such as the sun, or the lens may be damaged.
Cleaning Needs:Do not use the device in dirty or dusty environments, and prevent dust from entering the lens or other optical components, will affect the final result.
Waste Management:Be careful about the environment. Do not throw this product anywhere but in the container intended for it. And do not throw it into the fire, otherwise it could explode.
TECHNICAL SERVICE : http://imperiielectronics.com/index.php?controller=contact
imperii Video Camera Sunglasses Instruction Manual – imperii Video Camera Sunglasses Instruction Manual – imperii Video Camera Sunglasses Instruction Manual –
[xyz-ips snippet=”download-snippet”]