imperii Walkie Talkie

Product Overview
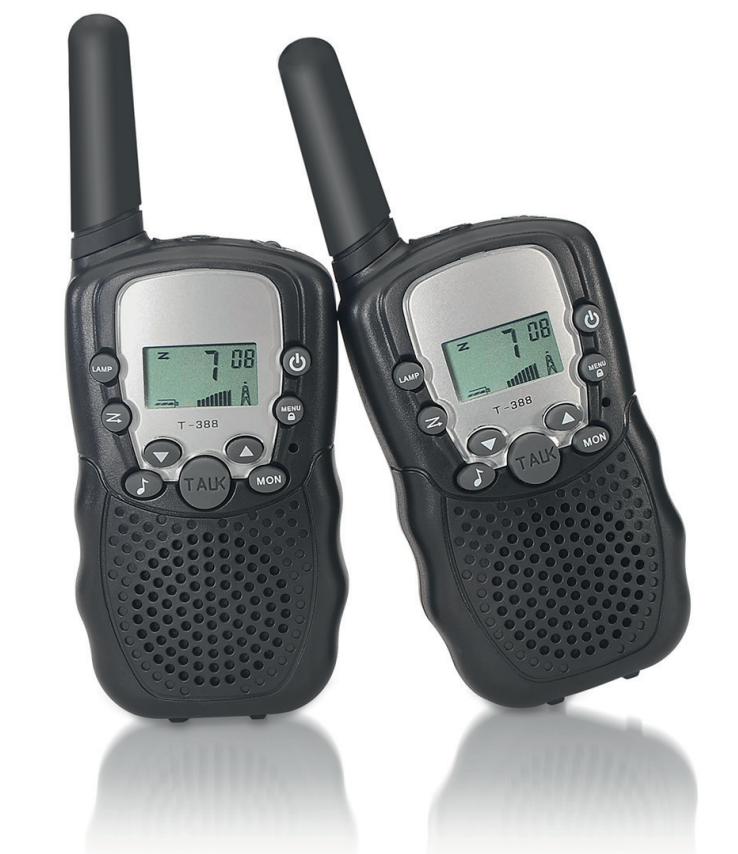
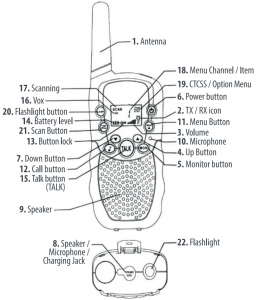 IMAGE 01
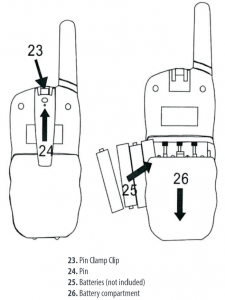 IMAGE 02
Instructions for use
This set includes two units of walkie-talkies: they are communication devices that operate in radiofrequencies movable. They incorporate 8/20/22 channels (optional) as well as LCD backlit, allowing you to communicate without costs over several kilometers (up to 3 km in open areas).NOTE: Please read lhe1e in1tructions carefully before using the equipment and keep them for future reference!
SPECIFIC RECOMMENDATIONS
- Consult your doctor before using if you have any medical device.
- To avoid risk of burns, do not use the device If the exterior is damaged in any way.
- Move away from hazardous environments (eg gas stations, boat decks, or fuel or chemical Installations} before using the device.
- Turn off the device if you are in an airplane or a hospital, as this may cause radio interference.
- Remove the batteries if you are not going to use them for a long time. Never mix new and old batteries or other brands.
- Keep the transmitter and antenna at least 5cm from your face. The antenna should point up so you can talk normally.
- Do not dean with solvents or other chemical agents.
- Do not modify the device in any way. In the event of damage, make sure the device is checked by a qua lilied professional.
- It can not be used to contact emergency services.
DESCRIPTION OF COMPONENTS (Images 1 and 2)
- Antenna
- RX Icon_ Appears when receiving.TX Icon _Appears when transmitting,
- Volume level indicator
- Set Up Button
- Continuous Reception
- Power button
- Bottom Adjust Button
- Headphone Hale
- Speaker
- Microphone
- Menu; Enter the menu settings
- Call button {CALL)
- Button lock indicator
- Battery level indicator
- Push to Talk button (TALK)
- VDX indication
- Scan Indication: Displays during scan mode
- Menu Channel/ Item Indication
- CTCSS / Option menu, value
- Flashlight button
- Scan button
- Flashlight
- Pin Clamp Clip
- Pin
- Batteries (not included)
- Battery compartment
BEFORE USE (Image 2]
To insert the batteries into the devices, first remove the pin; lift the securing clip (23) and push up the pin (24).Open the battery compartment (26) and insert 4 AAA batteries (25) (not included}, making sure the poles are properly aligned. Then close the lid.
USINGTHE WALKIETALKIE
- Turn the device on and off:To turn the device on or off, press and hold the On/ Off button (6) for 3 seconds. A BEEP sound will confirm the status.
- Adjust the Volume:To increase the volume, press the Up Adjust Button.
 . (4), and the Down Button (7) to decrease the volume.Note: The volume level {3) is shown on the display.
 - Low Battery Indicator/ Charging Level:The charge level is indicated by the number of squares within the battery icon on the LCD. Full battery Battery 2/3 charged Battery 1/3 charged Empty batteryWhen the battery charge level is low, the battery icon will blink a BEEP will sound ta Indicate that the batteries should be replaced.
- Receiving /Transmitting Communications:The devices are in Receive Mode when they are turned on, that is, they are ready to receive a call or sound transmitted by the activated frequency.When you press the call button (12), the device switches to Transmission Mode. Then you are transmitting a sound signal to the other device.To send a voice message, press the talk button (TALK) (15) and speak into the microphone (1 0).Continue to press the button until you have finished transmitting your message.Keep the microphone at least 5cm from your face.Note:● The other device must be in the same channel and have the same cress code (see item 7)● When the transmission is complete and the TALK button 115) is no longer being pressed, tile other device will emit a BEEP sound to indicate that it is ready to transmit
- Changing Channels:Press the Menu button (11 ), the number of the current channel will flash in the display.Press the Up (4) or Down (7) buttons to change the channel.Press the TALK button (15) ta confirm and return to stand-by mode.Note: If you do not press the button within 15 seconds of setting, the unit will return to standby mode by itself.
- CTCSS (Continuous Tone Coded Squelch)Free license radios operate In a frequency band between 400-470Mhz, and like our devices, have 8/20/22 radio channels available. If there are many radio users in your vicinity, there is the possibility of some of those users are using their same rad To channel. To prevent it from receiving signals from other users, we have integrated subchannels.The two radios can only communicate with each other when operating exactly on the same radio channel, and when they have chosen exactly the same subchannel.There are two types of dub channels: Coded Continuous Tone Squelch (CTCSS) When using the CTCSS, a low frequency tone (between 67 and 250 Hz) will be transmitted next to the voice signal. There are 38 tones available lo choose from, you can choose any of them. Due to filtering, these tones are generally not audible or disturb communication.
- CTCSSPress the MENU button (11) twice: the current CTCSS code will flash on the display.Press the Up (4) or Down (7) button to switch to another code.Press the TALK button (15) to confirm and return to stand-by mode.Note: To disconnect the cress, select the ‘OFF for CTCSS” code from the menu. When you confirm the choice, “OFF” will appear on the display.
- MonitorYou can use the monitor function to check the weather signals on your channel.Press and hold the MON button to activate channel monitoring.Note: During channel monitoring, the recei.er circuit will not listen to CTCSS codes.
- VOX SelectionThese devices are prepared for voice activated transmissions (VDX). In VOX mode, the radio will transmit signal when activated by its voice or some sound around. YOX mode is not recommended if you plan to use the radio in noisy or windy environments.Note: The VOX mode will be replaced when you press the TALK button (15].Pressing the MENU button (11] three times will activate the YOX mode, a11d the VOX icon will appear on the screen.Press the Up button (4) ta adjust the VOX sensitivity level between 1 and 3 (level 3 is the most sensitive).Press the Down button (7) until OF appears in the display, and YOX mode is turned off.Press the TALK button (15) to confirm and return to stand-by mode.
- Scanning an active radio channelPress the SCAN button (21):The “Scan” function indicator {17) will appear on the screen, and the channel (18) will continuously scan channels 1 through 8/20/22.Press the Down button (7) to start scanning channels and 8/20/22 to 1.Once an active channel is found, scanning will stop and you can listen to the transmission.When the transmission in the found channel stops, the scanning will start again automatically.NOTE: If you press the TALK button (15) while listening to a found channel, the radio will be in standby mode on the found channel.
- Ring-tonesA ringing tone alerts the other device that yo want to start talking.Setting the Ring-ToneThese walkie talkies have 10 ring tones.Press the MENU button [11 l four times, and the current ring tone will sound, and you will see flashing on the display.Press the Up (4) and Down (7) buttons to switch to other ring tones. Press TALK (15) to confirm and return ta standby mode.Sending Ring TonePress the call button (CALL) (12) briefly. The ring tone will be transmitted on the set channel.
- Key tone on / offWhen a button is pressed, the unit beeps briefly.To set the keypad tone:Press the MENU button (11) live times and the display will show TO.Press Up to activate (DN) or Down to turn off (OFF) the key tone.Press TALK (15) to confirm the selection and return to stand-by mode.
- Roger Beep On/ OffAs soon as you release the TALK button after speaking, the unit will send a sound called “Roger Beep” or Beep to confirm that it has stopped talking. To establish the Roger Beep:Press the MENU button (11) six times and the display will show RO.Press Up to activate (ON) or Down to deactivate (DF) the Roger Beep.Press the TALK button (15) to confirm theselection and return to stand-by mode.
- Keyboard lockPress and hold the MENU button [11) for 2 seconds to activate the key lock mode. The lock icon will appear on the LCD screen.Pressing it for another 2 seconds disengages the lock.Turn off keyboard lock.Note: The TALK (15), CALL (12), MON (5) and On/ Off (6) buttonswill still be functional despite the lock.
- Screen backlightTo activate LCD feedback, press any button except MENU (11) or MON (5). The LCD monitor will be backlit for 5 seconds.
- Handset connectionThese walkie talkies can be used with headphones. The connector is on the top of the unit (SJ. Insert the headset Jack (2.5mm) into the connector. The small button on the headphones works the S<1me as the TALK button [15) on the unit.When using the TALK button (15) from the handset, you must also use the ha11dset microphone to talk.Note: Do not connect it to other headphones as this may damage the device.
- Battery saving functionWhen the device has not been used for 6seconds, the power saving mode is automatically activated. This does not affect reception or transmission, and the standard mode is automatically reactivated as soon as a signal is detected.
- Built-ln flashlightAs an additional feature, it has a flashlight that can be used for bath your lighting needs and to send light signals.
|
TECHNICAL SPECIFICATIONS |
|
| Subcode | CKSS 99 |
| Range | Up to 3km (open field) |
| Battery | 4xAAA |
| Transmission | = <500mWERP |
| Modulation Type | FM-F3E |
 Disposal of Old Electronic and Electronic Equipment(Applicable in the European Union and other European countries with select collection systems).This symbol on the product or its packaging indicates that this product can not be treated as household waste.Instead, it should be taken to a selective collection point where electrical or electronic equipment can be left Ensuring th.t this product is disposed of properly will help to prevent potential negative consequences for the environment and human health, which could occur if It is disposed improperly. Recycling materials will help conserve natural re1ources. For more detailed information about recycling of this product, please contact your local council or your local waste disposal service.
TECHNICAL SERVICE : http://imperiielectronics.com/index.php?controller=contact
![]()
imperii Walkie Talkie User Manual – imperii Walkie Talkie User Manual – imperii Walkie Talkie User Manual –
[xyz-ips snippet=”download-snippet”]