
THE IMS1270 CIPS USER’S MANUAL (2)Data Processing and Tools
Customizable Ion Probe SoftwareVersion 4.0
CIPS user’s manual (2) June2003 not fully documented for Image Processing, Periodic table, General Setup, Hardware setup, Other Tools
Displaying and processing the Isotope analysis results
Overview
When clicking on the main bar menu DATA PAGING, both the curve_browser box and the curve panel are displayed. the curve_browser box allows to select the current analysis or any previous analysis file name.
The curve panel allows to display and to process any set of curves (Y1(X),…, Ym(X), …) where Y1,… Ym, … are the signals measured within an analysis and corresponding to the different species defined in the analysis species table (see the section § The SPECIES table box)
The curve_browser box
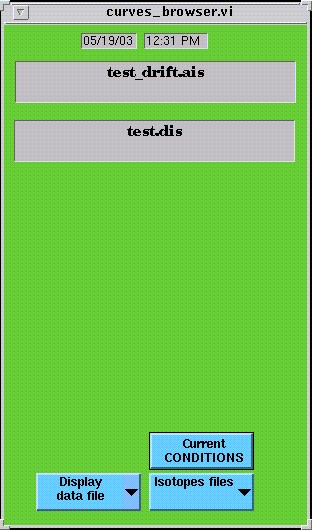
This box is attached to the Curve panel. It allows to load the current analysis or any previous analysis file name in the Curve display window.
FILE CONDITIONS/CURRENT CONDITIONS both selections are equivalent if READ ACQUISITION or DISPLAY ACQUISITION is selected in the left side field below. In the other case (selection of READ FILE or DISPLAY FILE), it allows to display the data of a previous analysis file with the current graphic conditions (scale, curve selection etc…) or with the current spreadsheet conditions (computed ratios, correction…)
READ ACQUISITION/ DISPLAY ACQUISITION/ READ FILE/ DISPLAY FILE According to the selection READ/DISPLAY, the curve or the spreadsheet window will be selected and opened. According to the selection ACQUISITION/FILE, the current acquisition or a previous acquisition file will be loaded. WARNING: If NONAME is selectected in the next field, no file box will be opened for selecting a file.
ISOTOPE/HIGH RESOLUTION… Filters the analysis filename wich will be proposed for being displayed.
Displaying and processing the analysis results with the curve panel
For opening this panel, click DATA PAGING on the main bar menu or CURVES in the spreadsheet panel.
For an advanced use of this panel processing functions, it is highly recommended to read the chapter 16 Graph and Chart Controls and Indicators of the LabVIEW® user’s gide (See the appendix § The LabVIEW® graph functions)
LIN/LOG
SCALE achieves an autoscale
The cursor table See the appendix § The LabVIEW graph functions, p.16-36
# CURVE allows to select the curve which is to be processed. This selection is required as far as a set of several curves is displayed in the graphic window.
MEASURE opens the peak information box, dedicated to the High-Resolution peak processing. See the section § Featuring a High resolution Spectrum with the “Peak Processing”
PROCESS (Remove/Background substraction/Surface/Normalize/Drivate curve/Integrate curve/Smooth) according to the the selected functions, a small dedicated box is opened in the panel right hand side and cursors are assigned to the processing function. For a detailed description of all these functions, see the following section § The curve processing functions.
SHOW (Analytical conditions/Acquisition conditions/Raw data) Analytical conditions displays the Analytical parameter box. See the section § Defining an isotope analysis/Analytical parameters. Acquisition conditions displays the analysis SPECIES TABLE box. See the section § Defining an isotope analysis/ The SPECIES TABLE box.
COMMENTS opens a Comment panel where it is possible to edit some comments which will be attached to a graph print. This comment panel is not automatically refreshed for a new analysis.
PRINT DATA
GRAPH PROPERTIES Normally for the factory set-up only. allows to modify the cursor properties, the curves coulours etc… For using this panel, the user must read the chapter 16 of LabVIEW® user’s manual (See the appendix § LabVIEW® graph options and graph cursors)
SPREADSHEET opens the Spreadsheet panel
SAVE Open the file manager box for saving the processed data.
Overlay Off /Overlay On An additional box overlay is opened when overlay On. Note that this box automatically opened if the processing options Derivate or Integrate are selected allows to manage several sets of curves on the same plot. When the Overlay box is opened, a second Y-scale is displayed at the graphical window right hand side.
The curve processing functions.
When using any processing function, it is recommended to check that the cursors required for the processing are displayed on the screen. If they are not, check that the cursor color is not transparent. Normally, the useful cursors can be driven with the mouse. This feature is set in the Graph Properties panel. It is always possible to move a cursor by blackening the square in the cursor table and by clicking the special cursor button![]()
|
Processing function |
dedicated box |
| Remove
The double Vertical & Horizontal cursor #10 is assigned to this function. Move the cursor to the point to be removed and click OK in the dedicated box. The removed point is replaced by another point, interpolated between its two neighbours. |
|
| Background substraction
Intensity Editing field to enter the background level wich will be substracted by clicking OK. Default value is the displayed curve maximum. Level (%) Display field the background percentage level is calculated with the displayed curve maximum. It is also possible to select the background level with the cursor #10. |
|
| Surface
Surface Display field displays the surface located between the curve and both cursors #10 and #11 |
|
| Normalize
Click the rectangle just below Normalize, in the dedicated box. Select amongNormalize NO/Normalize to Max/Normalize to flat top peak. The last selection is available only if the Peak information box Measure + Flat is opened (see the section § Featuring a High resolution Spectrum with the “Peak Processing”) |
|
| Derivate curve
Click the rectangle just below order, in the dedicated box. Select amongNone/first/second (for first and second derivatives) span Editing field is the order of the filtering achieved previously to the derivation. It cannot be lower than 5. A second scale is displayed at the right hand side of the graphic window. OVERLAY switches from OFF to ON. Clear Overlay hides the integral curve. |
|
| Integrate curve Computes and displays the integral curve.
A second scale is displayed at the right hand side of the graphic window. OVERLAY switches from OFF to ON. Clear Overlay hides the integral curve. |
|
| Smooth
Iter Editing field is the number of times the operator has clicked OK. Span Editing field is the order of the filtering achieved previously to the derivation. It cannot be lower than 5. |
Processing the results with the isotope spreadsheet
Overview
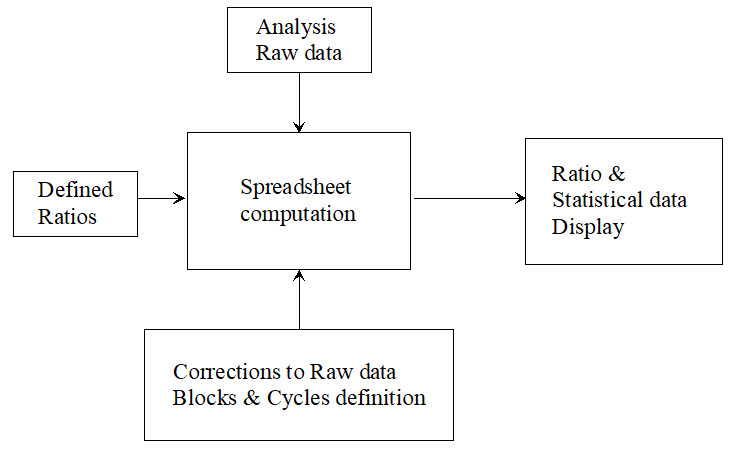
The Isotope Analysis spreadsheet is dedicated to the following purposes:
- To define the ratios which must be displayed and computed
- To display the isotope ratios as final results of the analysis
- To modify the correction parameters taken into account in the ratio computation, and to display therefore the different steps of the computing process which transforms the raw data into the final result.
- To estimate the uncertainty of the isotope ratio measurement and to help for searching for the causes of non-reproducibility.
This last task requires to tackle with some statistical issue. An appendix presents some basic results of statistics. Some comments are necessary to explain how to apply these statistical results to the ion counting detection.
In the case of using an EM for measuring the ion signals, it is clear that a large enough number of counts is necessary to estimate a ratio at a given accuracy. It is explained in the appendix § Fundamental of Statistics, that, when measuring N counts during a given time T, the unavoidable dispersion on this measurement is N1/2, providing that N is larger than a fewunits. (This is also true in the case of FC measurement, but this uncertainty is then always dominated by the preamplifier noise). Consequently, when a ratio is derived from two numbers of counts N1 and N2, there is an unavoidable uncertainty which can be expressed as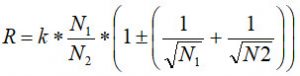
As it is explained in the appendix § Fundamental of Statistics, this formula is slightly more complicated in the general case when the ratios are defined as The spreadsheet allows to divide the overall analysis into sub-measurements and to compare the unavoidable uncertainty
in the more simple case) , labelled in the spreadsheet as Poisson (%) to the actual experimental standard deviation of the mean, labelled in the spreadsheet as Std error mean (%), measured among the set of considered sub-measurement. A sub-measurement may be an elementary analysis cycle, or a block of cycles. When both Poisson and Std error mean are very close, it can be deduced that there is no other cause of dispersion than counting statistics within the analysis.When this criterion is not met in the case of EM measurement or when FC measurements are involved in a ratio definition, the spreadsheet allows to investigate if the measured dispersion is of stochastic type or drift type. If the dispersion is stochastic, it will be possible to estimate the uncertainty of the overall measurement. This will be not possible in the case of a drift dispersion.In the spreadsheet, the complete set of N=n*M cycles are divided into M blocks of n cycles.
| Criterion for stochastic dispersion | 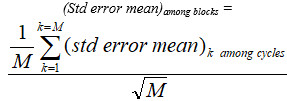 |
| Uncertainty |  |
In the case of drift dispersion, though the dispersion value is of interest, a confidence interval cannot be deduced. It is necessary to run several analyses to check if the criterion for stochastic dispersion is met for this set of analysis. The couple (Blocks, cycles) is then replaced by the couple (Analysis, Blocks).
As it can be seen, the spreadsheet table is divided into two parts. The upper part displays the data computed over a single block, while the lower part displays the data computed over the overall analysis cycles. In the first case, the cycle is taken as elementary measurement and in the second case with the selection OVER BLOCK, the block is taken as elementary analysis.
The user may process the raw data by himself. It is possible to export data to ASCII files or ISO format. (See below, the button PRINT)
WARNING: The Raw data are always expressed in counts per second.
As the counting time is always contained in the raw data files, it is always possible to compute the number of counts per cycle for every species.
The spreadsheet EM and Faraday corrections
For the EM and Faraday physical principles, refer to the appendices § The EM Physical principles and § The Faraday cup measurement principles in the CIPS user’s manual (3)
The EM deadtime
Let’s assume that the EM counting system is such that after the leading edge of a counted pulse, the system is paralysed during a so-called deadtime t. If Nmeas pulses are actually counted during one second, that mean that the effective counting time was not 1 second but (1-Nt). This leads to the deadtime formula:
On the IMS1270, the EM deadtime is normally determined by the hardware (See User’s guide for Multicollector). However, note that the deadtime is not the single parasitic effect which depend on the count rate. Other phenomenas are involved in the EM measurement process, such as the EM amplifier baseline drift which is caused by the fact that the EM amplifier is AC coupled. Finally, t can be considered as well as an empirical first order correction with respect to the couting rate.
The EM yield and background.Even at low count rate, a part of the secondary ions are not detected by the EM system. This yield YEM is normally determined by comparing both FC and EM signals for a count rate close to 106 cps.When no secondary ions are emitted, some parasitic counts are detected by the EM. This background signal bck can be measured . Generally, it is close to a few counts per minute. Finally, the full correction formula of EM detection can be expressed as
The linear drift correctionThe accuracy required for an isotopic ratio may be as small as 0.01% while the order of magnitude of the primary current stability within an analysis is 1%. When ratios are calculated within a cycle, it is clear, in the case of monocollection analyses, that the different masses are measured at different time and that primary current drift may occur or even if the primary current is stable enough, secondary signal drift may occur for various reasons. It can be therefore desirable to drift back the measurements so that all the cycle mass measurements could be considered as simultaneous. When the linear drift is ON, this drift back can be attempted by interpolating all the mass measurement at the location of the first mass in a time scale.Note that such an interpolation is of very small interest regarding the overall result, since it can be demonstrated easily that the relative error e resulting from a signal drift in the monocollection mode is![]()
Where t is the delay between the 2 ratio mass measurements, within a cycle, T is the overall analysis time and dI/I, the relative signal drift between the beginning and the end of the analysis.
The EM drift correctionThe EM Drift correction can be enabled only if the EM drift control was selected for the analysis (See the section § the EM Drift control in the CIPS user’s manual (1) and the hereunder section § EM Yield drift measurement within an Isotope Analysis ).As it is explained there, the EM Drift Control run along an analysis provides with a table [cycle, relative Yield] which make it possible to apply the EM correction formula with a specific yield YEM*Ycycle for every cycle, where Ycycle is the relative yield of the [cycle, relative Yield] table.
Faraday correctionsIn the Faraday mode, the dominating error is the offset drift. The strategy of correction is far different according as the analysis is run in a monocollection or a multicollection mode.• In the monocollection mode, it will be recommended to add in the analysis cycle a background mass (typically, an integer number + 0.5) in order to record the current offset at each cycle. It will be then possible to define ratios (See the section The SPECIES TABLE box/The Ratio Defining box in the user’s manual (1)) where this offset signal is subtracted from each Faraday signal.• In the multicollection mode, the offset measurement must be performed before the analysis (See the hereunder section § FCs Offset Calibration.) Once recorded, the FC offset will be automatically subtracted in a software sublayer. In the same way, an automatic routine allows to record the respective efficiency of the different Faraday channels See the hereunder section § FCs Calibration. Further, this calibration results will be also taken into account in a software sublayer. Both the FC offset and the FC yield are not transferred in the detection set-up
In the detection set-up panel, it is expected that the EM yield is different from 1 and the EM deadtime different from 0 and further that in the spreadsheet, EM yield and EM deadtime corrections must be applied.But, in the case of FC detection, though the user can also apply such corrections, they must normally be set to zero.
The Main Spreadsheet panel
The Spreadsheet panel can be displayed by clicking DATA PAGING in the Main bar menu and Spreadsheet in the Curve panel (See the above section § Displaying and processing the analysis results with the curve panel)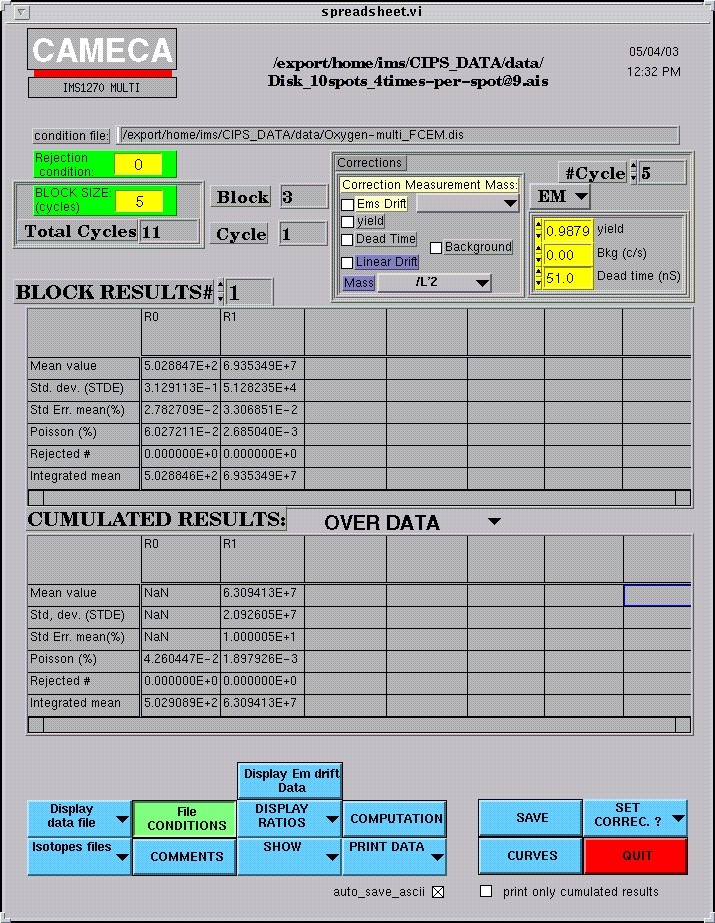 The spreadsheet computing parameter box (right top corner)For every loaded analysis raw data, these parameters can be modified with an immediate update of the results.
#Cycle Editing field number of cycles per block. The number of blocks is deduced from the analysis total number of cycles and displayed in the Block box (diplay field).The EM drift, Yield, Background, Dead Time, Linear Drift chekboxes enable or unable the respective corresponding corrections according as they are checked or not. See the above section § The EM and Faraday corrections.The display/Editing fields Yield, Bkg (c/s), Dead time (nS), displays first the corresponding values stored in the detection set-up panel (See User’s guide for Multicollector, Chapter Software tools for testing the Hardware). They can be edited further without modifying the content of the set-up panel. Except if the user clicks the spreadsheet panel bottom button SET CORREC/Export to Set-Up.
This box allows to define for each detection channel a set of correction parameters (Y, bck, dt). As the analysis species table contains the correspondances between measured mass Mm, and a detection channel, it is finally possible to build a Mass correction table [m, Ym, bckm, dtm]. For the use of these parameters, see below the section § The spreadsheet computed cells. For some comments about these corrections, see below the Appendix § The EM and Faraday corrections.
Mass (MeanTime/M1/M2…) allows to select the exact location in the analysis cycle where all the measurements will be interpolated in the case of Linear drift. Selecting Mean Time means that all the measurements will be interpolated at the middle of the cycle; selecting Mi means that all the measurements will be interpolated at the mass Mimeasurement time. This selection defines the time t0 within a cycle where all the mass signals will be interpolated. For the use of t0 , see below the section § The spreadsheet computed cells.
Other fields of the spreadsheet panel topCondition file display field The analysis definition path and filename corresponding to the current spreadsheet data.
Rejection condition display/Editing field When new data are read, it displays the value recorded in the additionnal ISOTOPE box (See the section § The additionnal ISOTOPE boxes/ Analysis time, Cycles, Blocks). It must be an integer. Let us call it nrej.This field can be further edited. Whenever statistical computations over a set of data are required, a preliminary computation of the pair (average, s) is achieved. Then, all the data outside the interval [average – nrejs, average + nrejs] are rejected, and the final computation does not take into account the rejected data.
BLOCK SIZE display field Number of cycles contained in the block as it is defined in the analysis definition file. It is not updated if the user modifies the spreadsheet field # Cycle.
Total Cycles display field Total number of cycles.
Block display field Number of blocks, taking into account the total number of cycles displayed in the spreadsheet field Total cycle and the number of cycles per block edited in the spreadsheetfield #Cycle. If the preadsheet displays the current analysis (option READ ACQU, see below), the Block field displays the index of the current block.
Cycle display field Number of cycles per block as it is defined in the Analysis definition file or edited in the spreadsheet field #Cycle. If the preadsheet displays the current analysis (option READ ACQU, see below), the Cycle field displays the index of the current cycle within its block.
The spreadsheet bottom panel buttons
Read Acq/Read Data file allows to load in the spreadsheet either the current acquisition data, in real time or previously saved data. Read data filr opens the CIPS file manager box. If Read Acq is selected, Display Acq will be further displayed there If Read Data file is selected, Display Data File will be further displayed there.
Isotope files/Mass spectrum/… allows to select the type of analysis which will be sorted by the file manager box.
File CONDITIONS/Current CONDITIONS According to this selection, the analysis cycle partitioning into blocks is defined in the first additionnal Isotope box (See the section § The additionnal ISOTOPE boxes/ Analysis time, Cycles, Blocks) or in the spreadsheet panel top. The rejection option is also adressed by this option.
Display EM Drift data Displays EM Correction box
RATIOS (Display Ratios/define Ratios) allows to display in a dedicated box the ratios R0, R1, R2… corresponding to the spreadsheet columns or modify these ratios or to define new ratios See below the Display Ratio Box, if Define Ratios is selected In this last case, the Ratio Defining box is opened. For using this box, refer to the CIPS user’s manual (1), the section § The SPECIES TABLE box/The Ratio Defining box.
SHOW (Analytical conditions/Acquisition conditions/Raw data) Analytical conditions displays the Analytical parameter box. See the CIPS user’s manual (1), section § Defining an isotope analysis/Analytical parameters. Acquisition conditions displays the analysis SPECIES TABLE box. See the section § Defining an isotope analysis/ The SPECIES TABLE box.
COMPUTATION Opens the Computation panel dedicated to the display and processing of an overall set of analysis resulting ratio.
PRINT DATA (Statistics/Rawdata/Print to file (DOS)/Print Raw to file (DOS)/Print to file (ISO)/Print Raw to file (ISO) allows to print either the spreadsheet statistical data or the Raw data. Note that the Raw data listings contain also the statistical results. Options Print to DOS allows to write the data into an ASCII file readable by a PC, in order, for example to process the data with in a standard spreadsheet. ISO is the UNIX ASCII format, accepted by spreadsheet MicrosoftÔ Excel® under MacIntosh®.
SAVE opens the CIPS file manager box in order to save the spreadsheet data.
CURVES Switches to the Curve panel. In the same way, in the Curve panel, the spreadsheet button allows to switch to the spreadsheet panel.
SET CORREC ? (Export to set-up) Transfers the data contained in the spreadsheet panel top fields (Yield, Bckg, deadtime) to the Detection Set-up panel.
Auto_save_ascii When this button is black, all the analysis output data files and processing output data files are automatically saved in an ASCII format file, additionally to the normal Labview® format file.
The Display Ratio Box
 Display EM Correction box
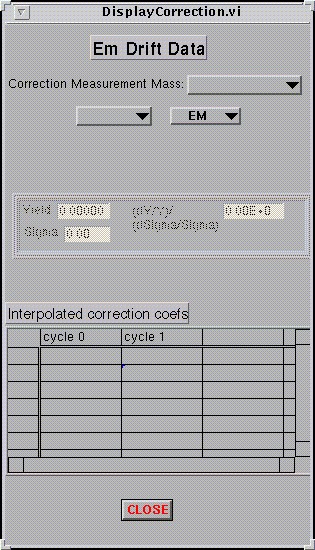
This box displays the results of the EM Drift Control routine. Refer to the CIPS user’s manual (1), section § The EM Drift Control.
The EM Drift correction is applied if the spreadsheet EM drift correction checkbox (Top bar) is checked.
See, for this correction the above section § The EM and Faraday corrections
Cycle is a combo which allows to display the result of any measurement cycle (for example 1/11/21/31…)
EM/L2/L1… allows the EM selection if the EM Drift control routine has been run with several EM.
Yield, Sigma, (dY/Y)/(dsigma/sigma) displays the results of the measurement cycle selected above.
Interpolated correction coef displays the relative yields as they are applied onto every cycle.
7.5.4 The spreadsheet computed cellsThis section contains a lot of formulas. The hereunder glossary may help the reader which requires to have a precise knowledge of the formulas involved in the CIPS spreadsheet.
| GLOSSARY | |
| i (1 to N) | Cycle index in a N cycle analysis. |
| N | Total analysis number of cycles. |
| k (1 to B) | Block index in the same analysis. |
| B | Number of Blocks |
| j (1 to n=N/B) | Cycle index in a block |
| n | Number of cycles in a block |
| m (1 to M) | Mass index. |
| M | Total number of measured masses, defined in the species table. |
| Countm,i (counts) | EM Raw data |
| Im,i (A) | FC current |
| SRm,i (cps) | Raw data signal |
| Tm (sec) | counting time related to the mass m. |
| Ym, | Yield which is applied as a correction onto the raw data |
| bckm (cps) | Background which is applied as a correction onto the raw data |
| dtm(ns) | Deadtime which is applied as a correction onto the raw data |
| Scm,i (cps) | Data signal, after the (Yield, bkg, dt) corrections if required. |
| pm,i | Slope dSR/dt |
| Tcycle (sec) | Overall cycle time |
| SCm,i (cps) | Corrected data signal, including the linear drift correction, if required. |
| RATi | Ratio calculated over a single cycle |
| RAWRATk | Ratio calculated with the raw data SR. |
| NUMRATk | Numerator of RAWRATk |
| DENRATk | Denominator of RAWRATk |
| Mean ratio calculated over a block | |
| STDEk | Ratio experimental standard deviation calculated over a block k |
| STER%k(%) | experimental standard deviation of the mean computed over the block k (Estimated uncertainty of the ratio computed over the block k .) |
| POIS%k (%) | Accuracy of the ratio computed over the block k data, if the single cause of uncertainty was the finite number of counts. |
| RATBLOCKk | Ratio calculated with the overall data of the block k. |
| Mean ratio calculated over the overall analysis cycles. | |
| STDE | Ratio standard deviation calculated over the overall analysis set of blocks |
| STER% (%) | Estimated accuracy of the ratio computed over the overall analysis cycles. |
| POIS% (%) | Accuracy of the ratio computed over the overall analysis data, if the single cause of uncertainty was the finite number of counts. |
| RAT | Ratio calculated with the overall analysis data. |
Let i (1 to N) be the cycle index in a N cycle analysis.Let k (1 to B) be the block index in the same analysis.Let j (1 to n=N/B) be the cycle index in a block.Let m (1 to M) be the mass index.Raw data SRm,i (displayed in the Raw data panel and printed as Raw data)
All the raw data SRm,i are expressed in counts per seconds.
– EM case 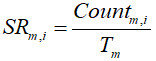
where Tm is the Mass m counting time, and Countm,i the number of counted counts during Tm.
– Faraday case 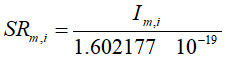
Where Im,i is the Faraday current, measured in Ampere.
Corrected data SCm,i
1st correction: Yield, background, deadtime.
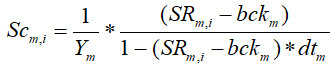 Where Ym, bckm, dtm are respectively the yield, the background level and the deadtime corresponding to the Masse m.
For defining these corrections,see the previous section § The Main Spreadsheet panel.
For some comments about these corrections, see below the Appendix § The EM and Faraday corrections.
If a channel yield correction is not enabled, Ym is set to 1. If a channel Background correction is not enabled, Bckm is set to 1. If a channel deadtime correction is not enabled, dtm is set to 0.
2nd correction Linear Drift
Defining the cycle slopes pm,i as
Where Tcycle is the overall cycle time, derived from the species table.The linear drift correction is defined as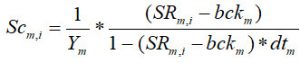
Where tm is the cycle time location of the Mass m counting time and t0 the reference cycle time location defined by the selection Linear drift (See above the section § The Main Spreadsheet panel).
For some comments about these corrections, see below the Appendix § The EM and Faraday corrections.
Ratios
Any numerator and denominator ratio can be defined as a linear combination of the species counting rate. (See the section § The ratio Defining box)
Cycle Ratio The cycle Raw Ratio is further used for the Poisson calculation
![]() is the mean SRm computed over a block data.
is the mean SRm computed over a block data.
Computation over one block data
The spreadsheet top half displays statistical computing within the block k. The displayed block k can be selected by the user (the incrementable box close to BLOCK RESULT #.
| BLOCK RESULT # | k |
| R | |
| Mean value |  |
| Std dev (STDE) |  |
| Std Err Mean (%) |  |
| Poisson (%) | 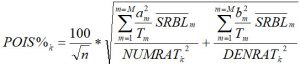 |
| Integrated Mean | 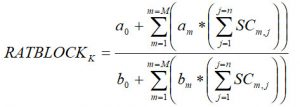 |
For some comments about how these formulas are derived from the basic statistical laws, see the appendix § Fundamental of Statistics.
When printing Statistics or Raw data, the above computed reults are listed for each block. In the case of Raw Data, the cycle data SRm,i are also listed.
Computation over the cumutaled data
This spreadsheet bottom half displays the overall analysis result: One result for each ratio, with some additional data for estimating its uncertainty. A box located close to CUMULATED RESULTS allows to select OVER BLOCK/OVER DATA.
OVER BLOCK/OVER DATA In the case OVER BLOCKS, the block is considered as the elementary measurement, and then, the same statistical features as above, in the BLOCK spreadsheet are computed. In the case OVER DATA, the partitionning into block is not taken into account.
| CUMULATED RESULTS | OVER DATA |
| R | |
| exactly the same computation is achieved as in the case of one block (See above): A single block is considered, consisting of all the N analysis cycles. |
The following table concerns only the case OVER BLOCKS
| CUMULATED RESULTS | OVER BLOCKS |
| R | |
| Mean value |  |
| Std dev (STDE) |  |
| Std Err Mean (%) | 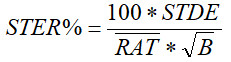 |
| Poisson (%) | POIS% is the same than in the OVER DATA case, i.e., by considering a single block containing all the data . |
| Integrated Mean |  |
7.5.5 Processing a set of analysis resulting ratios
The panel Computing can be opened from the panel SpreadsheetNot yet documented
The EM Control and EM drift correction
Overview
As it is mentioned both in this document, § The EM physical principles/EM aging and in the User’s guide for Multicollector, the EM aging is an issue regarding the isotope ratio measurement reproducibility, especially in the multicollection mode, since along an analysis, each EM channel may have a different drift. In order to give the user means of controlling the EM aging effect ant to correct the resulting drift, a software package has been developped.When a precision better than 10-3 is targetted for isotope analyses involving multicollector EMs the hereunder strategy is recommended:
- Periodically (typ. every 10 hours of EM use at 200000cps), the EM HV must be reset using the automatic EM HV Adjust tool. This will ensure that the PHA will be kept within a given template to its normal template.
- At any time, the PHA featuring tool allows to feature the EM PHA.
- Comparison between 2 set of PHA features allows to compute the resulting EM yield drift. This can be run manually in the EM drift measurement tool.
- During an isotope analysis session involving samples and standard analyses, the EM HV is not re-adjusted, but the same routines as in the PHA featuring and EM drift measurement tools can be run automatically either every block within an analysis or before each elementary analysis (See § Isotope Analysis). Then, the EM yield drift correction may be activated in the analysis data processing spreadsheet.
Both the mathematical model of EM drift correction and the processing routines required for the yield corrections are presented in the CIPS user’s manual (3), section § .
Tools
8.2.1 PHA8.2.1.1 previous functions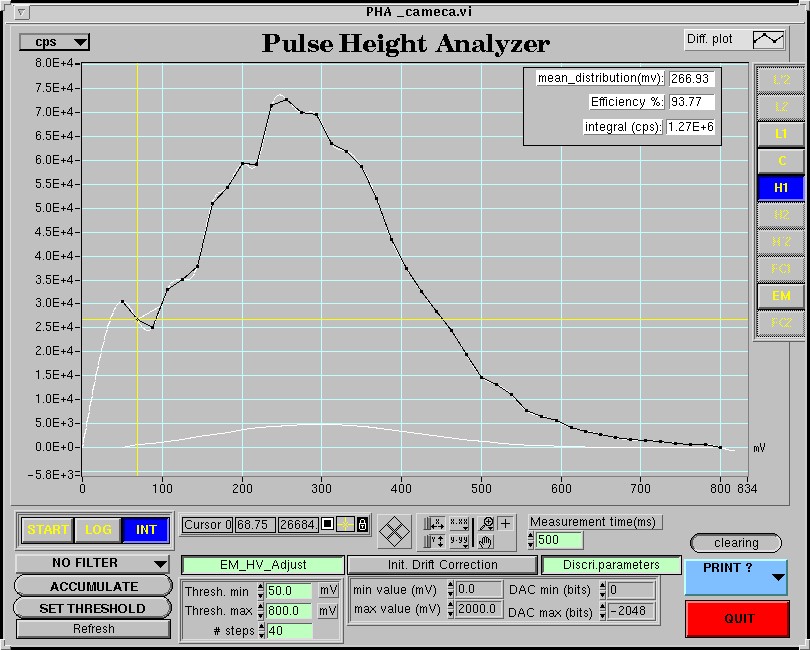 The Tool PHA is targetted to display the Pulse Height Amplitude distribution curve of any EM (main axis EM or multicollector EM) in order to check its aging and to set either the EM HV or the EM Threshold.
The PHA acquisition consists of an EM signal counting when scanning the threshold. The scan parameters define a scan cycle.
The menu bar L’2/L2/L1/C/H1/H2/H’2/FC1/EM/FC2, located at the top right hand side of the window is purposed to select the detector to be measured.
START/STOP Click START for launching the acquisition. Then, the button turns to STOP and the scan cycles do not stop until the operator clicks STOP.
LOG/LIN for displaying the curve with a logarithmic or a linear curve. After being clicked LOG, the button turns to LIN.
INT/DIFF When the operator clicks INT, the button turns to DIFF. Then the direct curve (Thr, EM) is displayed on the graphical window. When the operator clicks DIFF, the button turns to INT, and the derivative of the direct curve is displayed. This derivated curve is normally more familiar to the user.
NO FILTER/ORDER1/ORDER2/…/ORDER11 allows to select a smoothing function. The option NO FILTER is recommended
ACCUMULATING/ACCUMULATE Click ACCUMULATE for accumulating the successive cycles. Then the button turns to ACCUMULATING. If ACCUMULATE is displayed, the cycles are not accumulated.
SET THRESHOLD/SETTING For setting the threshold, click SET THRESHOLD. Then the button turns to SETTING. It is then possible to grab the vertical cursor with the mouse pointer, and when the mouse pointer leaves the graphical window, the cursor value will be loaded into the instrument. This can be checked on the keyboard display. When the button displays SET THRESHOLD, the mouse pointer can be used for moving both cursor along the curve and displaying the coordinates of the current point in the small boxes located just below the plot.
Scan parameters EDIT Fields
Thresh. Min (typ:60 mV) and Thresh. Max (typ: 600mV) are the lowest and the uppest values of the scanned threshold.
# step (typ: 40) is the scan number of points.
Measurement time (typ: 50ms) is the counting time per point.
Discri parameters EDIT Fields
These parameters allows to set the dependence of the actual threshold voltage on the keyboard variable, expressed in digits between -2048 and 2047. Normally, the following values must be edited:
| min value (mV) | 0.0 | DAC min (bits) | 0 |
| max value (mV) | 2000.0 | DAC max (bits) | -2048 |
But other values might be entered if the user has mounted another discriminator.8.2.1.2 New functions related to EM driftEM HV Adjust opens the box dedicated to run the automatic routine targetted to set the EM HV (See the hereunder section § EM HV Adjust)
INIT Drift correction opens the box dedicated to run the EM PHA featuring routine. See below § EM PHA featuring, EM drift measurement .
Discri parameters opens the SetThrparam box dedicated to edit the different thresholds involved in the EM PHA featuring routine. See below § Set Thresholds for the PHA featuring routine
8.2.2 Set Thresholds for the PHA featuring routineAvailable from The EM Drift Measurement. (Measurement Parameters button)
The pull-down menu L’2/L2/L1/C/Axial/H1/H2/H’2, located at the top of the window is purposed to select the EM detector.Thr1, …, Thr4, EDIT Fields edits the EM thresholds used in the EM drift mesurement procedure. (See § )
All same checkbox to set the same values for all the EM Channels waiting time, Meas. time EDIT Fields set the timing parameters of the Overall PHA featuring and the drift measurement routines OK validates the edited data and close the box Cancel closes the box without modifying the thresholds8.2.3 EM HV Adjust8.2.3.1 Overview
As it is explained in the section § , (CIPS user’s manual (3)) when an EM is used, there is an aging phenomenon consisting in a gain decrease and requiring therefore to increase the EM High Voltage (EM HV) all along the EM life, for compensating the aging.
The EM HV routine is purposed to re-adjust automatically EM HV. EM HV is set to keep the PHA curve within a given template featured by a couple of value (Thr1=Thresh(100%), Thr3=Thresh(50%)). Practically, the routine does not process the PHA curve, but it just set EM HV so that when setting the EM discriminator threshold to Thresh(50%), the signal is the half of this corresponding to Thresh(100%). Note that the Thresh(100%) value is typically the same that the working threshold, normally kept fixed all along the EM life
8.2.3.2 DescriptionAvailable from The PHA window (EM_HV_Adjust button)
The EM HV Adjust routine main box
- Measurement parameters : clicking this button opens the editing box The box is opened with the parameter values as they were previously set.
- EM HV adjust (START/STOP) Starts or stops the routine
- EM_HV displays the EM HV value all along the routine completion.
- Loop nb displays the number of the routine loop in progress.
- Delta displays d which must be smaller and smaller if the routine is converging (See below the definition of d)
- Quit closes the box and updates EM HV.
- Restore closes the box without updating EM HV.
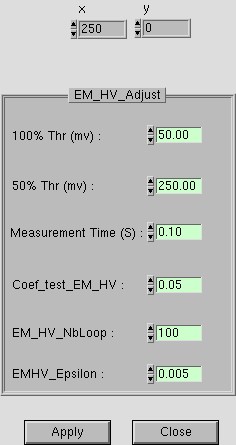
The EM_HV_Adjust_parameter box
- 100% Thr (digits) edits Threshold(100%), the reference threshold value normally close to the working threshold value. (typ 70)
- 50% Thr (digits) edits Threshold(50%), which set the EM signal at the half of the amplitude obtained when the threshold is set at Threshold (100%). (typ 350)
- EM HV Time (s) edits the step counting time, corresponding to Threshold(100%) or Threshold(50%) as well (typ. 1 s.)
- Coeff_test_EMHV edits the routine feedback coefficient k. At each routine step, EM HV is readjusted accordingly to
EMHVNEW = EMHVOLD * k *d
 IEM(Thr100%) and IEM(Thr50%) being the EM signal obtained with the EM threshold set at Thr100% and Thr50%.
(typ 0.1)
- EMHV_nbloop edits the routine maximum number of loop. (typ. 10)
- EMHV Epsilon edits the routine convergence test coefficient which is compared to d (typ 0.005)
- Apply writes in the Setup file the Measurement Parameters box modified parameters and closes the box
- Cancel closes the box without writing in the setup file the box modified values.
8.2.4 Overall PHA featuring, drift measurment8.2.4.1 Overview
The Overall PHA featuring & drift measurement tool is purposed to run manually the both the Overall PHA featuring and drift measurement routines.
The Overall PHA featuring routine corresponds to the procedures described in the CIPS user’s manual (3) section § The EM drift correction principles/ Before analysis, S(Thr) overall featuring s and a calculation. It consists of switching successively the selected EM thresholds to the five values Thr0, Thr1, Thr2, Thr3, Thr4 and to record the EM signal. This is repeated a given number of cycles.
The Drift measurement routine corresponds to the procedures described in the CIPS user’s manual (3), section § . It consists of switching successively the selected EM thresholds to both values Thr1 and Thr3 and to record the EM signal. This is repeated a given number of cycles.
For both routines, the values of different thresholds, Thr1… and the sequence timing parameters (waiting time, counting time, number of cycles) are edited in the Set threshold parameters box.8.2.4.2 Em Drift Measurement Description
Available from The PHA window (Init Drift Correction button)
Measurement parameters button opens the window Set Threshold
Enabled detectors (L2, L1, C, H1, H2, EM) checkboxs select the detector channels involved in the PHA featuring or drift measurement routines.
Mode (Overall PHA/ Drift Measurement) selects the routine to be run. If Overall PHA is selected, refer to the CIPS user’s manual (3), section § The EM drift correction principles/ Before analysis, S(Thr) overall featuring s and a calculation .If Drift Measurement is selected, refer to the CIPS user’s manual (3), section §
H1/H2/C/L1/L2/Axial pull-down menu selects the channel which is displayed in the box.
Fit coefs Ref. in , displays the 4 coefficients Lambda, Beta, Alpha, Sigma previously calculated (last Valid ).
New Fit coefs, displays the 4 coefficients Lambda, Beta, Alpha, Sigma calculated.
Yield displays the relative yield derived from the new sigma according to the formula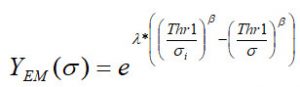
where si is the last validated sigma and s the new sigma. (It displays 1.00 just after a Valid .
(dY/Y)/(dsigma/sigma) displays the Yield drift to Sigma drift ratio, calculated according to the formula
Start launches the featuring PHA featuring routine. The routine will be run according to its Measurement parameters. (Thresholds, timing)
Stop stops the routine and computes the coefficients if at least one cycle was run.
Valid gives to the last computed coefficients the status of “last validated coefficients”. They are there displayed in the upper part of the box (Fit coefs ref. in), and the Yield drift will be calculated with respect to this measurement.
Quit closes the box.
Measurement cycle diplays the routine cycle in progress.8.2.4.3 PHA Display Description
See the pannel above (Em Drift Measurement Description)
The displayed curve is according the formula
Checking the Diff box displays the dS/dThr.
The EM PHA featuring routine measured data can be displayed at the box bottom.
8.3 EM Yield drift measurement within an Isotope Analysis
The Drift Measurement routine, as it is described in to the CIPS user’s manual (3), section § , can be run automatically during an analysis. (See the section § the EM Drift control in the CIPS user’s manual (1)). The EM Drift Control routine is run at a number of measurement cycles defined in the EM Drift Control box.
For the considered EM, the threshold is successively switched n_cycle times from Thr1 to Thr3, n_cycle being defined in the Set Threshold box.
It results, for every EM involved in the control a table [measurement cycle, relative Yield], where the relative Yield is computed according to the
section. It is then possible to interpolate a Relative Yield from the measurement cycles to all the analysis cycles. Finally, it results a table [cycle, relative Yield].8.4 EM Yield drift correction in the data spreadsheet
If the automatic EM Drift correction is included within an analysis (See the previous section § EM Yield drift measurement within an Isotope Analysis , it results a table [cycle, relative Yield], and the EM signal can be corrected in the spreadsheet (See the above section § Processing the results with the isotope spreadsheet) according to the formula
Overview
The stage Navigator is an interface dedicated to the control of the sample stage, either in an interactive mode, in combination with the optical microscope viewing or in a batch mode, for running a chained analysis (See the CIPS user’s manual (1), section § ). For this last purpose, the stage Navigator allows the user to build a Holder list which is a mapping of all the points of interest for a given sample holder prepared with given samples.The coordinate system origin is the sample holder center (See INIT in the Stage Navigator panel)Typical operations performed with the stage Navigator
- Carrying the stage at the loading position for introducing a sample Hoder (LOAD HOLDER)
- Selecting the Holder synoptic (Single or 3 Holes, etc…) according to the present loaded holder. The selected holder type is then displayed in the Holder graphical window.
- Moving the stage, either with the command GO TO, or with the Holder graphical window. By observing the optical microscope or the MCP video camera window, the operator can move more accurately the stage to an analysis point.
- Recording a past or future analysis point in the Holder List by clicking Store position. The recorded point is then displayed in the graphical window.
- Recalling a holder list stored point by clicking Recall position
- Transferring the coordinates of a Holder list point to the chained analysis table (See the section § Running a chained analysis).
From the main bar menu, click HOLDER
Left hand side bar
GO TO Moves the stage to the position (X, Y) edited in the boxes X Position and Y Position (See below)
LOAD HOLDER/UNLOAD HOLDER Moves the stage to the loading position, in order to unload or to load a sample Holder. It also opens the Holder List panel.
Position (Track Ball) Assign the track ball to the stage control.
Store Position Opens the Holder List panel and add as a new point the current position displayed in the box Current Position. In the Holder list panel, OK will validate this storing operation. (See below the section § The Holder list panel)
Recall Position Opens the Holder List panel. The operator must then select a line. The Holder list panel OK will move the stage to the selected position. (See below the section § The Holder list panel)
Abort aborts a stage motion
GO TO A DEFINE POSITION direct access to all the (X, Y) stored positions. The selection in the list of one of these will trigger the stage motion.
Panel Central Part
HOLDER NAME display field displays the Holder Name edited in the the Holder list panel. (See the next section § The Holder List Panel)
SAMPLE ITEM display field displays the number of the position selected in the Holder List table. (See the next section § The Holder List Panel)
CURRENT POSITION display fields displays the stage current position.
GOTO X(µm) Y(µm) Editing field When the operator clicks the button GO TO (See above), the stage moves to the position edited in these boxes or shift the stage of the values edited in these boxes according to the selection Absolute/Relative (See below)
Absolute/Relative selects the operating mode of the GO TO Command.
INIT launches the Stage Init process. The stage moves to both axis stops. The overall travel is recorded. The stage is then moved at the stage center (X=0, Y=0), as it is defined by these 2 pairs of stops.
READ reads the current position at any time and displays the position in the Current Position fields. This button is to be used when the operator wants to refresh this data faster than the automatic update.
QUIT for quitting the panel
Panel Right hand side
The graphical window displays the Holder type and the Holder list points, but it allows also to control the stage in the following way:
- Driving the vertical cursor moves the stage along the X axis.
- Driving the horizontal cursor moves the stage along the Y axis.
- Driving the cursor cross point moves the stage along both the X&Y axes.
For the Zoom and the shift facilities, see below scale and offsetx&y. At the cursor cross point, there is a red circle. As its radius is always 500 µm, it gives the scale when the image is zoomed.
Note that the Holder list points are attached by a line. This is a way to display them even at low magnification.
Valid Cursors have an effect onto the stage motion only if the Valid button is black.
Holder type (None/Single/Multiple1/Multiple2/4Holes) allows to define the holder type currently loaded. The holder holes are then displayed in the grapgical window.
goto display fields displays the cursor state actual position. At a steady state, it must display the same data as the Current Position fields.
Scale The cursor located just above “Scale” allows to tune the ZOOM from 1 to 100. The zoom center is the graphical window cursor cross point. Offsetx, offsety Editing field allows to shift the graphical window image.
The Holder List Panel
This panel is opened by the Stage Navigator panel buttons LOAD HOLDER, Store Position and recall position
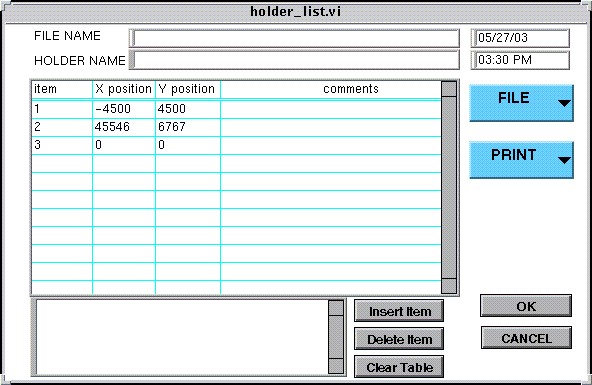
FILENAME display field displays the filename given when saving the holder list. (See below FILE)
HOLDER NAME Editing field this name will be also displayed in the Stage Navigator panel.
Insert Item Inserts a line in the table.
Delete Item Deletes the table current line.
Clear Table Clears the Holder List.
OK Validates the Stage Navigator command (LOAD HOLDER, Store Position, Recall Position) which has opened the Holder list panel.
CANCEL for quitting the panel without executing the Stage Navigator command which has opened the Holder list panel.
PRINT for printing
FILE (SAVE/LOAD) allows to save the current Holder List or to recall a previously stored list.
The Holder List Table
item display/Editing field label of the stored point, automatically incremented if not edited.
X Position, Y Position display/Editing field Point coordinates, in µm. Automatically recorded and displayed by using Store Position, in the Stage Navigator panel.Comments Editing field
Image Processing

TOOLS
Stability
In the Tool menu, click Stability
 nA/cps selection for the field located just below. This DISPLAY Field displays the mean value of the curve plotted in the graphical window. Sample time EDITING Field Time interval between 2 measurements.
Dwell EDITING Field Counting Time
PRIMARY STABILITY DISPLAY Field Computed statistical results DI/I(%), Slope(%), STDE computed over the currently displayed data.
START/STOP for starting and stopping the stability measurement.
LIN/LOG graphical window Y-axis scale selection
SNAP/LIVE if LIVE is selected, the displayed right end point is always the last acquired point. If SNAP is selected, the operator can shift the display window all along the measurement time. The display window width (it is a time interval) is determined by standard LabVIEW® ways (See the appendix § LabVIEW® graph options and graph cursors.)
PRIMARY/EM/FC…. Selection of the recorded signal.
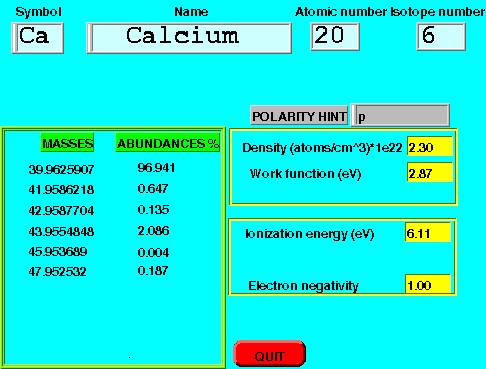
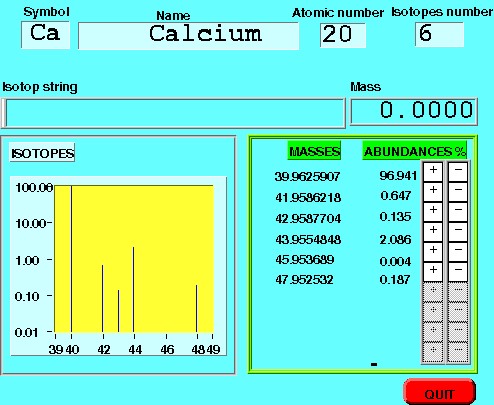
CESIUM/DUO in the case of primary signal recording, allows to display the type of the current measured source11.2 Periodic Table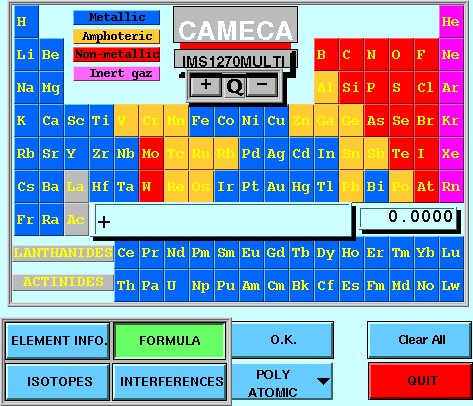
11.3 Setup panels11.3.1 General setup
Path: TOOLS/Setup/General Setup
This interface must not be very used: The first block is used only with IMS 6f equipped with CIPS. The second block is never used. The last block concern the headers displayed and printed with the plots. 11.3.2 Hardware setup
Path: TOOLS/Setup/Hardware set-up
This interface is to be used only for service purpose. Note that the selection CAMAC/68030 corresponds to the 2 different ways for the main FC1 and EM acquisition: Standard Cameca counting channel or CAMAC.
There are 2 connections between the Host computer and the keyboard µP : RS485 dedicated to the motor control, RS232C kbd port to the file transfer and the RS232C Mul port to all the connections between the keyboard software and CIPS involved in the multicollector control.
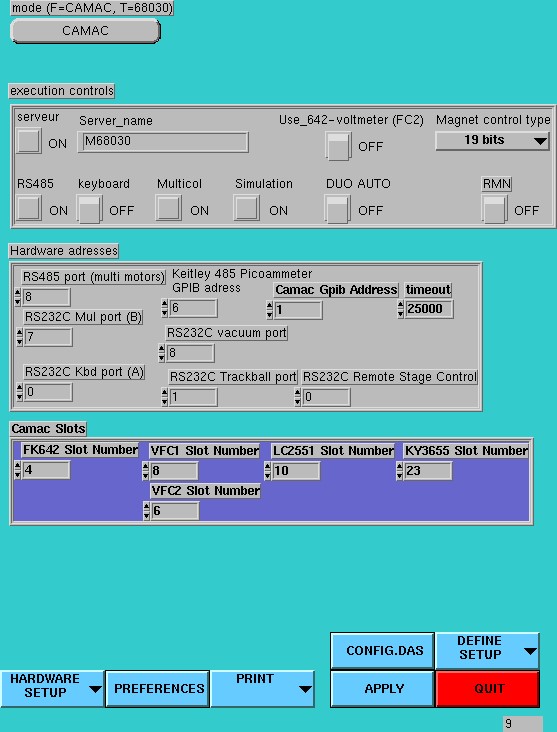 Simulation ON/OFF allows to test the overall CIPS without any instrument11.3.3 Detection SetupPath: TOOLS/Setup/Detection SetupThis interface must be used each time a EM or a FC are swiched on a collector. In the Finnigan electrometry chamber, each amplifier has a number. Note that A#9 is the FC1 Cameca amplifier and A#8 is the FC2 Keithley 642 amplifier.
Axial detectors parameters are the signal level threshold for automatic switching within an analysis. The FC to EM theshold must be smaller than the EM to FC for avoiding unstabitity in the threshold neighbourhood.
Multicol waiting time, ?
Multicollector safety is the level threshold which triggers a grounding of the detector ESA outer electrode in order to remove the ion current from the collector EM.
Detector parameters: “yield“, “Background” and “Dead time” are those taken into account in the tuning interfaces.
See the section § Appendix 1: The EM Physical principles
Detection setup/Hardware setup/… Opens different Setup pannels
Preferences opens the Preference pannel, for selecting the different configuration options.
Apply closes the pannel and saves the setup modifications.
Quit closes the pannel without saving the setup modifications.
Define Setup …
11.3.4 Measure set_up
Path: TOOLS/ TEST/ Camac_read_test/ setup/ Measure set_upPath: TOOLS/ Setup/ Measure set_up
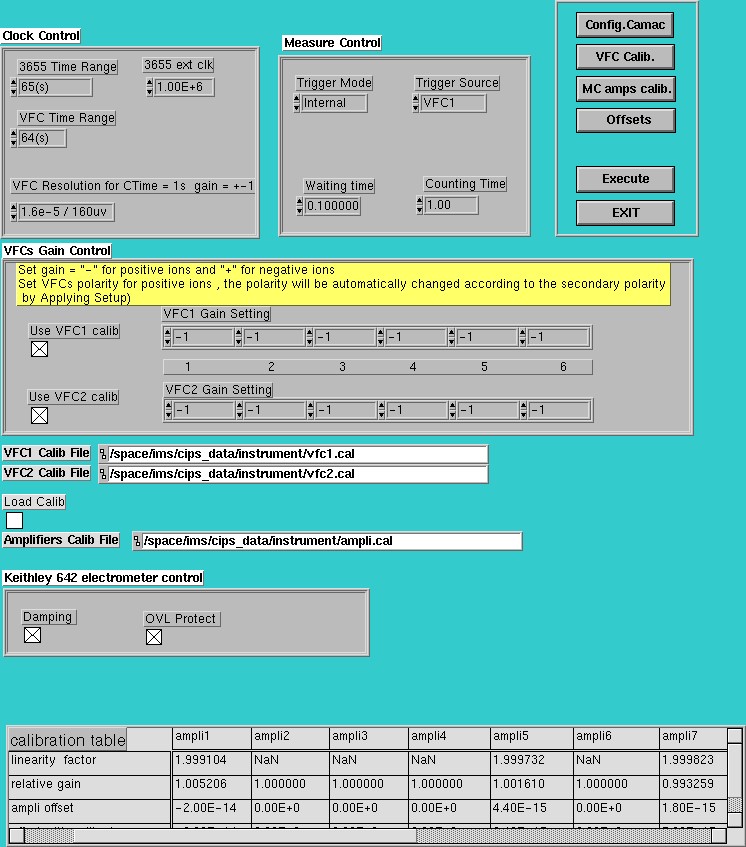
“VFC Resolution for Ctime=1s gain=+-1” selects the frequency (the same for all the channels). The inverse of frequency is displayed, with the corresponding voltage resolution.
“VFC Time range” maximum allowed counting time. The counter maxi is 16 Mcps. So, if the input channel is scheduled to be at full range, and the frequency set at 1MHz, “VFC Time range” should be set at 16s.
“Waiting time” and “counting time” are the default values.
Possible values of VFC gain are: +1, -1, +10, -10.
“Use VFC calib” enabled means that the linearity and offset tables (The VFC_Calib table, and not the Amplifiers_Calib table will be taken into account. Note there are 2 VFC PCBs in the Camac crate, VFC1 and VFC2.
“MC amps calib” opens the window for starting the FC amplifier calib routine.
“VFC Calib” opens the window for starting the VFC semi-auto calib routine.
11.3.5 FCs Calibration
Can be opened from the main Tuning panel (Refer to the CIPS user’s manual (1) section § )
This interface window is dedicated for running the FC amplifier calibration routine which activates the Finnigan hardware. It is advised to run this routine once per day if the multicollector is used in FC mode with a required high accuracy.
Once the routine is achieved, the relative gains and ampli offsets will be taken into account.
The FC amplifier calib routine consists of 3 cycles (Input ref= 0V, 4.5V, 9V). The reference voltage is connected as input for each of the 9 amplifiers. So, if both the “settling time” and the “counting time” are set to 5s, the overall routine will last 4mn 30sec. When the 3 cycles are completed, the FC are connected, and all the channels output are read for filling the line “ampli offset“
“Linearity factor” is just a performance measurement and does not involved any further correction.
“offset with calibrator” is the result of the routinefirst cycle and is not taken into account in the offset correction (the previous line is used).
“Mean value” displays the different mean values along the routine cycles.
11.3.6 FCs Offset Calibartion
Can be opened from the main Tuning panel (Refer to the CIPS user’s manual (1) section § )
and also TOOLS/ Setup/ Hardware setup/ Config DAS/ Offsets
This window is targetted to allow a fast update of the FC amplifier offsets without running the overall calibration routine.
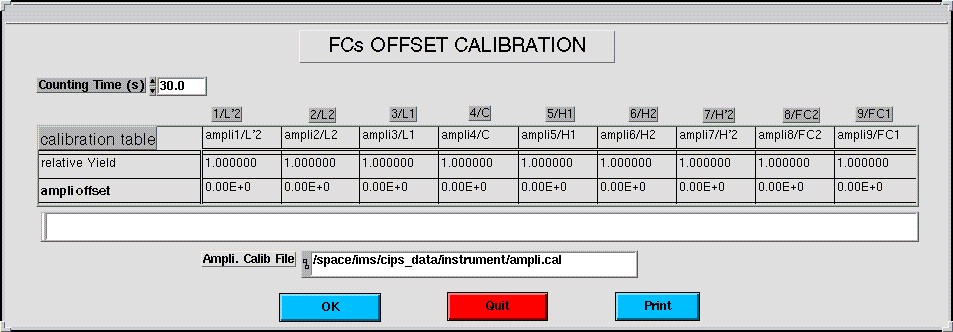
counting time edits the overall measurement time (typ 30 s)
OK updates the measured offsets which will be further substracted.
“OK” fills the line “ampli offset” of the table “Amplifiers_Calib”:
So, the normal use of this interface is:
- remove all the enabling crosses of the table.
- Press “OK“
- Enable the boxes corresponding to actually used FC channels
- Press “OK“
11.4. Other Tools11.4.1 Preferences
Path: TOOLS/Setup/Detection Setup/Preferences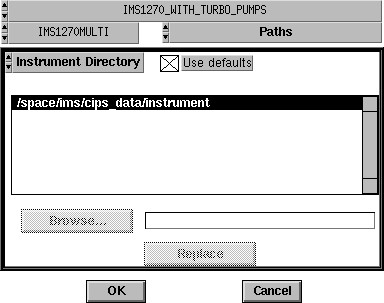 11.4.2 Vacuum synoptic
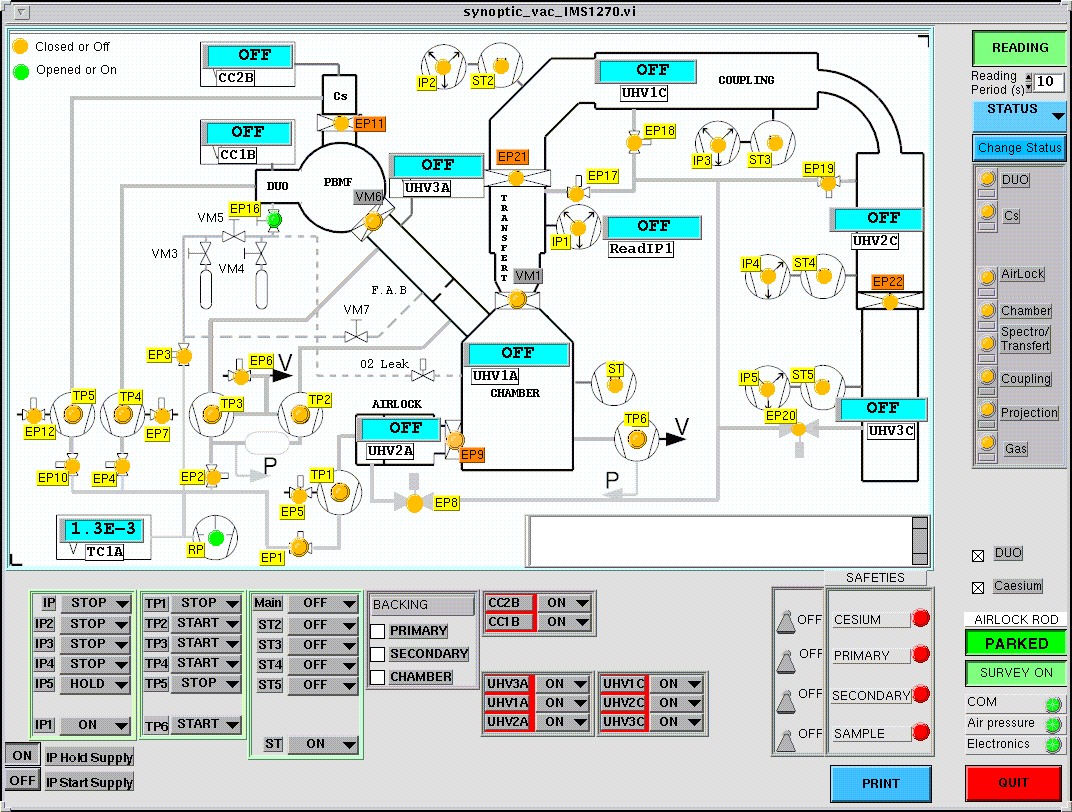 11.4.3 Ohtes tools
Set-up
See the section § Starting the Instrument/The instrument Set-up panel
Vacuum
Clicking Vacuum opens the synoptics which allows to control the vacuum system and to display its status. See The IMS 6F/ IMS 1270 User’s guide, Chapter 4 Vacuum system operation.
Init Serial Lines Initializes all the serial lines : RS232c trackball, RS232c kbd, RS232c vacuum processor and RS485 motirized aperture bus.
Dead Time Not yet documented
Multicol See User’s guide for Multicollector, chapter Tools for testing the Hardware
Test Tests Hardware (Camac…) purposed for service people. Not yet documented
12. (Appendices)12.1 (Appendix 1: The EM Physical Principles)See The IMS 1270 CIPS user’s guide (3)
12.2 (Appendix 2: The EM drift correction principles)See
12.3 (Appendix 3: The QSA effect)See
12.4 (Appendix 4: The Faraday cup Measurement principle)See The IMS 1270 CIPS user’s guide (3)
12.5 (Appendix 5: Fundamental of Statistics)See The IMS 1270 CIPS user’s guide (3)
12.6 (Appendix 6: LabVIEW® graph options and graph cursors)See
The IMS1270 Cips User’s Manual – The IMS1270 Cips User’s Manual –
[xyz-ips snippet=”download-snippet”]