![]()
 Quick Start GuideD-TEK® 3 Refrigerant Leak Detector
 |
 |
 |
Turning D-TEK 3 on and preparing for use
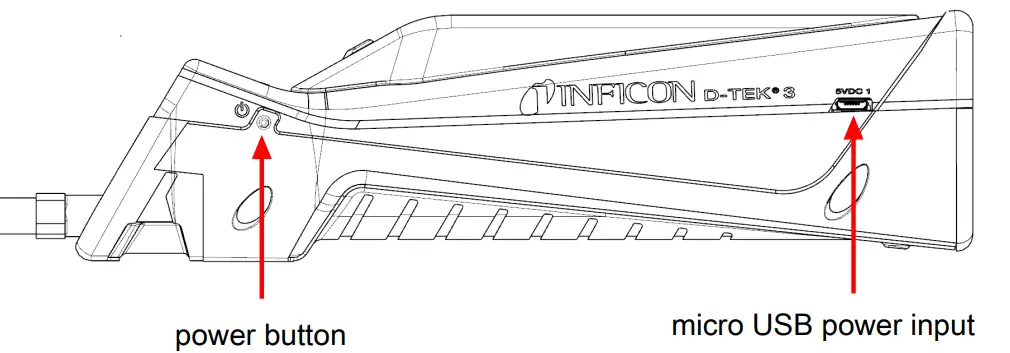
- Long-press the power button to turn D-TEK 3 on or off.
 If the power indicator does not illuminate, the battery is very low and needs to be charged. D-TEK 3 can be used while charging.
 - D-TEK 3 begins a warm-up for 45-90 seconds. When the warm-up is complete, D-TEK 3 is ready for use.
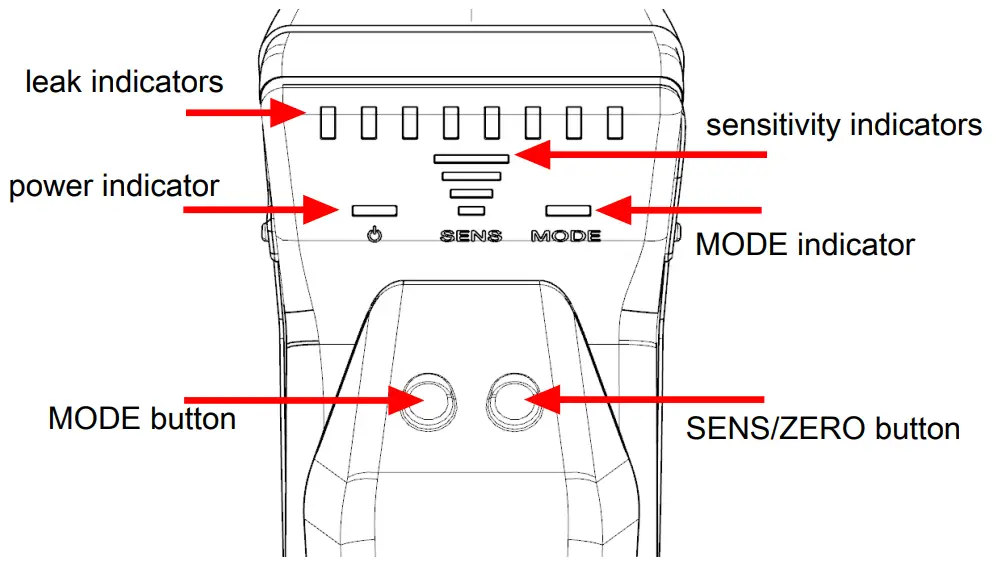
- To switch modes, press the MODE button. This toggles between Pinpoint and Manual Zero modes.D-TEK 3 always starts up in the last mode that was used.
Using Pinpoint mode
- Place the tip of D-TEK 3 as close as possible to the suspected leak. Do not block the airflow.
- Slowly (2.5 to 5 cm [1 to 2 in.] per second) move the probe past each possible leak point. If a leak is detected, D-TEK 3 alarms and the leak indicators illuminate.In Pinpoint mode, D-TEK 3 automatically zeros to the background refrigerant concentration after a few seconds. When this occurs, either continue looking for a higher concentration of a refrigerant or move to an area of lower concentration to reset the zero point.
- When a leak is identified, pull the probe away from the leak for a few seconds and then return the probe to the suspected leak site to verify the leak.For leaks of varying sizes or SAE applications, press the SENS/ZERO button to switch the sensitivity mode. The current sensitivity is indicated by the sensitivity (SENS) indicators. Refer to the full operating manual online for more information about SAE applications.
Manual Zero mode
Manual Zero mode operates in a similar way to Pinpoint mode but allows the user to manually zero the instrument to the background refrigerant by pressing the SENS/ZERO button. The SENS indicators flash briefly to indicate a new zero point has been set. The MODE indicator flashes slowly while in Manual Zero mode.NOTE: There is no sensitivity setting in Manual Zero mode.
Removing and installing the lithium-ion battery

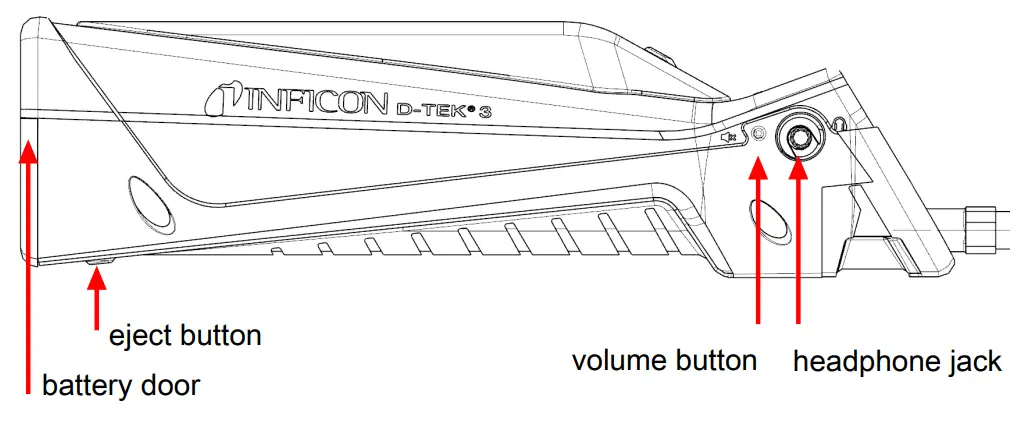
- Press the eject button to release the battery door.
- Move the battery release tab to the side until the battery begins to eject.
- Slide the battery out.
- Align the new battery with the rails.
- Gently push the battery along the rails until the battery release tab engages.Do not force the battery. If it does not slide freely, check alignment and try again.
- Reinstall the battery door.
Replacing and installing the sensor
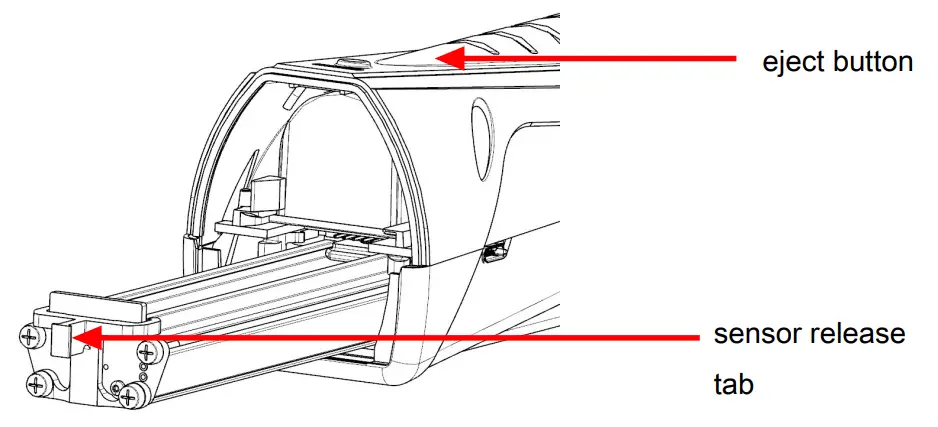
- Press the eject button to release the battery door.
- Grasp the sensor release tab and gently pull the sensor out.
- Align the new sensor with the rails.
- Gently push the sensor along the rails until it clicks into place.Do not force the sensor. If it does not slide freely, check alignment and try again.
- Reinstall the battery door.The MODE indicator will change to green if a CO2 sensor is installed.
Replacing filters
- Unscrew the probe tip and remove the filter.
- Insert the new filter into the probe tip.
- Screw on the probe tip.
Charging and Battery Information
To charge D-TEK 3, plug the supplied USB cable into an appropriate power source and plug the micro USB end into the D-TEK 3 micro USB power input. The power indicator slowly flashes while charging. The color of the power indicator indicates the charge percent.
| Color | % Charge |
| Green | >30% |
| Orange | 10-29% |
| Red | <10% |
NOTE: D-TEK 3 can be operated while charging.NOTE: A new lithium-ion battery will only be partially charged. It is recommended to fully charge the battery before use. Allow approximately 3 hours for a full charge.
Cautions:
- Only use a certified charger/cord with an output of 5V (dc), 1A
- Keep the device out of extremely high or low-temperature locations
- Temperature ranges and humidity:• Storage: -20-60°C (-4-140°F)• *Operating: -20-50°C (-4-122°F)• Charging: 0-45°C (32-113°F)• Humidity: 95% RH NC maximum
- Do not expose battery to liquid
- Do not use the device if you notice any damage to the battery
- Do not disassemble or modify the battery
- Handle and dispose of the battery per local regulations
- If the recharging operation fails to complete, even when the specified recharging time has elapsed, immediately stop further recharging
- Do not leave the battery unattended while charging
- Unplug the charger when the battery is fully charged
- Improper use or disposal of lithium-ion batteries can cause a fire
- Not intended for use in flammable environments
 report this ad
*Use in temperatures below 0°C (32°F) should be limited. Extended warm-up time is recommended before use in low-temperature environments.
Download the full operating manual from
 https://l.ead.me/bb8amIwww.inficonservicetools.com
![]() Laboratory Accurate. Tool box Tough,Two Technology PlaceEast Syracuse, NY 13057-9714 USAPhone: +1.800.344.3304Fax: +315.434.2520E-Mail: [email protected]www.inficonservicetools.comBonner Strasse 498D-50968 Cologne, GermanyPhone: +49 221 56788-660Fax: +49 221 56788-9660E-Mail: [email protected]www.inficonservicetools-europe.comDue to our continuing program of product improvements, specifications are subject to change without notice.All trademarks are the property of their respective owners.074-711-P1OA©2020 INFICON
Laboratory Accurate. Tool box Tough,Two Technology PlaceEast Syracuse, NY 13057-9714 USAPhone: +1.800.344.3304Fax: +315.434.2520E-Mail: [email protected]www.inficonservicetools.comBonner Strasse 498D-50968 Cologne, GermanyPhone: +49 221 56788-660Fax: +49 221 56788-9660E-Mail: [email protected]www.inficonservicetools-europe.comDue to our continuing program of product improvements, specifications are subject to change without notice.All trademarks are the property of their respective owners.074-711-P1OA©2020 INFICON
[xyz-ips snippet=”download-snippet”]