
![]() Model:AXIUM DX8000
Model:AXIUM DX8000
![]()
User GuideWWW.ingenico.com
Introduction
We hope that you will be fully satisfied with your new AXIUM DX8000 terminal.Read this guide to understand and make the best use of your terminal. It presents you with the necessary information about the use, installation, maintenance, safety, and security recommendations.![]() WARRANTYUse only the power supply included with the product to ensure the best performance and safety. Maintenance should only be provided by Ingenico authorized technicians.Failure to comply with these instructions will void the manufacturer’s responsibility.
WARRANTYUse only the power supply included with the product to ensure the best performance and safety. Maintenance should only be provided by Ingenico authorized technicians.Failure to comply with these instructions will void the manufacturer’s responsibility. This symbol indicates there are warnings or cautions that need to be checked in the user guide. the symbol indicates an important Warning.
![]() This symbol indicates an important Warning.
This symbol indicates an important Warning.![]() This symbol indicates a piece of advice.
This symbol indicates a piece of advice.
Presentation
2.1 Content of the box
- AXIUM DX8000 terminal unit equipped with a paper roll
- Power adapter
- A battery pack
- This user guide
![]() WARNINGThe power supply unit provided with your equipment is specially designed for the ingenicoAXIUM DX8000 terminal. Do not use any other power supply. The use of a power supply with apparently similar voltage/current characteristics may damage your terminal.
WARNINGThe power supply unit provided with your equipment is specially designed for the ingenicoAXIUM DX8000 terminal. Do not use any other power supply. The use of a power supply with apparently similar voltage/current characteristics may damage your terminal.![]() ADVICEKeep the package. It must be re-used whenever the terminal is shipped.
ADVICEKeep the package. It must be re-used whenever the terminal is shipped.

|
AT |
BE | CY | CZ | DK | EE | Fl |
|
FR |
DE | EL | HU | IE | IT | LV |
| LT | LU | MT | NL | PL | PT |
SK |
| SI | ES | SE | UK | BG | RO |
HR |
2.2 Overview of AXIUM DX8000
|
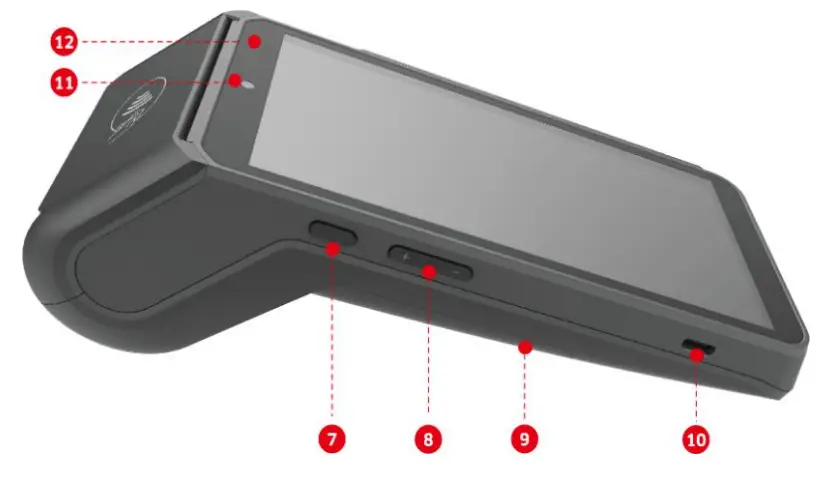 |
| 1. Contactless landing zone2. LCD and touch screen3. Smart card reader4. Buzzer5. Magnetic card reader6. Easy Loading Printer | 7. Power Key8. Volume Keys9. Battery cover10. USB Type-C connector11. Front scanner12. LEDs for Contactless Card |
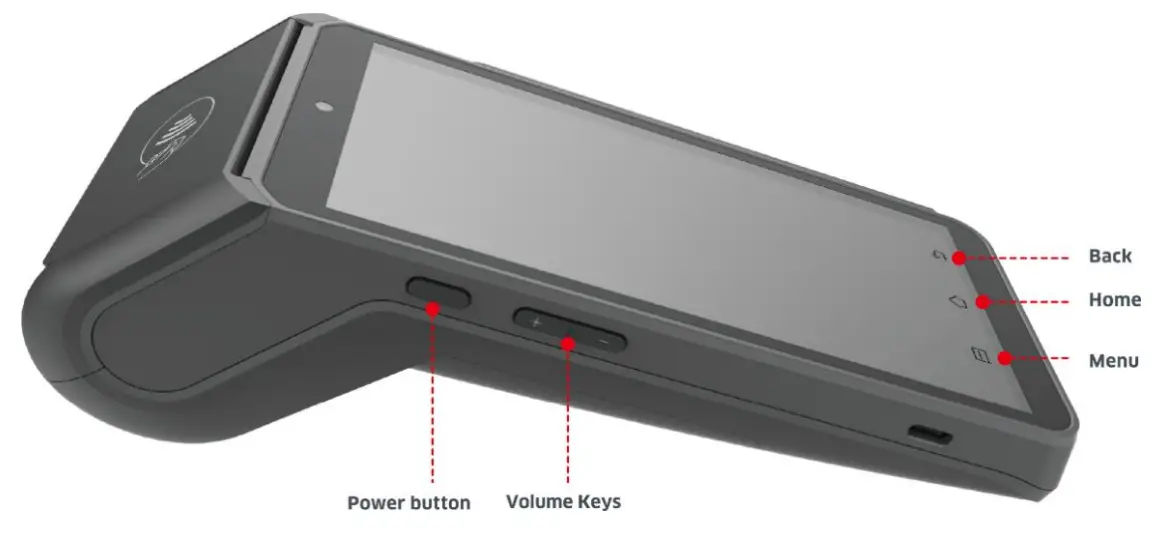
2.3 Keypad FunctionsThe terminal has three physical keys on the left side of the terminal, a power button, and two-volume keys.If the terminal has a 5.99-inch screen, there are three virtual keys at the bottom of the screen, Menu, Home, and Back keys.If the terminal has a 5.5-inch screen, there are three capacitive keys at the bottom of the screen, Menu, Home, and Back keys.
2.4 Touch PanelThe AXIUM DX8000 is equipped with a touch panel that allows you to capture functions and menus with your finger or use a stylus.
Use of the terminal
![]() ADVICEBefore using the terminal, always check if the roll of paper is present3.1 Power on/Power off the terminalTo power on Make sure the terminal battery is correctly installed and Press the <Power>button for about 1s until the display is turned up.To power off Press, the <Power> button for more than 2s until the display shows the following figure, then press <Power off>.
ADVICEBefore using the terminal, always check if the roll of paper is present3.1 Power on/Power off the terminalTo power on Make sure the terminal battery is correctly installed and Press the <Power>button for about 1s until the display is turned up.To power off Press, the <Power> button for more than 2s until the display shows the following figure, then press <Power off>.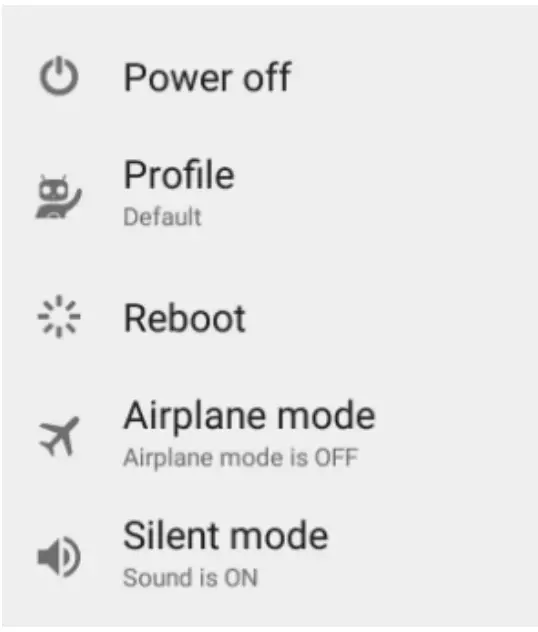 If the battery is empty, the terminal automatically shuts off.Abnormal power off:When the device works abnormally, for example, it is crashed and no actions menu popped out while pressing the power button, please long-press the power button for 8s, the device will be automatically powered off.Screen saver mode:Short-press the power button for about 0.5s, the terminal display will be turned on or off.3.2 Reading cardsMagnetic stripe cardThe card can be read bi-directionally, with the stripe facing the terminal.Use a regular movement in order to ensure a reliable card reading.
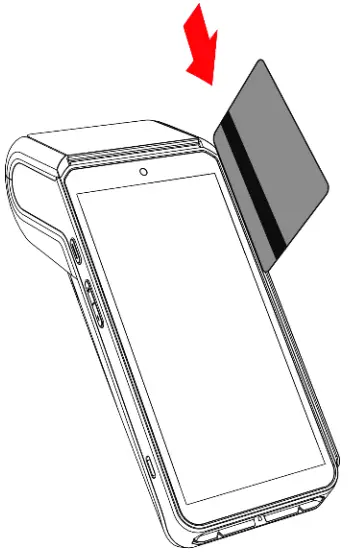
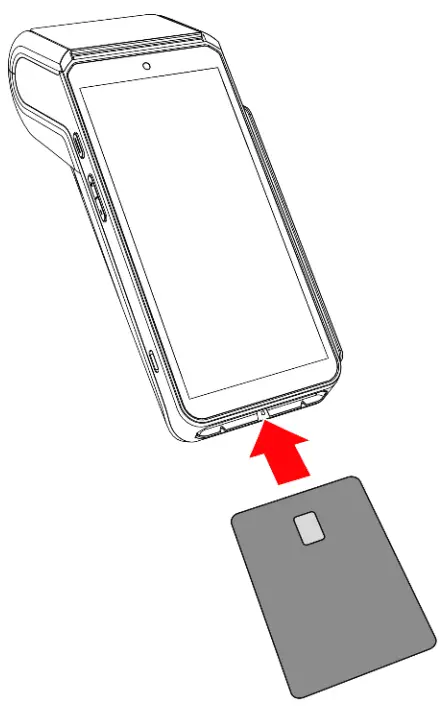
Contactless cardBring the card firmly up to the active zone. Keep the card close to the reader during the transaction.On the front, LEDs are displayed to indicate transaction processing. Smart cardInsert the card horizontally with the metal chip facing upward and leave it in position throughout the transaction.
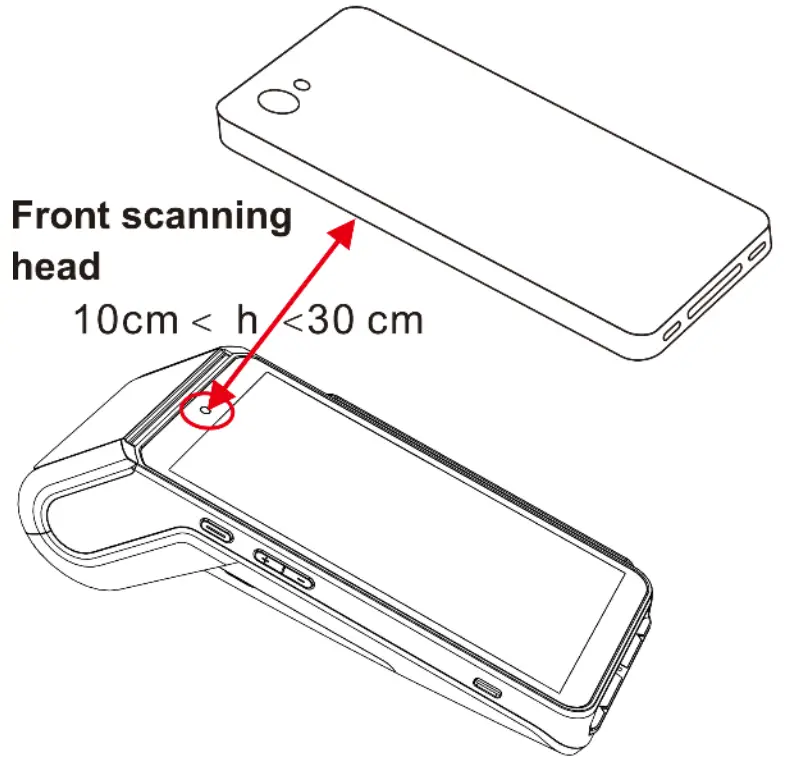
3.3 Usage of Front Camera
- The brightness of the mobile phone must be set to the brightest or not less than 2/3 of the maximum brightness.
- The screen of the mobile phone must face the front scanning head above the terminal screen and keep it stationary.
- The screen of the mobile phone must be parallel to the front scanning head.
- The vertical distance between the screen of the mobile phone and the front scanning head should be between 10~ 30 cm; 20 cm would be the best.
- The terminal will beep with a successful scanning.
3.4 USB type-CThere is a USB Type-C connector on the left side of the terminal.The connector manages Host and Slave connections.The connector integrates the Audio Jack solution.
![]() WARNING
WARNING![]() To prevent possible hearing damage, do not listen to high volume levels for long periods.
To prevent possible hearing damage, do not listen to high volume levels for long periods.
Installation
4.1 RecommendationsOperating conditions
| Ambient temperature* | From -lot to +50°C |
| Max relative humidity | From io%to 9o%, Non-condensing |
(*)Excluding battery chargingBattery charging conditions
| Ambient temperature | From 0°C to +40°C |
Storage conditions
| Ambient temperature | From -20 t to +70 t |
| Max relative humidity | From 5% to 9o%, Non-condensing |
4.2 Installing modules4.2.1 SAM1/SAM2![]() WARNINGSwitch off the terminal before opening the trapdoor.The SAM connectors are located inside the terminal, in a closed compartment.
WARNINGSwitch off the terminal before opening the trapdoor.The SAM connectors are located inside the terminal, in a closed compartment.
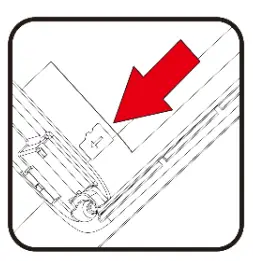
- Turn the terminal and remove the trapdoor.

- SAM1, SAM2 is identified by the engraved marks on the lower housing.
- When introducing a SAM in its slot, be sure to put the cut corner as indicated in the picture.
- Close the trapdoor.
![]() ADVICEAXIUM DX8000 is equipped with a dual SAM slot.When using two SAM cards, it is recommended to insert the bottom one first, then the top one.When using only one SAM card, it is recommended to insert SAM1 slot (bottom).4.2.2 MicroSD Memory Card
ADVICEAXIUM DX8000 is equipped with a dual SAM slot.When using two SAM cards, it is recommended to insert the bottom one first, then the top one.When using only one SAM card, it is recommended to insert SAM1 slot (bottom).4.2.2 MicroSD Memory Card![]() WARNINGSwitch off the terminal before opening the trapdoor.MicroSD connector is located inside the terminal, in a closed compartment.
WARNINGSwitch off the terminal before opening the trapdoor.MicroSD connector is located inside the terminal, in a closed compartment.
 |
 |
- Turn the terminal and remove the trapdoor.
- MicroSD is identified by the engraved marks on the lower housing.
- Insert MicroSD card and push it to the end.
- Close the trapdoor.
The terminal supports MicroSD up to 32GB.4.3 Paper roll4.3.1 Main characteristics of INGENICO paper roll
|
R4o paper roll characteristics |
Precisions |
| Color | White |
| Width | 58mm |
| Diameter | 40mm |
| Length | About 18 meters |
The thermal paper can be deteriorated by poor storage conditions, so we recommend you to avoid:
- Storage in hot wet places (near air-conditioner, humidity higher than 85%).
- Exposure to sunlight or ultraviolet for long periods.
- Contact with organic solvents (solvent type adhesive).
- Direct contact with materials containing plasticizers (PVC transparent folders or envelopes).
- Direct contact with <<diazo>>papers.
- Direct contact with water.
- Rubbing or pressing the paper too strongly.
![]() WARNINGFor best product performance, only use heat sensitized paper approved by Ingenico.4.3.2 Installing paper roll
WARNINGFor best product performance, only use heat sensitized paper approved by Ingenico.4.3.2 Installing paper roll
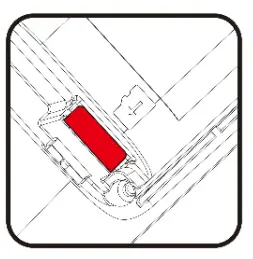
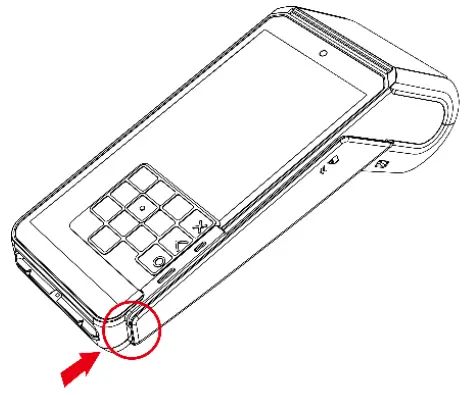
- Open the paper cover by lifting the catch located at the top of AXIUM DX8000 and pull the cover to the rear of the terminal.
- Insert the paper roll in the compartment following the directions shown in the below picture.
- Pull the paper up to the top of the terminal, maintain the paper and close the cover
- Press simultaneously on both upper corners of the paper flap until it clips into position.
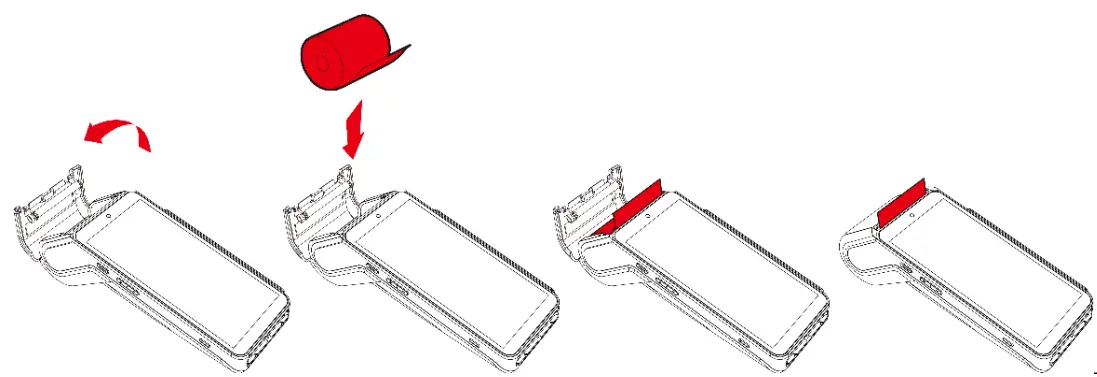
![]() ADVICEIf you insert a new R40 paper roll, tear off the first length (one complete turn to avoid printing on adhesive footprint).
ADVICEIf you insert a new R40 paper roll, tear off the first length (one complete turn to avoid printing on adhesive footprint).![]() WARNINGSwitch off the terminal prior to installing a paper roll. Use only paper approved by Ingenico.The use of non-approved paper is likely to damage the printer of your terminal.4.4 Battery4.4.1 Charging the battery
WARNINGSwitch off the terminal prior to installing a paper roll. Use only paper approved by Ingenico.The use of non-approved paper is likely to damage the printer of your terminal.4.4 Battery4.4.1 Charging the battery
- When does the battery need to be charged?• When used daily, the terminal charges its battery each time the power adapter is connected. Charging starts automatically.
- How can the battery be charged?Using the power adapter• Connect the power adapter to the terminal USB type-C connector located on the left side of the terminal.• Connect the power adapter to the power supply mains network.• Check the charging status on the top of the screen (it means battery charging).
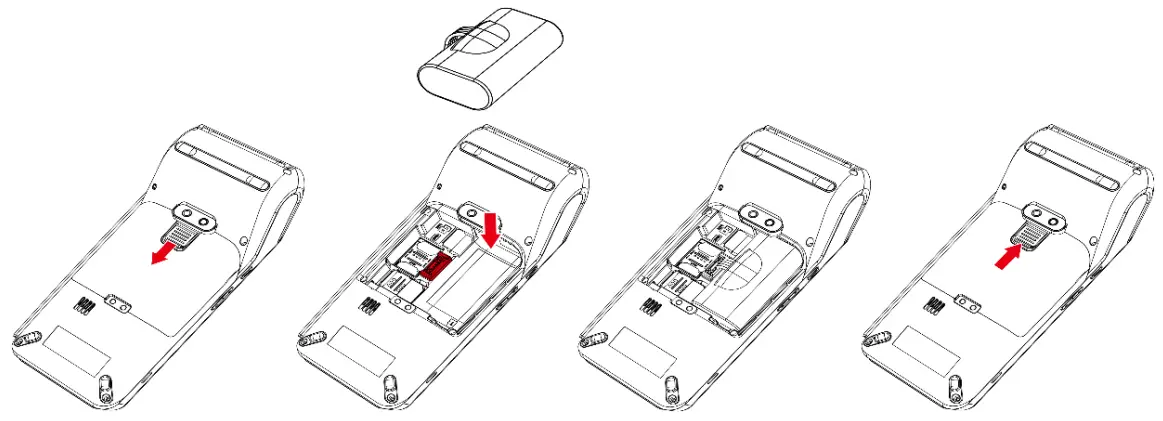
4.4.2 Installing the battery![]() WARNINGCheck that the terminal is not connected to the main electric network.
WARNINGCheck that the terminal is not connected to the main electric network.
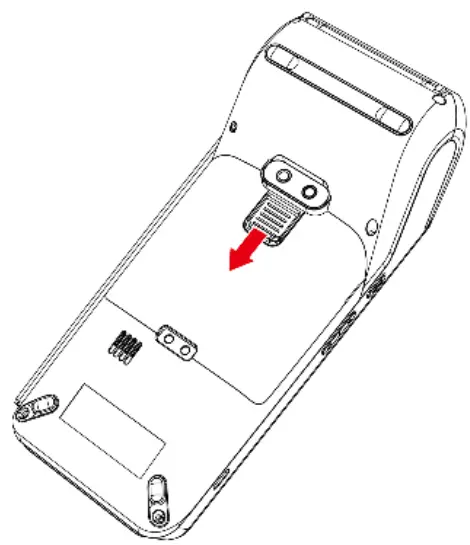
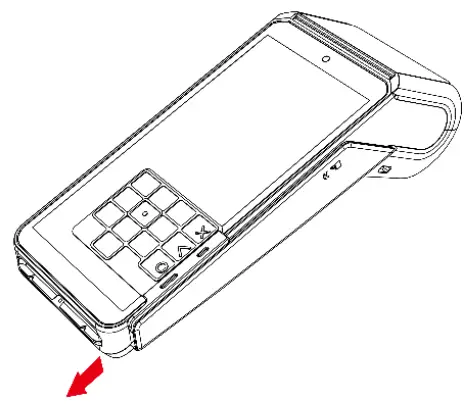
- Turn your terminal and unclip the battery trapdoor by pushing the clips as shown with the arrow on the picture.
- Disengage the trapdoor.
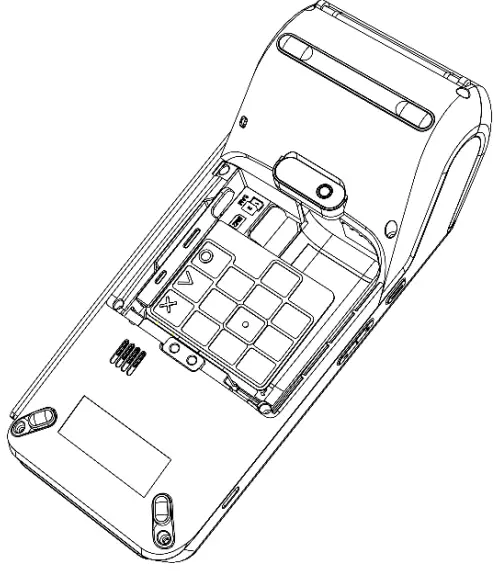
- Take the battery pack included in the box
- Locate the battery pack connector beside the battery compartment
- Plug the battery pack connector according to the connector locating system.
- Place the battery pack in its compartment
- Close the battery trapdoor.
4.5 Visual Impaired Accessory
- Install the VI accessory on the screen.
- Take out the VI accessory.
- Store the VI accessory. Put the VI accessory flat on the battery.
Recommendations
5.1 SafetyPowering down the AXIUM DX8000Disconnect the AXIUM DX8000 power supply block adapter from the electrical mains network.Lithium cellThe AXIUM DX8000 is fitted with an internal lithium cell which should only be accessed by a qualified technician.Battery
- AXIUM DX8000 is fitted with a battery specially designed for this terminal.
- Only use the appropriate chargers and batteries listed in Ingenico’s catalog.
- Do not short-circuit the battery.
- Do not attempt to open the battery container.
- Used batteries must be disposed of at the appropriate sites.The lifespan of the battery depends on:
- Features used.
- A number of charges and discharge cycles.
- Use temperature.
![]() CAUTIONTHE RISK OF AN EXPLOSION BATTERY IS REPLACED BY AN INCORRECT TYPE.DISPOSE OF USED BATTERIES ACCORDING TO THE INSTRUCTIONS.Electrical power supply networkThe electrical outlet must meet the following criteria:
CAUTIONTHE RISK OF AN EXPLOSION BATTERY IS REPLACED BY AN INCORRECT TYPE.DISPOSE OF USED BATTERIES ACCORDING TO THE INSTRUCTIONS.Electrical power supply networkThe electrical outlet must meet the following criteria:
- Must be installed near the equipment and easily accessible
- Do not short-circuit the battery.
- Do not attempt to open the battery container.
 report this ad
The power supply label contains seventeen symbols:
 |
CCC (China Compulsory Certificate) Mark | |
BSMI(Taiwan) |
 |
The Regulatory Compliance Mark (RCM) |  |
PSE Mark(Japan) |
 |
International Efficiency Marking Protocol (Energy Star Level 6) |  |
Recycle in accordance with the waste electronic & electrical equipment directive |
 |
Indoor use only | |
Underwriters Laboratories Inc (US Compliance) |
 |
“Conformite Europe enne” or CE Mark |  |
Made from recyclable material |
 |
Double insulation symbol | |
Low-density version of Polyethylene (LDPE) |
 |
5 Years China RoHS symbol |  |
Chlorinated Polyethylene (CPE) |
 |
10 Years China RoHS symbol | |
Risk of explosion if the battery is incorrectly replaced or is placed in a |
 Dispose of batteries at a hazardous waste collection site or a recycling facilitySAM1/SAM2 Readers compartmentThe trapdoor for battery, SAM1/SAM2, readers located underneath the terminal, must be in place during the normal operation of the terminal. See sections “Installing modules” and “Installing the battery”.On airplanesYour terminal must be switched off by removing the battery pack. Remove the battery from the terminal when on an airplane.Non-compliance with these safety rules may result in legal action and/or a ban on later access to cellular network services.Explosion areasSome regulations restrict the use of radio equipment in chemical plants, fuel depots and any site where blasting is carried out. You are urged to comply with these regulations. The terminal shall be protected by a specially fitted and certified cover enabling use in proximity to a fuel pump.Thunderstorm weatherAccording to some relevant reports, the mobile phone electromagnetic wave is good conductor of lightning. It is much easier to suffer lightning strike when the damp atmosphere form a magnetic conductivity, especially in open areas. Do not use wireless terminals under thunderstorm weather.Electronic health appliancesYour terminal is a radio transmitter which may interfere with health appliances, such as hearing aids, pacemaker, hospital equipment, etc.Your doctor or the equipment manufacturer will be able to provide you with appropriate advice.5.2 Security of your terminalYour device fulfills current applicable PCI PTS security requirements.Upon receipt of your terminal you should check for signs of tampering of the equipment.It is strongly advised that these checks are performed regularly after receipt. You should check, for example: that the keypad is firmly in place; that there is no evidence of unusual wires that have been connected to any ports on your terminal or associated equipment, the chip card reader, or any other part of your terminal. Such checks would provide a warning of any unauthorized modifications to your terminal, and other suspicious behavior of individuals that have access to your terminal. Your terminal detects any“tampered state”. In this state the terminal will repeatedly flash the message “Warning a Detected” and further use of the terminal will not be possible. If you observe the“Warning Detected” message, you should contact the terminal helpdesk immediately.You are strongly advised to ensure that privileged access to your terminal is only granted to staff that has been independently verified as being trustworthy. The terminal mustnever be put in or left at a location where it could be stolen or replaced by another device.5.3 Fixed installationIf the device is to be used in a situation where it is not possible for the cardholder to pick up and shield their PIN entry themselves, the device may be used, but it must be installed in the following manner:
- The device must be angled at 45 or more so that oversight of the PIN entry from the rear of the device is not possible.
- The device must either be fitted in a swivel stand – so that the customer can position the device in the best angle to prevent oversight – or the device must be fixed in thebest possible position to prevent oversight if such a generic position exists in the specific environment to which the device is installed.
- The device environment must be accompanied by conspicuous notices and educational material which informs the customer to shield their PIN during PIN entry.
- The device must be deployed so that oversight from other customers, either indifferent payment lanes or in other areas of the shopping environment, is prevented.This may be achieved through the placement of the lanes and device so that the customer is automatically positioned between the device keypad and other customers. Alternatively, it may be achieved by the environment in which the device is installed, so that the checkout itself shields the PIN entry process.
- The terminal is exclusively made for indoor use.
![]() ADVICEPositioning of the terminal on the check stand must be in such a way to make cardholder PIN (Personal Identification Number) spying infeasible.Installing the device on an adjustable stand must be done in such a way that consumers can swivel the terminal sideways and/or tilt it forwards/backward to a position that makes visual observation of the PIN-entry process difficult.Positioning of in-store security cameras such that the PIN-entry keypad is not visible.NEVER ask the customer to divulge their PIN Code. Customers should be advised to ensure that they are not being overlooked when entering their PIN Code.5.4 Cleaning the terminalUnplug all the wires from the terminal.Good rules for proper cleaning of the terminal are:
ADVICEPositioning of the terminal on the check stand must be in such a way to make cardholder PIN (Personal Identification Number) spying infeasible.Installing the device on an adjustable stand must be done in such a way that consumers can swivel the terminal sideways and/or tilt it forwards/backward to a position that makes visual observation of the PIN-entry process difficult.Positioning of in-store security cameras such that the PIN-entry keypad is not visible.NEVER ask the customer to divulge their PIN Code. Customers should be advised to ensure that they are not being overlooked when entering their PIN Code.5.4 Cleaning the terminalUnplug all the wires from the terminal.Good rules for proper cleaning of the terminal are:
- Use a soft cloth that is very slightly soaked with soapy water to clean the outside of the terminal.
- Do not clean the electrical connections.
- Do not use in any case, solvents, detergents, or abrasive products: Those materials might damage the plastic or electrical contacts.
- Avoid exposing the terminal to the direct rays of the sun.
- Do not put anything into the slot of the smart card reader.
5.5 Transport and storageAdopt general transportation mode, and prevent the goods from sunlight, snow, shower, and mechanical impact. Transport the devices with care, do not throw them forcibly. Prevent the packaging from extrusion during transportation, to avoid breakage.The product should be stored in the original packing box. The warehouse is not allowed to have all sorts of harmful gases, inflammable, explosive, corrosive chemical goods,strong mechanical vibration, and strong magnetic fields. The packing box should be at least 15cm above the ground, and be away from heat, cold, window, or air inlet source at least 50cm.
Standard
FCC WarningThis device complies with part 15 of the FCC Rules. Operation is subject to the following two conditions: (1) This device may not cause harmful interference, and (2) this devicemust accept any interference received, including interference that may cause undesired operation.Any changes or modifications not expressly approved by the party responsible for compliance could void the user’s authority to operate the equipment.Note: This equipment has been tested and found to comply with the limits for a Class B digital device, pursuant to part 15 of the FCC Rules. These limits are designed to provide reasonable protection against harmful interference in a residential installation. This equipment generates, uses, and can radiate radio frequency energy and, if notinstalled and used in accordance with the instructions, may cause harmful interference to radio communications. However, there is no guarantee that interference will notoccur in a particular installation. If this equipment does cause harmful interference to radio or television reception, which can be determined by turning the equipment off andon, the user is encouraged to try to correct the interference by one or more of the following measures:
- Reorient or relocate the receiving antenna.
- Increase the separation between the equipment and receiver.
- Connect the equipment into an outlet on a circuit different from that to which the receiver is connected.
- Consult the dealer or an experienced radio/TV technician for help.
ISEDC WARNINGThis device complies with the ISEDC license-exempt RSS standard (s). Operation is subject to the following two conditions:(1) this device may not cause interference, and(2) this device must accept any interference, including interference that may cause undesired operation of the device.Under Innovation, Science, and Economic Development Canada regulations, this radio transmitter may only operate using an antenna of a type and maximum (or lesser) gainapproved for the transmitter by Innovation, Science, and Economic Development Canada.To reduce potential radio interference to other users, the antenna type and its gain should be so chosen that, the equivalent isotropically radiated power (e.i.r.p.) is not more thanthat necessary for successful communication.Environment (WEEE, Batteries, and packaging)This product is labeled in accordance with European Directives 2012/19/EU concerning Waste Electrical and Electronic Equipment (WEEE) and 2013/56/EU concerning Batteries and Accumulators. Those provisions are requiring producers and manufacturers to become liable for take-back, treatment and recycling upon end of life of equipment and batteries.BATTERIESIf your product contains batteries, they must be disposed of at appropriate collection points.THE PRODUCTThe crossed-out waste bin stuck on the product or its accessories means that the product belongs to the family of electrical and electronic equipment, and waste batteries must not be thrown away but collected separately and recycles.Please contact your retailers for more detailed information about the compliance solution in place for disposing of your old product and used batteries.Packaging waste must also be collected separately to assure proper disposal and recycling.In this way, you can participate in the re-use and upgrading of Electrical and Electronic Equipment Waste, which can have an effect on the environment and human health.
Troubleshooting
Q: The terminal cannot be started.A: The device might be under low energy status or the program may be damaged.Please make sure the power is enough and then restart your device. If it still fails, please contact our customer service department for help.Q: The printer can not work.A: This may be caused by an abnormal power supply or incorrect paper installation.Check the battery status or the terminal power connection. If the remaining battery power is insufficient for a complete printing operation, the printer will notprint the paper.Check the printer roller and if the paper dust cover is correctly installed.If the problem still exists, please contact our customer service center.Q: Transaction Processing FailureA: Following reasons are likely to cause transaction failure: damaged magnetic card or smart card SAM card, damaged card reader, improper operation of card swiping, damaged or unconnected, unconnected phone line, etc.
- Try to use more than one magnetic card to test the transaction, to confirm the failure is not caused by a magnetic card.
- Make sure card swiping is operated correctly.
- Manually process the transaction instead of the card reader. If a manual transaction works, the failure may be caused by the magnetic card reader.
- Use more than one smart card to test the transaction, to confirm the failure is not caused by the smart card. Make sure the SAM card is correctly inserted into the card slot.
If there is still a problem, please contact our customer service center.This Document is Copyright © 2020 by ingenico Group. ingenico retains full copyright ownership, rights and protection in all material contained in this document. The recipient can receive this document on the condition that he will keep the document confidential and will not use its contents in any form or by any means, except as agreed beforehand, without the prior written permission of ingenico. Moreover, nobody is authorized to place this document at the disposal of any third party without the prior writtenpermission of ingenico. If such permission is granted, it will be subject to the condition that the recipient ensures that any other recipient of this document, or informationcontained therein, is held responsible to ingenico for the confidentiality of that information.Care has been taken to ensure that the content of this document is as accurate as possible. ingenico however declines any responsibility for inaccurate, incomplete or outdated information. The contents of this document may change from time to time without prior notice, and do not create, specify, modify or replace any new or prior contractual obligations agreed upon in writing between Ingenico and the user.ingenico is not responsible for any use of this device, which would be non-consistent with the present document.All trademarks used in this document remain the property of their rightful owners.WWW.ingenico.com28-32,Boulevard de Grenelle, 75015 PARIS – FRANCE/ (T)+33(0)1 58 01 80 00 / (F)+33 (0)1 58 01 91 35Ingenico-SA au capital de 47 656 332 / 317 218 758 RCS Nanterre.
![]() Copyright0 2020 IngenicoAll rights reserved
Copyright0 2020 IngenicoAll rights reserved
References
[xyz-ips snippet=”download-snippet”]