
Inner Balance Wellness Jin Massage
Chair User Manual

Safety Instructions
SAVE THESE INSTRUCTIONSGROUNDING INSTRUCTIONS
This product must be grounded. If it should malfunction or breakdown, grounding provides a path of least resistance for electric current to reduce the risk of electric shock. This product is equipped with a cord having an equipment-grounding conductor and a grounding plug. The plug must be pugged into an appropriate outlet that is properly installed and grounded in accordance with all local codes and ordinances.
DANGER – Improper connection of the equipment-grounding conductor can result in a risk of electric shock. Check with a qualified electrician or serviceman if you are in doubt as to whether the product is properly grounded. Do not modify the plug provided with the product – if it will not fit the outlet, have a proper outlet installed by a qualified electrician.
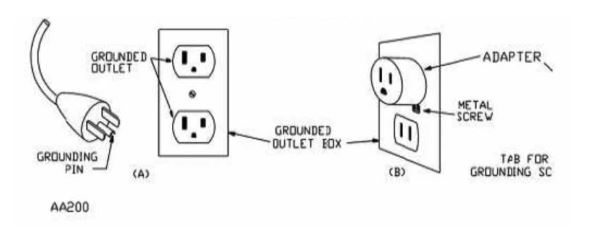
This product is for use on a nominal 120-V circuit, and has a grounding plug that looks like the plug illustrated in sketch A in Figure 86.1. A temporary adapter that looks like the adapter illustrated in sketches B and C may be used to connect this plug to a 2-pole receptacle as shown in sketch B if a properly grounded outlet is not available. The temporary adapter should be used only until a properly grounded outlet (sketch A) can be installed by a qualified electrician. The green colored rigid ear, lug, or the like extending from the adapter must be connected to a permanent ground such as a properly grounded outlet box cover. Whenever the adapter is used, it must be held in place by a metal screw.
Figure 86. 1Grounding Methods
IMPORTANT SAFEGUARDS
When using an electrical appliance, basic precautions should always be followed, including the following:
Read all instructions before using (this appliance).
DANGER – To reduce the risk of electric shock: Always unplug this appliance from the electrical outlet immediately after using and before cleaning.
WARNING – To reduce the risk of burns, fire, electric shock, or injury to persons:
- An appliance should never be left unattended when plugged in. Unplug from outlet when not in use, and before putting on or taking off parts.
- Do not operate under blanket or pillow. Excessive heating can occur and cause fire, electric shock, or injury to persons.
- Close supervision is necessary when this appliance is used by, on, or near children, invalids, or disabled persons.
- Use this appliance only for its intended use as described in this manual. Do not use attachments not recommended by the manufacturer.
- Never operate this appliance if it has a damaged cord or plug, if it is not working properly, if it has been dropped or damaged, or dropped into water. Return the appliance to a service center for examination and repair.
- Keep the cord away from heated surfaces.
- Never operate the appliance with the air openings blocked. Keep the air openings free of lint, hair, and the like.
- Never drop or insert any object into any opening.
- Do not use outdoors.
- Do not operate where aerosol (spray) products are being used or where oxygen is being administered.
- To disconnect, turn all controls to the off position, then remove plug from outlet.
- To reduce the risk of electric shock, this appliance has a polarized plug (one blade is wider than the other). This plug will fit in a polarized outlet only one way. If the plug does not fit fully in the outlet, reverse the plug. If it still does not fit, contact a qualified electrician to install the proper outlet. Do not change the plug in any way.
- Keep children away from extended foot support (or other similar parts).
- Warning– Connect this appliance to a properly grounded outlet only. See Grounding Instructions.
- WARNING – Do not use massager in close proximity to loose clothing or jewelry. Keep long hair away from massager while in use.
DANGER –
- Never use pins or other metallic fasteners with this appliance.
- Carefully examine the covering before each use. Discard the appliance if the covering shows any sign of deteriorations, such as checking, blistering, or cracking.
- Keep Dry – Do not operate in a wet or moist condition.
SAVE THESE INSTRUCTIONS
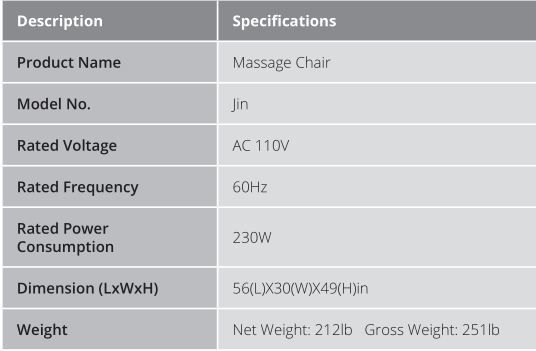
Product Specifications
Hardware Pack Contents
- 1 power cord
- 1 M6 Allen wrench
- 6 M6*20 shoulder fixed screws
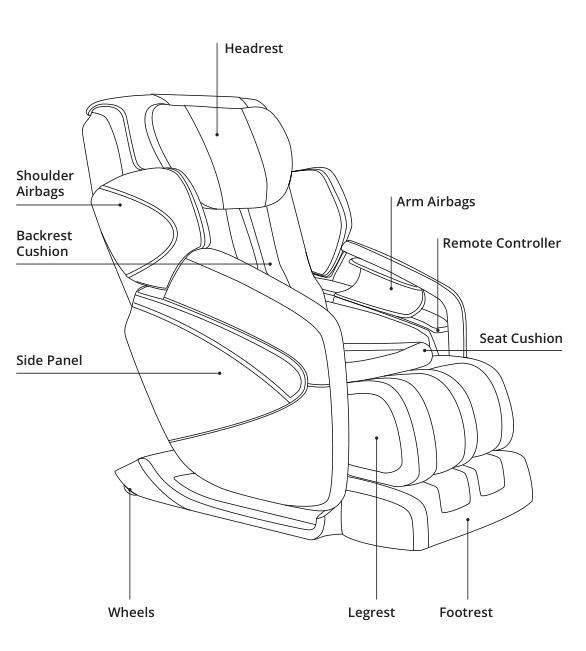
Product Components
MAIN BODY DIAGRAM (FRONT)
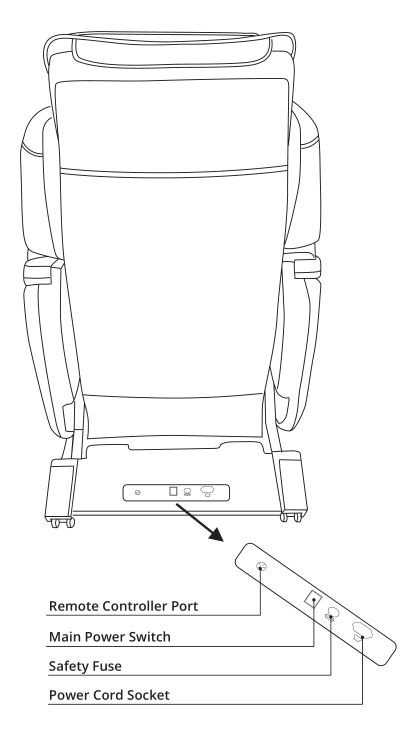
MAIN BODY DIAGRAM (REAR)
Chair Installation
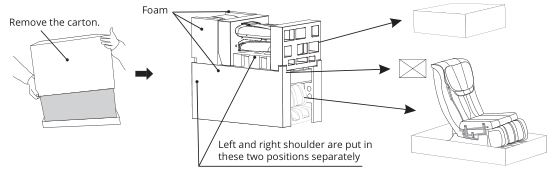
- Removing the chair and parts from the package

- Lift and remove main outer carton.
- Remove cardboard and foam on both sides of the massage chair.
- Remove accessory box (includes: instructions, power cord etc.).
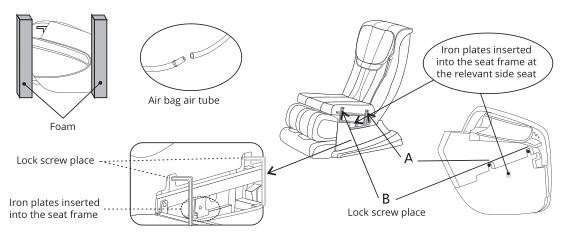
- Installing the side panel
- Remove the side panels from the carton, and take them out to begin assembly.
- Connect the side panel airhose with the airhose coming out of the side of the chair. Both sides of the airhose need to be inserted in order to prevent an air leak and loss of pressure during use.
- Unscrew bolt (B) from the side panel, insert the metal connector plates into the metal pipe which is on the corresponding side of the seat frame (as shown above). At the same time, put the other bolt (A) in the slot on thecorresponding seat frame. Then align the holes and screw in bolt (B). Tighten the two screws and repeat this process on both side panels.
- Smooth out the fabric of the chair.
- Installing the shoulder airbags
- Unzip the cloth cover for the shoulder airbag components revealing one locating pin and pin hole for each up and down.
- Insert up and down two locating pins into the pin holes on the left side of backrest (as shown). In the screw holes, lock cross screws with the cross screwdriver.
- Insert the air tube joints into air tubes. (Note: They must be inserted completely to prevent air leakage and loss of pressure during use.)
- Zip up the cloth cover.
- Repeat steps a-d on the other side of the chair.
- Adjust the shoulder airbags to fit your shoulder position if needed taking care not to force them into place.
- Installing the backrest and headrest
- Use the velcro strips to connect the backrest and cover.
- Smooth out the backrest and seat cushion.
- Finding a location for the chair
- Place the chair in the desired location and not in direct sunlight.
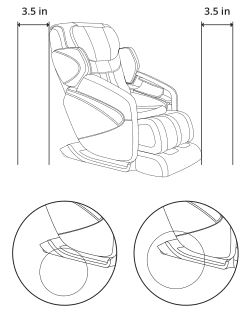
- Make sure there is at least 3.5 in behind and in front of the chair.
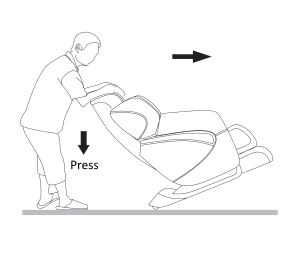
- Moving the massage chair
- Press down the back of massage chair to approximately 45° degree angle.
- This will allow it to easily be moved to another location.


CAUTION:
- Do not move massage chair when occupied or in use.
- Moving the massage chair may cause damage to floors. Floor protection is recommended.
- Do not drop or suddenly let go of the chair while moving it.
- Using two people to move the chair is recommended. The second person should lift up the legrest, while one person holds the backrest
Before Use
- Make sure that the product is in good condition.
- Confirm that the headrest, backrest and power plug are not damaged.
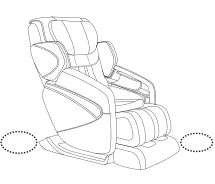
- Make sure the footrest is in its right position (as shown in the diagram to the left).
- Check the surrounding area to make sure it’s clear of anything obstructing the chairs incline/recline.
- Make sure there are at least 3.5 inches in front and back of chair.
- Connect the chair to a power source.
- Plug the chair in.
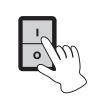
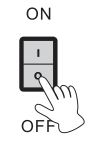
- Turn the power switch to “on.”
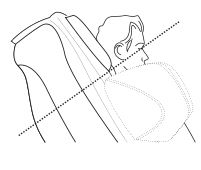
- Adjust the position of the headrest.
- Adjust the under-part of the headrest and align it with the position of the ear.

Remote Controller

Operation Guide
![]()
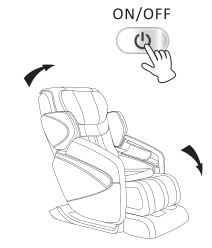
Start or Stop massage chair
- Press this button to turn the massage chair ON. Now you can select an auto course or manual massage function.
- Press this button again to turn massage chair OFF. Massage function will stop and the massage chair will come back to the original position. When the chair returns to the original position the chair will completely shut off and all buttons will be inactive.
![]()
Press once to temporarily pause or stop all the massage functions. Chair will enter idle mode. Press again to resume massage
![]()
Press this button to move the back and leg position. Press once for Zero G1, twice for Zero G2, three times for Zero G3 and four times to return to the original position.Zero G1 → Zero G2 → Zero G3 → Original Position
Note: The position adjustment buttons are disabled when the chair is in STRETCH mode.

This chair is designed with 9 auto massage modes.• FULL • RELIEF • THERAPY • YOGA • STRETCH• FLEX • NIGHT • AIR • QUICK

![]()
Air: Press this button for different combinations of massage.

Roller Location: Press and hold the up or down arrows to move the massage rollers to the desired location.
![]()
Width: Press once to adjust the width of the rollers.
![]()
Point: Press to control the location of the massage roller, once pressed use the up and down arrows to position the rollers.Kneading Point → Tapping Point → Dual Point → Shiatsu Point → Massage Point → Off
![]()
Whole: Press to manually choose the technique massaging the whole back.Kneading Whole → Tapping Whole → Dual Whole → Shiatsu Whole → Massage Whole → Off
DISPLAY DIAGRAM
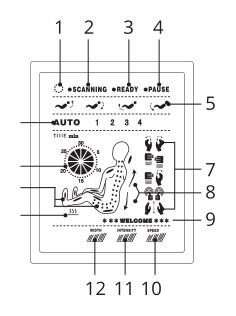
- Power is on.
- Massage chair is scanning the users back contour to provide a massage experience customized for the user.
- Scanning is complete and the massage is about to begin.
- Pause button has been pressed and the chair is temporarily stopped.
- Reclining position adjustment buttons are pressed and the backrest and/or legrest are moving.
- An Auto Course is activated.
- Which massage technique is activated.
- Direction of the massage rollers, moving upwards or downwards.
- Cheerful greeting from your massage chair
- Speed level, from one to three.
- Air intensity level, from one to three.
- Massage roller width, from narrow to wide.
- Heating function is on.
- Location of massage rollers and active air bags.
- Time remaining in current massage program.
AFTER USE
- After the massage program is completed, return chair to upright position by pressing the On/Off button. Before pressing:
- Make sure surrounding area is clear.
- Keep arms and legs away from gaps between the armrest, legrest, and footrest, to prevent possible injury.
- Then press the power button to turn off the massage chair and and bring it back upright. Once done, return remote controller to the storage pocket in the front of the chair by the users knee.
- Turn off the main power switch.
- Remove plug from power outlet.
- Do not pull on the power cord to remove the plug.
- Do not unplug with wet hands.

Maintenance
- Turn off and unplug the chair before cleaning.
- Use a dry, neutral colored cloth or soft bristled brush to lightly wipe the chair.
- Do not use water or any other liquids to clean the chair.
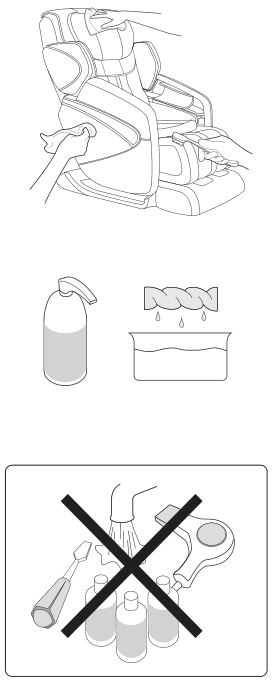
Any other servicing should be performed by an authorized service representative
Trouble Shooting
You may experience the following noises or feeling when in massage, as being due to the mechanical design, they will not have any effect on the operation of the unit and the product life.
- A “clatter” noise occurs when the knead balls go up and down.
- A “creak” noise of the gear and the motor occurs while in massage.
- A friction noise occurs when the knead balls rub the cover cloth.
- A rattling noise occurs while in the “Tap” or “Knead and Tap” massage movements (particularly when the massage moves from the shoulders to the back).
- In the “Knead”, “Tap”, or “Knead and Tap” massage movements, massaging speed may vary with the knead balls’ strength changed.
- A roaring noise of the motor occurs when load is given to the chair.
- A “cuckoo” noise occurs while in the auto mode course, the knead balls are automatically adjusted to the back-and-forth position to have the chair fitting in with the user’s body shape.
- The compressor’s noise and the air exhausting noise occur while in air-massage.
- A noise occurs when the air bag is inflated.
- A noise occurs while in massage of the shoulders.
- A grinding noise occurs when the backrest is reclined.
- There is a humming sound from the pump.
![]() WarningAbsolutely do not modify, disassemble or repair by yourself. Negligence may cause fire or mechanical trouble of the chair which may result in hazard on the body.
WarningAbsolutely do not modify, disassemble or repair by yourself. Negligence may cause fire or mechanical trouble of the chair which may result in hazard on the body. AttentionAfter checking, if the problem is caused by none of the above, switch off the power, unplug the power cord, and contact your dealer or our service center for repairs.Prior to operating the unit when it has not been used for a long period of time, read this manual carefully and make sure that the unit is still in good condition to avoid accident or injury.
Inner Balance Wellness Jin Massage Chair User Manual – Inner Balance Wellness Jin Massage Chair User Manual –
[xyz-ips snippet=”download-snippet”]