innoflame Fireplace Owner’s Manual
IMPORTANT INSTRUCTIONS
When using fireplace, basic precautions should always be followed to reduce the risk of fire, electrical shock, and/or injury including the following:
- Read all instructions before using this fireplace.
- This fireplace is hot when in use. To avoid burns, do not let bare skin touch hot surfaces. If provided, use handles when moving this fireplace.DANGER: High temperature may be generated under certain abnormal conditions. Do not partially or fully cover or obstruct the front of the fireplace.WARNING: In order to avoid overheating, do not cover the fireplace. It cannot be used in a closet.
- CAUTION: The fireplace should not be used by children or persons with reduced physical, sensory or mental capabilities.
- Children should be advised not to play with the fireplace.
- The fireplace is suitable for using in a recreational vehicle.
- Do not operate any fireplace with a damaged cord or plug or after the fireplace malfunctions, or if it has been dropped or damaged in any manner.
- If the supply cord is damaged, it must be replaced by the manufacturer, it’s service agent or similarly qualified persons in order to avoid a hazard.
- Any repairs to this fireplace should be carried out by a qualified electrician.
- Under no circumstances should this fireplace be modified. Parts having to be removed for servicing must be replaced prior to operating this fireplace again.
- Do not use outdoors.
- This fireplace is not intended for use in bathrooms, laundry areas and similar indoor locations. Never locate this fireplace where it may fall into a bathtub or other water container.
- Do not run cord under carpeting. Do not cover cord with throw rugs, runners or the like. Arrange cord away from traffic areas and where it will not be tripped over.
- To disconnect this fireplace, turn controls to the off position, then remove plug from outlet.
- Connect to properly grounded outlet only.
- This fireplace, when installed, must be electrically grounded in accordance with local codes or, in the absence of local codes, with the current CSA C22.1 Canadian Electrical Code or for USA installations, follow local codes and the National Electrical Code, ANSI/NFPA NO.70.
- There is a protective thermostat limiter inside the fireplace. When the inner temperature over heat, the thermostat limiter will shut off the power supply to avoid the risk of fire damage to the fireplace.
- The fireplace must not be located immediately below a socket-outlet.
- Do not insert or allow foreign objects to enter any ventilation or exhaust opening as this may cause an electric shock or fire, or damage to the fireplace.
- To prevent a possible fire, do not block air intakes or exhaust in any manner. Do not use on soft surfaces, like bed, where opening may become blocked
- This fireplace has hot and arcing or sparking parts inside. Do not use where gasoline, paint, or flammable liquids are used or stored. This fireplace should not be used as a drying rack for clothing. Christmas stockings or decorations should not be hung in area of it.
- Use this fireplace only as described in the manual. Any other use not recommended by the manufacturer may cause fire, electric shock or injury to persons.
- Always plug fireplace directly into a wall outlet/receptacle. Never use with an extension cord or relocatable power tap (outlet/power strip).
INSTALLATION INSTRUCTIONS
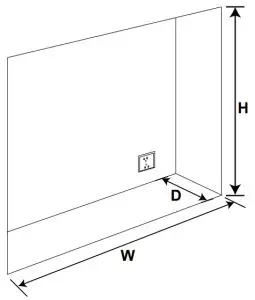
Cabinet Dimensions
| Model NO. | W | D | H |
| RV23D80L-1 | 22.3” | 6.2” | 18.3” |
| RV26D80L-1 | 25.5” | 6.2” | 18.3” |
| RV30D80S-1 | 29.7” | 6.2” | 14.9” |
| RV48D80L-1 | 41.5” | 6.2” | 18.3” |
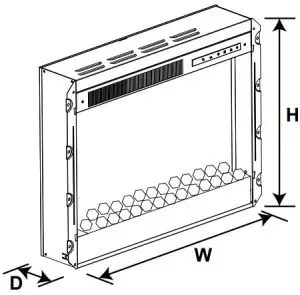
Fireplace Dimensions
| Model NO. | W | D | H |
| RV23D80L-1 | 21.9” | 4.7” | 18.1” |
| RV26D80L-1 | 25.1” | 4.7” | 18.1” |
| RV30D80S-1 | 29.2” | 4.7” | 14.7” |
| RV48D80L-1 | 41” | 4.7” | 18.1” |
Electrical Specifications
120V 60Hz 1400W
Grounding Instructions
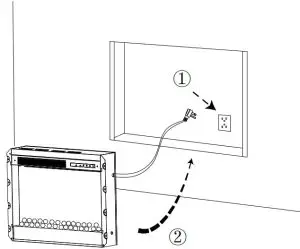
This fireplace is for use on 120 volt circuits. The cord has a plug as shown at (A) in figure 1.An adapter as shown at (C) is available for connecting three-blade grounding-type plugs to two-slot receptacles. The green grounding lug extending from the adapter must be connected to a permanent ground such as a properly grounded outlet box. The adapter should not be used if a three-slot grounded receptacle is available.
NOTE: Adapters are NOT for use in Canada
WARNING: Cabinet construction and electrical outlet wiring must comply with local bulding codes regulations to reduce the risk of fire, electrical shock and injury to persons.
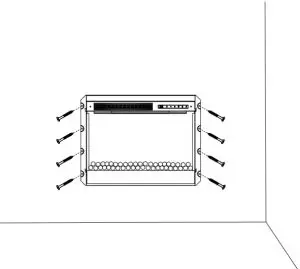
- Plug into the power supply and push the fireplace into the cabinet.

- Use 8 supplied screws to secure the fireplace to cabinet. (NOTE: RV30D80S-1 only 6 supplied screws to secure the fireplace to cabinet)
- Fit the glass panel by locating the 4 tabs into the slots on both sides of the fireplace.
- Secure the glass panel in place at both top sides using the 2 supplied screws.
OPERATING INSTRUCTIONS
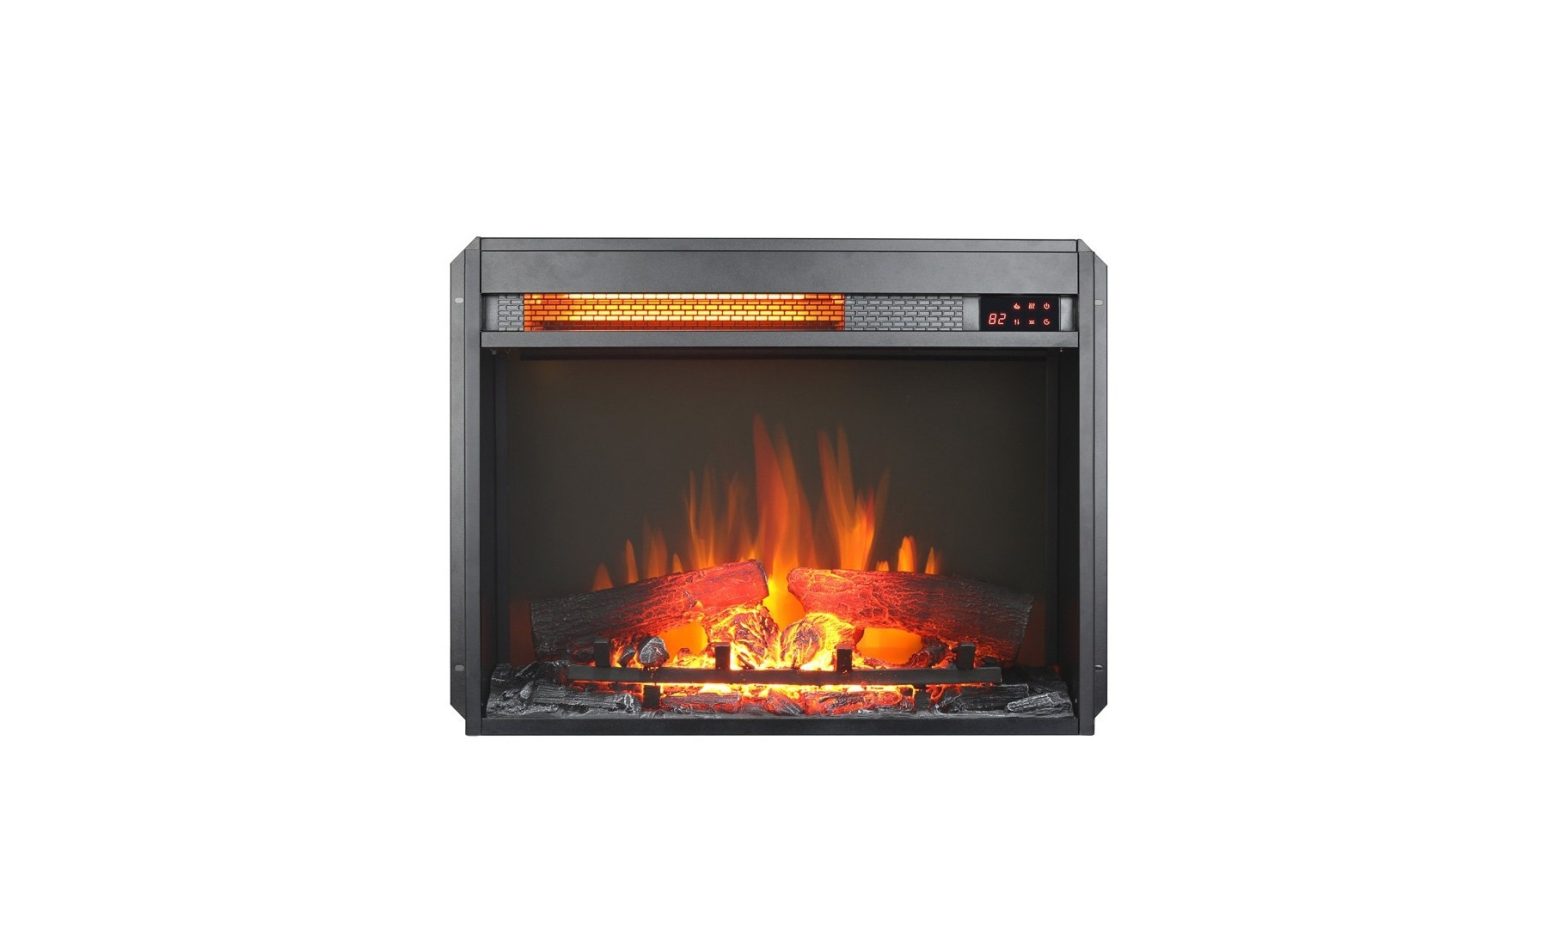
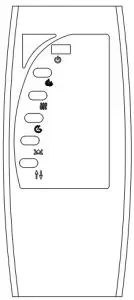
CONTROL PANEL
Control panel can be access at upper-right corner of the fireplace.

NOTE: The remote control is intended only for the functional operation of the product, It can not lock/unlock the heating function!
The Power Button
The power button turns the fireplace on & off. When the fireplace is off pressing the power button once will switch on the fireplace. Once on, if the fireplace display is not illuminated pressing the power button will light up the display. If the power button is pressed again within 10 seconds it will turn off the fireplace. If the display is already illuminated then only one press of the power button is needed to turn off the fireplace.The power button has a built in memory function that will retain the status of the fireplace when turned off. With the exception of the timer, the fireplace will restart in its previous status. If the fireplace is disconnected from the main power source it will lose the memory and restart at the default settings.
The Flame Button
Each time the Flame Button is pressed, the color of the flame changes. There are 7 colors, dynamic condition ,and the OFF setting you can cycle through.
The Heater Button
The Heater Button turns the heater On & Off. When the heater is on, press the Increase/Decrease button to change the desired temperature. There are 11 temperature settings: 72℉-74℉-76℉-78 ℉-80℉-82℉-ON-64℉—72℉(22℃-23℃- 24℃-25℃-26℃-27℃-ON-18℃—22℃).Temperature unit convert function: When the heater is on, press and hold the Power Button for 5 seconds, current temperature unit display will flash 3 timers and convert to another temperature unit (Note: This can’t be set with the remote control).Lock & unlock heater function: press and hold the Heater Button for 10 seconds, the ember bed will flash 6 times, indicating that the heater function is locked. To unlock the heater function, just repress and hold the heater icon for 10 seconds again, then the ember bed will also flash 6 times indicating the heater function is unlocked and to recover the original states which you have set.(Note: This can’t be set with the remote control).
The Timer Button
The TIMER has adjustable setting with range from 30 minutes to 6 hours and OFF. As shown the following: 30 minutes- 1h-2h-3h-4h-5h-6h-OFF. Once you have set the timer, and the timer is up, the ember bed will flash 6 timers and close all the functions and enter stand by mode. In this mode, you should touch the power icon to restart the fireplace.
The Ember Bed Button
Each time the Ember Bed Button is pressed, the color of the ember bed changes. There are 7 colors and dynamic condition you can cycle through.
The Increase/Decrease Button
This button is only used to setting the temperature.
BATTERY REPLACEMENT
NOTE:
- Do not mix old and new batteries.
- Do not mix alkaine, standard (carbon zinc), or rechargable (nicad, nimh, etc.) batteries.
- Do not ingest batteries.
- Always purchase the correct size and grade of battery most suitable for the intended use.
- Replace all batteries of a set at the same time.
- Clean the battery contacts and also those of the device prior to battery installation.
- Ensure the batteries are installed correctly with regard to polarity (+ and -). Remove batteries from equipment which is not to be used for an extended period of time.
BATTERY DISPOSAL
![]() Battery may contain hazardous substances which could endanger the environment and human health. This symbol marked on the battery and/ or packaging indicates that used battery shall not be treated as municipal waste. Batteries should be disposed of at an appropriate collection point for recycling. By ensuring the used batteries are disposed of correctly, you will help preventing potential negative consequences for the environment and human health. The recycling of materials will help to conserve natural resources. For more information about recycling of used batteries, please contact your local municipality waste disposal service.
Battery may contain hazardous substances which could endanger the environment and human health. This symbol marked on the battery and/ or packaging indicates that used battery shall not be treated as municipal waste. Batteries should be disposed of at an appropriate collection point for recycling. By ensuring the used batteries are disposed of correctly, you will help preventing potential negative consequences for the environment and human health. The recycling of materials will help to conserve natural resources. For more information about recycling of used batteries, please contact your local municipality waste disposal service.
CARE AND MAINTENANCE
IMPORTANT:
- Always unplug the power cord before cleaning the fireplace. Allow the unit to cool before cleaning it.
- Wipe the exterior surface of the fireplace occasionally with a soft, damp cloth (not dripping wet), and dry the exterior surface before operating.
- Do not immerse the fireplace in water.
- Do not use any cleaning chemicals such as detergents and abrasives.
- Do not allow the interior to get wet, as this could create a hazard.
- Light accumulated dust may be removed from the fireplace with a soft, dry cloth.
- To store the fireplace, put it back into its original packaging and store in a clean, dry place.
- The blower and flame motor are pre-lubricated for a durable using time and need no further lubrication or maintenance. Dust particles will accumulate on/in the fireplace, so periodic cleaning/vacuuming of the fireplace is recommended.
TROUBLESHOOTING
| Fault code | Fault Cause | Solution |
|
E1 |
The heater is overheating | Call dealer for service. |
|
E2 |
NTC is defective. | Call dealer for service. |
|
E3 |
The heater not working. |
If the vents are dirty or clogged. Unplug the power, clean the dust and debri of the vent area. Wait for 5 minutes, plug in and turn on the heater. If the heater still does not work, please call dealer for service. |
CIRCUIT DIAGRAM
RV23D80L-1 & RV26D80L-1 & RV30D80S-1 CIRCUIT DIAGRAM
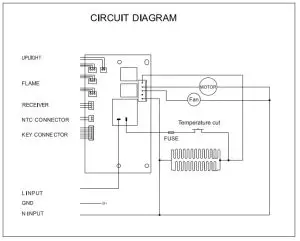
RV48D80L-1 CIRCUIT DIAGRAM
report this ad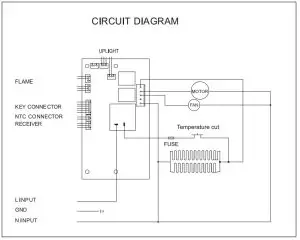
[xyz-ips snippet=”download-snippet”]