
![]()
QUICK SETUP GUIDEReplacement Remote For LG TVsNS-RMTLG21
PACKAGE CONTENTS
- Replacement Remote
- Quick Setup Guide
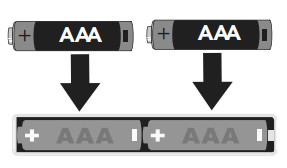
INSTALLING BATTERIES
Insert two AAA batteries (not included) into the remote. Make sure that the + and – symbols match the + and – symbols in the battery compartment.
SETTING UP YOUR REMOTE
The Insignia remote is pre-programmed to control most LG TVs. If the buttons do not work, complete the following steps:
- 1 Make sure that your TV is on and not in standby mode.
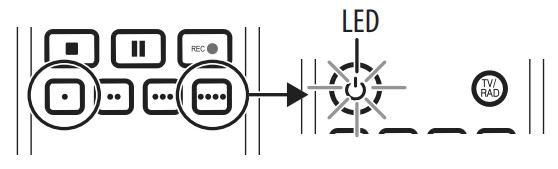
- On your new remote, hold down red and blue buttons until the
 power button LED blinks twice.
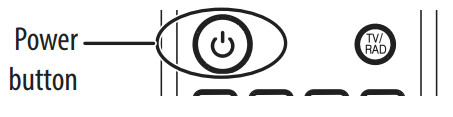
 - Point your new remote towards the TV, then press and hold the power button.
- As soon as your TV turns off, immediately release the power button. The LED blinks twice.Note: You have three seconds to release the power button before your remote sends a different code to your TV.
- Use the power button to turn on your TV, then test the other buttons.
- If one or more buttons don’t work as you expect, repeat steps 1 through 5 using the MENU or INFO button instead of the power button.
SETTING UP YOUR SOUNDBAR OR AUDIO RECEIVER VOLUME CONTROL
If you have your TV connected to a soundbar or audio receiver, you can set up your new remote to control the volume of this device.
Simple Setup
| DIGIT | BRAND |
| 0 | Yamaha |
| 1 | Bose |
| 2 | Denon |
| 3 | Samsung /JBL / Harman / Kardon |
| 4 | LG /JVC |
| 5 | Marantz / Philips |
| 6 | Onkyo |
| 7 | Panasonic /Technics |
| 8 | Pioneer |
| 9 | Sony |
If you have a soundbar or audio device from one of the brands listed above, complete the following steps:
- Turn your TV and soundbar or audio device on, and make sure that there is something playing that you can hear.
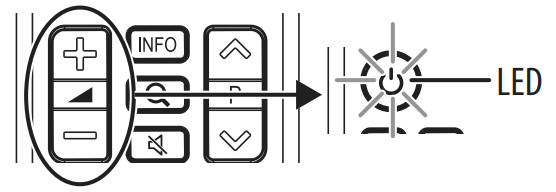
- On your new remote hold down volume + and – buttons together until the LED blinks twice.
- Point your new remote towards your soundbar or audio devices and hold down the digit button for your brand (see the table to the left).
- As soon as your soundbar or audio device mutes the volume, release the digit button. The LED blinks twice. The remote has found the code for your soundbar or audio device.
The volume buttons should now control the volume of your soundbar or audio devices.
Audio code setupIf your soundbar or audio device is not one of the brands listed, you can also set up the remote to control it by entering a four-digit code. Locate the brand of your soundbar or audio device in the Remote Codes List found in the separate document.
- Hold down volume + and – buttons together until the LED blinks twice.
- Enter the first four-digit code for your soundbar or audio device. The LED should blink twice on the last digit.
- Test volume + and – buttons and the (mute) button.
Note: If the volume buttons don’t work, start again at step 1 using the next code on the list.
Turning on all devicesIf you have set up your soundbar or audio device using Simple Setup or Audio Code Setup, you can now turn your TV and the audio device both on and off using a single button. Hold down the![]() power button for three seconds. Your new remote turns on both the TV and the audio device or soundbar. If you press and release the button, it only turns on the TV.
power button for three seconds. Your new remote turns on both the TV and the audio device or soundbar. If you press and release the button, it only turns on the TV.
RESETTING VOLUME CONTROL
You can reset the volume control back to the soundbar or audio receiver.
- Hold down the green and yellow buttons until the LED blinks twice.
- Press 977.
- The LED blinks four times and the remote is now reset.
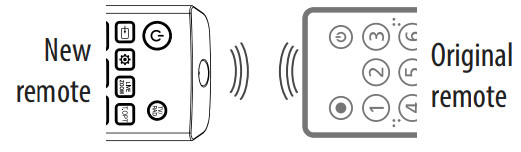
LEARNING FUNCTIONS
Your new remote can learn any function from your original remote.
- Place both remotes on a flat surface with the infrared eyes facing each other and 1–2 inches (2.5–5 cm) apart.Note: If you have difficulty with the learning function, install new batteries.
- On your new remote, hold down the yellow and green buttons until the LED blinks twice.
- Press 975 on your new remote.
- On your new remote, press the button you want to learn a new function (for example, volume +button).
- On the original remote, press the button with the function you want to teach to the button you pressed in Step 4.If the LED button blinks twice on your new remote, your new remote learned the function.Notes:• If the LED shows one long blink, the function was not learned correctly. Try again from step 4.• Some remotes send commands differently. If you find a function that can’t be learned, try holding down the button on the original remote instead of pressing and releasing it.
- Repeat steps 4 and 5 to add another function to your new remote.Note: You can learn from multiple remotes, but only one function per button.
- After you teach your new remote all the functions you want it to learn, press and hold ENTER until the LED blinks twice.Note: If you find one or more buttons don’t work as you expect, start again at step 1.
DELETING A LEARNED FUNCTION
- On your new remote hold down the yellow and green buttons until the LED blinks twice.
- Press 976.
- Press the button on your new remote you want to reset twice, the LED should blink twice. The learned function has been deleted.
Your new remote has three App Shortcut buttons which can be used to immediately open Netflix, HBO Now, Rakuten TV, or Hulu on your Smart TV.
 If you don’t have shortcut app buttons, you can program them to open apps immediately. To program the shortcut app buttons, you need to know the sequence of buttons you press to bring up the app (for example, Home > Menu > Down (twice) > OK).
- Make sure that your TV is on (not in standby mode) and that the new remote is operating the TV.
- Hold down an App Shortcut button until the LED blinks twice.
- Press the sequence of buttons exactly as you would normally to open the Streaming Service App.Note: It might take a few seconds for the TV to react. Wait for your device to respond first. The remote remembers the timing.
- After you finish the sequence and the Streaming Service App starts on your TV, hold down the App Shortcut button until the LED blinks twice and goes off. The shortcut button is now programmed.

Note:If you find the sequence doesn’t work as expected, you can repeat the same sequence to reprogram.
LEGAL NOTICES
FCC Statement:This equipment has been tested and found to comply with the limits for a Class B digital device, pursuant to part 15 of the FCC Rules. These limits are designed to provide reasonable protection against harmful interference in a residential installation. This equipment generates, uses, and can radiate radio frequency energy and, if not installed and used in accordance with the instructions, may cause harmful interference to radio communications. However, there is no guarantee that interference will not occur in a particular installation. If this equipment does cause harmful interference to radio or television reception, which can be determined by turning the equipment off and on, the user is encouraged to try to correct the interference by one or more of the following measures:
- Reorient or relocate the receiving antenna.
- Increase the separation between the equipment and receiver.
- Connect the equipment into an outlet on a circuit different from that to which the receiver is connected.
- Consult the dealer or an experienced radio/TV technician for help.
This device complies with part 15 of the FCC Rules.Operation is subject to the following two conditions: (1) This device may not cause harmful interference, and (2) this device must accept any interference received, including interference that may cause undesired operation.Caution: Changes or modifications not expressly approved by the party responsible for compliance could void the user’s authority to operate the equipment.
ONE-YEAR LIMITED WARRANTY
Visit www.insigniaproducts.com for details.
CONTACT INSIGNIA:
 report this ad
For customer service, call 1-877-467-4289 (U.S. and Canada) or 01-800-926-3000 (Mexico) www.insigniaproducts.comINSIGNIA is a trademark of Best Buy and its affiliated companies.Distributed by Best Buy Purchasing, LLC7601 Penn Ave South, Richfield, MN 55423 U.S.A.©2020 Best Buy. All rights reserved.
References
[xyz-ips snippet=”download-snippet”]