20217 Exercise bike Insportline Omahan UB User Manual
SAFETY INSTRUCTIONS
- Read the manual carefully and keep it for future reference.
- To ensure the best safety of the exerciser, regularly check it on damages and worn parts.
- If you pass on this exerciser to another person or if you allow another person to use it, make sure that that person is familiar with the content and instructions in these instructions.
- Only one person should use the exerciser at a time.
- Before the first use and regularly make sure that all screws, bolts and other joints are properly tightened and firmly seated.
- Before you start your work-out, remove all sharp-edged objects around the exerciser.
- Only use the exercise for your work-out if it works flawlessly.
- Any broken, worn or defective part must immediately be replaced and/or the exerciser must no longer be used until it has been properly maintained and repaired.
- Parents and other supervisory persons should be aware of their responsibility, due to situations which may arise for which the exerciser has not been designed and which may occur due to children’s natural play instinct and interest in experimenting.
- If you do allow children to use this exerciser, be sure to take into consideration and assess their mental and physical condition and development, and above all their temperament. Children should use the exerciser only under adult supervision and be instructed on the correct and proper use of the exerciser. The exerciser is not a toy.
- Make sure there is sufficient free space around the exerciser when you set it up min 0.6 m.
- To avoid possible accidents, do not allow children to approach the exerciser without supervision, since they may use it in a way for which it is not intended due to their natural play instinct and interest in experimenting.
- Please note that an improper and excessive work-out may be harmful to your health.
- Please note that levers and other adjustment mechanisms are not projecting into the area of movement during the work-out.
- No adjustable part may protrude and limit user movement.
- When setting up the exerciser, please make sure that the exerciser is standing in a stable way and that any possible unevenness of the floor is evened out.
- Always wear appropriate clothing and shoes which are suitable for your work-out on the exerciser. The clothes must be designed in a way so that they will not get caught in any part of the exerciser during the work-out due to their form (for example, length). Be sure to wear appropriate shoes which are suitable for the work-out, firmly support the feet and which are provided with a non-slip sole.
- Be sure to consult a physician before you start any exercise program. He may give you proper hints and advice with respect to the individual intensity of stress for you as well as to your work-out and sensible eating habits.
- Maximal weight: 150 kg
- Category: HC for home use (EN 957)
IMPORTANT NOTES
- Assemble the exerciser as per assembly instructions and be sure to only use the structural parts provided with the exerciser and designed for it. Prior to the assembly, make sure the contents of the delivery is complete by referring to the parts list of the assembly and operating instructions.
- Be sure to set up the exerciser in a dry and even place and always protect it from humidity. If you wish to protect the place particularly against pressure points, contamination, etc., it is recommended to put a suitable, non-slip mat under the exerciser.
- The general rule is that exercisers and training devices are no toys. Therefore, they must only be used by properly informed or instructed persons.
- Stop your work-out immediately in case of dizziness, nausea, chest pain or any other physical symptoms. In case of doubt, consult your physician immediately.
- Children, disabled and handicapped persons should use the exercise only under supervision and in presence of another person who may give support and useful instructions.
- Be sure that your body parts and those of other persons are never close to any moving parts of the exerciser during its use.
- When adjusting the adjustable parts, make sure they are adjusted properly and note the marked, maximum adjusting position, for example of the saddle support, respectively.
- Do not work out immediately after meals!
WARNING! A system for monitoring heart rate may not be accurate. Overloading during training may cause serious injury or death. If you feel any discomfort, immediately stop the exercise!
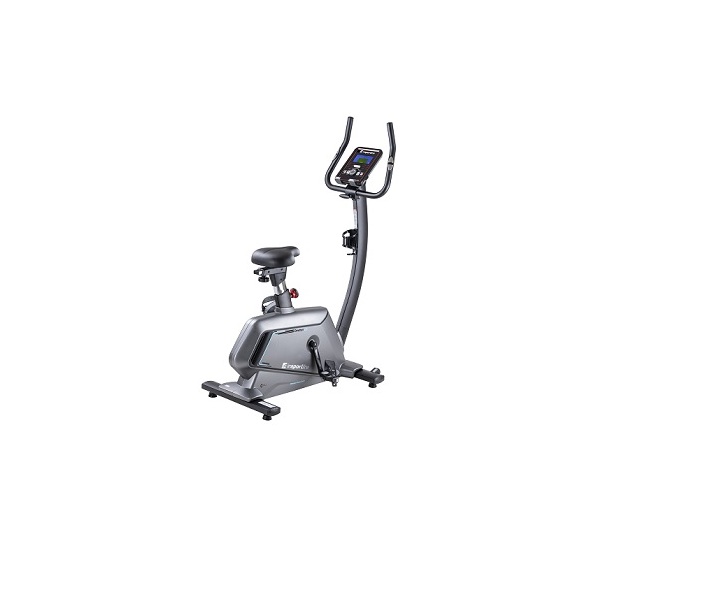
PRODUCT DESCRIPTION

- Console
- Handlebars
- Middle post
- Front stabilizer
- Pedal L
- Rear stabilizer
- Seat
- Bottle holder
TECHNICAL SPECIFICATIONS
| Model | B30 |
| Unfolded dimension | 1090 x 560 x 1490 mm |
| Maximal load capacity | 150 kg |
| Speed ratio | 10.3 |
| Flywheel | External, magnetic, one directional Φ280/9 kg |
| Saddle adjustment – Vertical | 10 positions, 270 mm |
| Saddle adjustment – Horizontal | 70 mm |
ASSEMBLY
 Prepare all parts and tools in clean and free space. Follow each step carefully.
ASSEMBLY MATERIAL
|
No. |
Name | Specification |
Qty |
|
26 |
Allen screw | M10×70×20 |
4 |
|
27 |
Flat washer | Φ 10 |
4 |
|
28 |
Spring washer | Φ 10 |
4 |
|
29 |
Screw | M4×6 |
6 |
|
31 |
Spring washer | M12×60 |
2 |
|
32 |
Screw | M4×16 |
6 |
|
87 |
Screw | ST4×12 |
4 |
| Allen key | 5×80×80S |
1 |
|
| Allen key | 6×66×140 |
1 |
|
| Wrench | t4.0×38×145 |
1 |
STEP 1:Attach the front stabilizer (2) to the main frame using the washer (28), spring washer (27) and bolt (26).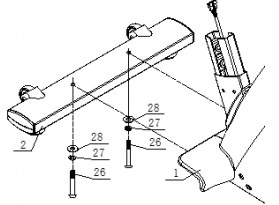
STEP 2:Attach the rear stabilizer (3) to the main frame (1) using the curved washer (28), spring washer (27) and bolt (26).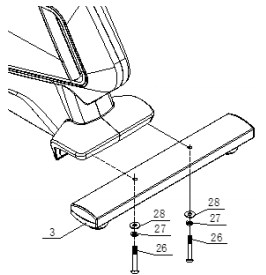 STEP 3:Attach the seat post (4) to the main frame (1).
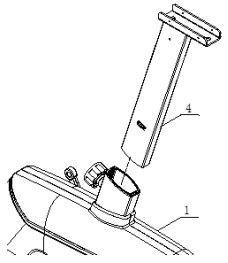 STEP 4:Attach the seat (5) to the seat support (60) using the nuts (59).
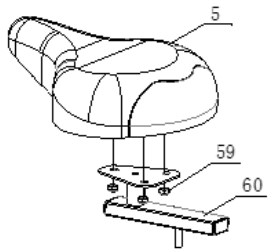 STEP 5:Attach the seat (5) to the seat post (4) using the nut (25) and the hand screw (23). Secure the L-seat cover (16) and the R-seat cover (17) to the seat post (4) with the screws (29).
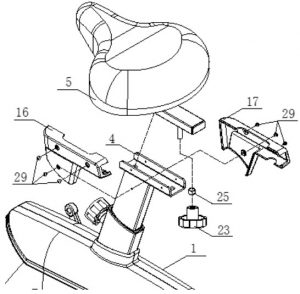
STEP 6:Attach the bolt (31) to the main frame (1). Connect the motor communication cable (10) and the console communication cable (9). Attach the center post (6) to the main frame (1). Remove the caps (88) first and secure with screws (31). Then cover the screws with caps (88).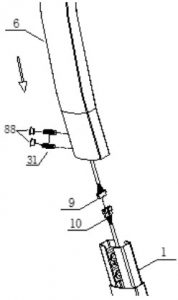 STEP 7:Attach the handles (7). Pass the pulse measurement cables (11) through the hole in the middle post (6). Then attach the hand screw (21) to the handle cover (13). Attach the bottle holder (20) to the middle post (6) with the screw (32).
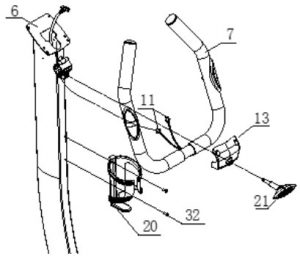 STEP 8:Connect the console communication cable (9) to the back of the console. Connect the pulse cable from the handles (11) to the console (12). Attach the bracket (8) to the middle post (6) with the screws (24).
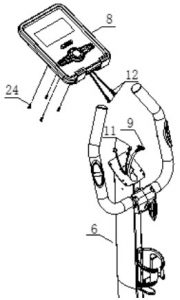 STEP 9:Attach the handle covers (14 and 15) to the center post (6) with the screws (32). Attach the front handle cover (13) with the screws (87).
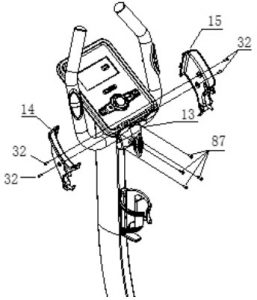 STEP 10:Attach the pedal L (18) and pedal R (19) to the main frame (1).
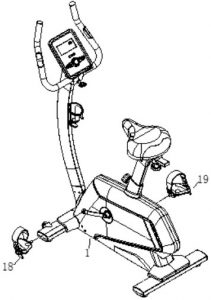
STEP 11:Plug in the power.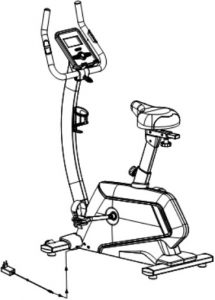
CONSOLE
BUTTONS
| START/STOP | Start / stop program |
| RESET | If a program is paused or you are setting up values, returns to the menu
Hold for 2 seconds, the console will restart and start user settings |
| UP (+) | Increase value |
| MODE/ENTER | Confirm settings, enter settings |
| DOWN (-) | Decrease value |
| RECOVERY | Starts RECOVERY test |
| BODY FAT | Starts BODY FAT test |
DISPLAY
| TIME | Display: 0:00 – 99:59, Settings: 0:00 – 99:00 |
| DISTANCE | Display: 0:00 – 99,99, Settings: 0:00 – 99,90 |
| CALORIES | Display: 0:00 – 9999 Cal, Settings: 0:00 – 9990 Cal |
| PULSE | Display: P-30 – 230, Settings: 0-30 – 230 |
| WATT | Display: 0:00 – 999, Settings: 10-350 |
| SPEED | Display: 0,0 – 99,9 km/h |
| RPM | Display: 0,0 – 999 |
AFTER TURNING ONWhen the console is turned on, the display will show all the data and play a sound signal (Pic. 1). Then select the user (Pic. 2) and set the AGE, GENDER, HEIGHT, WEIGHT. After 4 minutes without pedaling or receiving a signal, the console switch to standby mode. Pressing any button switches the console from standby mode.
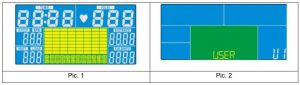
SETTING PERSONAL DATASelect user U1 – U4 and confirm with ENTER. Use the UP (+) / DOWN (-) keys to set SEX (gender), AGE (Pic. 3), height, weight, and press ENTER to confirm. After setting up the user, the main menu is displayed (Pic. 4). Here the user can start the training with the START / STOP button.
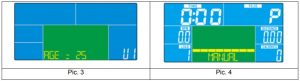
PROGRAMSMANUAL will flash in the main menu. Select the program with the UP (+) / DOWN (-) buttons and confirm with the ENTER button. Programs go in the order: MANUAL – PROGRAM – USER PROGRAM – H.R.C WATTMANUAL MODEUse the UP (+) / DOWN (-) keys to select a program, select MANUAL (Pic. 4) and press ENTER to confirm.Use the UP (+) / DOWN (-) keys to set TIME, DISTANCE, CALORIES, PULSE, and ENTER.Press the START / STOP button to start the program. During the program, the user can use the UP (+) / DOWN (-) buttons to set the load from 1 to 16.Press the START / STOP button to pause the program. Press RESET to return to the main menu.PROGRAM MODE (PEDNASTAVENÉ PROGRAMY)Use the UP (+) / DOWN (-) keys to select a program, select PROGRAM (Pic. 5) and press ENTER.Use the UP (+) / DOWN (-) keys to select program P01 – P12, the profiles will be displayed in sequence.Use the UP (+) / DOWN (-) keys to set TIME.Press the START / STOP button to start the program. During the program, the user can use the UP (+) / DOWN (-) buttons to set the load from 1 to 16.Press the START / STOP button to pause the program. Press RESET to return to the main menu.

USER PROGRAM MODEUse the UP (+) / DOWN (-) keys to select a program, select USER PROGRAM (Pic. 6) and press ENTER to confirm.Use the UP (+) / DOWN (-) keys to set the load from 1 to 16 for each training segment. Confirm with ENTER. A total of 20 segments. Press and hold ENTER to complete and exit. Use the UP (+) / DOWN (-) keys to set TIME.Press the START / STOP button to start the program. During the program, the user can use the UP (+) / DOWN (-) buttons to set the load from 1 to 16. Press the START / STOP button to pause the program. Press RESET to return to the main menu.H.R.C PROGRAMUse the UP (+) / DOWN (-) keys to select a program, select H.R.C (Pic. 7) and press ENTER to confirm.Use the UP (+) / DOWN (-) keys to select H.R.C 55 (Pic. 8), H.R.C 75, H.R.C 90 or TAG (custom target, original value: 10, Pic. 9) and press ENTER to confirm. When selecting H.R.C 55, H.R.C 75, H.R.C 90, the console displays the target age-based heart rate. Use the UP (+) / DOWN (-) and ENTER keys to set TIME. If you select TAG H.R, the default value of 100 flashes on the display (Pic. 9). Use the UP (+) / DOWN (-) keys to set the value from 30-230. Confirm with ENTER. Use the UP (+) / DOWN (-) keys to set TIME. Press the START / STOP button to pause the program. Press RESET to return to the main menu.

WATT PROGRAMUse the UP (+) / DOWN (-) keys to select a program, select WATT (Pic. 10) and press ENTER. Use the UP (+) / DOWN (-) keys to set the value. (Original Value: 120) Use the UP (+) / DOWN (-) keys to set TIME. Press the START / STOP button to start the program. During the program, the user can use the UP (+) / DOWN (-) buttons to adjust the power from 10 to 350. Press the START / STOP button to pause the program. Press RESET to return to the main menu.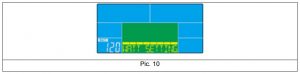
BODY FAT PROGRAM
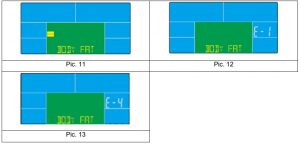
During training, press START / STOP to stop the program and press BODY FAT (Pic. 11) to turn on the measurement. Grasp the sensors on the handles. After 8 seconds, console displays BMI, FAT% (fat percentage) Press BODY FAT again to return to the menu. Error messages:E-1 (Pic. 12) the user does not hold the pulse handles correctly.E-4 (Pic. 13) FAT% exceeded value (5.0% – 50.0%)
BMI
| BMI |
LOW |
LOW/MID | MID |
MID/HIGH |
|
RANGE |
<20 | 20 – 24 | 24,1 – 26,5 |
>26,5 |
BODY FAT
|
SYMBOL |
— | + | ▲ |
◆ |
| FAT% |
LOW |
LOW/MID |
MID |
MID/HIGH |
| MAN |
<13% |
13%-25.9% |
26%-30% |
>30% |
| WOMAN |
<23% |
23%-35.9% |
36%-40% |
>40% |
RECOVERY PROGRAMIf the pulse value is displayed (holding the sensors on the handles), press the RECOVERY button.All displayed values are paused, only TIME is displayed, and countdown starts from 00:60 to 00:00 (Figure 14). When the time reaches 0, the display shows RECOVERY status FX (X = 1-6 Fig. 15). F1 is the best result, F6 is the worst result.
| 1,0 | Excellent |
| 1,0 <F <2,0 | Above average |
| 2,0<F <2,9 | Good |
| 3,0<F <3,9 | Average |
| 4,0<F <5,9 | Below the average |
| 6,0 | Bad |
NOTES:
- Console has a 9V, 1300 mA adapter.
- If the user stops pedaling for 4 minutes, the console enters Sleep mode. All data and settings are saved until next run.
- If the console is not working properly, try turning it off and on.
USE
Exercise on the exercise bike is based on very simple movements, but you will surely fall in love with them. Thanks to simplicity of the exercise on the exercise bike in can be done by elderly people. Prior to exercise, it is necessary to adjust the height of the saddle. It is important that you sit comfortably. The bicycle saddle must be set so that you can hold the ergonomically shaped handles when sitting. You should not have fully extended hands. You can damage your muscles.To ensure a comfortable and comfortable exercise, put your feet on the pedal. Nowadays, all modern pedals are equipped with straps for fastening and stabilizing of the foot. It is important for your foot to be firmly and safely positioned during exercise. The basis of exercising on a bicycle is that the legs are moving on a specific elliptical path. This movement is very similar to cycling. When doing exercise on a bicycle, you just sit on the saddle with the right height, keep your feet firmly in the pedals, hold the ergonomically shaped handles and exercise. It is advisable at the beginning to choose a lower load. If you exercise at regular intervals on an exercise bike, you can gradually increase the load. You can increase the load gradually over a week or two weeks. Selecting a high load during the start of training can lead to rapid fatigue and muscle damage.When exercising, it’s important to choose the right load and the right tempo. Try to keep it throughout the exercise. It is not recommended to choose a high pace right from the start. Increase tempo after about a week of regular exercise. The high pace is not equal to the faster burning of calories. Correct calorie burning is reflected in an appropriate and regular exercise. At the beginning of the exercise, the number of burned calories may seem low, but regular and appropriate exercise is the key to achieving the best results.Exercise on the exercise bike also leads to the formation of muscles. It is mainly used to strengthen the thigh and calf muscles. While exercising on a bicycle, you also move your buttocks.If you want to exercise right, you should not forget to breathe properly. Proper and regular breathing is recommended in any exercise. It is important to keep regular deep inhales and exhales. Regular and proper breathing during exercises on the exercise bike involves intense exercise of the abdominal muscles. It is advisable to practice 30-35 after consuming food. Failure to do so may result in less calories burned, and in older age even lead to digestive problems.For best results, you should also consider your diet. It is recommended to start a day of eating sweet food and pastries or muesli with milk. For lunch is recommended to eat a caloric richer meal. Do not forget about the soup. In the evening, light meals are recommended. If you want to improve your health, it’s not just a regular exercise but a whole diet. Bicycle exercise is an effective exercise for all busy people. Exercise on the exercise bike is effective in strengthening muscles, especially thighs, calves and buttocks. Regular exercise can lead to a slimmer figure. Exercise is recommended not only as a winter training for cyclists but also for people who want to burn excess calories. Regular breathing, regular exercise, reasonable tempo, and balanced diet can lead to your desired results.
EXERCISING INSTRUCTIONS
A successful workout begins with warm-up exercises and ends with cool-down (relaxing) exercises. The warm-up exercises should make your body ready for the main workout. The cool-down phase should protect your muscles from injuries and cramps. Do warm-up and cool-down exercises as shown in the chart below.Touching your toesSlowly bend your back from hips. Keep your back and arms relaxed while stretching downwards to your toes. Do it as far as you are able and hold the position for 15 seconds. Bend your knees slightly. Upper thighLean against a wall with one hand. Reach down and behind you. Lift up your right or left foot to your buttock as high as possible. Keep for 30 seconds and repeat twice for each leg.
 Hamstring stretchedSit and outstretch your right leg. Rest the sole of your left foot against the inside of your right tight. Stretch out your right arm along your right leg as far as you can. Hold for 15 seconds and relax. Repeat all with your left leg and left arm.
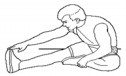 Inside upper thighSit on the floor and place your feet together. Knees are pointed outwards. Pull your feet as close as possible to your groin. Press your knees carefully downwards. Keep this position for 30-40 seconds if possible.
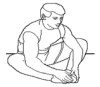 Calves and Achilles tendonLean against a wall with your left leg in front of the right one and your arms forward. Stretch out your right leg and keep your left foot on the floor. Bend your left leg and lean forwards by moving your right hip in the direction of the wall. Hold for 30-40 seconds. Keep your leg stretched and repeat exercising with other leg.
CORRECT BODY POSTURE
When training, keep your body upright, or you can learn your hand on your forearms. During pedaling, you should not have your legs fully extended. Your knees should be slightly bent when fully pressing down the pedal. Keep your head straight with your spine to minimize the pain of the cervical muscles and upper back muscles. Always exercise fluently and rhythmically.
MAINTENANCE
- When assembling, tighten all screws and adjust the bike to the horizontal position.
- Check the screws after 10 hours of use.
- Wipe the sweat after the exercise. Clean the device with a cloth and gentle cleanser. Do not use solvents or aggressive cleaners on the plastic parts.
- When noise is increased, it is necessary to check that all joints are tightened properly.
- Place the product in a clean, ventilated and dry room. · Do not expose the device to direct sunlight.
STORAGE
Keep the exercise bike in a clean and dry environment. Make sure the power switch is turned off and the exercise bike is not plugged into the power socket.
IMPORTANT NOTICE
- This exercise bike comes with standard safety regulations and is suitable for home use use. Any other use is prohibited and may be dangerous to users. We are not responsible for any injury caused by improper and forbidden use of the machine.
- Consult your doctor before starting training on the exercise bike. Your doctor should evaluate whether you are physically fit to use the machine and how much effort you are able to undergo. Incorrect exercise or switching of the body can harm your health.
- Carefully read the following tips and exercises. If you experience pain, nausea, breathing, or other health problems during exercise, immediately stop the exercise. If the pain persists, contact your doctor immediately.
- This exercise bike is not suitable for medical purpose. It can also not be used for healing purposes.
- The heart rate monitor is not a medical device. It provides only approximate information about your average heart rate, and any suggested pulse rate is not medically binding. Accumulated data may not always be accurate regarding uncontrollable human and environmental factors.
ENVIRONMENT PROTECTION
After the product lifespan expired or if the possible repairing is uneconomic, dispose it according to the local laws and environmentally friendly in the nearest scrapyard. By proper disposal you will protect the environment and natural sources. Moreover, you can help protect human health. If you are not sure in correct disposing, ask local authorities to avoid law violation or sanctions. Don’t put the batteries among house waste but hand them in to the recycling place.
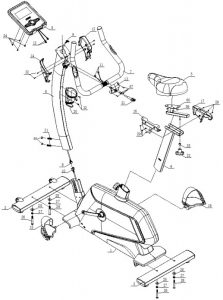
DIAGRAM
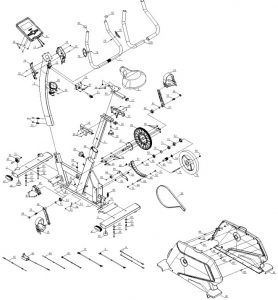
PARTS LIST
|
No. |
Name | Qty. | No. | Name |
Qty. |
|
1 |
Main frame |
1 |
36 |
Crank – L |
1 |
|
2 |
Front stabilizer |
1 |
37 |
Crank – R |
1 |
|
3 |
Rear stabilizer |
1 |
38 |
Strap |
1 |
|
4 |
Seat post |
1 |
39 |
Foam roller |
2 |
|
5 |
Seat |
1 |
40 |
Motor cover – left |
1 |
|
6 |
Middle post |
1 |
41 |
Motor cover – right |
1 |
|
7 |
Handlebars |
1 |
42 |
Brake cable |
1 |
|
8 |
Console |
1 |
43 |
Power adapter 240 V |
1 |
|
9 |
Console communication cable |
1 |
44 |
Magnetic sensor |
1 |
|
10 |
Motor communication cable |
1 |
45 |
Power communication cable |
1 |
|
11 |
Pulse communication cable |
2 |
46 |
Magnetic motor |
1 |
|
12 |
Console communication cable |
1 |
47 |
End cap |
4 |
|
13 |
Front handlebar cover |
1 |
48 |
Support feet |
4 |
|
14 |
Side handlebar cover – L |
1 |
49 |
Allen screw Φ8×33×M6×15 |
2 |
|
15 |
Side handlebar cover – R |
1 |
50 |
Transport wheels Φ54.5×23.5 |
2 |
|
16 |
Seat cover – L |
1 |
51 |
Allen screw M6×15 |
5 |
|
17 |
Seat cover – R |
1 |
52 |
Bearing 6203-2RS |
3 |
|
18 |
Pedal – L |
1 |
53 |
Nut M5 |
2 |
|
19 |
Pedal – R |
1 |
54 |
Screw M5x60 |
1 |
|
20 |
Bottle handlebar |
1 |
55 |
Screw ST4×12 |
1 |
|
21 |
Knob |
1 |
56 |
Seat post grommet |
1 |
|
22 |
Handlebar clamping ring |
1 |
57 |
Crank axis |
1 |
|
23 |
Seat knob |
1 |
58 |
Belt |
1 |
|
24 |
Screw M5×10 |
4 |
59 |
Nut M8 |
10 |
|
25 |
Sleeve Φ25×Φ19×60 |
1 |
60 |
Seat adjustment |
1 |
|
26 |
Screw M10×70×20 |
4 |
61 |
Shaft retaining ring Φ17 |
2 |
|
27 |
Spring washer Φ10 |
4 |
62 |
Shaft retaining ring Φ12 |
2 |
|
28 |
Arc washer |
4 |
63 |
Shaft retaining ring Φ10 |
3 |
|
29 |
Screw M4×6 |
6 |
64 |
Tensioning wheel |
1 |
|
30 |
Allen screw M8×20 |
5 |
65 |
Tensioning spring |
1 |
|
31 |
Allen screw M12*60 |
2 |
66 |
Brake tension spring |
1 |
|
32 |
Screw M4×16 |
6 |
67 |
Magnet |
10 |
|
33 |
Closing part of the seat |
1 |
68 |
Magnetic control axis |
1 |
|
34 |
Crank cover |
2 |
69 |
Ball-bearing 6300-2RS |
1 |
|
35 |
Screw |
2 |
70 |
Washer |
1 |
|
71 |
Ball-bearing 6003-2RS |
1 |
81 |
Screw ST4x16 |
8 |
|
72 |
One-way bearing |
1 |
82 |
Magnet |
1 |
|
73 |
Small pulley |
1 |
83 |
Screw |
1 |
|
74 |
Ball-bearing |
1 |
84 |
Fixed tension wheel |
1 |
|
75 |
Flywheel axis |
1 |
85 |
Magnet |
1 |
|
76 |
Flywheel |
1 |
86 |
Plastic screw |
6 |
|
77 |
Square cover |
1 |
87 |
Screw ST4×12 |
4 |
|
78 |
Pulse handle |
2 |
88 |
Hole plug |
2 |
|
79 |
Screw ST4×20 |
2 |
89 |
Spring washer |
4 |
|
80 |
Round end cap |
2 |
TERMS AND CONDITIONS OF WARRANTY, WARRANTY CLAIMS
General Conditions of Warranty and Definition of TermsAll Warranty Conditions stated hereunder determine Warranty Coverage and Warranty Claim Procedure. Conditions of Warranty and Warranty Claims are governed by Act No. 89/2012 Coll. Civil Code, and Act No. 634/1992 Coll., Consumer Protection, as amended, also in cases that are not specified by these Warranty rules.The seller is SEVEN SPORT s.r.o. with its registered office in Borivojova Street 35/878, Prague 13000, Company Registration Number: 26847264, registered in the Trade Register at Regional Court in Prague, Section C, Insert No. 116888. According to valid legal regulations it depends whether the Buyer is the End Customer or not. “The Buyer who is the End Customer” or simply the “End Customer” is the legal entity that does not conclude and execute the Contract in order to run or promote his own trade or business activities. “The Buyer who is not the End Customer” is a Businessman that buys Goods or uses services for the purpose of using the Goods or services for his own business activities. The Buyer conforms to the General Purchase Agreement and business conditions.These Conditions of Warranty and Warranty Claims are an integral part of every Purchase Agreement made between the Seller and the Buyer. All Warranty Conditions are valid and binding, unless otherwise specified in the Purchase Agreement, in the Amendment to this Contract or in another written agreement.
Warranty ConditionsWarranty PeriodThe Seller provides the Buyer a 24 months Warranty for Goods Quality, unless otherwise specified in the Certificate of Warranty, Invoice, Bill of Delivery or other documents related to the Goods. The legal warranty period provided to the Consumer is not affected.By the Warranty for Goods Quality, the Seller guarantees that the delivered Goods shall be, for a certain period of time, suitable for regular or contracted use, and that the Goods shall maintain its regular or contracted features.
The Warranty does not cover defects resulting from (if applicable):
- User’s fault, i.e. product damage caused by unqualified repair work, improper assembly, insufficient insertion of seat post into frame, insufficient tightening of pedals and cranks
- Improper maintenance
- Mechanical damages
- Regular use (e.g. wearing out of rubber and plastic parts, moving mechanisms, joints etc.)
- Unavoidable event, natural disaster · Adjustments made by unqualified person
- Improper maintenance, improper placement, damages caused by low or high temperature, water, inappropriate pressure, shocks, intentional changes in design or construction etc.
Warranty Claim ProcedureThe Buyer is obliged to check the Goods delivered by the Seller immediately after taking the responsibility for the Goods and its damages, i.e. immediately after its delivery. The Buyer must check the Goods so that he discovers all the defects that can be discovered by such check. When making a Warranty Claim the Buyer is obliged, on request of the Seller, to prove the purchase and validity of the claim by the Invoice or Bill of Delivery that includes the product’s serial number, or eventually by the documents without the serial number. If the Buyer does not prove the validity of the Warranty Claim by these documents, the Seller has the right to reject the Warranty Claim. If the Buyer gives notice of a defect that is not covered by the Warranty (e.g. in the case that the Warranty Conditions were not fulfilled or in the case of reporting the defect by mistake etc.), the Seller is eligible to require a compensation for all the costs arising from the repair. The cost shall be calculated according to the valid price list of services and transport costs. If the Seller finds out (by testing) that the product is not damaged, the Warranty Claim is not accepted.The Seller reserves the right to claim a compensation for costs arising from the false Warranty Claim. In case the Buyer makes a claim about the Goods that is legally covered by the Warranty provided by the Seller, the Seller shall fix the reported defects by means of repair or by the exchange of the damaged part or product for a new one. Based on the agreement of the Buyer, the Seller has the right to exchange the defected Goods for a fully compatible Goods of the same or better technical characteristics. The Seller is entitled to choose the form of the Warranty Claim Procedures described in this paragraph. The Seller shall settle the Warranty Claim within 30 days after the delivery of the defective Goods, unless a longer period has been agreed upon. The day when the repaired or exchanged Goods is handed over to the Buyer is considered to be the day of the Warranty Claim settlement. When the Seller is not able to settle the Warranty Claim within the agreed period due to the specific nature of the Goods defect, he and the Buyer shall make an agreement about an alternative solution. In case such agreement is not made, the Seller is obliged to provide the Buyer with a financial compensation in the form of a refund.

SEVEN SPORT s.r.o. Registered Office: Borivojova 351878. 130 00 Praha 3. Czech Republic Headquarters, Delnicka 957, 749 01 Vitkov. Czech Republic Warranty & Service Centre: Cermenska 486.749 01 Vitkov. Czech Republic CRN: 26847264VAT ID: CZ26847264Phone: +420 556 300 970E-mail, eshop©insportline.cz Web: www.envinsportlino.cz
SK INSPORTLINE s.r.o. Headquarters, Warranty & Service centre: Eleldricna 6471, 911 01 Trencin, SlovakiaCRN: 36311723VAT ID. SK2020177082Phone: +421(0)326 526 701E-mail: sk reklamacle©insponline.sk Web: www.vnvinspodline sk
[xyz-ips snippet=”download-snippet”]