
![]()
USER MANUAL - ENIN 16713 E-Scooter inSPORTline Skootie
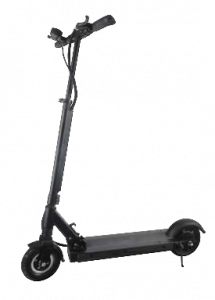
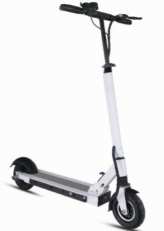
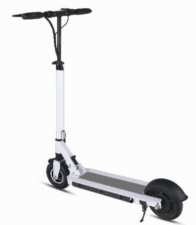
Picture for illustration purpose only. Color may vary.
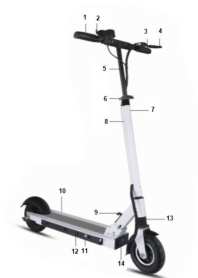
PRODUCT DESCRIPTION
 |
 |
 |
|
1) Handle |
|
2) Speed control / Acceleration |
|
3) Grip |
|
4) Brake lever |
|
5) Telescopic pipe |
|
6) Quick release |
|
7) Jump bead |
|
8) Main tube |
|
9) Fold switch |
|
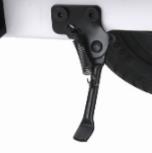
10) Kickstand |
|
11) Light switch |
|
12) Charge socket |
|
13) Damping spring |
|
14) Battery capacity labeling |
 |
 |
|
Quick folding mechanism, self-locking/release |
Rear air-free solid wheel |
 |
|
Scrub anti-skid frame |
 |
 |
|
Damping spring |
Battery charger connector |
 |
 |
|
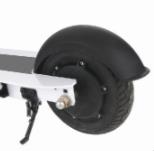
Front tire |
Speed control throttle/ON, OFF button/Battery indicator |
 |
|
| LED head light/Speed limit switch (left side slow, right side fast)/Horn | |
 |
 |
|
Locking cap |
Kickstand |
WARNINGS
- Maintain it regularly and according to the manual to avoid injury or product damage. The user is fully responsible for regular maintenance.
- Read this manual carefully before first use and keep it for future reference.
- Observe all local laws and regulations.
- Never use it at night, at dusk or in poor visibility.
- Don’t stunt and don’t jump with this device.
- Don’t carry items or other people on this device. Only one person may use it at the time.
- Use it only according to the manual to avoid injury or damage. Don’t do any improper modification.
- Before riding, make sure, that the safety switch is inserted all the way into the middle folding mechanism/bridge.
- While riding on public road or in traffic please pay extra attention.
- Use it only on a flat surface without any obstacle. Always wear protectors (elbow, knee, shoulder, wrist), helmet and sports shoes.
- All the moving parts (hinges and brakes) must be adjusted and put to their correct position after some time of usage.
5
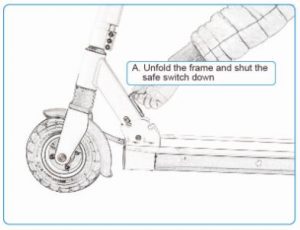
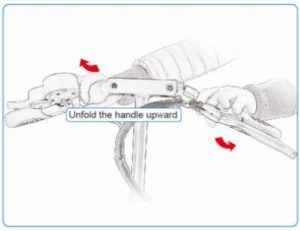
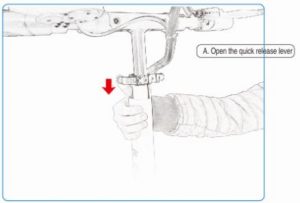
UNFOLDING E-SCOOTER
STEP 1

STEP 2
6
STEP 3

STEP 4
NOTE: Before each use make sure, that the safety switch is inserted all the way into the central folding mechanism. Otherwise you risk injury of yourself or mechanism breakage.
7
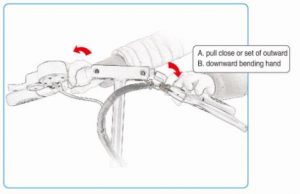
FOLDING E-SCOOTER
STEP 1
STEP 2
8
STEP 3

STEP 4

NOTE: This product features a unique folding mechanism, that enables a quick and easy folding, carrying, transport and storing.
BATTERY
- Never operate the motor during charging.
- Indicator lights on the throttle are intended only for a general knowledge (full/empty) and give no precise information about the battery status.
- Don’t store it for a long time (over 2 months) with fully charged battery.
- Discharge the battery from time to time while riding the e-scooter until the red-light position (until it slows down and stops).
- Never use the battery if it is broken, smells, is overheated or if there is some leakage from it.
- Avoid contact with any substance leaking from the battery.
- Keep the battery away from children and pets. Protect yourself from the battery voltage. It can be dangerous.
9
- Use and store it only according to the product requirements and within specified limits. Otherwise you could damage the battery or shorten its lifespan. Improper using or storing may result in warranty void.
BATTERY CHARGING
This product has an external charger. Connect the charging cable to the scooter charging socket under the footboard on the rear right side. Then connect the charger into an electric outlet.Red light - battery is chargedGreen light - charging has been completed
WARNING:
- Avoid long periods with fully charged or discharged battery.
- Charge it fully for 9 hours to maximize its lifespan.
- Before installing, maintaining or removing the battery, unplug the scooter from the outlet. It is very dangerous to operate it in an unplugged state because of electric shock risk.
- Don’t attempt to open the battery. Don’t insert any object into battery and don’t try to dismantle with any tool to avoid electric shock, fire or injury. Pay attention. There are toxic substances inside the battery.
- Use only original charger. Dispose the battery only according to local laws and environmentally friendly.
OPERATION
Power switch
There is ON/OFF button ![]() on the controller. Pressing the button by turn on the console. Pressing it again will turn off the console.
on the controller. Pressing the button by turn on the console. Pressing it again will turn off the console.
WARNING: Release speed control before braking!
Speed controlPush the SPEED CONTROL to accelerate the E-Scooter.Use the button on the display to switch between 3 modes to limit the maximum speed. When the scooter is switched on, the last set mode is always active: slow 20 km/h; medium approx. 25 km/h - factory set maximum speed; fast approx. 35 km/h – after turning off the speed limit
10


11
SAFETY INSTRUCTIONS
- Read this manual carefully before first use and keep it for future references.
- Always follow local laws and regulations while driving e-scooter.
- This scooter can use one person at the time.
- Put your feet on the scooter while riding.
- It is not recommended to do stunts or jump, it can increase risk of injury.
- You should be extra careful when riding in poor visibility, dusk, night or bad weather conditions.
- Before using e-scooter wait until all moving parts such as brakes and hinges are automatically adjusted.
- Your first ride should be in flat area without obstacles.
- Release speed control before braking.
- Wear protection gear included helmet and shoes.
- Be careful when riding the e-scooter in rough or uneven terrain. Do NOT put yourself or others into dangerous situations.
- Regularly check all parts and immediately exchange worn or damaged parts.
- Incorrect use can lead to serious injury, damaging properties or death.
- Keep away from kids and pets. This is not a toy.
- Do NOT drive on steep slopes and always control your speed.
- Don’t carry items on this device.
- Turn off the power before charging.
- Do NOT drive on roads covered by ice or oil.
- Adjust the E-Scooters height to avoid injury.
- Do NOT place the scooter in the water with depth up to 5 cm and do NOT wash it with water directly, the water can cause damage to the electronic and the motor.
- Load capacity: 120 kg
- This product meets standards: EN 55014-1: 2006+A1: 2009+A2: 2011, EN 55014-2: 1997+A1: 2001+A2: 2008 EN 61000-3-2: 2014, EN 61000-3-3: 2013
RIDING OPERATION
PREPARATION
- Choose flat place without obstacles.
- Unfold the scooter as mentioned in the chapters above.
- Adjust the height of T tube.
FIRST START (ask others for help)
- Press the POWER button and turn on the scooter.
- To ensure the safety of the rider, as others for help. Put one foot on the board and another on the floor. Then slowly pull the accelerator.
- When the scooter starts moving, put both feet on the board and speed up by pulling the accelerator.
BRAKING
Pull the break slowly, this will cut down the electricity to the motor and make you slow down. Put one foot on the floor. Do NOT break suddenly. This may lead to serious injury.
Note: Do NOT use while raining. If you use it while raining keep the speed below 10 km/h without sudden breaking to avoid injury. Riding involve some risks of injury. By riding the E-Scooter the responsibility to drive safety is on you. It is crucial to know local rules and regulations to act accordingly and to avoid injury and damage.
CHARGING THE BATTERY
Each scooter is equipped with dedicated battery and charger, do NOT use different brands of chargers of batteries.
BATTERY
The battery can be charge any time. Please turn off the battery before charging it up. Recharge the battery at least once every month. If the battery is not charging because it was not used for a long time, please contact the service.
CHARGER
The charger has over charger protection. The charger will turn off when the battery reaches 100%.
CHARGING INSTRUCTIONS
- Insert the charger to the AC adaptor in the scooter.
- Insert the charger to the power socket.
- After connection, the indicator will show red color, which means the charging is working, when the indicator turns green, the charging has finished.
TURN OFF THE SPEED LIMIT
When the speed limit is switched off, the maximum speed is increased from 25 km/h to approx. 35 km/h.Always follow local regulations and laws.Switching off the limiter is at your own risk.
| Unscrew the cover located behind front wheel (4 screws) |  |
| You will see 2 connected wires (the speed limit is on) | 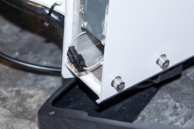 |
| Disconnecting the wires will turn the speed limit off | 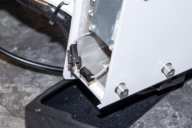 |
DEFAULT SETTINGS
|
Default settings |
||||||
|
10 inches |
8 inches |
|||||
| 36v | 48v | 52v | 36v | 48 | ||
| P0 | Wheel diameter | 10 | 10 | 10 | 8 | 8 |
| P1 | Low-voltage protection (DO NOT CHANGE) | 315 | 415 | 430 | 315 | 415 |
| P2 | Number of pole pairs (for motor) | 15 | 15 | 15 | 15 | 15 |
| P3 | Speed signal selection (DO NOT CHANGE) | 0 | 0 | 0 | 0 | 0 |
| P4 | Kilometres or miles | 0 | 0 | 0 | 0 | 0 |
| P5 | Start with push or immediate start | 1 | 1 | 1 | 1 | 1 |
| P6 | Cruise (1 – yes, 0 – no) | 1 | 1 | 1 | 1 | 1 |
| P7 | Fast start or slow (1 – fast) | 0 | 0 | 0 | 0 | 0 |
| P8 | Speed limiter |
Can choose from 1-100 |
||||
| P9 | Electronic brake effectivity |
1 – low, 0 – high |
Turn on the display and press the ON / OFF and MODE buttons simultaneously for a few seconds. Navigate with MODE button. To adjust the pre-set value, briefly press ON / OFF (value then flashes, press MODE to increase or ON / OFF to decrease value. For saving leave the set values idle for a few seconds
14
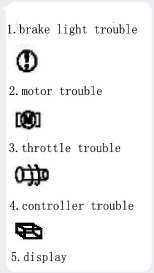 |
1. Brake error |
| 2. Motor error | |
| 3. Accelerator error | |
| 4. Control unit error | |
| 5. Display |
QUICK MAINTENANCE
Do NOT try to fix or modify the E-Scooter by your own. It can cause damage and cancel the manufacturer warranty.
REAR FLAT TIRE REPAIR
- Make sure that the scooter is turned off and it is not plugged in the power supply.
- Place the scooter on a high and stable surface. The rear and flat tires must be in the air. The scooter should stay on its board.
- Use 3 mm Allen key to remove both rear plastic covers.
- From right side gently disconnect all motor connectors attach to wires.
- Use 19 mm key to disassemble motor nuts and motors.
- Remember position and place of washers and nuts.
- Use professional spoons to dismount tire from motor, be careful not to damage rim or tire. Use liquid soap around the rim and the tire to slide the tire out of the rim.
- Glue the damaged parts of tire.
- Put the tire back. Use liquid soap to put the tire back to rim. Do NOT use any tools to put the tire back, use only hands.
- Check your repair by pumping 45 psi to the wheel.
- To put the scooter back together do all steps in reverse.
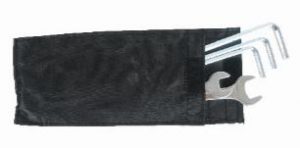
Required Tools
15
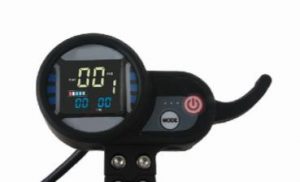
OPERATION
The display shows
|
The battery charge |
|
Speed |
|
Scooter running status |
|
Current distance |
|
Total distance |
|
Charging time |
Press the ON/OFF button ![]() for 3 seconds to start the electronic meter system. The LED light is on and the meter is in the standby mode. Short press of ON/OFF button
for 3 seconds to start the electronic meter system. The LED light is on and the meter is in the standby mode. Short press of ON/OFF button ![]() will show present gear L1, L2 and L3. L3 is top gear with maximum speed. L1 is bottom gear with minimum speed. Short press the MODE button
will show present gear L1, L2 and L3. L3 is top gear with maximum speed. L1 is bottom gear with minimum speed. Short press the MODE button ![]() to select gear and press ON/OFF button
to select gear and press ON/OFF button ![]() or wait 5 seconds to save the option. The gear set up has a memory function, it will automatically set the gear to one that was used last. With full charged battery and user weight under 70 kg the speed is in average:
or wait 5 seconds to save the option. The gear set up has a memory function, it will automatically set the gear to one that was used last. With full charged battery and user weight under 70 kg the speed is in average:
Short press of MODE button ![]() the display will change to single range display. The trip icon will light up and display current distance. For example, 0123.5 means that current distance is 123.5 miles.
the display will change to single range display. The trip icon will light up and display current distance. For example, 0123.5 means that current distance is 123.5 miles.
Press the MODE button ![]() for 3 seconds to clear the data. Pressing the MODE button
for 3 seconds to clear the data. Pressing the MODE button ![]() again will show total distance. The ODO icon will light up and display total distance. The ODO meter can NOT be restarted to zero. Pressing the MODE button
again will show total distance. The ODO icon will light up and display total distance. The ODO meter can NOT be restarted to zero. Pressing the MODE button ![]() again will show total battery charge and discharge. For example, 00016 means that the battery was discharged and charged 16 times.
again will show total battery charge and discharge. For example, 00016 means that the battery was discharged and charged 16 times.
Pressing the MODE button ![]() again will show time. Time format is MM: SS (minutes: seconds).
again will show time. Time format is MM: SS (minutes: seconds).
Automatic shut downThe motor will automatically shut down without display operation and 0 speed after 90 seconds. Press the ON/OFF button ![]() for 3 seconds to start the motor.
for 3 seconds to start the motor.
Starting upTo gain acceleration you need to give the scooter velocity by foot and then press the accelerator to gain speed. Then you can put your foot back on the board and increase/ decrease speed as needed.
MAINTENANCE
LubricationYou need to lubricate the folding mechanism every six months. Do NOT use WD40 (rust-proof oil) to lubricate parts or front and rear wheels. If you are not sure, contact your dealer.
This product is equipped with lithium Li-Ion battery that can be repeatedly charged at least 800 times. If the battery discharge faster, you should replace the battery.
GENERAL TROUBLESHOOTING
If the scooter is not working, please check following:
- The battery is charged.
- There is no surplus electricity.
- Pull and release the brakes.
- All sockets are clean and correctly linked.
16
If the scooter is not working after everything has been check please contact your dealer.
SPECIFICATIONS AND PARAMETERS
| Product specification | Dimension | 100x56x120 cm |
| Step board | 810 mm | |
| Weight | With batteries 13.5 kg | |
| Product | Maximum capacity | 120 kg |
| Maximum speed | 25 km/h (35 km/h without speed limit.) | |
| Gradient | 15% | |
| Battery type | Ternary lithium battery | |
| Battery information | Standard voltage | 36 V |
| Battery capacity | 10/15/18/21 Ah | |
| Range | 28/38/45/58 km | |
| Motor information | Motor type | Brushless dc motor |
| Rated power output | 350 W | |
| Maximum speed | 1200 rpm | |
| Rated voltage | 36 V | |
| Maximum output torque | 9.5 N.m | |
| Battery charger parameters | Input voltage | AC 100-240 V |
| Output current | 3A | |
| Charging time | 8-12 hours | |
| Charging power consumption | 0.6 kWh | |
| Wheels | Size | 8 inches |
| Tire type | Air filled / Pneumatic tires | |
| Brake | Rear drum brake | |
| Lamp type | LED |
ENVIRONMENT PROTECTION
After the product lifespan expired or if the possible repairing is uneconomic, dispose it according to the local laws and environmentally friendly in the nearest scrapyard.By proper disposal you will protect the environment and natural sources. Moreover, you can help protect human health. If you are not sure in correct disposing, ask local authorities to avoid law violation or sanctions.Don’t put the batteries among house waste but hand them in to the recycling place.
TERMS AND CONDITIONS OF WARRANTY, WARRANTY CLAIMS
General Conditions of Warranty and Definition of Terms
All Warranty Conditions stated hereunder determine Warranty Coverage and Warranty Claim Procedure. Conditions of Warranty and Warranty Claims are governed by Act No. 89/2012 Coll. Civil Code, and Act No. 634/1992 Coll., Consumer Protection, as amended, also in cases that are not specified by these Warranty rules.
The seller is SEVEN SPORT s.r.o. with its registered office in Borivojova Street 35/878, Prague 13000, Company Registration Number: 26847264, registered in the Trade Register at Regional Court in Prague, Section C, Insert No. 116888.
According to valid legal regulations it depends whether the Buyer is the End Customer or not.
“The Buyer who is the End Customer” or simply the “End Customer” is the legal entity that does not conclude and execute the Contract in order to run or promote his own trade or business activities.
“The Buyer who is not the End Customer” is a Businessman that buys Goods or uses services for the purpose of using the Goods or services for his own business activities. The Buyer conforms to the General Purchase Agreement and business conditions.
These Conditions of Warranty and Warranty Claims are an integral part of every Purchase Agreement made between the Seller and the Buyer. All Warranty Conditions are valid and binding, unless otherwise specified in the Purchase Agreement, in the Amendment to this Contract or in another written agreement.
Warranty Conditions
Warranty Period
The Seller provides the Buyer a 24 months Warranty for Goods Quality, unless otherwise specified in the Certificate of Warranty, Invoice, Bill of Delivery or other documents related to the Goods. The legal warranty period provided to the Consumer is not affected.
By the Warranty for Goods Quality, the Seller guarantees that the delivered Goods shall be, for a certain period of time, suitable for regular or contracted use, and that the Goods shall maintain its regular or contracted features.
The Warranty does not cover defects resulting from (if applicable):
- User’s fault, i.e. product damage caused by unqualified repair work, improper assembly, insufficient insertion of seat post into frame, insufficient tightening of pedals and cranks
- Improper maintenance
- Mechanical damages
- Regular use (e.g. wearing out of rubber and plastic parts, moving mechanisms, joints etc.)
- Unavoidable event, natural disaster
- Adjustments made by unqualified person
- Improper maintenance, improper placement, damages caused by low or high temperature, water, inappropriate pressure, shocks, intentional changes in design or construction etc.
Warranty Claim Procedure
The Buyer is obliged to check the Goods delivered by the Seller immediately after taking the responsibility for the Goods and its damages, i.e. immediately after its delivery. The Buyer must check the Goods so that he discovers all the defects that can be discovered by such check.
When making a Warranty Claim the Buyer is obliged, on request of the Seller, to prove the purchase and validity of the claim by the Invoice or Bill of Delivery that includes the product’s serial number, or eventually by the documents without the serial number. If the Buyer does not prove the validity of the Warranty Claim by these documents, the Seller has the right to reject the Warranty Claim.
If the Buyer gives notice of a defect that is not covered by the Warranty (e.g. in the case that the Warranty Conditions were not fulfilled or in the case of reporting the defect by mistake etc.), the Seller is eligible to require a compensation for all the costs arising from the repair. The cost shall be calculated according to the valid price list of services and transport costs.
If the Seller finds out (by testing) that the product is not damaged, the Warranty Claim is not accepted. The Seller reserves the right to claim a compensation for costs arising from the false Warranty Claim.
18
In case the Buyer makes a claim about the Goods that is legally covered by the Warranty provided by the Seller, the Seller shall fix the reported defects by means of repair or by the exchange of the damaged part or product for a new one. Based on the agreement of the Buyer, the Seller has the right to exchange the defected Goods for a fully compatible Goods of the same or better technical characteristics. The Seller is entitled to choose the form of the Warranty Claim Procedures described in this paragraph.
The Seller shall settle the Warranty Claim within 30 days after the delivery of the defective Goods, unless a longer period has been agreed upon. The day when the repaired or exchanged Goods is handed over to the Buyer is considered to be the day of the Warranty Claim settlement. When the Seller is not able to settle the Warranty Claim within the agreed period due to the specific nature of the Goods defect, he and the Buyer shall make an agreement about an alternative solution. In case such agreement is not made, the Seller is obliged to provide the Buyer with a financial compensation in the form of a refund.
![]()
SEVEN SPORT s.r.o.
Registered Office: Borivojova 35/878, 130 00 Praha 3, Czech RepublicHeadquarters: Delnicka 957, 749 01 Vitkov, Czech RepublicWarranty & Service Centre: Cermenska 486, 749 01 Vitkov, Czech RepublicCRN: 26847264VAT ID: CZ26847264Phone: +420 556 300 970E-mail: [email protected][email protected][email protected]Web: www.insportline.cz
SK
INSPORTLINE s.r.o.
Headquarters, Warranty & Service centre: Elektricna 6471, 911 01 Trencin, SlovakiaCRN: 36311723VAT ID: SK2020177082Phone: +421(0)326 526 701E-mail: [email protected][email protected][email protected]Web: www.insportline.sk
Date of Sale: Stamp and Signature of Seller:
19
[xyz-ips snippet=”download-snippet”]