
USER MANUAL ENIN 16714 E-Scooter inSPORTline Voltero
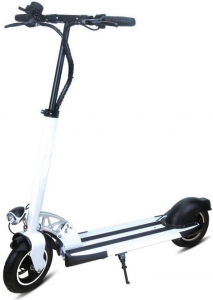
*Picture is for illustration purposes only
SAFETY INSTRUCTIONS
- Read this manual carefully before first use and keep it for future references.
- Always follow local laws and regulations while driving e-scooter.
- This scooter can use one person at the time.
- It is not recommended to do stunts or jump, it can increase risk of injury.
- You should be extra careful when riding in poor visibility, bad weather conditions or in the evening.
- Before using e-scooter wait until all moving parts such as brakes and hinges are automatically adjusted.
- Your first ride should be in flat area without obstacles.
- Release speed control before braking.
- Wear protection gear included helmet and shoes.
- Be careful when riding the e-scooter in rough or uneven terrain. Do NOT put yourself or others into dangerous situations.
- Regularly check all parts and immediately exchange worn or damaged parts.
- Do NOT use damaged product or when there are sharp objects on the product.
- Incorrect use can lead to serious injury, damaging properties or death.
- Do NOT use on public roads or traffic.
- Keep away from kids and pets. This is not a toy.
- Do NOT drive on steep slopes and always control your speed.
- Don’t carry items on this device.
- Do not expose the battery to extreme temperatures and direct sunlight. Keep the battery in dry and cold place.
- Maximum weight limit: 100 kg
- The product meets the standards: EN ISO 12100:2010, EN 12184:2014, EN 61000-6-1:2007, EN 61000-6-3:2007+A1:2011+AC:2012
3
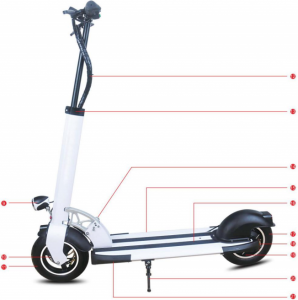
PRODUCT SPECIFICATION

| 1. | Brake | 5. | Colorful display |
| 2. | LED Light | 6. | Accelerator |
| 3. | Turn light | 7. | Handlebar |
| 4. | Horn | 8. | T Tube |
4
| 9. | Front light | 16. | Footboard |
| 10. | Aluminum Alloy Wheel Hub | 17. | Rear tire |
| 11. | Front tire | 18. | 3D Reflector/ Turn light |
| 12. | Wire Harness | 19. | Brushless hub motor |
| 13. | Quick release | 20. | Kickstand |
| 14. | Lock/Release button | 21. | Removable part for basic maintenance |
| 15. | Battery charge interface |
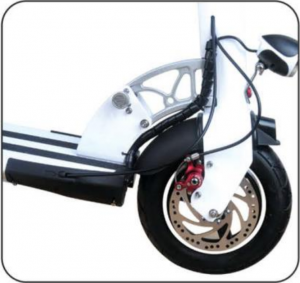
Removable part for basic maintenance
Accelerator / Switch Button / Battery Indicator
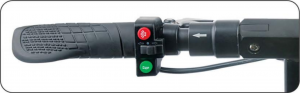
LED front light/speed control switch (left fast/right slow) / horn switch
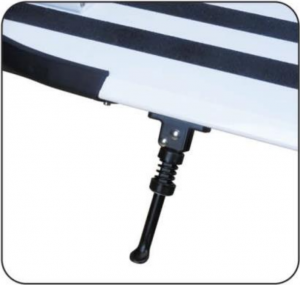
Quick release Kickstand
5
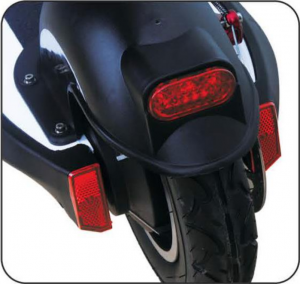
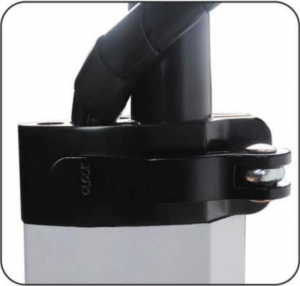
Quickly fold system 3D Reflector
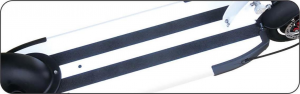
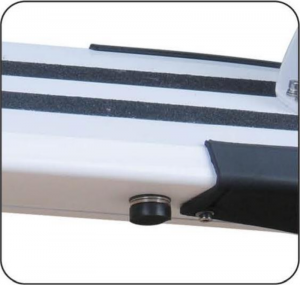
Footboard
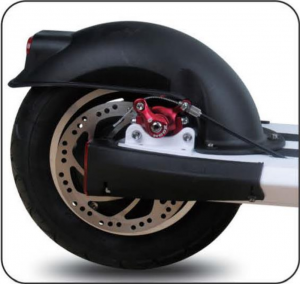
Rear Disc-brake Battery Charge Interface
6
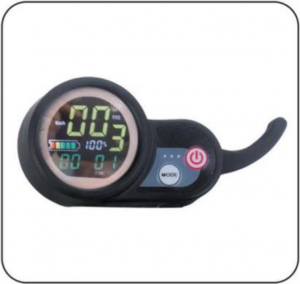
DISPLAY OPERATIONS
1. APPERANCE
2. OPERATIONS
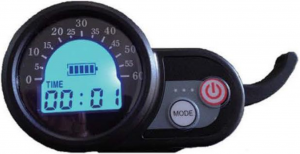
Through short press of MODE button, you can cycle over ODO, CHA, TIME.ODO will show total travel distance (you cannot reset this value)CHA will show number of charging (“00016” means total 16 discharges and charges)TIME will show time, you can set up time “MM: SS” (minutes: seconds)When there is no display operation and scooter is still for 90 seconds, the scooter will automatically shout down to save electricity. Press the on/off button ![]() for 3 seconds to start up scooter.To start up the scooter you first need to put one feet on the scooter and then push the scooter by the other feet. After you give scooter initial velocity pull the speed control lever to start the scooter. After that you can use speed control lever to adjust speed.
for 3 seconds to start up scooter.To start up the scooter you first need to put one feet on the scooter and then push the scooter by the other feet. After you give scooter initial velocity pull the speed control lever to start the scooter. After that you can use speed control lever to adjust speed.
SERIAL NUMBER
Do not loose serial number of your scooter. Keep it separately and in safe place. Each scooter has unique serial number. In case of loss or theft you will need the serial number to provide necessary information. Serial number is on the bottom near the front wheel.
7
OPENING E-SCOOTER
Step 1
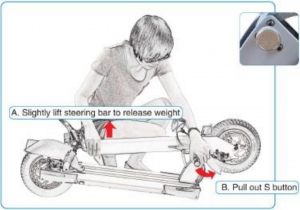
A. Slightly lift steering bar to release weightB. Pull out S button
NOTE:• To release the S button (lock button), hold the steering rod in one hand in a far point from the folding mechanism to create a momentum. Find a point in which there is no pressure on the opening mechanism, meanwhile creating a gentle pull on the S button in the other hand. At the right point of no pressure the mechanism will be released and the S button will come out easily. That will enable the folding of the handlebar. E-scooter patent for quickly and steady locking is based. Imprudence in this act will harm and cause wear to the folding system.
Step 2
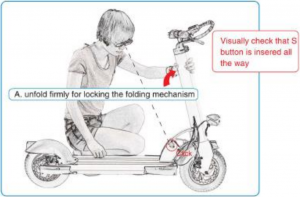
Visually check that S button is insered all the wayA. Unfold firmly for locking the folding mechanism
8
Step 3
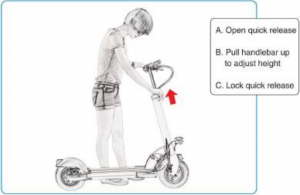
A. Open quick releaseB. Pull handlebar up to adjust heightC. Lock quick release
NOTE:• Before driving you must ensure that the S button in inserted all the way into the central folding mechanism. Otherwise you risk injury or folding system breakage.
FOLDING E-SCOOTER
Step 1The telescopic steering rod: start this quick action by opening the quick release and sliding out the telescopic handlebar of the main steering rod (where the e-scooter logo is written) and lock the quick release.
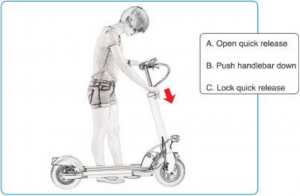
A. Open quick releaseB. Push handlebar downC. Lock quick release
NOTE:• E-scooter has a unique folding mechanism, which enables a quick and easy fold for carrying transportation and storage.
9
Step 2
Folding of the steering system is achieved by pulling out the S button and folding the steering rod towards the rear wheel till you hear a click, that confirms the locking of the mechanism. Make sure the S button is inserted all the way in both positions.
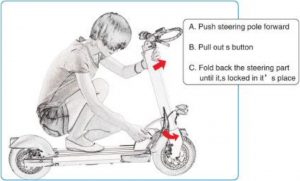

A. Push steering pole forwardB. Pull out S buttonC. Fold back the steering part until it’s locked in it’s place
BATTERY CHARGING
BATTERY
- Never operate the battery during charging.
- Indicator lights in the throttle are intended only for general knowledge. (full/empty) and doesn’t give a precise indication of the battery status.
- Don’t store the scooter for a long time (over 2 months) with fully charged battery.
- Discharge the battery from time to time by riding the scooter in the red led light position until it slows down and stops.
- Don’t use the battery, if it is broken, if emits unusual odor, is overheated or there is some leakage from it.
- Avoid contact with any substance coming from the battery.
- Keep it away from children and pets.
- Improper manipulation or exposing to incorrect voltage can result in injury or death.
- Improper using, storing or charging could void the warranty or break the battery.
10
CHARGING
- Your E-scooter has an external charger. Connect the charging cable to the scooter charging socket under the footboard on the right side at the rear. Then connect the charger electric cable to an electrical outlet.
Charger lights red - battery is chargedCharger lights green - charging has been completed
- Avoid long periods with an uncharged or fully charged battery.
- To maximize your e-scooter battery performance, charge it fully for 9 hours a month.
- Unplug device from the outlet before installing or removing the battery or before maintenance. It is dangerous to operate the scooter when it is plugged into an AC outlet. This could result in an electric shock, injury or product damage.
- Don’t try to open the battery. Never insert any item into the battery to avoid an injury or fire. There are toxic and dangerous substances inside it that could endanger your health or environment.
- Use only original charger and only original battery. The battery and product should be disposed according to local laws and national requirements.
WARNING: Do not expose the battery to extreme temperatures and direct sunlight. Keep the battery in dry and cold place.
OPERATION
- There is ON/OFF
 button on the throttle. Pres this button to operate the scooter. The indicator lights turn on.
 - Push the button once long to turn off the scooter.
WARNING: Release speed control before braking.
11
SPEED CONTROL THROTTLE
Use the button on the display MODE to switch between 3 speed modes to limit the maximum speed. When the scooter is switched on, the last set mode is always active: slow approx. 20 km / h – safe speed for driving in bad weather conditions; medium approx. 25 km / h – pleasant cruising speed; fast about 45 km / h.
- Push button of speed control to accelerate the device.
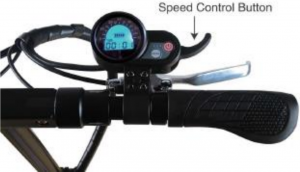
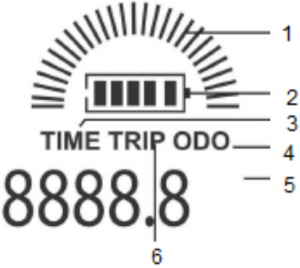
1) Speed display2) Battery capacity3) Time4) Total distance5) Numerical value6) Single mileage
DEFAULT SETTINGS
| Default settings | ||||||
| 10 inches | 8 inches | |||||
| 36v | 48v | 52v | 36v | 48 | ||
| P0 | Wheel diameter | 10 | 10 | 10 | 8 | 8 |
| P1 | Low-voltage protection (DO NOT CHANGE) | 315 | 415 | 430 | 315 | 415 |
| P2 | Number of pole pairs (for motor) | 15 | 15 | 15 | 15 | 15 |
| P3 | Speed signal selection (DO NOT CHANGE) | 0 | 0 | 0 | 0 | 0 |
| P4 | Kilometres or miles | 0 | 0 | 0 | 0 | 0 |
| P5 | Start with push or immediate start | 1 | 1 | 1 | 1 | 1 |
| P6 | Cruise (1 – yes, 0 – no) | 1 | 1 | 1 | 1 | 1 |
| P7 | Fast start or slow (1 – fast) | 0 | 0 | 0 | 0 | 0 |
| P8 | Speed limiter | Can choose from 1-100 | ||||
| P9 | Electronic brake effectivity | 1 – low, 0 – high |
Turn on the display and press the ON / OFF and MODE buttons simultaneously for a few seconds. Navigate with MODE button. To adjust the pre-set value, briefly press ON / OFF (value then flashes, press MODE to increase or ON / OFF to decrease value. For saving leave the set values idle for a few seconds
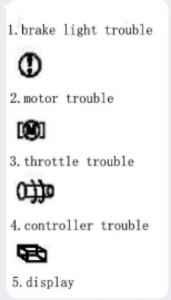 |
1. Brake error |
| 2. Motor error | |
| 3. Accelerator error | |
| 4. Control unit error | |
| 5. Display |
TIRE PRESSURE AND SAFETY
WARNING: Follow local laws and requirements for using this device in place where there you intend to ride. Never violate local laws and restrictions.
Tire air pressure: 40 - 50 psi
To protect your head from an injury (that happens frequently) use an approved helmet and protectors. Never use damaged or worn protective garments. Always use a helmet and wear it correctly.
Safety test: Before each ride make a visual inspection. Check that all bolts and nuts are well tightened. Regularly check it for damage or wearing. Never use damaged or worn product and replace broken parts immediately. Contact authorized service.
Check the wheels and tires regularly as well. Rotate them with fingers to check that they work properly. Check normal rotation of wheels during braking. If it doesn’t work properly, contact an authorized service. Check the brake before each riding.
NOTE: To speed up, lean forwards. To brake, shift your weight backwards.
13
DRIVING TECHNIQUE
- Know the scooter before first use and test your ability to control this product.
- Turn continuously and brake safely having enough free space.
- Practice your first ride in an open area without obstacles.
- Never let distract your mind during riding.
Foot position - put your foot on the board as close to the front part as possible. Let your other foot on the ground. Make sure the route is clean and free. To start riding, push yourself forwards (like on a non-motorized scooter). Push off with the foot that is on the ground. Immediately after pressing the throttle downwards, tilt your body forwards as a prevention from falling back while increasing your speed. Avoid excessive body pressing on the handlebars during speed changing. One foot is at front and the second one is back. It is comfortable to place the feet like on a skateboard for optimal stability.
NOTE: Riding on a scooter can be dangerous. You use the product on your own responsibility and be familiar with all the safety precautions before riding.
Turning – it is the same as on a surf or snowboard. The handlebar should be parallel to the body. Before turning look at the approaching direction to be sure the operation is safe.
Braking – shift your weight backwards so that the braking is realized through your feet and not through handlebar and steering system. Learn well to adjust the gravity center during stopping to avoid turning over or excessive wearing of the braking and steering system.
PRODUCT MAINTENANCE
This product has been designed and assembled by professionals. Don’t do any improper modification of the e-scooter or of any part to avoid warranty void or product damage.
Required tools:
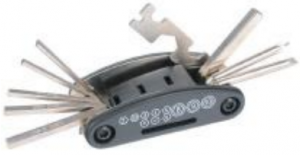 |
 |
| General utility tool | 15-18 Hex |
14
FLAT TIRE MAINTENANCE
WARNING: Unplug the scooter and power it off before starting any maintenance.
- Check that it is unplugged and powered off.
- Place this device on a high, stable surface where there it is placed only on its body. The front and rear wheel are in air.
- Open both plastic covers using proper tools.
- Easily take the motor cable out from right of the scooter.
- Use 15-18 hex to disassemble the nuts and motor.
- Remember the exact order and place of washers on each motor side.
- Use professional spoons (not plastic or small ones) to dismount tire from the motor. Do it carefully and don’t damage the motor, rim, tire and tube. Use liquid soap around the rim to slide tire out from the rim.
- Fix or replace the tube.
- Put the tire back in place. You can use a liquid soap to do it easily. Use only hands without any tool.
- Pump the wheel up to 45 psi to check that the repair has been completed.
- To assemble the device, follow the same steps but reversely.
Lubrication - Apply a little amount of lubricating oil or lubricant in the clutch sleeve folding handle every six months.
NOTE: Don’t use WD40 (anti-rust oil) to lubricate it. Don’t lubricate the front and rear part. If you are not sure, ask an expert.
Tire – if the brake performance gets worse, use a line brake regulator to adjust it to achieve the best braking effect. It the braking or brake sensitivity is still bad or you can hear an unusual noise from the braking system, replace the brake pads and contact a service.
This product is equipped with lithium battery that can recharged for 800 times. If the battery gets empty in a short time, it should be replaced.
TURN OFF THE SPEED LIMIT
When the speed limit is switched off, the maximum speed is increased from 25 km/h to approx. 45 km/h.
Always follow local regulations and laws.
Switching off the limiter is at your own risk.
| Unscrew the cover located behind front wheel (4 screws) | 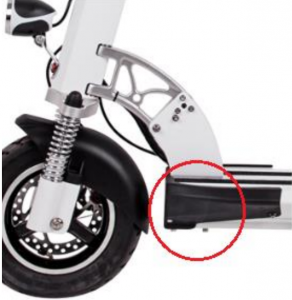 |
| You will see 2 connected wires (the speed limit is on) | 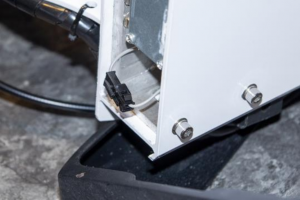 |
| Disconnecting the wires will turn the speed limit off |  |
TROUBLESHOOTING
If the product doesn’t work normally, check it following the points below:
- Check if the power switch is on or not
- Check the battery power
- Check brake
- Check that all sockets and connectors are clean and right
If everything seems to be right and the scooter still doesn’t work, contact the service.
16
SPECIFICATIONS AND PARAMETERS
| Motor Specification | Rated output power | 600 W |
| Rated voltage | 52 V | |
| Battery capacity | 26 AH | |
| Range | 70-80 km/h | |
| Product specification | Dimensions | 110x56x120 cm |
| Front and rear center distance | 850 mm | |
| Performance | Weight | 20.5 kg (with battery) |
| Max. load | 120 kg | |
| Max. speed | 45 km/h | |
| Climbing angle | 10° | |
| Battery type | Ternary lithium electricity | |
| Motor | Motor | DC brushless motor |
| Max. rotating speed | 1300 rpm | |
| Max. output torque | 9.5 Nm | |
| Charger | Input voltage | AC 100-240 V |
| Output current | 3 A | |
| Charging time | 5-8 h | |
| Single consume power | 0.6 KWh | |
| Tires | Tire size | 10” |
| Tire type | pneumatic | |
| Brake | Brake type | Front and rear disc brake |
| Light | LED | Front light with horn |
ENVIRONMENT PROTECTION
After the product lifespan expired or if the possible repairing is uneconomic, dispose it according to the local laws and environmentally friendly in the nearest scrapyard.
By proper disposal you will protect the environment and natural sources. Moreover, you can help protect human health. If you are not sure in correct disposing, ask local authorities to avoid law violation or sanctions.
Don’t put the batteries among house waste but hand them in to the recycling place.
TERMS AND CONDITIONS OF WARRANTY, WARRANTY CLAIMS
General Conditions of Warranty and Definition of Terms
All Warranty Conditions stated hereunder determine Warranty Coverage and Warranty Claim Procedure. Conditions of Warranty and Warranty Claims are governed by Act No. 89/2012 Coll. Civil Code, and Act No. 634/1992 Coll., Consumer Protection, as amended, also in cases that are not specified by these Warranty rules.
17
The seller is SEVEN SPORT s.r.o. with its registered office in Borivojova Street 35/878, Prague 13000, Company Registration Number: 26847264, registered in the Trade Register at Regional Court in Prague, Section C, Insert No. 116888.
According to valid legal regulations it depends whether the Buyer is the End Customer or not.
“The Buyer who is the End Customer” or simply the “End Customer” is the legal entity that does not conclude and execute the Contract in order to run or promote his own trade or business activities.
“The Buyer who is not the End Customer” is a Businessman that buys Goods or uses services for the purpose of using the Goods or services for his own business activities. The Buyer conforms to the General Purchase Agreement and business conditions.
These Conditions of Warranty and Warranty Claims are an integral part of every Purchase Agreement made between the Seller and the Buyer. All Warranty Conditions are valid and binding, unless otherwise specified in the Purchase Agreement, in the Amendment to this Contract or in another written agreement.
Warranty Conditions
Warranty Period
The Seller provides the Buyer a 24 months Warranty for Goods Quality, unless otherwise specified in the Certificate of Warranty, Invoice, Bill of Delivery or other documents related to the Goods. The legal warranty period provided to the Consumer is not affected.
By the Warranty for Goods Quality, the Seller guarantees that the delivered Goods shall be, for a certain period of time, suitable for regular or contracted use, and that the Goods shall maintain its regular or contracted features.
The Warranty does not cover defects resulting from (if applicable):
- User’s fault, i.e. product damage caused by unqualified repair work, improper assembly, insufficient insertion of seat post into frame, insufficient tightening of pedals and cranks
- Improper maintenance
- Mechanical damages
- Regular use (e.g. wearing out of rubber and plastic parts, moving mechanisms, joints etc.)
- Unavoidable event, natural disaster
- Adjustments made by unqualified person
- Improper maintenance, improper placement, damages caused by low or high temperature, water, inappropriate pressure, shocks, intentional changes in design or construction etc.
Warranty Claim Procedure
The Buyer is obliged to check the Goods delivered by the Seller immediately after taking the responsibility for the Goods and its damages, i.e. immediately after its delivery. The Buyer must check the Goods so that he discovers all the defects that can be discovered by such check.
When making a Warranty Claim the Buyer is obliged, on request of the Seller, to prove the purchase and validity of the claim by the Invoice or Bill of Delivery that includes the product’s serial number, or eventually by the documents without the serial number. If the Buyer does not prove the validity of the Warranty Claim by these documents, the Seller has the right to reject the Warranty Claim.
If the Buyer gives notice of a defect that is not covered by the Warranty (e.g. in the case that the Warranty Conditions were not fulfilled or in the case of reporting the defect by mistake etc.), the Seller is eligible to require a compensation for all the costs arising from the repair. The cost shall be calculated according to the valid price list of services and transport costs.
If the Seller finds out (by testing) that the product is not damaged, the Warranty Claim is not accepted. The Seller reserves the right to claim a compensation for costs arising from the false Warranty Claim.
In case the Buyer makes a claim about the Goods that is legally covered by the Warranty provided by the Seller, the Seller shall fix the reported defects by means of repair or by the exchange of the damaged part or product for a new one. Based on the agreement of the Buyer, the Seller has the right to exchange the defected Goods for a fully compatible Goods of the same or better technical characteristics. The Seller is entitled to choose the form of the Warranty Claim Procedures described in this paragraph.
The Seller shall settle the Warranty Claim within 30 days after the delivery of the defective Goods, unless a longer period has been agreed upon. The day when the repaired or exchanged Goods is handed over to the Buyer is considered to be the day of the Warranty Claim settlement. When the Seller is not able to settle the Warranty Claim within the agreed period due to the specific nature of the Goods defect, he and the Buyer shall make an agreement about an alternative solution. In case such agreement is not made, the Seller is obliged to provide the Buyer with a financial compensation in the form of a refund.
![]()
SEVEN SPORT s.r.o.Registered Office: Borivojova 35/878, 130 00 Praha 3, Czech RepublicHeadquarters: Delnicka 957, 749 01 Vitkov, Czech RepublicWarranty & Service Centre: Cermenska 486, 749 01 Vitkov, Czech RepublicCRN: 26847264VAT ID: CZ26847264Phone: +420 556 300 970E-mail: [email protected][email protected][email protected]Web: www.insportline.cz
SKINSPORTLINE s.r.o.
Headquarters, Warranty & Service centre: Elektricna 6471, 911 01 Trencin, SlovakiaCRN: 36311723VAT ID: SK2020177082Phone: +421(0)326 526 701E-mail: [email protected][email protected][email protected]Web: www.insportline.sk
Date of Sale: Stamp and Signature of Seller:
19
References
[xyz-ips snippet=”download-snippet”]