Treadmill inSPORTline inCondiT30i

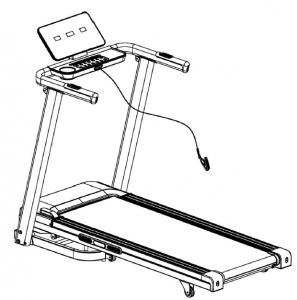
USER MANUAL EN IN 21318 Treadmill inSPORTline inCondiT30i
SAFETY INSTRUCTIONS
- Read the manual carefully and keep it for future reference.
- Always clip the safety key to your clothes or belt before starting exercising.
- Move naturally, forward. Do not look on your feet. Only for one person can use the product on the same time.
- Speed increase gradually, not instantly.
- In case of danger, press the stop button or pull out the safety key.
- Leave the device after it stop moving.
- Follow the assembly instructions. Assembly can be done by adult person.
- Keep away from kids and pets. Do not leave kids and pets unattended near the treadmill.Treadmill is for adults only.
- Before starting any exercise, program ask your physician. It is important if you have heathissues or ongoing treatment or have high blood pressure.
- Regularly check all bolts and nuts. They must be tightened properly. Regularly check thetreadmill for damage or signs of wear. Do not use damaged or wear treadmill.
- Regularly check the treadmill for signs of wear or damage. If any sharp edge appears stopusing the treadmill.
- Please the treadmill on flat, dry and cleat surface. Keep safety distance of at least 0.6 maround the treadmill. Do not use in humid areas. Do not place the treadmill on thick carpet.
- If the power cable is damaged do not use the device. Buy new one in authorized shop.
- Protect the treadmill from humidity and water.
- Place the treadmill not to cover socket.
- Do not use aerosol sprays in the area around treadmill.
- If the treadmill is running, do not remove the protective cover. If you need to remove theprotective cover during maintenance, unplug the treadmill from socket.
- Always wear sport clothes. Do not wear loose clothes that can get stuck. Always wear sportboots.
- Do not turn on the treadmill if you are standing on it. There is a delay when you turn on thetreadmill. Before starting the treadmill stand on the side.
- Do not exercise 40 min after eating food.
- Always do warm ups before exercise.
- Do not place foreign object to ventilation or sockets.
- Maintenance should be done only according to the manual, to prolong the lifespan.
- Do not modify the product.
- Exercise reasonably and do not overextend. If you exercise for the first time, hold yourhandles firmly until you get used to the device.
- In case of error or damage stop the exercising immediately. If the treadmill suddenly increases its speed, remove the safety key.
- Connect the treadmill to socket after the treadmill is assembled. Use only grounded socket.
- If you are not using the device unplug it from socket and safety key removed.
- Any part of the treadmill cannot prohibit the movement of the user.
- Do not use outdoors.
- Do not expose to direct sunlight.
- Do not place in areas with high humidity (pools, sauna etc.)
- Continuous use cannot be longer than 2 hours.
- If the treadmill is not in use, remove the safety key.
- Operation temperature: 5 40 °C · Max. user weight: 120 kg
- Category: HC (according to EN 957) suitable for home use.
SAFETY WARNING:
Do not use heart rate sensors in the handle at speeds above 14 km / h. WARNING! The heart rate monitoring system may not be accurate. Overextending during training can cause serious injury or death. If you feel nauseous, stop the exercise immediately!
ASSEMBLY
The package includes:
|
No. |
Name |
Spec. |
Picture |
Qty. |
|
A |
Treadmill |
|
1 |
|
|
B |
Console |
|
1 |
|
|
C14 |
Safety key |
|
1 |
|
|
E08 |
Power cable |
|
1 |
|
|
B08 |
Wrench /w screwdriver |
S=13, 14, 15 |
|
1 |
|
B09 |
Allen key |
S5 |
|
1 |
|
D05 |
Allen bolts |
M8x45 |
|
4 |
|
D09 |
Allen bolts |
M8x15 |
|
4 |
|
D24 |
Washer |
Ø8 |
|
2 |
|
D29 |
Washer |
Ø8 |
|
2 |
STEP 1 Carefully pull out the belt (A) and console (B) out of the box.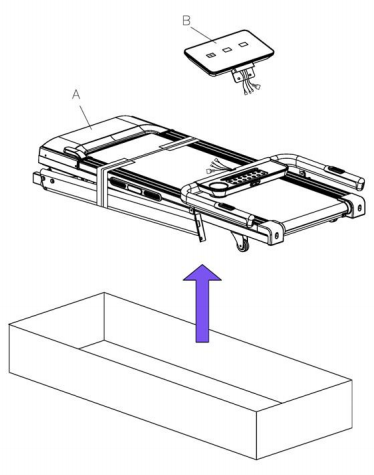
STEP 2 Attach the posts (A04 and A05) to the treadmill (A) with 2x bolts (D05) on each side. Attach the handrails (A03) to the posts (A04 and A05) with 2x washers (D29) and 2x bolts (D09).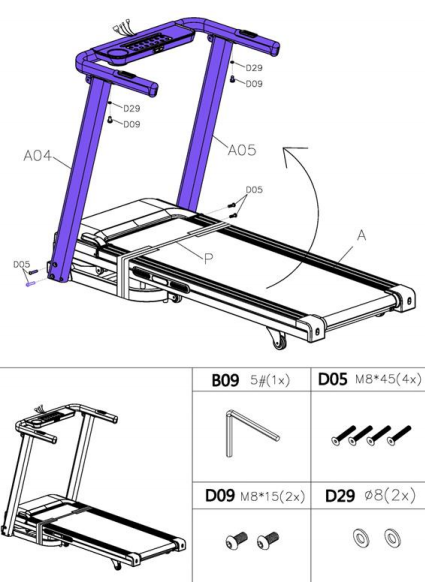
STEP 3 Connect the console cables to the cables from the console bracket as shown. Then attach the console (2) to the console bracket (A03) with 2x washers (D24) and 2x bolts (D09).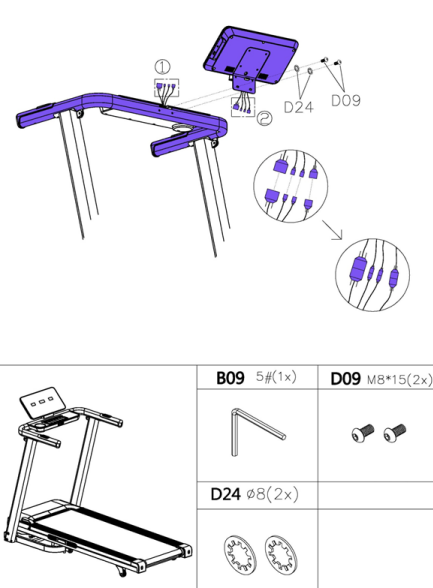
STEP 4 Cut the tape.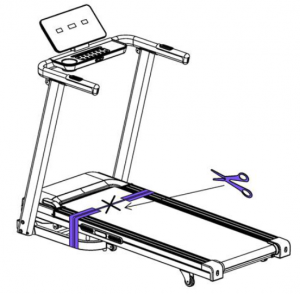

STEP 5 Lift the belt and attach the feet (f) to the belt with the screws (b), then attach the feet (f) to the bottom frame with the screws (b).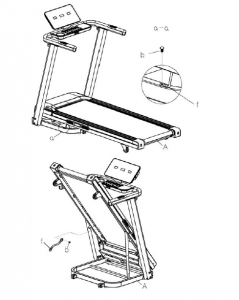
KROK 6The treadmill is ready for use, attach the safety key for use and check function.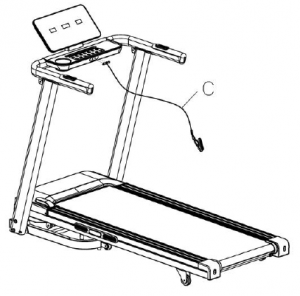
TRANSPORTATION
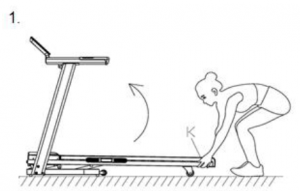
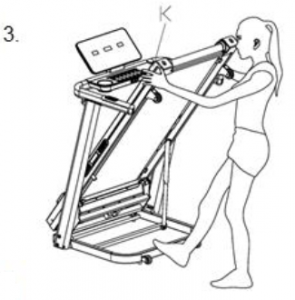
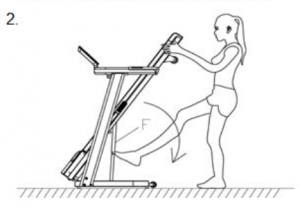
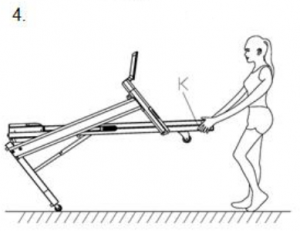
Lift the treadmill by the rear part (K) and secure with the bracket (F). Then tip and move the treadmill using the transport wheels. If the belt is heavy, ask another person for help.
CONSOLE

- INSTANT INCLINE: Press 3, 6, 9 to quickly change incline.
- INSTANT SPEED: Press 3, 6, 9 to quickly change speed.
- INCLINE +: Press to increase incilne.
- INCLINE -: Press to decrease incline.
- START: Press to turn on the treadmill.
- MODE: Press the button to displey TIME, DISTANCE, CALORIES WORKOUT TARGETS, 15 programs, 3 user programs and BODY FAT.
- STOP/PAUSE: Press to stop / pause the treadmill.
- SPEED -: Press to reduce speed.
- SPEED +: Press to increase speed.
Media (optional):
- MP3: Use 3 mm cable to connect.
- USB: You can use USB port to charge your device.
Console function:
- Calories: Display burned calories.
- Distance: Display distance.
- Incline: Display incline.
- Time: Display time use.
- Speed: Displays current speed. You can adjust the speed by the buttons.
- Pulse: Displays the current heart rate. Grasp the sensors on the handles. The sensors start detecting the pulse after 5 seconds. Displayed values are for reference only and are not for medical or healing purposes.
- Mode: Press the MODE button to change the value of TIME, DISTANCE, CALORIES, 15 programs, 3 user programs and BODY FAT7.1. Set time, distance and calories: Press the MODE button in the STANDBY MODE, values of time, distance and calorie values lights up.7.2.Press SPEED +/- or INCLINE +/- buttons to set the speed and incline values. Press the START button to start the treadmill in 3 seconds. Press SPEED +/- to adjust the speed. Press INCLINE +/- to adjust the incline.7.3. 5 preset programs: Press MODE repeatedly in STANDBY MODE to display the 15 preset programs. Use the SPEED +/- and INCLINE +/- buttons to set the training value. Each program is divided into 10 parts, the console will sound a sound when entering a new segment. Use the SPEED +/- and INCILNE +/- buttons to adjust the speed and incline of each segment. The console sounds 6 beeps when the program is completed.7.4. 3 user programs: Press MODE repeatedly in STANDBY MODE to display 3 user programs. Use the SPEED +/- and INCLINE +/- buttons to set the training value. Each program is divided into 10 parts, the console will sound a sound when entering a new segment. Use the SPEED +/- and INCILNE +/- buttons to adjust the speed and incline of each segment. The console sounds 6 beeps when the program is completed.7.5. To start the body fat test: Press MODE repeatedly, in STANDBY MODE, FAT is displayed.
Press MODE to enter.
Use the SPEED +/- buttons to set the values. F-1 to F-4 values (F-1 – GENDER, F-2 – AGE, F-3 HEIGHT, F-4 WEIGHT) Then use the MODE button to enter F-5 (BODY FAT TEST), grasp the sensors on the handles and the console will display the values after 3 seconds. Values are for guidance only and are not for medical or healing purposes.
|
F-1 |
GENDER |
01 MALE |
02 FEMALE |
|
F-2 |
AGE |
10 – 99 |
|
|
F-3 |
HEIGHT |
100 – 200 cm |
|
|
F-4 |
WEIGHT |
20 – 150 kg |
|
|
F-5 |
RESULT |
≤ 19 |
Underweight |
|
RESULT |
20-25 |
Normal weight |
|
|
RESULT |
26-29 |
Overweight |
|
|
RESULT |
≥30 |
Obesity |
LUBRICATION NOTIFICATION
The treadmill automatically alerts the user. A warning is displayed after 300 km. The console will sound a beep every 10 seconds and the OIL will be displayed. Read the user manual before lubricating and then apply the lubricant to the center of the treadmill. After lubrication, press the STOP button for 3 seconds to turn off the alarm and notification.
SAFETY KEY
If the safety key is removed during exercising, the treadmill will stop. The display shows — together with the beep. The treadmill will not work until the key is inserted again.
SAVING MODE
The belt is equipped with a power saving mode that starts after 10 minutes when the treadmill is not in use. Console shuts down, press any button to wake up console,TURNIN ON / OFF THE TREADMILL
Press the button to turn on / off the treadmill (│)and ( O )
WARNING
- We recommend that you start exercising at a slower speed. Hold on to the handrails until you are confident to start exercising on higher speeds.
- Connect the safety key to the console and then to your clothes. In case of malfunction or problems, pull out the key.
- To stop safely, press the STOP button or remove the safety key.
MAINTENANCE GUIDE
General cleaning will help to prolong the life and improve performance on your treadmill. Keep the unit clean and maintained by dusting the components on a regular basis, cleaning the two exposed sides of the running belt to prevent dust from accumulating underneath the belt. Keep your running shoes clean so that dirt from the shoes does not wear the running belt. Clean the surface of the running belt using a clean damp cloth. Keep liquids away from electrical parts and running belt.To prolong the lifespan of the treadmill it is recommended to turn it off every 2 hours of continues use for at least 10 minutes.A loose running belt will result in the runner sliding off when running, while too tight running belt will result in decrease of the motors performance and will also create more friction between the roller and running belt. The most suitable tightness for the belt is distance of 50-75mm from the running board.
ADJUSTING THE RUNNING BELT
Place the treadmill on level ground and set it at 3.5 5 km/h to check and see if the running belt (20) drifts from the center.If the running belt (20) drifts to the right, turn the adjusting bolt on the right side ¼ turn clockwise, then turn the left adjustment bolt ¼ turn counterclockwise. If the belt does not move, repeat this step until it centers. Refer to image A.
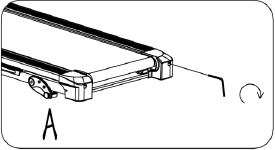
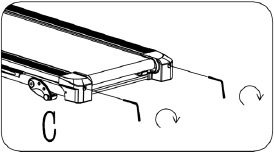
If the running belt (20) drifts to the left, turn the adjusting bolt on the left side ¼ of a turn clockwise, then turn the right adjustment bolt ¼ turn counter-clockwise. If the belt does not move, repeat this step until it centers. Refer to image B.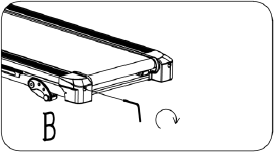 Over time, the running belt (20) will loosen. To tighten the belt, turn both the left & right-side adjustment bolts one full turn clockwise. Check the tension of the belt. Continue this process until belt is at the correct tension. Make sure to adjust both sides equally to ensure even belt alignment. Refer to image C.

LUBRICATING THE TREADMILL
Lubricating the running belt & the running board is essential as the friction affects the life span and operations of the treadmill. Therefore, we suggest you to inspect the running belt regularly.
WARNING: Always unplug the treadmill from the electrical outlet before cleaning, lubricating, or repairing the unit.
The following time table is recommended:
|
Light user (less than 3 hours/week) |
Every 6 months |
|
Medium user (3 – 5 hours/week) |
Every 3 months |
|
Heavy user (more than 5 hours/week) |
Every 2 months |
How to lubricate the treadmill:
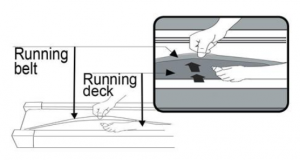
Lift up the belt on one side and apply a lubricant, then apply lubricate to entire surface with a cloth. repeat on the other side.All moving parts must move freely and quietly. Abnormal movement may impair product safety. Check and tighten all screws regularly.Proper and regular maintenance extends the lifespan of the treadmill.
TROUBLESHOOTING
TROUBLESHOOTING
|
PROBLEM |
CAUSE |
SOLUTION |
|
Treadmill will not start |
Not plugged in. |
Plug the cord into the outlet. |
|
Safety key not inserted. |
Insert safety key. |
|
|
Running belt not centered |
Running belt tension not proper on the left or right side of the running board. |
Tighten the adjustment bolts on the left and right side of the rear roller. |
|
Computer not working |
Wires from the computer and bottom control board not properly connected. |
Check wire connections from the computer to the control board. |
|
Transformer is damaged. |
If the transformer has become damaged, contact customer service. |
|
|
E01 & E13: Communication failure |
No communication from console to control board. |
Check wire connections from the computer to the control board and replace wires and/or control board if necessary. |
|
E02: Burst clash protection |
Incoming voltage is lower than 50% of the required voltage. |
Check the incoming voltage against the required voltage. Check wire connections to the motor. Check the control board, replace if necessary. |
|
E05: Current overload protection (Self Protecting System)) |
The incoming voltage is too low or too high. The control board is damaged. |
Restart the treadmill. Check if the incoming voltage is correct. Check the control board, replace if damaged. |
16
|
A moving part of the treadmill is stuck and therefore the motor is unable to rotate properly. |
Inspect the moving parts of the treadmill to ensure that they are operating correctly. Check the motor, listen for strange noises and check for a burning smell. Replace the motor if necessary. |
|
|
E06: Motor error |
The motor wire is not connected or the motor is damaged. |
Check motor wires to see if the motor is connected. If the wire has been punctured or damaged, you will need to replace it. If the problem is not solved, you may need to replace the motor |
|
E08: Control Board Abnormality |
The control board is not connected. |
Check the upper and middle wires to see if the control board is connected. If the wire has been punctured or damaged, you will need to replace it. If the problem is not rectified, you may need to replace the control board. |
|
E10: Motor abnormality |
The motor is damaged or a moving part of the treadmill is stuck and therefore the motor is unable to rotate properly. |
The torque is too big, please adjust the torque. Check moving parts of the treadmill to ensure that they are operating correctly. Replace the motor if necessary. Lubricate the treadmill. |
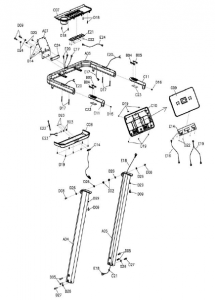
DIAGRAM
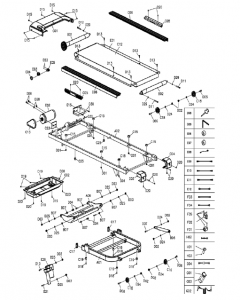
|
No. |
Name |
Spec. |
Qty. |
No. |
Name |
Spec. |
Qty. |
|
A01 |
Base frame |
1 |
C21 |
Ring-shape wire plug |
2 |
||
|
A02 |
Main frame |
1 |
C22 |
EVA cushion |
1 |
||
|
A03 |
Console bracket |
1 |
C23 |
EVA cushion |
2 |
||
|
A04 |
Left upright tube |
1 |
C24 |
Console wire cover |
1 |
||
|
A05 |
Right upright tube |
1 |
D01 |
Nut |
M6 |
6 |
|
|
A06 |
Incline bracket |
1 |
D02 |
Nut |
M8 |
8 |
|
|
A07 |
Console fixed bracket |
1 |
D03 |
Nut |
M10 |
6 |
|
|
B01 |
Front roller |
1 |
D04 |
Bolt |
M10*55 L20 |
4 |
|
|
B02 |
Back roller |
1 |
D05 |
Bolt |
M8*55 |
4 |
|
|
B03 |
Safety key shrapnel |
2 |
D06 |
Bolt |
M8*40 L20 |
4 |
|
|
B04 |
Left pulse steel plate |
2 |
D07 |
Bolt |
M8*30 L15 |
1 |
|
|
B05 |
Right pulse steel plate |
2 |
D08 |
Bolt |
M8*25 |
2 |
|
|
B06 |
Cylinder |
1 |
D09 |
Bolt |
M8*15 |
6 |
|
|
B07 |
Incline bracket bushing |
8 |
D10 |
Bolt |
M10*45 L15 |
1 |
|
|
B08 |
Wrench w/screw driver |
S=13, 14, 15 |
1 |
D11 |
Bolt |
M6*65 |
2 |
|
B09 |
5# Allen wrench |
5 mm |
1 |
D12 |
Bolt |
M6*55 |
1 |
|
C01 |
Motor top cover |
1 |
D13 |
Bolt |
M6*35 |
6 |
|
|
C02 |
Motor bottom cover |
1 |
D14 |
Bolt |
M5*16 |
4 |
|
|
C03 |
Left back end cover |
1 |
D15 |
Bolt |
M5*12 |
7 |
|
|
C04 |
Right back end cover |
1 |
D16 |
Bolt |
M5*10 |
2 |
|
|
C05 |
Decorative cushion |
2 |
D17 |
Screw |
ST4.2*45 |
4 |
|
|
C06 |
Side rail |
2 |
D18 |
Screw |
ST4.2*20 |
8 |
|
|
C07 |
Console top cover |
1 |
D19 |
Screw |
ST4.2*12 |
18 |
|
|
C08 |
Console bottom cover |
1 |
D20 |
Screw |
ST4.2*12 |
20 |
|
|
C09 |
Panel top cover |
1 |
D21 |
Bolt |
M10*95 L25 |
1 |
|
|
C10 |
Pane bottom cover |
1 |
D22 |
Screw |
ST2.9*8 |
20 |
|
|
C11 |
Handle cover |
2 |
D23 |
Screw |
ST2.9*6 |
4 |
|
|
C12 |
Running belt |
1 |
D24 |
Lock washer |
8 |
8 |
|
|
C13 |
Motor belt |
1 |
D25 |
Lock washer |
10 |
6 |
|
|
C14 |
Safety key |
1 |
D26 |
Flat washer |
8 |
6 |
|
|
C15 |
Blue cushion |
6 |
D27 |
Bolt |
M8*55 L20 |
2 |
|
|
C16 |
Transport wheel |
2 |
D28 |
Spring washer |
8 |
2 |
|
|
C17 |
Square plug |
2 |
D29 |
Arc-gasket |
8 |
2 |
|
|
C18 |
Adjustable wheel |
2 |
D30 |
Lock washer |
6 |
3 |
|
|
C19 |
Foot pad |
4 |
D31 |
Bolt |
M8*15 |
2 |
|
|
C20 |
Washer |
2 |
D32 |
Bolt |
M5*15 |
2 |
|
E01 |
Running board |
1 |
E23 |
Safety key sensor bottom signal wire |
2 |
||
|
E02 |
DC motor |
1 |
E24 |
Keyboard connecting wire |
1 |
||
|
E03 |
On-off switch |
1 |
E25 |
Incline motor |
1 |
||
|
E04 |
Overload protector |
1 |
F01 |
Filter |
1 |
||
|
E05 |
Power socket |
1 |
F02 |
Inductance |
1 |
||
|
E07 |
Magnetic core |
1 |
F03 |
AC single wire |
1 |
||
|
E08 |
Power wire |
1 |
F04 |
Grounding wire |
1 |
||
|
E09 |
AC signal wire |
Brown 200 |
1 |
F05 |
Screw |
ST4.2*12 |
4 |
|
E10 |
AC signal wire |
Brown 350 |
2 |
H01 |
USB board |
1 |
|
|
E11 |
AC signal wire |
Blue 350 |
2 |
H02 |
USB power wire |
1 |
|
|
E12 |
Ground wire |
1 |
H03 |
Screw |
ST2.9*8 |
2 |
|
|
E14 |
Console |
1 |
G01 |
Power amplifier board |
1 |
||
|
E15 |
Control board |
1 |
G02 |
Audio input and output board |
1 |
||
|
E16 |
Top signal wire |
1 |
G03 |
Power amplifier power wire |
1 |
||
|
E17 |
Middle signal wire |
1 |
G04 |
Audio socket wire |
1 |
||
|
E18 |
Bottom signal wire |
1 |
G05 |
Speaker 1 |
1 |
||
|
E19 |
Hand pulse top signal wire |
1 |
G06 |
Speaker 2 |
1 |
||
|
E20 |
Hand pulse bottom signal wire |
2 |
G07 |
Mp3 wire |
1 |
||
|
E21 |
Keyboard |
1 |
G08 |
Screw |
ST2.9*8 |
14 |
|
|
E22 |
Safety key sensor top signal wire |
2 |
ENVIRONMENT PROTECTION
After the product lifespan expired or if the possible repairing is uneconomic, dispose it according to the local laws and environmentally friendly in the nearest scrapyard. By proper disposal you will protect the environment and natural sources. Moreover, you can help protect human health. If you are not sure in correct disposing, ask local authorities to avoid law violation or sanctions. Don’t put the batteries among house waste but hand them in to the recycling place.TERMS AND CONDITIONS OF WARRANTY, WARRANTY CLAIMSGeneral Conditions of Warranty and Definition of Terms All Warranty Conditions stated here under determine Warranty Coverage and Warranty Claim Procedure. Conditions of Warranty and Warranty Claims are governed by Act No. 89/2012 Coll. Civil Code, and Act No. 634/1992 Coll., Consumer Protection, as amended, also in cases that are not specified by these Warranty rules.
The seller is SEVEN SPORT s.r.o. with its registered office in Strakonická street 1151/2c, Prague 150 00, Company Registration Number: 26847264, registered in the Trade Register at Regional Court in Prague, Section C, Insert No. 116888.According to valid legal regulations it depends whether the Buyer is the End Customer or not.“The Buyer who is the End Customer” or simply the “End Customer” is the legal entity that does not conclude and execute the Contract in order to run or promote his own trade or business activities.“The Buyer who is not the End Customer” is a Businessman that buys Goods or uses services for the purpose of using the Goods or services for his own business activities. The Buyer conforms to the General Purchase Agreement and business conditions.These Conditions of Warranty and Warranty Claims are an integral part of every Purchase Agreement made between the Seller and the Buyer. All Warranty Conditions are valid and binding, unless otherwise specified in the Purchase Agreement, in the Amendment to this Contract or in another written agreement.Warranty ConditionsWarranty Period
The Seller provides the Buyer a 24 months Warranty for Goods Quality, unless otherwise specified in the Certificate of Warranty, Invoice, Bill of Delivery or other documents related to the Goods. The legal warranty period provided to the Consumer is not affected.By the Warranty for Goods Quality, the Seller guarantees that the delivered Goods shall be, for a certain period of time, suitable for regular or contracted use, and that the Goods shall maintain its regular or contracted features.
The Warranty does not cover defects resulting from (if applicable):
- User’s fault, i.e. product damage caused by unqualified repair work, improper assembly, insufficient insertion of seat post into frame, insufficient tightening of pedals and cranks
- Improper maintenance
- Mechanical damages
- Regular use (e.g. wearing out of rubber and plastic parts, moving mechanisms, joints, wear of brake pads/blocks, chain, tires, cassette/multi wheel etc.)
- Unavoidable event, natural disaster
- Adjustments made by unqualified person
- Improper maintenance, improper placement, damages caused by low or high temperature, water, inappropriate pressure, shocks, intentional changes in design or construction etc.
Warranty Claim Procedure
The Buyer is obliged to check the Goods delivered by the Seller immediately after taking the responsibility for the Goods and its damages, i.e. immediately after its delivery. The Buyer must check the Goods so that he discovers all the defects that can be discovered by such check.When making a Warranty Claim the Buyer is obliged, on request of the Seller, to prove the purchase and validity of the claim by the Invoice or Bill of Delivery that includes the product’s serial number, or eventually by the documents without the serial number. If the Buyer does not prove the validity of the Warranty Claim by these documents, the Seller has the right to reject the Warranty Claim.
If the Buyer gives notice of a defect that is not covered by the Warranty (e.g. in the case that the Warranty Conditions were not fulfilled or in the case of reporting the defect by mistake etc.), the Seller is eligible to require a compensation for all the costs arising from the repair. The cost shall be calculated according to the valid price list of services and transport costs.If the Seller finds out (by testing) that the product is not damaged, the Warranty Claim is not accepted. The Seller reserves the right to claim a compensation for costs arising from the false Warranty Claim. In case the Buyer makes a claim about the Goods that is legally covered by the Warranty provided by the Seller, the Seller shall fix the reported defects by means of repair or by the exchange of the damaged part or product for a new one. Based on the agreement of the Buyer, the Seller has the right to exchange the defected Goods for a fully compatible Goods of the same or better technical characteristics. The Seller is entitled to choose the form of the Warranty Claim Procedures described in this paragraph.
The Seller shall settle the Warranty Claim within 30 days after the delivery of the defective Goods, unless a longer period has been agreed upon. The day when the repaired or exchanged Goods is handed over to the Buyer is considered to be the day of the Warranty Claim settlement. When the Seller is not able to settle the Warranty Claim within the agreed period due to the specific nature of the Goods defect, he and the Buyer shall make an agreement about an alternative solution. In case such agreement is not made, the Seller is obliged to provide the Buyer with a financial compensation in the form of a refund.
CZ SEVEN SPORT s.r.o.
Registered Office: Strakonická 1151/2c, Praha 5, 150 00, CR
Headquaters: Dlnická 957, Vítkov, 749 01
Warranty & Service: Cermenská 486, Vítkov 749 01
CRN: VAT ID: 26847264 CZ26847264
Phone: E-mail: +420 556 300 970
Web: www.inSPORTline.cz
SK inSPORTline s.r.o.
Headquaters, warranty & service center: Elektricná 6471, Trencín 911 01, SK
CRN: VAT ID: 36311723 SK2020177082
Phone: E-mail: +421(0)326 526 701
Web: www.inSPORTline.sk
References
[xyz-ips snippet=”download-snippet”]


