
INVROHEAT WALLHEATER Personalised Panel Heater

CongratulationsThank you for choosing one of the best Infrared heaters available on the market today. Our Infrared heater produces safe, clean and economical heat by utilizing infrared heating elements. The heating process of the Infrared heater is similar to the way the sun warms the earth. Our goal is to provide you with the best quality products and service. We believe you will enjoy your new decorative heater!
DO & DO NOT
A. Do not bend the heater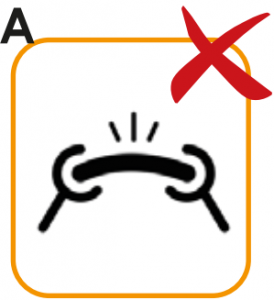 B. Never use sharp objects or cut the heater
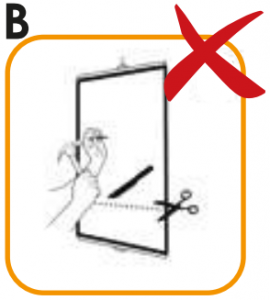 C. Never cover the heater or place it on
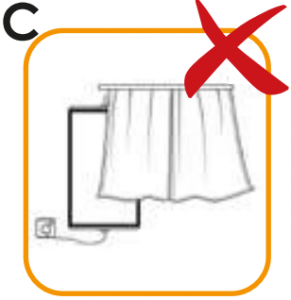 D. Do not use any chemical cleaning products
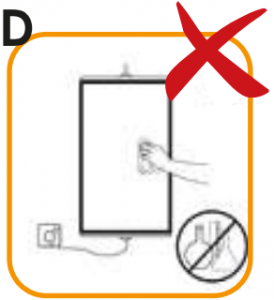 E. Do not place any objects close to the heater
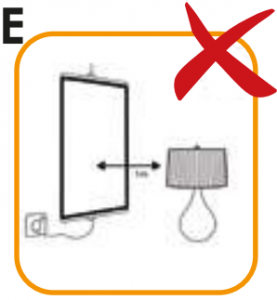 F. NOT put heater on the ground when powered ON
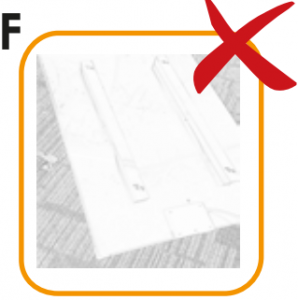 G. Never use to heat or dry an object especially your bed or clothes
 H. Do not use in the bathroom or in humid places
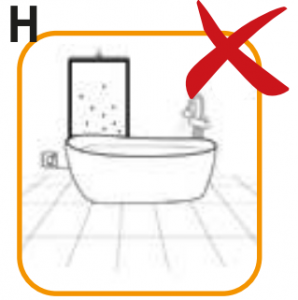 I. Do not use in the bathroom or in humid places
 J. Check the sticker at the back and find if you have a 220V or 110V version
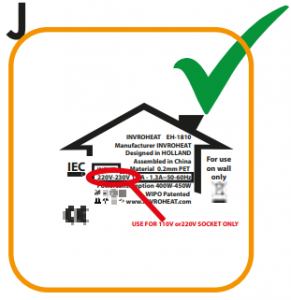 K. Hang the heater on the wall, plug it into a socket and switch on
 L. Hang the heater out of reach of children and pets

Overview
- FRONT OF HEATER
- BACK OF HEATER
- HANGING BRACKET
- HEATER SUPPORT BARS
- WARRANTY STICKER
- ON/OFF SWITCH / THERMOSTATE
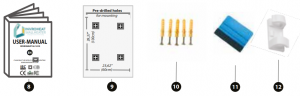
- POSTER
- USER MANUAL
- MOUNTING MAP
- WALL – SREWS
- POSTER SCRAPER
- CABLE HOLDER


|
HEATER MODEL IH-0202 |
|
| Power supply | 220V-240V |
| Power consumption | 600 – 700W |
| Switching stages | 1 |
| Suitable for rooms max. | 12m |
| Switch clock. | No |
| Color | Multi-color |
| Weight | 3.20 Kg |
| Length of power cord | 150 cm |
| Poster height | 100 cm |
| Poster width | 60 cm |
| Poster thickness | 0,12mm |
| Poster coating | Pet-Film |
Content of the package
- Heater 1 piece
- Remote control 1 piece
- Screws 4 pieces
- User manual 1 Piece
- (see backside) Mounting map 1 Piece
- Cable Holder 2 pieces
INSTALLING YOUR HEATER
NOTE: Your heater has a special heat-resistant coating. This coating has a specific odor that will sometimes be presentwhen the box is opened, a sort of ’new car smell’. When first operated, the coating will produce this particular odor forthe first few hours. If you are sensitive to odor, you may want to run the heater in a garage with the door open until theodor disappears.Make sure your wall is fully flat and there are no objects behind the surface where you intent to mount your heater. Usethe mounting plate to determine exactly where you need to drill the holes for the Wall-screws. Please make sure thatthere are NO electricity cables behind the heater. If you encounter any difficult, consult a professional.
A. Drill the holes according to the mounting plate (9). B. Ensure that the heater hangs straight against the wall. Note that the heat emitted by the heater, may overtime discolor certain surfaces.
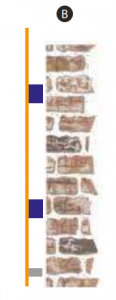
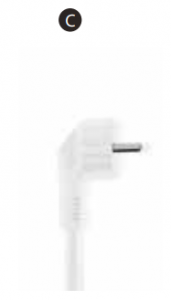
C. Check the power cord for any faults before plugging it into pre determined socket at page.WARNING: the heater will heat up within 30 seconds.
D. Turn the heater on by plugging the power cord into the power socket and switching the ON/OFF switch.

Use of the cable holder;
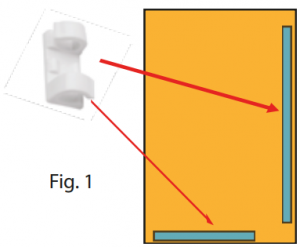
- Determine where the cable should exit the heater the cable-holder should be placed at the area marked in fig 1.
- Clean the area first and let it dry natural.
- Peel off the sticker of the holder.
- Stick the cable holder onto the cleaned area
- Press it firmly for 5-7 seconds
- Place the cable into the clip and lock it in place
Operating instruction IH-0202 without remote
To begin to use the heater, please follow these instructions:
- Check the heater to be sure it is not damaged.
- Connect the power cable into the power socket, than push the switch, on the side of the heater to ON position. The switch will luminate and the heater will heat-up. Please be a ware that the heater will become warm within 30 seconds.
- When you are not using the heater, we recommend that youdisconnect the heater from the power network.
We have made a special instruction video to mount your heater Watch the special instruction video on our website: https://invroheat.com/instructions
Operating instructions Model 0202 + remote
Control buttons:
A. Up/down keysB. Timer buttonC. On/OFF buttonD. Timer buttonE. Timer light (red)F. DisplayG. Set buttonH. Temp button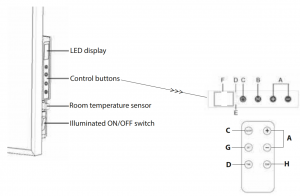
To begin to use the heater, please follow these instructions:
- Check the heater to be sure it is not damaged.
- Connect the power cable into the power socket, than push the switch,on the side of the heater to ON position. The switch will luminate.
- Press the “On/OFF” at the remote or on the panel. The heater will turn on. Please be aware the heater becomes warm within 30 seconds
- How to set the temperature:Press the TEMP button to start the setting, and press “+” or “-” to increase or to decrease. When you reached the desired temperature, press “SET” to store it.
- Your heater is equipped with a so called “Open window detection” When the temperature drops with more than 5 degrees, the heater will shutdown for 5 minutes. After 5 minutes it automatically will power on again.
- How to set the system time;Press ‘time’ button when the heater is power on , and the ‘–‘ symbol tor hour will start to flash , press ‘+’, ‘-‘ to set the right hour. Press ‘set’ button and the’–‘ symbol for minute start to flash , and’+’, ‘-‘ to set the right minute . Press ‘set’ button and the ‘week’ symbol will start to flash , press ‘+’, ‘-‘ to set the right week. Press ‘set’ again to quite the system time setting.
- Start the heater with week timer option : Press the Set button, and then press the on//off straight way7.1 Press Timer button when the heater is power off(make sure the main illuminated switch is on) .7.2 After the operation of 5.2, the ‘week’ symbol in the LCD display will start to flash , you can choose the day you want to set the timer by pressing the’+’,’-‘ button . Press ‘set’ again and the grouping symbol in the display will start to flash, press ‘+’ , ‘-‘ to choose the group you want to set, you can totally set 4 groups per day tram P1 to P4. Press ‘set’ again to start to set the time of power on tor the selected group. the symbol of ‘on’ will be lighten in the display after that, and the ‘–‘symbol tor hour start to flash, press ‘+’, ‘-‘ to choose the hour that you want to let the heater power on. Press ‘set’ again and the ‘-‘symbol tor minute will start to flash, press ‘+’, ‘-‘ to choose the minute. Press ‘set’ button again to set the time you want to let the heater power off, and the symbol of ‘off will be lighten in the display after that, and the ‘–‘symbol tor hour start to flash, press ‘+’, ‘- ‘ to choose the hour that you want to let the heater power off. Press ‘set’ again and the ‘- ‘symbol tor minute will start to flash, press ‘+’, ‘-‘ to choose the minute. After this, the First timer group is set successfully. Press ‘set’ again and the ‘week’ symbol will start to f lash , and you can set another group of timer for the same day you set as above, or choose another day to set the timer, the way of operation is same as explained above.7.3 After the operation of 5 .2 , you can press the ‘time’ button(or leave it without any operation tor more than 1O seconds) to finish the week timer setting.
- When you are not using the heater, we recommend that you disconnect the heater from the power network.
IMPORTANT INSTRUCTIONS
 IMPORTANT INSTRUCTIONS
When using electrical appliances, basic precautions should always be followed to reduce the risk of fire, electric shock, and injury to persons, including the following:
- Read all instructions before using this heater. 5) Do not run cord under carpeting. Do not cover cord with throw rugs, runners, or similar coverings. Do not route cord under furniture or appliances. Arrange cord away from traffic area and where it will not be tripped over.
- To disconnect heater, turn controls to off, then remove plug from outlet.
- Do not insert or allow foreign objects to enter any ventilation or exhaustopening as this may cause an electric shock or fire, or damage the heater.
- To prevent a possible fire, do not block air intakes or exhaust in any manner. Do not use on soft surfaces, like a bed, where openings may become blocked.
- A heater has hot and arcing or sparking parts inside. Do not use it in areas where gasoline, paint, or flammable liquids are used or stored.
- Use this heater only as described in this manual. Any other use not recommended by the manufacturer may cause fire, electric shock, or injury to persons.
- Always plug heaters directly into a wall outlet/receptacle. Never use with an extension cord or relocatable power tap (outlet/power strip).
TROUBLE SHOOTING
 If your heater fails to operate, please follow these instructions:◊ Ensure that your circuit breaker or fuse is working properly.◊ Be sure the heater is plugged in and that the electrical outlet is working properly.◊ If the ON/OFF switch is not illuminated at ON position, send it to service center for reparation directly
NOTE: IF YOU EXPERIENCE A PROBLEM WITH YOUR HEATER, PLEASE SEE THE WARRANTY INFORMATION FOR INSTRUCTIONS. PLEASE DO NOT ATTEMPT TO OPEN OR INFORMATION FOR INSTRUCTIONS. PLEASE DO NOT ATTEMPT TO OPEN OR REPAIR THE HEATER REPAIR THE HEATER YOURSELF. DOING SO MAY VOID THE WARRANTY AND COULD CAUSE DAMAGE OR PERSONAL YOURSELF. DOING SO MAY VOID THE WARRANTY AND COULD CAUSE DAMAGE OR PERSONAL INJURY. IF THE PROBLEM STILL PERSISTS, PLEASE CONTACT THE DISTRIBUTOR. INJURY. IF THE PROBLEM STILL PERSISTS, PLEASE CONTACT THE DISTRIBUTOR.
CLEANING AND STORAGE
 Before cleaning your heater, switch off the heater and allow it to cool. Disconnect the electricity supply to the appliance. The outside can be cleaned by wiping it over with a Clean your heater, with a soft, damp and lint-free cloth. NEVER use any aggressive cleaning agents such as cleaning sprays solvents, alcohol-based or abrasive cleaners. Never immerse the heater in water!
 Store your heater preferably in the original box. If you not have your box anymore, cover the heater to protect it from dust. Place no objects on top of the heater, Keep the storage dry and free of frost and direct sunlight. Make absolutely sure the heater can not be damaged by bending or nearby objects. If the heater is damaged it may not be used anymore.
CORRECT DISPOSAL OF THIS PRODUCT
 This marking indicates that this product should not be disposed with other household wastes throughout the EU. To prevent possible harm to the environment or human health from uncontrolled waste disposal, recycle it responsibly to promote the sustainable reuse of material resources. To return your used device, please use the return and collection systems or contact the retailer where the product was purchased. They can take this product for environmental safe recycling.
OPERATING
WARNING! To reduce the risk of electric shock or personal injury, read all the instructions before using this heater. This appliance is intended for household (office) or personal use only as described in this manual. Any other use, including but not limited to commercial, agricultural, or outdoor use, is not recommended by the manufacturer and may cause electric shock, injury and/or damage. The use of attachments or accessories that are not recommended or sold by Invroheat may cause hazards and void warranty
This heater must be plugged into a 110V/220V, 15 Amp (or more) circuit of its own. Nothing else can be plugged into the same circuit. If you are unsure whether your home complies with this restriction, consult a certified electrician prior to use.
Plug the power cord directly into the socket. Do not plug the heater into an extension cord, surge protector, timer, circuit breaker, or a socket with other appliances. There is a risk of overheating, malfunction, property damage, injury, or even death if these instructions are not adhered to!
This heater gets hot when in use. To avoid burns, do not let it come in contact with bare skin.
Keep combustible materials, including furniture, pillows, bedding, paper, clothes, and curtains away from the front, sides and back of the heater.
Extreme caution is necessary when any heater is used by or near children, disabled persons, pets, or when the heater is left operating unattended. Always unplug the heater when not in use.
Do not operate any heater with a damaged power cord or plug or after it has malfunctioned, been dropped, or damaged in any way whatsoever. Contact the manufacturer for ways to resolve any problems. Never make any repairs yourself.
Do not use outdoors. Exposure to the elements including rain, snow, sun, wind or extreme temperatures may cause the heater to become unsafe.
This heater is not intended for use in bathrooms, laundry rooms and similar indoor locations, nor any locations protected by a GFCI. Always follow all instructions for your own safety Always unplug the heater when leave home!
Safe way to heat a child’s room or play area  This appliance can be used by children of eight (8) years of age and older and persons with reduced physical, sensory or mental capabilities or who lack experience and knowledge if they have been supervised or instructed about the hazards involved and that they understand how to use the appliance in a safe way. Children should not play with or near the heater. Children should not clean or maintain the heater unless supervised. The heater should be cleaned with a soft dry cloth. Do not use abrasive solvents to clean the heater as they may cause damage. If the power cord is damaged, it must be replaced by the manufacturer’s agent or a similarly qualified person / organization in order to avoid hazards. Precautions should be taken to avoid creasing the heating element; The heater should not be installed on an irregular surface. The appliance must be disconnected from the power supply when being serviced and when parts are being replaced. If the plug must be removed, there should be a clearly visible indication that the plug should remain removed.
SAFETY & TEMPERATURE REGULATION
The safety of our product is of utmost importance. Therefore, we have added technical features to the heater to prevent dangerous situations. To prevent overheating, an auto Shut Off function will activate if the heater reaches maximum temperature( 105 degree). Also, every 6 hours the heater will power-off to cool down for 10 minutes, auto restart or need Manual operation ,press power switch two restart heater. We strongly advice not to use the heater if the ambient temperature is higher than 25 degrees. It reduces the lifespan.Please consult our website, time to time, for the latest user information, tips and warnings. www.INVROHEAT.com
WARRANTY
This certificate shall constitute the only warranty granted on the product detailed below. You will be required to produce the correctly completed Warranty Coupon and the original sales invoice to validate this warranty. For more information, please contact our customer care line. Invroheat warrants to the original purchaser, for a period of 60 months (sixty months) from the date of purchase of the product, that the product shall be free from defects under normal domestic use. This warranty includes the repair or replacement of any defective part of the product, without charge, where failure occurs under normal working conditions (as outlined in this manual) and within the 24 months (12 months) warranty period. Any claims under warranty will not result in an extension of the warranty period; note that every new or repaired part installed under warranty will be covered by the warranty for a further 3 months after installation.
THIS WARRANTY IS SUBJECT TO THE FOLLOWING CONDITIONS:
- Invroheat shall not be responsible for damages resulting from fire, flood, civil disturbance, or any act of God. The Company shall not, in terms of these warranties, be responsible nor held liable for any consequential loss or damage of any kind caused by or due to the failure or malfunction of the appliance.
- Excluded from this warranty are damages caused by knocks or impacts, scratches, falls, incorrect transportation or installation, and wear and tear caused by misuse of the appliance.
- This warranty will be rendered invalid if:a. Intervention or repairs are attempted by any persons or with any substitute parts not duly authorized by Invroheat.b. The serial number of the appliance has been removed.c. There has been abuse or misuse in conflict with the operating instructions, connection to the incorrect voltage or if the product has been subject to commercial use.
- If service is requested under warranty and no fault or defect can be found, all costs will be for the purchaser’s account.
- This warranty will no longer be valid if any information in the certificate or sales invoice has been deleted, obscured or amended in any way
WARRANTY COUPONInfrared Heater IH-0202 and IH-0202R(to be completed by the purchaser)Please e-mail this portion to [email protected]; or go to http.www.invroheat.com/warranty
 INVROHEAT is CE, IEC, RoHS, FCC and CB certified by the world’s leading inspection, verification, testing, and certification company.
INVROHEAT USA1 Venture, Suite 200Irvine, CA 92618USA+1.949.599.6159[email protected]


References
[xyz-ips snippet=”download-snippet”]