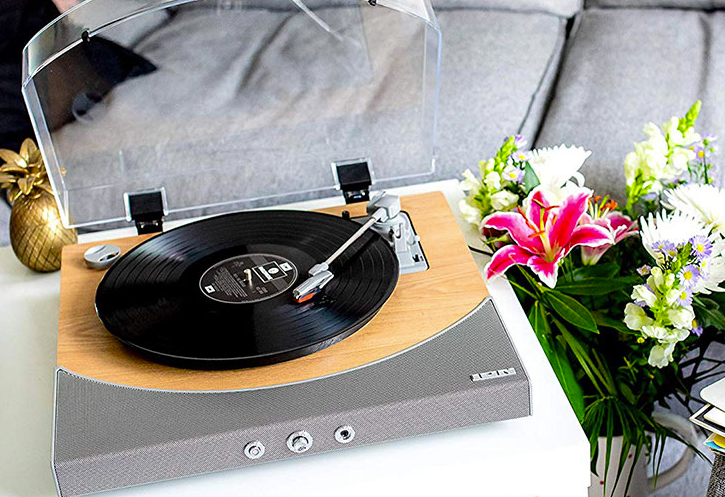
ION 1500000215789 Premier LP
![]()
Introduction
Thank you for purchasing the Premier LP. At ION, your entertainment is as important to us as it is to you. That’s why we design our products with one thing in mind—to make your life more fun and more convenient.
Box Contents
- Premier LP – 45 RPM Adapter
- Power Adapter – USB Cable
- Dust Cover – Quickstart Guide
- Felt Slipmat – Safety & Warranty Manual
Important: Visit ionaudio.com to download the free EZ Vinyl/Tape Converter software.
Support
For the latest information about this product (documentation, technical specifications, system requirements, compatibility information, etc.) and product registration, visit ionaudio.com.For additional product support, visit ionaudio.com/support.
Setup
Items not listed under Introduction > Box Contents are sold separately.
Features
Top Panel
- Platter: Place your record here.
- 45 RPM Adapter Holder: Holds the included 45 RPM adapter. When not using the adapter, please place it in this holder.
- Tonearm: Tracks the groove in a vinyl record. When the tonearm reaches the center of a playing vinyl record, it will automatically return to the arm rest.
- Arm Clip: This specially designed arm clip secures the tonearm while at rest or when not in use. The arm clip has been designed to remain in the up position while unlocked.
- Raise / Lower Lever: Raises and lowers the tonearm.
- 33 / 45 / 78 Switch: This switch controls the RPM of the turntable platter.Note: For best results when playing 78 RPM vinyl records, use a 78 stylus (sold separately). Only use a 78 stylus with 78 RPM vinyl records. Purchase a 78 RPM stylus at ionaudio.com.
- Speakers: Plays the audio from your vinyl record and the Aux Input.
Front Panel
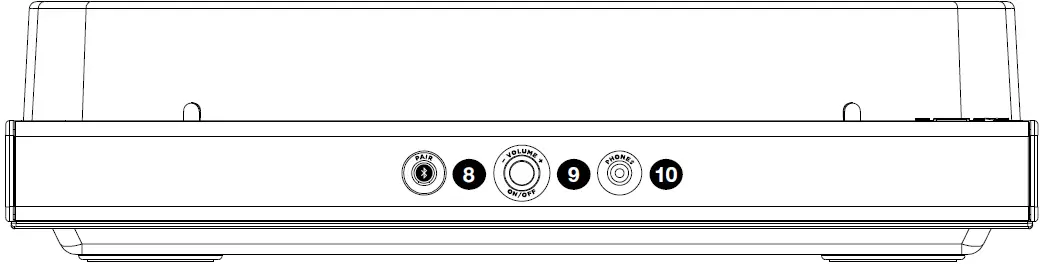
- Bluetooth Button: Press this button to start Bluetooth pairing. The LED will blink when pairing with a Bluetooth device, and remain solid once fully paired. If after 1 minute no Bluetooth speaker can be found to pair with, the Bluetooth transmitter will become inactive and the LED will turn off. If currently connected to a Bluetooth speaker, press and hold this button to disconnect from the speaker.
- Volume/Power: This knob is used both for powering on Premier LP and adjusting the volume. To turn Premier LP on or off, press the knob. To adjust the volume, turn the knob left and right.
- Headphone Jack: Connect headphones (sold separately) to listen to your vinyl playback.
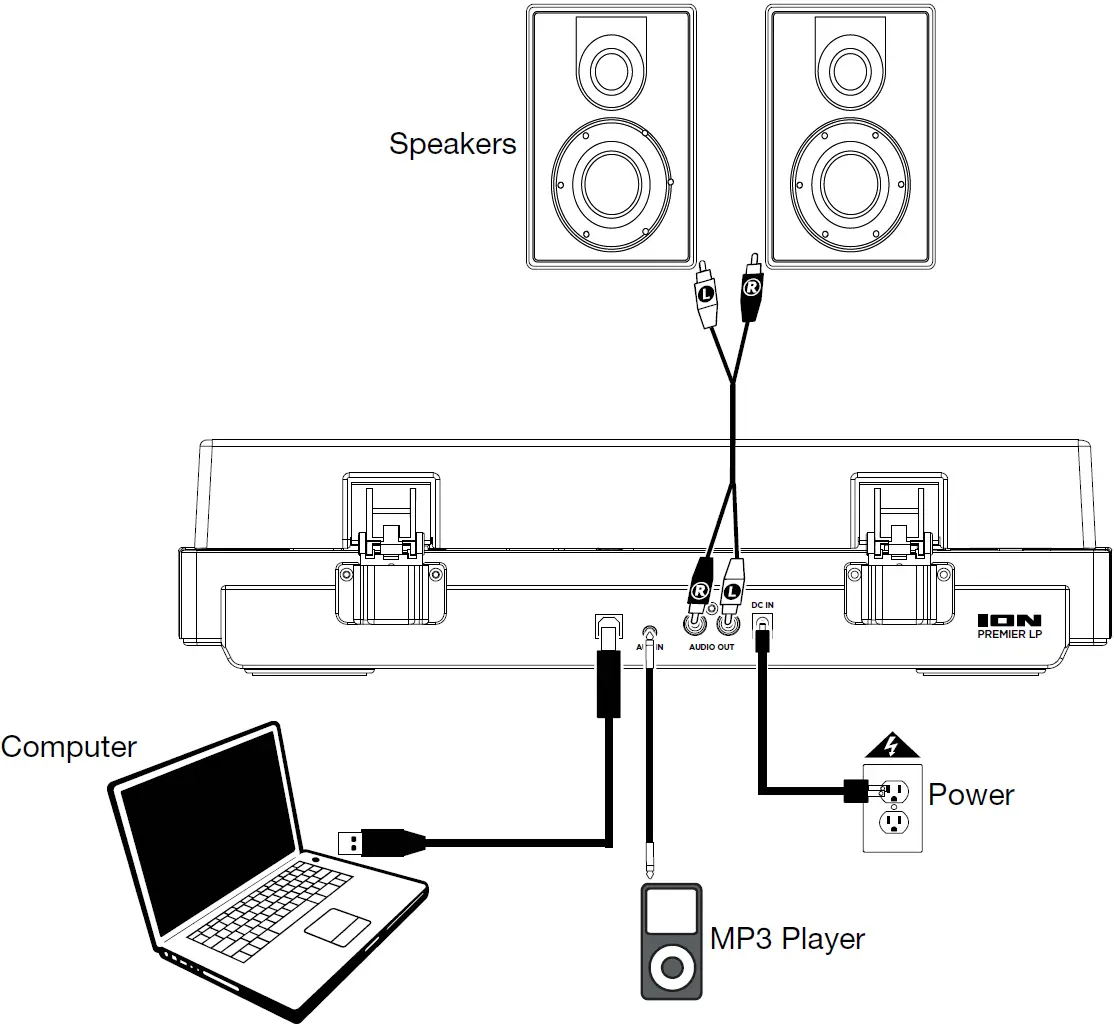
Rear Panel

- USB Audio Output: Use the included USB cable to connect your turntable to your computer. The USB connection will send audio from the turntable to your computer. Please see the Using Premier LP With Your Computer section of this manual for information.
- Aux Input: Connect a CD player, digital media player, or other audio source to this 1/8” (3.5 mm) stereo auxiliary input. The audio from the Aux Input is also transmitted over a Bluetooth connection.
- RCA Output: The audio from a playing vinyl record is sent to this line-level RCA audio output. Warning: The RCA Outputs are line-level. Please only connect these to line-level inputs. You may damage your receiver if you plug in a line-level device into a phono-level input.
- Power Cable Input: Use the included adapter to connect to wall power.
Operation
Playback
There are 4 ways to listen to your vinyl records with Premier LP:
- You can simply listen to your music using Premier LP’s internal speakers.
- You can connect Premier LP to a Bluetooth speaker. See the section Pairing Premier LP to a Bluetooth Speaker for details.
- If you prefer to use your own stereo speakers, you can connect Premier LP’s RCA outputs to a stereo system or to powered speakers. Do not connect them to phono-level inputs; Premier LP’s RCA outputs are line-level and could damage a device with phono-level inputs. Any other standard input type, such as CD, Aux In, or Tape is acceptable.
- You can listen through your computer speakers or with headphones connected to your computer, once your computer soundcard’s input device has been set to USB PnP Audio Device or USB Audio Device, depending on your Windows operating system (USB PnP Audio Device on macOS) and that you are record-monitoring the audio using EZ Vinyl/Tape Converter or similar software (Premier LP cannot be used as a playback device for your computer’s audio). See the section Setting Your Computer’s Soundcard as the Default Playback Device for details on how to configure sound playback.
Note (for European models only): Premier LP will automatically power off after 10 minutes if no audio is playing.
Pairing Premier LP to a Bluetooth SpeakerPremier LP has a Bluetooth transmitter to send audio to a Bluetooth speaker wirelessly.
- Power on your Bluetooth speaker and ensure it is in pairing mode.
- Power on the Premier LP turntable.
- Press and release the Bluetooth button on Premier LP to start pairing to your Bluetooth device. Once Premier LP is connected to the Bluetooth speaker, the Bluetooth LED will be solid blue. Your Bluetooth speaker should also indicate that its paired.Note: Premier LP will connect to the closest Bluetooth speaker that is near it. If after 5 minutes no Bluetooth speaker can be found to pair with, the Bluetooth transmitter will become inactive and the LED will turn off.Note: Maximum range will be achieved when using devices with Bluetooth 4.0 or higher.
- Play music on your Premier LP turntable. If you are connected to a Bluetooth speaker and do not hear audio, try pressing the play button on the speaker or try pressing the Bluetooth button on Premier LP.
- Adjust the volume on your Bluetooth speaker (if applicable) or the Volume knob on Premier LP to control the output level.
- To disconnect pairing, press and hold the Bluetooth button, power off the Premier LP turntable, or turn off pairing on your Bluetooth speaker.
Note: Before connecting to your Bluetooth speaker, move other Bluetooth receivers/speakers out of range of Premier LP (30’/9.1m or more) or turn them off.
Using Premier LP With Your Computer
RecordingTo record music to your computer, you can use ION EZ Vinyl/Tape Converter and a USB cable. EZ Vinyl/Tape Converter conveniently saves your recordings to your computer. After you finish converting your vinyl, you can then burn to CD or load onto portable media devices.Visit ionaudio.com to download the free EZ Vinyl/Tape Converter software.
- With EZ Vinyl/Tape Converter installed on your computer, use the included USB cable to connect Premier LP’s USB port to an available USB port on your computer.
- On your computer, you can open EZ Vinyl/Tape Converter by going to Start Menu > All Programs (Windows) or the Applications menu (macOS).
- Follow the on-screen instructions to set up your recording. When prompted to play your music, move Premier LP’s tonearm over the record to start playback.Note: To listen to a record while it’s playing, listen through Bluetooth speakers, your computer’s speakers, or connect Premier LP’s RCA outputs to a stereo system or powered speakers. Do not connect them to phono-level inputs; Premier LP’s RCA outputs are line-level and could damage a device with phono-level inputs.
- When the record has ended, Premier LP’s tonearm will automatically return to the arm clip.
Visit ionaudio.com/computer-optimization for more information on optimizing your computer for audio.
PlaybackYou can listen to the music on your computer through its internal speakers or through headphones connected to it. (Premier LP cannot be used as a playback device for your computer’s audio.)To listen to a record while it’s playing, listen through Bluetooth speakers, your computer’s speakers, or connect Premier LP’s RCA outputs to a stereo system or powered speakers. Do not connect them to phono-level inputs; Premier LP’s RCA outputs are line-level and could damage a device with phono-level inputs.
Troubleshooting
If you experience any difficulties, please refer to the troubleshooting steps below as well as those in the EZ Vinyl/Tape Converter manual.If you are recording to a computer:
- Make sure that Premier LP is powered on and that the needle is on the record.
- Make sure Premier LP is selected as your computer’s default recording device (see the instructions below).
- If you are listening through your computer’s speakers, make sure those speakers are selected as your computer’s default playback device (see the instructions below). Alternatively, you can use Bluetooth or the RCA Outputs to connect Premier LP to a stereo system or powered speakers. Do not connect the RCA Outputs to phono-level inputs; Premier LP’s RCA outputs are line-level and could damage a device with phono-level inputs.Note: The RCA outputs monitor the signal coming out of the turntable, not the signal coming from your computer.
- Disconnect then reconnect the USB cable connecting Premier LP to your computer.
I’m not hearing any audio when playing music:
- If you are playing music from vinyl:
- Make sure that Premier LP is powered on and that the needle is on the record.
- Use Bluetooth or the RCA Outputs to connect Premier LP to a stereo system or powered speakers. Do not connect the RCA Outputs to phono-level inputs; Premier LP’s RCA outputs are line-level and could damage a device with phono-level inputs.
- If you are playing music from your computer:
- Make sure your software music player’s volume is turned up.
- Make sure your computer’s volume is turned up.
- Make sure your computer’s speakers are selected as your computer’s default playback device (see the instructions below). (Premier LP cannot be used as a playback device for your computer’s audio.)
I am hearing a hum through my speaker or laptop when using the turntable:
- If you are recording to a laptop:
- Please connect the laptop to a grounded power supply (3 prong)
- If you are playing through a speaker:
- Please connect to a grounded (3 prong) power supply.
My record is not playing at the correct speed; its pitch is too high or too low:
- Ensure the 33 / 45 / 78 switch is set to the correct speed for your record.
The Bluetooth speaker that I want is not pairing to Premier LP.
- Turn off or move other nearby Bluetooth speakers over 30’ (9.1m) away.
I am connected to a Bluetooth speaker but do not hear any audio.
- Use the volume knob on Premier LP to turn up the Bluetooth output level.
- If you are connected to a Bluetooth speaker with a play button, try pressing the play button. Alternatively, try pressing the Bluetooth button on Premier LP.
- Press and hold Premier LP’s Bluetooth button to disconnect it from the Bluetooth speaker. Then press and release the Bluetooth button to pair again.
- Turn Premier LP off and then on again, and then press its Bluetooth button to pair again.
My smartphone will not connect to Premier LP Turntable.
- Premier LP Turntable acts as a Bluetooth Transmitter, sending the audio out of Premier LP into other Bluetooth Speakers. Premier LP Turntable cannot act as a Bluetooth Receiver and play music from your smartphone over headphones or RCA outputs.
The Bluetooth LED will not stop blinking.
- Once the Bluetooth button is pressed, Premier LP will try to connect to nearby Bluetooth speakers for 1 minute. To stop the blinking Bluetooth LED, power cycle Premier LP.
I am hearing an echo when listening to music.
- Either listen to music through a paired Bluetooth speaker or connect the RCA audio outputs from Premier LP to a speaker. Both playback methods should not be used at the same time.
I am hearing static noise in my headphones.
- Press Premier LP’s Bluetooth button to disconnect it from a paired Bluetooth speaker. When listening to Premier LP with headphones, always make sure Premier LP is not connected to a Bluetooth speaker at the same time.
Setting Premier LP as the Default Recording Device
- Windows XP: Click Start Menu > Control Panel (or Settings > Control Panel in Classic View) > Sound and Audio Devices. Click the Audio tab and under Sound recording, select USB PnP Audio Device as the default device.
- Windows Vista: Click Start Menu > Control Panel (or Settings > Control Panel in Classic View) Hardware and Sound > Sound. Click the Recording tab and select USB PnP Audio Device as the default device.
- Windows 7: Click Start Menu > Control Panel > Sound. Click the Recording tab and select USB PnP Audio Device as the default device.
- Windows 8: From the Start Menu, click the lower-left corner of the screen to bring yourself to the Desktop.In the bottom-right corner of the Taskbar, locate the Volume Control “Speaker” icon. Right-click the speaker and select Playback Devices. In the Windows Sound control panel select the Recording tab.If USB PnP Audio Device does not have a green “check mark” symbol next to it, right-click it and select “Set as Default Device”.
- macOS: Click the upper-left “apple” icon then click System Preferences > Sound. Click the Input tab. From the menu, select USB PnP Audio Device as the device.
Setting Your Computer’s Soundcard as the Default Playback Device
- Windows XP: Click Start Menu > Control Panel (or Settings > Control Panel in Classic View) > Sound and Audio Devices. Click the Audio tab and under Sound playback, select your computer’s soundcard as the default device.
- Windows Vista: Click Start Menu > Control Panel (or Settings > Control Panel in Classic View) > Hardware and Sound > Sound. Click the Playback tab and select your computer’s soundcard as the default device.
- Windows 7: Click Start Menu > Control Panel > Sound. Click the Playback tab and select your computer’s soundcard as the default device.
- Windows 8: From the Start menu, click the lower-left corner of the screen to bring yourself to the Desktop.In the bottom-right corner of the Taskbar, locate the Volume Control “Speaker” icon. Right-click the speaker and select Playback Devices. The Windows Sound control panel should appear set on the Playback tab.If your computer’s soundcard does not have a green “check mark” symbol next to it, right-click it and select “Set as Default Device”.
- macOS: Click the upper-left “apple” icon then click System Preferences > Sound. Click the Output tab. From the menu, select Internal Speakers if you are using the computer’s internal speakers or select Headphones if you are using speakers or headphones attached to the computer’s 1/8″ headphone output.
BEFORE RETURNING THE PRODUCT, please contact ION Audio for technical support at ionaudio.com/support
 report this ad
![]()
References
[xyz-ips snippet=”download-snippet”]