
Bronco LPQuickstart Guide
Introduction
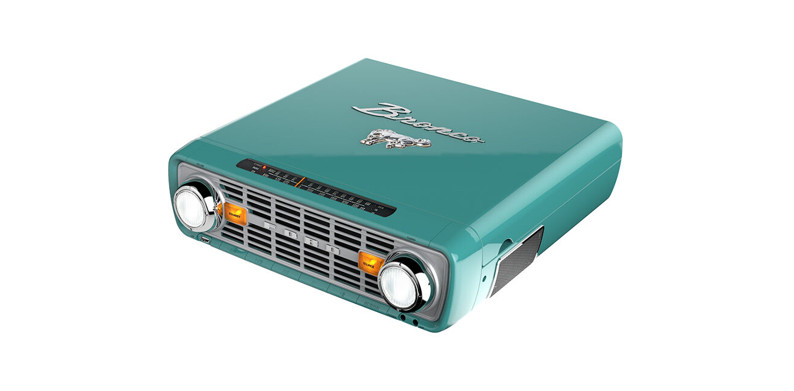
Thank you for purchasing the Bronco LP. At ION, your entertainment is as important to us as it is to you. That’s why we design our products with one thing in mind—to make your life more fun and more convenient.
Box Contents
Bronco LP45 RPM AdapterQuickstart GuideSafety & Warranty Manual
Support
For the latest information about this product (system requirements, compatibility information, etc.) and product registration, visit ionaudio.com.
For additional product support, visit ionaudio.com/support.
Quick Setup
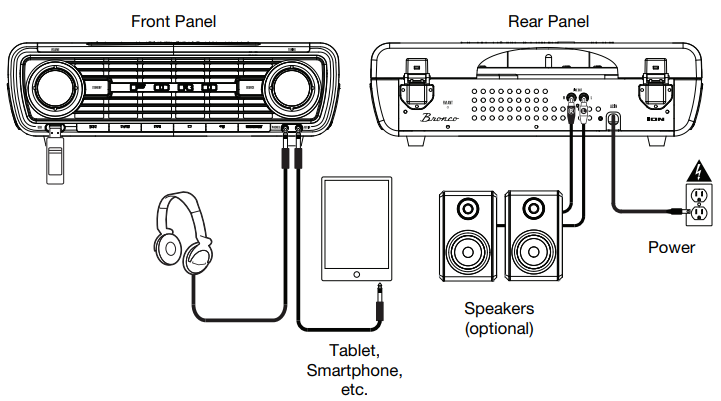
Connection DiagramItems not listed under Introduction > Box Contents are sold separately.
Features
Top Panel
- Platter: Place your record here.
- 45 RPM Adapter Holder: Holds the included 45 RPM adapter. When not using the adapter, please place it in this holder.
- Tonearm: The fixed tonearm can be raised and lowered by hand, or by pressing the raise / lower lever.
- Arm Clip: This specially designed arm clip secures the tonearm while at rest or when not in use. The arm clip has been designed to remain in the up position while unlocked.
- Raise / Lower Lever: Raises and lowers the tonearm.
- 33 / 45 / 78 Switch: This switch controls the speed of the turntable platter.Note: For best results when playing 78 RPM vinyl records, use a 78 stylus (sold separately). Only use a 78 stylus with 78 RPM vinyl records. Purchase a 78 RPM stylus at ionaudio.com.
- Autostop Switch: This switch turns autostop on or off. When autostop is on, the platter will start spinning when the tonearm is placed over the record and stop spinning when the record has reached the end. When Autostop is off, the platter will always spin regardless of the position of the tonearm.Note: If your vinyl record stops before it reaches the end of the music, turn Autostop to the offposition for this particular record. This is generally recommended for 45 RPM records.

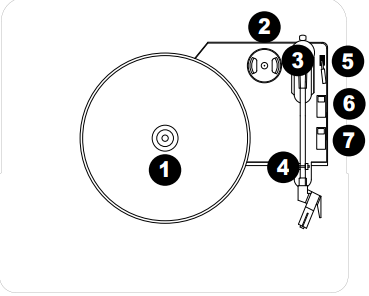
IMPORTANT: Remove the plastic cartridge cover (needle cover) before operating the turntable.*WARNING: The RCA outputs are LINE level. Please only connect these to LINE level inputs. You may damage your receiver if you plug in a LINE level device into a PHONO level input.
Front Panel
- Standby LED: This LED will illuminate when the unit is powered on.
- Phono LED: This LED will illuminate when Phono is selected with the Source button.
- USB LED: This LED will illuminate when USB is selected with the Source button.
- Aux LED: This LED will illuminate when Aux is selected with the Source button.
- FM LED: This LED will illuminate when FM is selected with the Source button.
- AM LED: This LED will illuminate when AM is selected with the Source button.
- Volume: Adjusts the sound level for the internal speakers and the headphone output.
- Standby: Press to power the unit on/off. Press and hold this button for 2 seconds to turn the headlights on and off.
- Source: Press this button to cycle through the sources for Phono, USB, AM, FM, and Aux. Press and hold this button to adjust the brightness of the headlights.
- Tuning: Adjust this to go to another radio station.
- USB Port: Playback tracks from your USB flash drive or record songs to the USB flash drive.
- Previous Track/Scan Backward: Press and release this button to go to the previous USB track.Press and hold this button to scan backward through the current track.
- Play/Pause: Press this button to play or pause a USB track.
- Next Track/Scan Forward: Press and release this button to go to the next USB track. Press and hold this button to scan forward through the current track.
- Stop: Press this button to stop the playback of a USB track. Press to end the recording to the USB flash drive.
- +10: Press this button to skip ahead 10 tracks on a USB flash drive.
- Rep/Rec (Repeat/Record): When USB is selected as the source, press this button to repeat thecurrently playing track and press the button again to repeat after all tracks have played through on theUSB flash drive. If Phono or Aux is selected as the source, press this button to start recording to aconnected USB flash drive.
- Headphone Output: Connect headphones here (sold separately) to listen to your source. When headphones are connected, the internal speaker is muted.
- Aux In: Connect the output of a line-level device to this input, such as from a smartphone, media player, tablet, etc. The audio played through this input can also be recorded to a connected USB flash drive.
- Speakers: Music from the selected source will playback through these internal speakers (as along as headphones are not connected to the headphone output).Rear Panel
- Line Output: Connect this output to a receiver, amplifier, or powered speakers.Note: Bronco LP’s volume control will not adjust the volume when the line output is in use.
- FM Antenna: Adjust this wire for better FM radio reception. For AM reception, rotate the unit until the best reception is found.
- Power Input: The integrated power cable is connected here.
 Standby LED: This LED will illuminate when the unit is powered on.
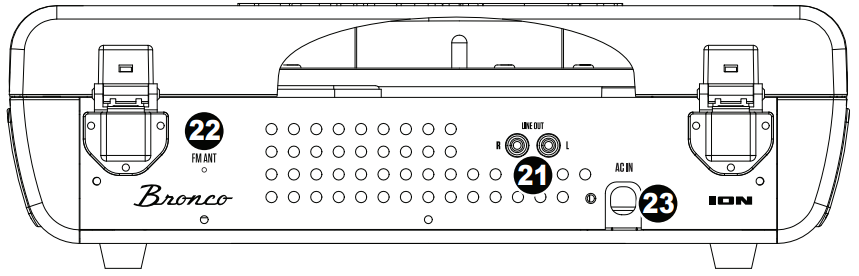
Operation
HeadlightsPress and hold the Power button for 2 seconds to turn the headlights on and off.Press and hold the Source button for 2 seconds to adjust the brightness.
Turntable Playback
Before use, please make sure to:• Remove the stylus protector. Reconnect the protective cap on the stylus when not in use.• Ensure the tonearm is free to move from the tonearm rest. Lock the tonearm in place again when not in use.
- Set the Source to Phono and lift the turntable dust cover.
- Place a record on the turntable, over the central spindle on the slipmat.
- Set the Speed selector to 33, 45, or 78 rpm depending on the record.
- Lift the tonearm from the tonearm rest by using the Raise Lever and slowly move it over the record. The turntable platter will start turning.
- Place the tonearm at the desired location of the record.
- Gently lower the tonearm onto the record to start playing.
- When Auto-Stop is On and the record is finished playing, the tonearm will automatically stop. Lift the tonearm from the record and put it back on the arm clip rest.
- To manually stop the record, lift the tonearm from the record and return it to the arm clip.Note: Do not stop or turn the platter manually. Moving or jarring the turntable without securing the tonearm clamp could result in damage to the tonearm.
Auto-stop Switch OperationCertain types of records may have an auto-stop area outside the pre-set limit, so the turntable may stop before the last track finishes. If this occurs, set the Auto-stop switch to the Off position. This allows the record to play to the end, but it will not stop automatically. You must manually raise the tonearm and place it back in the rest and then turn the power off to stop the turntable from spinning.
Aux In Playback
- Set the Source to Aux-In.
- Connect a 1/8” (3.5 mm) stereo audio cable (not included) from the Aux In on the front panel of Bronco LP to the line output or headphone output of your external audio device to be able to listen to the external source through Bronco LP’s internal speakers.
- Adjust the volume on Bronco LP to the desired level.
Note: If the line output of your external device is connected, you only need to adjust the system’s volume control. If your external device’s headphone output is connected, you may need to adjust the volume control on both your external device and Bronco LP to achieve the desired volume.
USB Flash Drive Playback
The following file types are playable from USB flash drives: MP3, WAV, and WMA.To playback a file:
- Connect the USB flash drive to the USB port.
- Set the Source to USB. The unit will start playback.
- Press the Stop button to stop playing.
Note: Please note that the unit can only read FAT32 format USB flash drives that are 32GB or less.
Listening to the Radio
- Set the Source to the desired frequency (AM or FM).
- Select the desired radio station by turning the Tuning dial.
- Adjust the volume to the desired level.
Note: The receiver has a built-in FM antenna hanging at the rear cabinet. This wire should be fully uncoiled and extended for best reception.
Recording
Recording from the Turntable
- Select Phono using the Source button.
- Insert the USB flash drive into the USB slot.
- Lower the tonearm to the desired location on the record.
- Press the Rep/Rec button.
- During recording, press the Next Track button to create a separate audio file.
- Press the Stop button to stop recording.
Recording from the Aux Input
- Insert the USB flash drive into the USB slot.
- Select Aux-In using the Source button.
- Connect your external audio device and start its playback.
- Press the Rep/Rec button.
- During recording, press the Next Track button to create a separate audio file.
- Press the Stop button to stop recording.
References
[xyz-ips snippet=”download-snippet”]