ION Dunk Quickstart Guide

ionaudio.com/supportFor technical support.
[pdf]For complete warranty information.
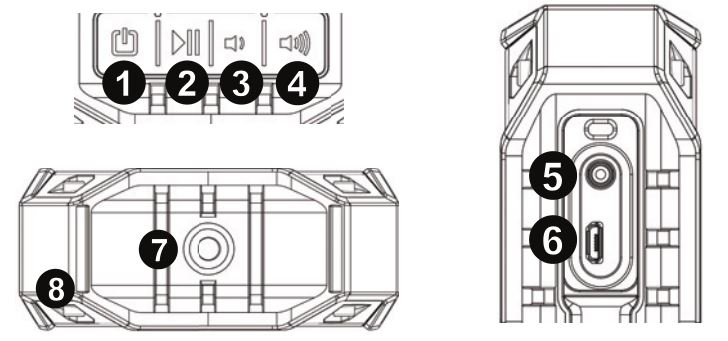
Controls Diagram
Box Contents:
Dunk, USB Charging Cable, Rubber Strap, Quick start Guide.
Charging Dunk:
Use the included micro-USB cable to connect Dunk to (A) a USB power adapter connected to a power outlet or (B) your computer (powered on) for 3 hours.
Controls:
- Power
- Play / Pause
- Volume – / Previous Track
- Volume + / Next Track
- 1/8″ (3.5 mm) Aux Input
- Micro-USB Charging Port
- Tripod Mount
- Strap Mount
- Power: Press and hold this button for 2 seconds to power Dunk on/off.
- Play / Pause: Press to play or pause a track from a connected Bluetooth device. Press this button to answer an incoming phone call or press to end an active call. Press and hold this button to enable your connected smartphone’s voice assistant (e.g. Siri® , Google ® , etc). This feature may not be compatible with all smartphones.
- Volume – / Previous Track: Press this button to decrease the track volume. Press and hold this button to skip to the beginning of the playing track (or the previous track depending on the player or position in the song).
- Volume + / Next Track: Press this button to increase the volume. Press and hold this button to skip to the next track.Note: Press the Volume + and Volume – buttons at the same time to enable or disable voice prompts and cycle through the available languages: English, Portuguese, Spanish, French, and tone/beeps (no spoken words).
Bluetooth Pairing:
- Turn on your Bluetooth device.
- Power on Dunk and it will automatically go into pairing mode to search for Bluetooth devices.
- Navigate to your Bluetooth device’s setup screen, find “DUNK” and connect.Note: If your Bluetooth device prompts for a pairing code, enter “0000”.Press and release the Play / Pause button to disconnect a paired Bluetooth device. To connect to another Bluetooth device, repeat step 3.
Using the Phone:
Note: You must power on and pair Dunk with your Bluetooth device before using it to listen to music or as a speakerphone.
When you have an incoming call, Dunk’s speaker will play a ringtone.
- To answer the call, press Dunk’s Play/Pause button. To reject an incoming call, press and hold the Play/Pause button.Note: If you get an incoming call during music playback, the music will pause until you end the call.
- Speak into the microphone and adjust the call volume using the Volume buttons.
- To end the call, press the Play/Pause button.
TWS Mode: Linking two speakers together for stereo sound
- Power on both Dunks.Note: In order to use TWS mode, you cannot have a Bluetooth device connected. If one speaker is connected to a Bluetooth device, break the connection by pressing and holding Volume – and Volume +.
- With no Bluetooth device connected (blue LEDs on both speakers will blink), on one Dunk press and hold Volume – and Volume + until you hear a short 3 tone melody; repeat this for the second Dunk. The melody will indicate the Dunks are searching for each other to link as their blue LEDs begin to blink fast.
- Wait about 10-30 seconds for the Dunks to find each other. Once ‘linked’, one Dunk will say “Paired” (if the voice prompts are enabled).
- When the Dunks are wirelessly linked to play in stereo, on your Bluetooth device turn on Bluetooth, and connect to “DUNK”.
- Once paired, you will hear “Paired” (if the voice prompts are enabled) and audio can now play out of both speakers in stereo.
- In TWS Mode: UI Controls on both speakers will be active.
- To exit TWS mode, press and hold Volume + and Volume – until the speaker goes back into pairing mode saying “Ready to Pair”.
- In TWS mode, press Power to turn off both speakers.
LED feedback:
- Bluetooth: In pairing mode, the blue LED will blink fast. Once a device is connected, the blue LED will be lit solid.
- Charging: During charging, the red LED will be solid red. After fully charged, the red LED will turn off. When the battery is low, the red will LED flash.
Powering down to save battery life:
- Powers off after 2 minutes with no Bluetooth or Aux device connected
- Powers off after 15 minutes with no audio signal when Bluetooth or Aux is connected
Specifications
- Dimensions: 3.75” x 3.75” x 1.25”; 95 x 95 x 50 mm
- Weight: 0.66 lbs.; 0.30 kg
- Output Power: 3.5 W continuous (5 W peak)
- Water Resistance: IPX7
- Bluetooth Profile: Version 3.0, A2DP, HFP, AVRCP
- Bluetooth Range: Up to 33 ft. / 10 m
- Connections: 3.5 mm (1/8”) aux input (line-level), micro-USB port
- Battery: Up to 10 hours playing time; Up to 3 hours to fully recharge
- Power: Micro-USB port (5 VDC, 1 A)
Safety Instructions
Read and follow these instructions, heed all warnings, and keep this document in a safe place for future reference. Clean only with dry cloth. Refer all servicing to qualified service personnel. Servicing is required when the apparatus has been damaged in any way, such as power cord or plug is damaged, does not operate normally, or has been dropped. Connect this product to a power supply only of the type described in these operating instructions, or as marked on the unit. Keep this product away from direct contact with liquids.
Caution: To reduce the risk of electric shock, do not remove any cover. No user-serviceable parts inside. Refer servicing toqualified service personnel only.
Note: This product contains a lithium-ion battery. Never dispose of any types of batteries in fire or near excessive heat or direct sunlight. Overheated batteries can rupture or explode. If you are unsure of how or where to dispose of a battery, refer to your local ordinances for the proper location, method, etc.
Notice Concerning FCC Regulations: You are cautioned that changes or modifications not expressly approved by the part responsible for compliance could void the user’s authority to operate the equipment. This equipment has been tested and found to comply with the limits for a Class B digital device, pursuant to part 15 of the FCC rules. These limits are designed to provide reasonable protection against harmful interference in a residential installation. This equipment generates uses and can radiate radio frequency energy and, if not installed and used in accordance with the instructions, may cause harmful interference to radio communications. However, there is no guarantee that interference will not occur in a particular installation. If this equipment does cause harmful interference to radio or television reception, which can be determined by turning the equipment off and on, the user is encouraged to try to correct the interference by one or more of the following measures: (a) reorient or relocate the receiving antenna; (b) move this unit; (c) increase the separation between the equipment and receiver; (d) connect the equipment into an outlet on a circuit different from that to which the receiver is connected; (e) be sure that all cables are properly shielded, using a choke or ferrite where appropriate; (f) consult the dealer or an experienced radio/television technician for help.
![]()
This device complies with part 15 of the FCC rules. Operation is subject to the following two conditions: (1) this device may not cause harmful interference, and (2) this device must accept any interference received, including interference that may cause undesired operation.
FCC RF Radiation Exposure Statement: This equipment complies with FCC radiation exposure limits set forth for an uncontrolled environment. End users must follow the specific operating instructions for satisfying RF exposure compliance. This transmitter must not be co-located or operating in conjunction with any other antenna or transmitter.

ESD / EFT Warning: This unit may contain a microcomputer for signal processing and control functions. In very rare situations, severe interference, noise from an external source, or static electricity may cause it to lock up. In the unlikely event that this should happen, turn off the unit, wait at least five seconds, and then turn it back on again.
In an environment with radio frequency interference, the unit may malfunction and resume normal operation after removal of the interference. For best audio quality, avoid using this device in a high RF-radiated environment. This unit does not exceed the Class B limits for radio noise emission from digital apparatus set out in the radio interference regulations of the Canadian Department of Communications.
ION Audio is a trademark of ION Audio, LLC, registered in the U.S. and other countries. Google is a registered trademark of Google Inc. Siri is a trademark of Apple Inc., registered in the U.S. and other countries. The Bluetooth word mark and logo are owned by the Bluetooth SIG, Inc. and any use of such marks by ION Audio is under license. All other product names, company names, trademarks, or trade names are those of their respective owners.
ION Dunk Quickstart Guide – ION Dunk Quickstart Guide –
[xyz-ips snippet=”download-snippet”]