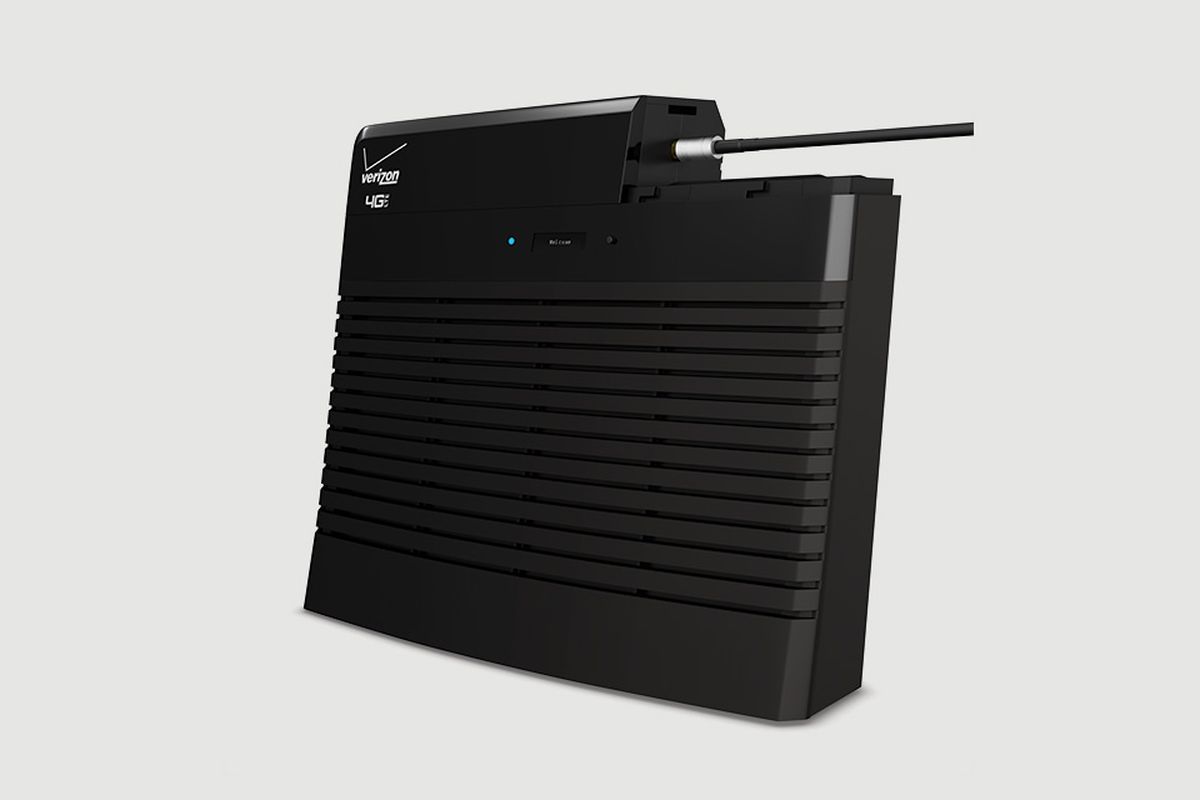
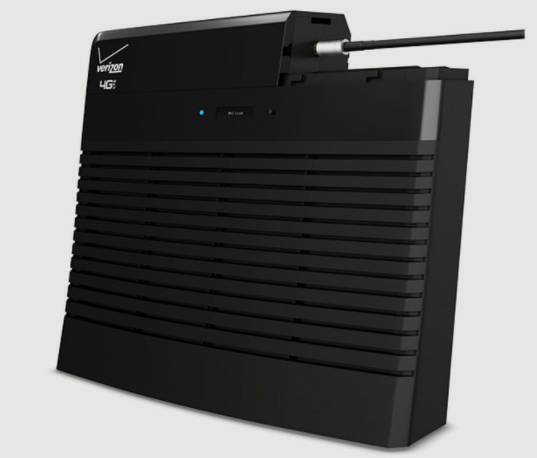
ION IPA119B Projector Deluxe
Introduction
Thank you for purchasing the Projector Deluxe. At ION, your entertainment is as important to us as it is to you. That’s why we design our products with one thing in mind—to make your life more fun and more convenient.
Box Contents
- Projector Deluxe
- Microphone with Cable (10′ / 300 cm)
- 12V, 4.5A Power Adapter (5′ / 150 cm)
- Remote Control
- AA Batteries (2)
- Quickstart Guide
- Support Insert
- Safety & Warranty Manual
SupportFor the latest information about this product (documentation, technical specifications, system requirements, compatibility information, etc.) and product registration, visit ionaudio.com. For additional product support, visit ionaudio.com/support.
Rechargeable Batteries
Note: Before you first use the product, please fully charge the battery. Your unit was purposely shipped with a reduced battery charge to ensure safe transit. Use the included power adapter to connect the unit to a power outlet and let it charge. This helps ensure the longest life for your battery. Here are some recommendations for getting the longest life from the internal battery.
General Usage: Fully charge the battery before using it. Charge the battery completely after each use.Storage: For best product longevity, do not store at exceedingly hot (greater than 90°F/32°C) or exceedingly cold (less than 32°F/0°C) temperatures. It is acceptable to leave your sound system plugged in. This will not overcharge the battery. If you leave the battery level low and do not charge it for 3 months, it may permanently lose capacity.Repair: If the battery fails to charge, check your fuse near the power cable input. If your fuse is intact and it still will not charge, contact ION Audio at ionaudio.com.Disposal: Bring the unit to a recycling center or dispose of in accordance with local ordinances.
Features
Top Panel
- Power Button: After powering on Projector Deluxe (via the Power Switch on the side panel), press this button in order to enter or exit standby mode. In standby mode, Projector Deluxe will not be fully turned off but it will save battery life.Note: When Projector Deluxe is out of standby mode and fully powered on, the speaker will work, but you will need to use the Projector On/Off button to turn on the projector.
- Projector On/Off: Press this button to turn the projector on or off.Tip: This feature can be useful for saving battery life. If you are only using Projector Deluxe to listen to music from a Bluetooth or auxiliary device, use this button to turn the projector off and save Projector Deluxe’s battery.
- Bluetooth Button: Press and hold this button to make Projector Deluxe unpair from a connected Bluetooth device and automatically search for another Bluetooth device to pair with. The Bluetooth button is only for unpairing connected Bluetooth devices, since Projector Deluxe is always in pairing mode.
- Echo Button: Use this button to turn the Mic Input’s echo effect on or off.
- Source Button: Press this button to determine the source of video played by Projector Deluxe: the USB Port or HDMI Port.
- Menu Button: Press this button to access the projector’s picture settings. Then use the Arrow buttons and OK button on the Navigation Pad to adjust the settings.
- Return: When using the projector, press this button to go back one page.
- Navigation Pad: Use the buttons here to navigate pages and select/adjust settings for your projector. Use the Arrow buttons to highlight/edit different options and the OK button to make a selection.
- Status LEDs: From left to right, these four LEDs are the:
- Standby LED: This LED will be off when Projector Deluxe is powered off, lit red when Projector Deluxe is powered on but in standby mode, and lit green when Projector Deluxe is powered on and in operation mode.
- Bluetooth LED: This LED will be lit blue when Projector Deluxe is paired with a Bluetooth audio source.
- Echo LED: This LED will be lit red when the mic echo effect is turned on.
- Battery LED: This LED will blink red when Projector Deluxe has a low battery. It will be lit solid when Projector Deluxe is connected to power and charging (solid red when the unit is still charging; green when the unit is fully charged).
- Volume Knob: Turn this knob to adjust the overall output volume of the loudspeaker.
- Mic Knob: Turn this knob to adjust the input volume of the Mic Input.
- Focus Ring: Rotate this wheel left and right in order to get a clear picture from the projector. How you should set the Focus Ring will depend on the distance between Projector Deluxe and the projection screen.
- Keystone Adjustment: If Projector Deluxe is not sitting on a level surface, use this lever in order to tilt the projector lens so that it is perpendicular to the projection screen.


Side Panel
- Power Switch: Turns Projector Deluxe on or off.
- DC In: Insert the included power adapter here to charge the unit.
- USB Port: Connect your USB drive here to load video, photo, music, and text files.
- HDMI Port: Connect a computer, DVD player, or other device to this input in order to project video.
- Aux Input (1/8″ / 3.5 mm): Connect an MP3 Player or other audio source to this 1/8” (3.5 mm) stereo auxiliary input.
- Mic Input (1/4″ / 6.35 mm): Connect the included microphone to this 1/4” (6.35 mm) input, if you would like to use a microphone while listening to music and/or projecting video. The microphone audio will be sent out of Projector Deluxe’s speaker. Control the volume of your microphone using the Mic knob.
Remote Control
- Power ( ): Powers Projector Deluxe on and off.
- PROJ: Turns the projector on and off.
- Previous ( ): Skips to the previous USB file.
- Next ( ): Skips to the next USB file.
- Rewind ( ): Rewinds the USB music or movie file.
- Fast-forward ( ): Fast-forwards the USB music or movie file.
- Play/Pause ( ): Plays/pauses the USB slideshow, movie file, or music file.
- Vol-: Decreases the volume of Projector Deluxe’s speaker.
- Vol+: Increases the volume of Projector Deluxe’s speaker.
- Flip: Flips the projector screen around.
- Source: Opens the menu for selecting the projector source and toggles between the two options: HDMI or USB Media Player.
- Zoom: Toggles through the projector’s zoom options.
- Navigation Pad: Use the buttons here to navigate pages and select/adjust settings on your projector.
- Exit button: When using the projector, press this button to go back one page.
- Menu: Press this button to access the projector’s picture settings.
- Number buttons: If entering a “Go Time” for a USB music or movie file, use these buttons to enter the time.
- Echo: Use this button to turn the Mic Input’s echo effect on or off.
- Bluetooth ( ): Press and hold this button to make Projector Deluxe unpair from a connected Bluetooth device and automatically search for another Bluetooth device to pair with.
Setup
Getting the Projector Ready
To set up the projector:
- Power up the projector by flipping Projector Deluxe’s Power Switch to the on position and then pressing the Projector button.
- Position Projector Deluxe in front of your projection screen, making sure that the lens is facing the screen. The closer that Projector Deluxe is to the projection screen, the smallerthe projected video will be. You’ll get a clear picture when the size of the projected video is between 2.5 feet and 12.5 feet.Note: The lens should be at the same height as the center of the projected video (as pictured below).
- Focus the lens as needed by turning the Focus Ring until you achieve a clear picture.

Some tips on using the projector:
- The projector will work best when used in a dimly lit environment.
- White is the ideal color for the surface of the projection screen.
- The lens should be perpendicular to the projection screen. If Projector Deluxe is not sitting on a level surface, you can correct the angle of the lens by using the KeystoneAdjustment or by raising/lowering the adjustable foot on the bottom of the unit.
- When you are done using the projector, fasten the included lens cap to the lens. If you are having trouble, use the Focus Ring to make sure that the lens is extended enough in order for the lens cap to latch onto it.

Connection Diagram
Items not listed under Introduction > Box Contents are sold separately.
Operation
Selecting the Projector Source
With the Projector Deluxe, you can project video from a device connected to the HDMI Port or project an image, music, video, or text file from a USB drive plugged into the USB Port.Note: To see what file formats Projector Deluxe can read on a USB drive, see the Appendix. To turn the projector on and off, press the Projector button while Projector Deluxe is fully powered on (not in standby mode).To select the video source for the projector:
- Press the Source button while the projector is turned on, and then a menu will appear on the right side of the projector screen.
- Press the Source button again to toggle between HDMI and USB Media Player. Alternatively, use the Arrow buttons on the Navigation Pad to highlight the desired option.
- When the desired source is highlighted on the screen, press the OK button to confirm your selection.
If USB Media Player is selected as the projector source, the top left of the screen will indicate whether a USB drive is plugged in, and four icons will appear on the projection screen: Photo, Music, Movie, and Text. This is the home screen when USB Media Player is selected as the projector source. When viewing files on a USB drive, you can always return to the home screen by pressing the Return button until you reach the home screen again. If HDMI is selected as the audio source, the projector will act as a live feed for the device plugged into the HDMI Port.See the following sections of this manual for more details on using Projector Deluxe with a USB drive or with a device connected to the HDMI Port. To adjust the projector’s picture settings or other settings, press the Menu button at any time while the projector is turned on. Use the Arrow buttons on the Navigation Pad to scroll through settings and press the OK button to select settings.
Projecting Image Files from a USB Drive
To project images from a USB drive:
- Plug your USB drive into the USB Port on Projector Deluxe. Select USB Media Player as the projector source and then access the home screen (as described in Selecting the Projector Source).
- Use the Arrow buttons to highlight the Photo icon. Then press the OK button.
- The projector will display the list of directories on the USB drive. Use the Arrow buttons to highlight the directory that contains the desired image files. Then press the OK button while the directory name is highlighted.
- The projector will display the list of folders/image files within that directory. Use the Arrow buttons to highlight the folder that contains the desired image files. Then press the OK button to select that folder. If there are no folders within the directory or if the desired image files are not in any folder, skip to Step 5.
- The projector will display a list of image files. Use the Arrow buttons to scroll between the images. When the image you want to display is selected, press the OK button to select that image.
- The projector will display the image and begin a slideshow that starts with that image and proceeds alphabetically through the rest of the images in the currently selected folder or directory.In order to adjust the playback of the images in the slideshow, you can use the menu at the bottom of the projector screen. If the menu does not appear automatically, press the OK button while an image is being displayed.
While the menu is shown, you can use the Arrow buttons, OK button, and Return button to navigate the following options:
- Play/Pause: Plays or pauses the slideshow.
- Prev.: Skips to the previous image in the slideshow.
- Next: Skips to the next image in the slideshow.
- Stop: Stops the slideshow and returns to the list of image files in the currently selected folder or directory.
- Repeat: Toggles between the repeat options. If Repeat… is selected, the slideshow will stop playing after all the images in the folder or directory have been displayed. If Repeat 1 is selected, the slideshow will play the currently selected image continuously. If Repeat All is selected, the slideshow will cycle through all the images in the folder or directory continuously.
- PList: Select this option to pull up a list of the image files in the currently selected folder or directory in order to change the photo/view the slideshow playlist without having to exit the slideshow.
- Info: Press this button to see the specifications for the currently projected image.
- Rotate: Select this option to rotate the image 90 degrees.
- ZoomI: Select this option to zoom in.
- ZoomO: Select this option to zoom out.
- Move: If a photo is zoomed in to more than 100% of its size, use this feature to adjust the portion of the photo that is visible on the projection screen.
- Slide: Select this option to toggle through the slideshow transition modes. To hide the menu from the slideshow, press the Down Arrow button. To exit the slideshow, press the Return button at any time.
Playing Music Files from a USB Drive
To play music from a USB drive:
- Plug your USB drive into the USB Port on Projector Deluxe. Select USB Media Player as the projector source and then access the home screen (as described in Selecting the Projector Source).
- Use the Arrow buttons to highlight the Music icon. Then press the OK button.
- The projector will display the list of directories on the USB drive. Use the Arrow buttons to highlight the directory that contains the desired music files. Then press the OK button while the directory name is highlighted.
- The projector will display the list of folders/music files within that directory. Use the Arrow buttons to highlight the folder that contains the desired music files. Then press the OK button to select that folder. If there are no folders within the directory or if the desired music files are not in any folder, skip to Step 5.
- The projector will display a list of music files. Use the Arrow buttons to scroll between the music files. As each file is highlighted, Projector Deluxe will begin playing a preview of the song. When the music file you want to hear is selected, press the OK button to select it.
- Projector Deluxe will begin playing the selected music file. The song artwork and a visualizer will be displayed on the projection screen. When the selected song finishes, Projector Deluxe will proceed to play the rest of the songs in the folder or directory in alphabetical order. In order to adjust playback of the music files, you can use the menu at the bottom of the screen. If the menu does not appear automatically, press the OK button while a song is playing.
While the menu is shown, you can use the Arrow buttons, OK button, and Return button to navigate the following options:
- Play/Pause: Plays or pauses the music file.
- FB: Rewinds the music file.
- FF: Fast-forwards the music file.
- Prev.: Skips to the previous song in the folder or directory.
- Next: Skips to the next song in the folder or directory.
- Stop: Stops the playlist and returns to the list of music files in the currently selected folder or directory.
- Set A / Set B / None: Use this option to loop a segment of a playing music file. In order to set the start point for the loop, press the OK button on the Set A option. Then set the end point of the loop by pressing the Set B option. After you do this, the loop will repeat. To deactivate the loop, press the OK button while None is highlighted.
- Mute: Silences the music file.
- PList: Select this option to pull up a list of the music files in the currently selected folder or directory in order to change the song/view the list without having to stop the music.
- Info: Press this button to see the specifications for the current music file.
- GoTime: Select this option to enter a track time for Projector Deluxe to skip to. You can use the Arrow buttons or Number buttons on the remote to enter the time.To hide the menu, press the Down Arrow button. To return to the list of files in the folder or directory, press the Return button at any time.
Projecting Movie Files from a USB Drive
To play videos from a USB drive:
- Plug your USB drive into the USB Port on Projector Deluxe. Select USB Media Player as the projector source and then access the home screen (as described in Selecting the Projector Source).
- Use the Arrow buttons to highlight the Movie icon. Then press the OK button.
- The projector will display the list of directories on the USB drive. Use the Arrow buttons to highlight the directory that contains the desired movie files. Then press the OK button while the directory name is highlighted.
- The projector will display the list of folders/movie files within that directory. Use the Arrow buttons to highlight the folder that contains the desired movie files. Then press the OK button to select that folder. If there are no folders within the directory or if the desired movie files are not in any folder, skip to Step 5.
- The projector will display a list of movie files. Use the Arrow buttons to scroll between the movie files. As each file is highlighted, Projector Deluxe may begin playing a preview of the highlighted video from the beginning. When the movie file you want to watch is selected, press the OK button to select it.
- A pop-up will appear asking if you would like to resume the video. Select Yes or No. If you select Yes, the video will continue playing from the point at which the video preview left off. If you select No, the video will restart from the beginning. If you did not highlight the movie file long enough for a preview to start, the movie will automatically play from the beginning after you select it.
When the selected video finishes, Projector Deluxe will proceed to play the rest of the videos in the folder or directory in alphabetical order. In order to adjust playback of the movie files, press the OK button to bring up the menu at the bottom of the screen. Then use the Arrow buttons, OK button, and Return button to navigate the following options:
- Play/Pause: Plays or pauses the video.
- FB: Rewinds the video.
- FF: Fast-forwards the video.
- Prev.: Skips to the previous video in the folder or directory.
- Next: Skips to the next video in the folder or directory.
- Stop: Stops playing the video and returns to the list of video files in the currently selected folder or directory.
- Repeat: Toggles between the repeat options. If Repeat… is selected, Projector Deluxe will stop playing videos after all the movie files in the folder have been played. If Repeat 1 is selected, Projector Deluxe will play the current video continuously. If Repeat All is selected, Projector Deluxe will cycle through all the movie files in the folder or directory continuously.
- Set A / Set B / None: Use this option to loop a segment of the video. In order to set the start point for the loop, press the OK button on the Set A option. Then set the end point of the loop by pressing the Set B option. After you do this, the loop will repeat. To deactivate the loop, press the OK button while None is highlighted.
- PList: Select this option to pull up a list of the video files in the currently selected folder or directory in order to change the video/view the list without having to stop playback.
- Info: Displays the specifications for the current video.
- SlowF: Toggles through the slow-motion playback options.
- StepF: Freezes the current video and then fast-forwards the video in small increments each time you select.
- GoTime: Select this option to enter a video time for Projector Deluxe to jump to. Use the Arrow buttons or the Number buttons on the remote control to enter the time.
- ZoomI: Zooms in on the video.
- ZoomO: Zooms out on the video.
- Aspect: Toggles through the aspect ratio settings.
- Move: If a video is zoomed in to more than 100% of its size, use this feature to adjust the portion of the video that is visible on the projection screen.To hide the menu, press the Down Arrow button. To return to the list of files in the folder or directory, press the Return button at any time.
Projecting Text Files from a USB Drive
To view a text document from a USB drive:
- Plug your USB drive into the USB Port on Projector Deluxe. Select USB Media Player as the projector source and then access the home screen (as described in Selecting the Projector Source).
- Use the Arrow buttons to highlight the Text icon. Then press the OK button.
- The projector will display the list of directories on the USB drive. Use the Arrow buttons to highlight the directory that contains the desired text files. Then press the OK button while the directory name is highlighted.
- The projector will display the list of folders/text files within that directory. Use the Arrow buttons to highlight the folder that contains the desired text files. Then press the OK button to select that folder. If there are no folders within the directory or if the desired text files are not in any folder, skip to Step 5.
- The projector will display a list of text files. Use the Arrow buttons to scroll between the text files. While a text file is highlighted, the projector will show a preview of the file. When the text file you want to view is selected, press the OK button to select it.
- The projector will then show the text file.
In order to adjust the projection of the text files in the folder or directory, press the OK button to bring up the menu at the bottom of the screen. Then use the Arrow buttons, OK button, and Return button to navigate the following options:
- Prev…: Goes to the previous page in the text file.
- Nex…: Goes to the next page in the text file.
- Prev.: Skips to the previous text file in the folder or directory.
- Next: Skips to the next text file in the folder or directory.
- Stop: Exits the text file and returns to the list of files in the folder or directory.
- PList: Select this option to pull up a list of the text files in the currently selected folder or directory in order to change the document/view the list without having to exit the document.
- Info: Displays the specifications for the text file. To hide the menu, press the Down Arrow button. To return to the list of files in the folder, press the Return button at any time during the slideshow.
Projecting Video from a Device Connected to the HDMI Port
To play video from a device connected to the HDMI Port (such as a DVD player or computer):
- Use an HDMI cable to connect your device to the HDMI Port on Projector Deluxe.
- Make sure that HDMI is selected as the projector source (as described in Selecting the Projector Source).
- Once you select HDMI as the projector source, the projector will display whatever is playing on the device connected to the HDMI Port. Use the controls on your device in order to adjust playback as needed.IMPORTANT NOTE: If no sound is heard from Projector Deluxe’s speaker when playing video from a device connected to the HDMI Port, check the source’s audio settings and make sure they are set to PCM Stereo mode. Alternatively, connect the device’s audio to Projector Deluxe via Bluetooth while playing video via HDMI.
Listening to Music from a Bluetooth Device
When Projector Deluxe is paired with a Bluetooth device (such as a smartphone), it can play music from the device through its speaker. You can play music from the Bluetooth device while the projector is on and operating or while the projector is off.
To pair with a Bluetooth device:
- Turn on your Bluetooth device and power on Projector Deluxe, which will automatically begin the pairing process (Projector Deluxe is always in pairing mode). You will know that Projector Deluxe is not yet paired to a Bluetooth device if the Bluetooth LED is still unlit.
- Navigate to the Bluetooth device’s setup screen. Then find and select Projector Deluxe. You will know that Projector Deluxe is paired with your Bluetooth device when the Bluetooth LED is lit solid blue. Also, the speaker will play a brief tone once pairing is complete.Note: If your Bluetooth device prompts for a pairing code, enter “0000”.Note: If you have previously paired to the Bluetooth device, you may be able to skip Step 2 and simply wait for it to connect with Projector Deluxe after powering on.
To disconnect the paired Bluetooth device, press and hold the Bluetooth button.
To pair with a different Bluetooth device, repeat step 2 after disconnecting from the first device. During the pairing process, it may help to move the first device out of range or to disable its Bluetooth capacity.Note: Maximum range will be achieved when using devices with Bluetooth 4.0.Note: Users should consider updating their Bluetooth device’s operating system if experiencing trouble with pairing or playing music.
Listening to Music from an Auxiliary Device
You can play music from an auxiliary device (such as an iPod or other MP3 player) through Projector Deluxe. You can play music from the auxiliary device while the projector is on and operating or while the projector is off.
To play an auxiliary device through Projector Deluxe:
- Use a standard 1/8” / 3.5 mm cable to connect the output jack on your aux device to the Aux Input on Projector Deluxe.
- Use the controls on your auxiliary device to play/pause a track, skip tracks, etc.Note: If the sound from your auxiliary device is distorted, try lowering the volume on the device. The volume on your auxiliary device should not be at full level.
Troubleshooting
If the unit is not charging: Make sure the power cable is properly connected to the power input and the power outlet.If the sound is distorted: Try lowering the volume control of your sound source, musical instrument, or microphone. Also, try to reduce the overall volume of Projector Deluxe using the Volume knob.If there is too much bass: Try adjusting the tone or EQ control on your sound source to lower the bass level. This will allow you to play the music louder before clipping (distortion) occurs.If there is a high-pitched whistling noise when using microphones: This is probably feedback. Point the microphone away from the speaker.If you can’t hear the microphone over the music volume: Turn down the music volume from your source.
If you cannot connect your audio device to Projector Deluxe via Bluetooth:
- Have your audio device (e.g., smartphone or tablet) and Projector Deluxe as close together as possible while trying to connect. Make sure both the audio device and Projector Deluxe are unobstructed by walls, furniture, etc.
- Reset the Bluetooth connection on Projector Deluxe to disconnect Projector Deluxe from any other audio device and restart the search process. If this does not work right away, power off Projector Deluxe and then power it back on.
- Reset the Bluetooth connection on your audio device by turning Bluetooth off and back on. You can find this under the Bluetooth menu in the Settings for your phone or other audio device.If this does not work, and you have connected to Projector Deluxe before, find Projector Deluxe in the list of available or previously connected devices in your audio device’sBluetooth menu, tap the “gear” or “i” icon located next to it and then select Unpair or Forget. Turn Projector Deluxe off and back on and try pairing again once it reappears in your available devices list.Note: If Projector Deluxe has been paired to another audio device recently that is still within range, you may need to repeat this process with that audio device to fully disconnect.
References
[xyz-ips snippet=”download-snippet”]