Ninja run GamepadUser Manual(PG-P4010)
Application Instruction:
- The product is mainly compatible with games operation via P4 and P3 console/ Android (Android 0 or above IOS (13.0 or above, support for any game version on P4.
- High-performance BT wireless connect technology, provide reliable signal without delay or disconnection within 8 meters, strong anti-interference performance and will not be affected by other wireless devices. driver-free, automatic connection, no complicated code matching process is required.
- Built-in LED colorful light, the gamepad has a colorful LED light bar to indicate the gamepad channel function and status. The indicator function Is the same as the original P4 gamepad. Different gamepads are indicated by different colors.
- Built-in motor, support for dual motor and dual vibration function.
- Built-in 3D acceleration sensor and gyroscope sensor, with six-axis sensor function.
- Equipped with a 5.5min headphone jack as the outlet of the audio signal of the game.
- The structure is ergonomic and feels comfortable.
- BT connection method is the same as the original gamepad.
- Support dual points capacitive sensor touchpad.
- Support to charge lithium battery via USB cable.
- Support for online upgrade via PC USB. support for the latest upgrade version of P4 console. Support programming function, according to the user’s preference, the normal function buttons or combination buttons can be set to S1-S4 programming buttons, convenient to use.
Product parameters:
- Charging Voltage: DC3.7V=50mA
- Battery capacity: 400mA
- Continuous playtime: about 8H
- Charge Time: about 3H
- 5.873.0. transmission distance: C.8M
- Standby time: 30 days after fully charged
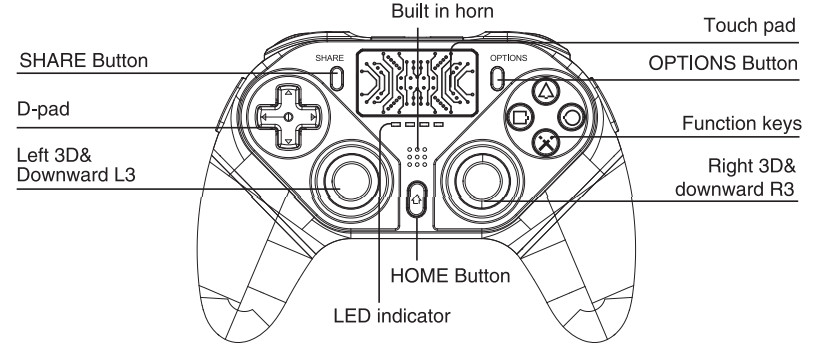
Product User Manual :
Connect to P4 console:
- Turn on the P4 console and enters the interface, connect the gamepad to the console via USB cable, and press the button HOME (house logo), the gamepad LED light will flash quickly when a single color LED is always on, which means the connection is successful, and then remove data cable. Repeat pressing the button HOME on the gamepad, the gamepad and the console will reconnect automatically.
- One press the HOME button: 1. Display the main screen, 2. Double press the HOME button to switch the starting application. 3. When the gamepad is under sleep mode, one press to wake up. 4. No support for wake up the console.
- Holding the HOME button:1. End off application.2. Logout I tum off P4 console.3. Display the operatable items according to the current situation.
- P4 console: gamepad SHARE button: can turn on (share)button. OPTIONS button: turn on select( option) button.P3 console: SELECT correspond to P4 SHARE button, START button corresponds to P4 OPTIONS button.
- Gamepad LED color indicator status description: display Player status, press the HOME button (PS button), the RGB color LED (light bar) will light up in blue, red, green, and pink, configure each controller, as the user login sequence identification. 1 P; Blue. 2P: Red 3P: Green. 4P: Pink A.Working channel: P4 console support for connection up to 4pcs P4 gamepad at one time. the gamepad will be indicated by different LED colors.B.After the gamepad is connected will correspond to each LED working channel, the first gamepad is connected to the console. blue light lit on to indicate user 1. The second gamepad connects with the console, the red light is lit on to indicate user 2. Turn off P4 console power, LED color will turn off within 10 seconds and the system enters the sleep mode.
- Touch screen test: P4 console setting–network connect—choose wireless network—input interface—test the touch screen function.
- Gravity sensor, gyroscope function will have correspond motion reactions when operating in a console game that supports six axes.
- 1n the game can test the output sound of speakers and headphones. When plug in the headphone’s speaker is silent, remove the headphones, speaker play sound.
Connect P3/PC:
- Connect gamepad to P3 / PC through USB data cable, use a wired gamepad.
- P3 / PC terminal does not support six-axis induction and vibration functions. when connect to a PC need to install a P4 driver.Game Platform: P3 game plaform.
The android device connects (Android standard HID mode):
- When the gamepad turns off, turn on the gamepad via pressing SHARE+HOME, and the indicator light flashes quickly.
- A1 at the same time. search BT name on Android device and click “PG-P4010” to pair.
- After paired successfully, the LED is always on. gamepad enters Android mode. can play games under Android standard protocol or download games from Octopus Game App.
IOS Device Connection (10S Standard mode).
- With the gamepad turn off. SHARE+HOM turns on the gamepad and the indicator lights flash intermittently.
- At the same time, search BT name on the IOS device and click “PG-P4010” to pair.
- After paired successfully. LED is always on and can play MFI certificated games.
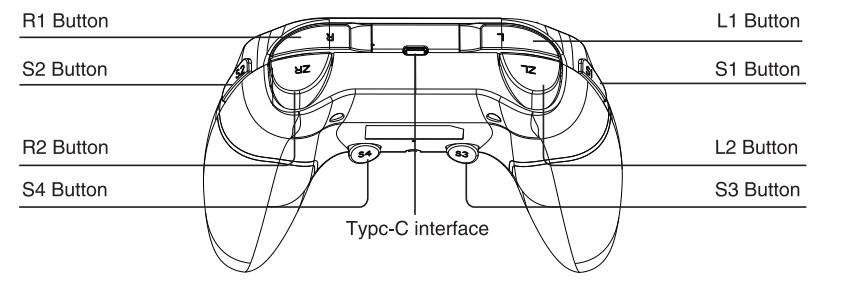
Programming function:
- Total 4 programming functional buttons (Si. S2. S3 and S4). Two at the left and right of the controller and the other two at the rear of the controller. And can be programmed according to your own preference
- Each programming button can program a single action button or multiple buttons. (for example ,
 L1 / L2 / Fl1 / 21 L31 R3 / cross buttons) can be set and programmed.
 - The programming button doesn’t have a turbo function.
- The programming button has a memory function, no matter the controller is under sleep mode, turned off or restart, the controller will remember the latest working state.
Program setting method:
- Press and hold the program button (eg.S1) then press the OPTIONS button until the mode LED flashes quickly to release all buttons.
- Then press one or multiple buttons that you want to be programmed from(/ LI /L2 / R1 / R2 I L3 / R3 / cross buttons).
- Press the Programming button (S1) again, mode LED returns to the display state before setting. That is to say, the programming setting is completed, and the mode indicator lamp returns to the display state before setting.
- After successful programming, the programming button (S1) has the same function as a single key or multiple keys just programmed.
Clear programmed setting method:
- Press and hold the programming button (eg. S1) and OPTIONS button until the mode LED flashes quickly to release all buttons.
- Press the programming button again to clear the programming settings.
Restore programming set to factory settings:
- Press and hold the 2 programming buttons at the rear of the controller and OPTIONS button for about 3 seconds until the mode LED flashes quickly, release all the buttons to return to the factory settings.
- Factory detail setting for programming buttons S1/S2/S3/S4 is as.
Gamepad charging/low battery:
- Low battery indication: When the gamepad battery voltage is above 3.6V, the indicator light is always on; when the battery voltage is at a low voltage of 3.3-3.6V, the indicator light flashes quickly at a frequency of 2.5Hz; when the voltage is lower than 3.3V, The gamepad enters the sleep mode.
- Charging indication: When the gamepad is connected, insert the USB charging cable, and the LED flashes slowly at a frequency of 0.5HZ.
- Charging indication: When the gamepad is not connected, the orange light shows gradually on/off to indicate that it is undercharging when the charging is completed, and the indicator light is off.
Notes:
- Please do not store products in humid or high-temperature places.
- Do not knock, beat, puncture, or try to disassemble to avoid unnecessary damage to the product.
- Non-professionals disassemble this product by mistake otherwise it will not be cover by the after-sales warranty service.
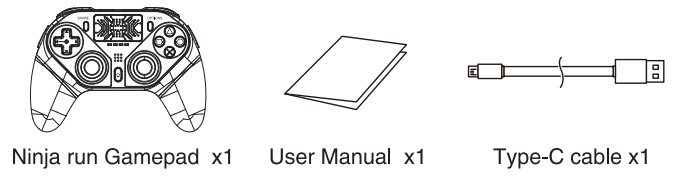
Included:
[xyz-ips snippet=”download-snippet”]