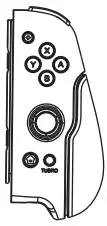
ipega PG-SW006 NS Joypad Controller User Manual
Product Application
- Gamepad is suitable for operation games on N-S system device.
- Gamepad button function correspondence with Joy-Con gamepad button function, and support TURBO (acceleration) &programming function.
- Gamepad support Six-axis gyroscope, vibration function,it will bring player an excellent gamimg experience.
- The Grip Stand built-in game card storage slot, can hold 4 large game cards and 1 Micro SD card.
Electrical Parameters
- Input voltage/current: DC5V/500mA;
- Working current: DC3.7V;
- Battery capacity: 400mAh;
- Working time: >10H;
- Charging time: About 3H; BT3.0,
- Transmission distance: -,.,8M;
Function and Operation
N-S console connectionGamepad and N-S separate connection operation: Connect the gamepad to the console for the first time: turn on N-S console, In the console main menu interface, use finger touch and click:gamepad icon change grip/sequence, Enter the console pairing mode interface.
When gamepad turn off, press pair button for 2 seconds to turn on gamepad pair search mode, gamepad LED began to run with flashing lights,when single or multiple LED are always on,gameapd and console paired search success,N-S console screen appears with two gray gamepad rotating, then press the left and right gamepad L and R button together, N-S console screen gray gamepad become black gamepad, Press A to complete the pairing and press HOME to exit the interface.
Connect the gamepad to the console again: The gamepad will go to sleep if not used within 5 minutes,When the gamepad need to be reused, Except TURBO button, programming button and 3D joystick,Short press other buttons to wake up reconnect and pair.Gamepad into N-S console connection operation: When gamepad tum off, insert the left and right gamepad directly into both side rails of the NS console and snap them in place,gamepad automatic pairing.
TURBO FunctionAction function include 13 buttons(A/B/XN/R/ZR/SR/SU/LJZUSUSR/±button) all can set TURBO function by manually;Setting method: long press action button at the same time press TURBO button,turn on TURBO function; press action button at the same time press TURBO button, turn off TURBO function; After the product disconnection. previous set TURBO function it will automatic cleared,lf TURBC function is enabled must be reset.
Programming function
- Left gamepad programming: press ” programming button ” + “
 ” button for 3 seconds . the motor began to vibrate and release the hand (Vibration stops for 2 seconds) Short press the function button to be entered, the programming button is the button function just entered.Notes:3D, TURBO. Capture button and pair button can’t programming. programming button
 - Right gamepad programming. press ” programming button ” + ” ” for 3 seconds. mato began to vibrate then release the hands (Vibration stops for 2 seconds) . Short press the function button to be entered, the programming button is the button function just entered.
Notes: 3D. TURBO. HOME button and pair button can’t programming.
Charging instruction
Gamepad and N-S separate connection operation:
- Gamepad power not enough the LED light will flash quickly.
- Single gamepad charging: adapter output DC5V500mA the USB cable TYPE-C port plug in gamepad TYPE-C port to charging.when turn off to charging 4 LED light flash, if connect success to charging correspondence light flash, fully charging is always on.
- N-S console charging: the left and right gamepad are install on both sides of the N-S console and insert in place. N-S console will automatic detect gamepad power.When detect gamepad Low power will automatic charge for gamepad.When N-S console battery is low power,Charge N-S console with original N-S charger. original USB TYPE-C charge plug in N-S TYPE-C console to charging.
 report this ad
Notes; At the STITCH console data port, cannot be used other charger for charging, otherwise our company is not responsible for the damage.so please follow the charging instructions Camethod.
Notes
- Do not store product in humid or high temperature places;
- Do not knock, beat, puncture, or try to disassemble to avoid unnecessary damage to the produ
- Do not throw away with garbage because product has built-in battery;
- Do not charge gamepad near fire or high temperature.
- Non-professionals disassemble this product by mistake otherwise it will not be cover by the after-sales warranty service;
Included
- Left gamepad x1
- Grip stand x1
- Right gamepad x1
- Manual x1
- USB cable x1

[xyz-ips snippet=”download-snippet”]