ipega PG-SW038 Ninja Run Wireless Controller User Manual
Application Introduction:
- Product is compatible with N-S / P3 / Android and computer (Win7 or above).
- Product function buttons correspond to N-S_pro function and support TURBO function.
- Product support six-axis function so that players can get better game experience.
- The structure is ergonomic and feel comfortable.
- Support programming function, according to the user’s preference, the normal function buttons or combination buttons can be set to S1-S4 programming buttons, convenient to use.*Due to the official game platform software upgrades or source code changes and other not resist factors caused some of the game can not be played or connected with our Gamepad, iPega company has no responsibility. iPega reserve the right of final interpretation for this.
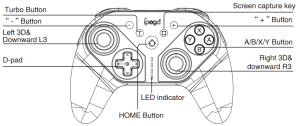
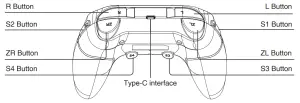
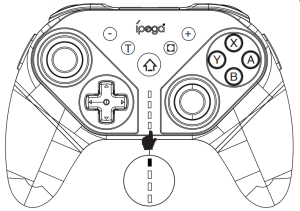
Instruction for key function;
Electrical Parameters:
- Working voltage:DC3.7V
- Working current:<30mA
- Static current:<20uA
- Continuous operation time:>8H
- Input voltage/current:DC5V/500mA
- Charging time:About 3 hours
- BT3.0, transmission distance:≤8M
- Battery capacity:400mAh
- Stand-by time:30 days after fully charged
Connection Mode:
Switch console connection :
- First connect gamepad to console turn on switch console, click the following selection on the main interface :Controller → Change Grip/order enter the console pairing mode interface Press L + R on the controller.
- When gamepad is turn off, press the combination button B+HOME for 2 seconds to turn on the gamepad to enter the pairing mode, the LED light start to flash in a circle, when one or more LEDs are always on (Automatic console allocation), indicate the gamepad paired with the console successfully, then press A button to operate.
- Alreadyed connected: Press the HOME button for 2 seconds to turn on gamepad, gamepad will connect to the console automaticly, then press A button to operate.

Android device connection :
When the gamepad is turn off, press Y+HOME button for 2 second to enter the Android standard game pairing mode, gamepad LED light flash quickly, search the device name”PG-SW038″on Android smartphone/tablet/smart TV and select “connection”! After connected, the LED light will be always on! When gamepad is already connected as before you can press HOME button directly, LED light flash slowly to indicate reconnection automatically.Recommend game platform: Octopus Game App.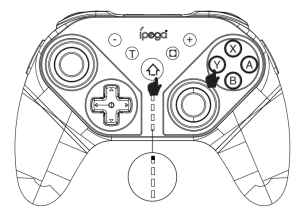

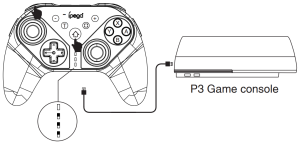
P3 console connection:
- When the gamepad is turn off, press A+HOME combination button for 2 seconds to turn on, LED indicator will flash.
- Connect the gamepad to the P3 console via USB cable, press the HOME button to pair it.
- After paired, the corresponding channel LED is on and the gamepad will enter P3 mode operation. 4.Remove USB cable, the gamepad enter the wireless connection.
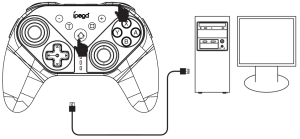
PC Wired Connection:
- When gamepad is turn off press L+HOME combination button for 2 seconds to turn on gamepad LED light flash quickly, Connect the gamepad to the PC device via USB cable. At this time is PC wired mode, the gamepad LED light is on.
- Press HOME button for 3 seconds to switch to PC Xbox360 mode at the same time gamepad LED light flash twice and then light on.
- Remark; iUnder wired connection mode, no six-axis function.
Operation instructions:
|
Android System |
N·S console |
|
|
Android wireless mode |
N·S wireless mode |
|
|
Pair Mode (Press and hold on 3’s) |
Y+ Home | B+HOME |
|
Indicator |
LED |
LED |
|
Remark |
six-axis not supported |
Support six -axis |
|
P3 Console |
PC computer |
|
|
P3 wireless mode |
PC wired mode |
|
| Pair Mode (Press and hold on 3’s) |
A+Home |
L+Home |
|
Indicator |
LED |
PC P3 mode: LED PC 360 mode LED |
|
Remark |
When enter the search status under wireless mode, need to plug in the USB cable. After connected, remove USB cable and gamepad enter the wireless connection |
six-axis not supported |
Programming function:
- S1/S2 is programming button on the left/right of the gamepad, and the bottom is programming button S3/S4.
- Each programming button support for mapping a single action button or programming multiple buttons. (Such as A/B/X/Y/L1/L2/R1/R2/L3/R3/up/down/left/right) can be set and programmed.
- A single programming button allows to set the combination buttons by up to 10 buttons.
- The programming button has no TURBO function.
- The programming button has a memory function, no matter the gamepad is sleeping, shutting down, or restarting, it will remember the last working state before.
Programming method:
- Press and hold the programming button (S1 S2 S3 S4) and the “+” button (START) that need to be set at the same time, then pairing LED indicators 1#, 4# and 2#, 3# flash alternately, release the button to enter the programming mode;
- Press one or more regular function buttons to be copied (such as pressing one of “A/B/X/Y/L1/L2/ R1/R2/L3/R3/up/down/left/right/” Or multiple buttons into a combination), press the corresponding programming button again to confirm and automatically exit, that is, the programming setting is completed, and the mode indicator light returns to the display state before the setting.
- After completed programming, the programming button has the same function as a single button or multiple button just programmed and mapped.
Clear Programming Function Method:
- Press and hold the programming buttons (S1 S2 S3 S4) and the “+” button (START) that need to be cleared at the same time. At this time, the LED indicators 1#, 4# and 2#, 3# flash alternately, then release the button;
- Press the programming button that needs to cancel the function again to confirm and exit automatically, and the mode indicator will return to the display state before setting. The programming button function is cleared.
- The initial functions of S1/S2/S3/S4 button correspond to BAYX button.
- Press S3 and S4 and the “+” key (START) at the same time to restore the factory programming settings.
TURBO function On/Off:
- Action button(A/B/X/Y/L/ZL/R/ZR) 8 button; TURBO function can be set manually.
- Setting method; Holding the action button, press TURBO button at the same time to turn on TURBO function; Repeat holding the action button, press TURBO button at the same time to turn off the TURBO function.
- After the product is disconnect, the previous set TURBO function is automatic clear, if the TURBO function is enabled it must be reset.
Gamepad charge/sleep/wake up/off function:
- 1.Gamepad turn off to charging LED1-LED4 indicator light flash at the same time, close when full charged.
- Turn on device to connect, charging LED indicator flash, and it is full and bright.
- Sleep/wake-up function: if the gamepad is not use within 5 minutes, it will enter into sleep. When need to Use it again, need to press the home button to wake up and connect back.
- When the battery power is no enough, the correspond indicator light flash quickly
Notes:
- Please do not store product in humid or high temperature places.
- Do not knock, beat, puncture, or try to disassemble to avoid unnecessary damage to the product.
- Non-professionals disassemble this product by mistake otherwise it will not be covered by the after-sales warranty service.
- Due to the official game platform software upgrades or source code changes and other not resist factors caused some the game can not be played ot connected with our Gamepad, iPega company has not responsibility. iPega reserve the right of final interpretation for this.
Included:
- Ninja run Wireless controller x1
- User Manual x1
- Type-C cable x1


Patent NO; 201930743696.0
 report this ad
[xyz-ips snippet=”download-snippet”]