iRV TechnologiesOperation ManualAM/FM/CD/DVD/MP3/MP4Digital 2.1 surround sound-Optical SPDIF Audio Input

IRV 63

WARNING – To reduce the risk of electrical shock, do not remove cover (or open unit). NO USER-SERVICEABLE parts are inside. Refer servicing to QUALIFIED SERVICE PERSONNEL.The design and manufacture of this player take personal safety into consideration. However, any improper operation may result in electric shock, fire, or another hazard.DO NOT open the cabinet by yourself to prevent electric shock. Please contact a professional technician to perform any service needed. Please use only components recommended by the factory when replacement is necessary.Please turn the unit off when not in use. Use a dry, soft cloth to clean the face with the system turned off.PRECAUTION – Moisture may cause the lens on the loader in this unit to malfunction. To remedy the problem, turn the unit on, eject the disc and run 1-2 hours to vaporize moisture inside the unit. Do not repeatedly turn the unit off and on. After turning the unit off wait 10 seconds before turning it on again. Do not use broken, scratched, or twisted discs in the player. This could result in damage to the unit. Use only 5°, 12cm discs in this unit.
IRV 63 TechnologiesCD/MP3/MP4/DVD Disc PlayerCompatible with standard size CD, MP3, MP4, and DVD discs (4.75″ or 12cm). The iRV63 is designed to read standard DVD, MP3, MP4, CD, CD-R, CD-RW, JPEG-CD Disc. Because of variations in recording methods some discs may not play on this unit. This unit will play region 1 DVDs (USA and Canada).
5V ChargeThis is NOT a USB port and CANNOT accept a flash drive for music playback. Only uses one 5V charging, also charges many devices like iPod
Built-In AM/FM Tuner18 preset FM stations and 12AM stations available to select.
High Definition Input1 High Definition input and 1 High Definition output. High Definition output with ARC function.
BTThis unit contains BT technology enabling secure, wireless connections between portable and fixed devicesThis unit contains a BT link that also enables handheld control of streaming music from users’ wireless device playlists.This unit supplies quality high-power audio and video outputs to three different zones. Zone 1 receives 2.1 digital surround sound. Zone 2 and 3 receive standard stereo audio.
This unit has 1 Video Input,1 Video Output,1 Audio input to allow users to enjoy entertainment from other sources such as Satellite Radio, VCRs, Digital Cameras, Video Games for iPods, and MP3 Players.
These sources must be connected through the inputs on the unit or through additional accessory wall plates.
ClockPress this to see the time. This unit has a built-in clock that can display the time in any mode when the clock button is pressed. Press and hold the clock button the unit enters clock set mode.
Consumer Electronics ControlThis unit has consumer electronics control features, functions will vary be based on a TV connection.It allows users to use a remote control multiple support high-definition equipment, no need to use other remote controls.
Near Field CommunicationThis unit has near-field communication liable and can complete a quick BT pairing.
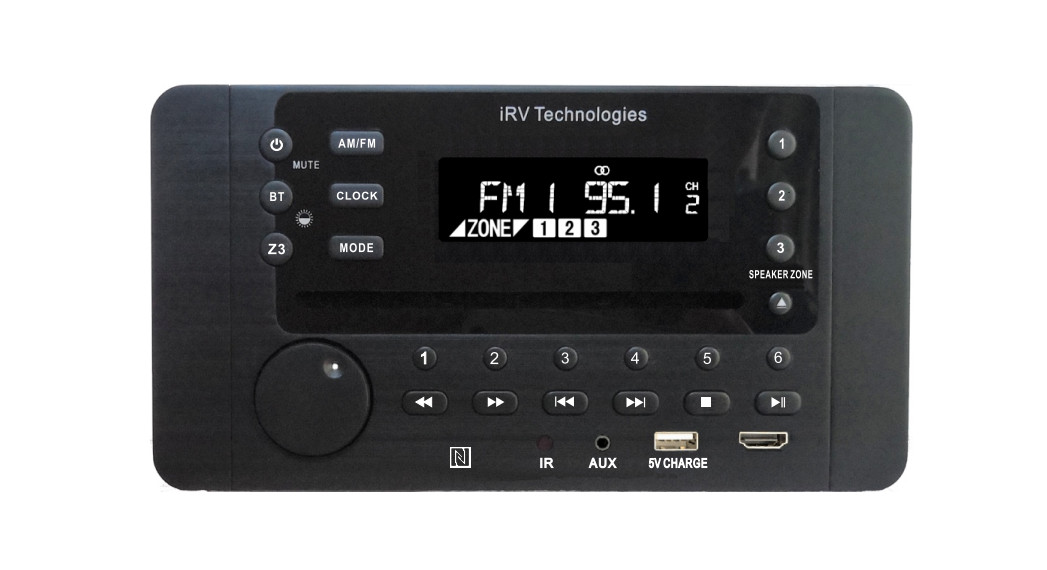
IRV63 FEATURES
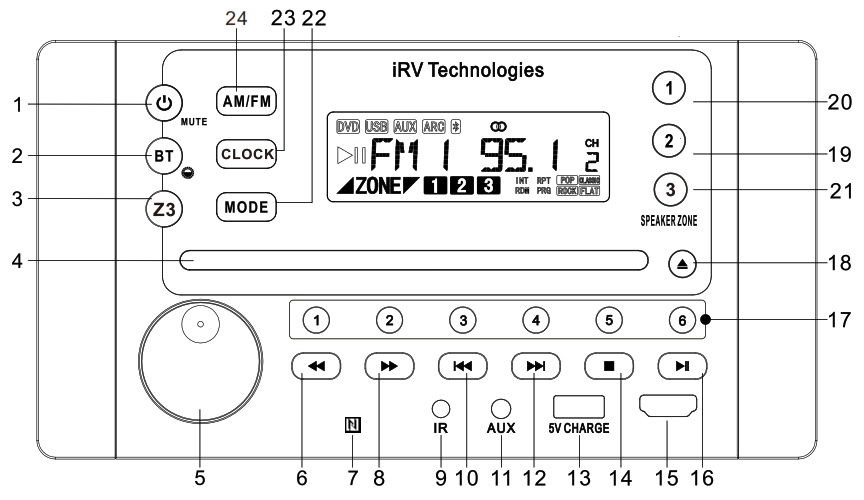
- POWERTurns the power on and off and makes the device mute.Note: Push and hold the POWER button for 5 seconds to make the device on/off.Quick Push can make the device mute.
- BTI
 Quick push this to enable BT connectivity. Push and Hold to adjust 3 levels brightness for LCD and button backlight.
 - Z3 buttonQuick push 23 buttons to enter into Z3 independent state.In this state, quick push Z3 to enter into Z3 operation menu. Push and hold Z3 button to exit from Z3 independent state.
- CD/MP3/MP4/DVD Disc loading slotInsert a disc to play. Compatible with standard size CD, MP3, Mp4, and DVD discs (4 75 or 12cm). The unit is designed to read standard CD, MP3, MP4, DVD, DVD+R, DVD-R Disc. Because of variations in recording methods some discs may not play on this unit. This unit will play region 1 DVDs (USA and Canada).
- VOLUMEIncrease or decrease the volume In all rooms where sound Is being played, also can operate subwoofer, bass, treble, and balance.
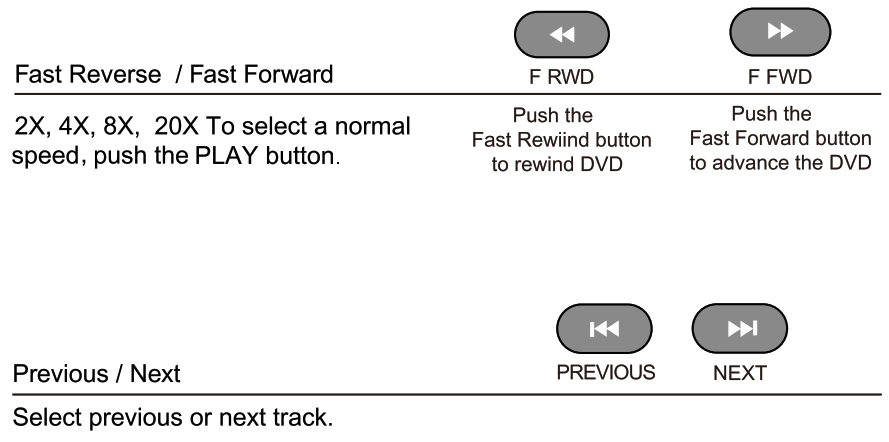
- /8 F RWD buttons Radio Mode: Press to auto scan and memorize band preset stations. Scan through all lower preset stations.Disc Mode: Select different levels of fast reverse.
- Near Field CommunicationThis unit has near field communication Table and can complete a quick BT pairing.
- IRInfrared remote sensor.
- /12 PREV and NEXT buttons Radio Mode: Press to select next frequency, higher or lower. DVD Mode: Moves menu selection.
- AUDIO INAnalog audio input from Mp3 or iPod player, This is a 3.5mm input.
- 5V ChargeThis is NOT a 1)88 port and CANNOT accept a flash drive for music playback. Only uses one 5V charging, also charges many devices like (Pod.
- STOP ■Press to stop playback of the disc. Press Play to continue the playback.
- High Definition Input1 High Definition Input and 1 High Definition output.High Definition output with ARC function.
- PLAY/PAUSE Press to play disc or pause playback of the disc. During radio mode: (Auto-storage /Preset scan).1) When the press, the radio searches from the current frequency and cheeks the signal strength level until 8 stations is found.And then the 8 stations frequency is preset to the corresponding preset memory numbered bank. When press and hold for more than 1second.The auto-storage operation Is Implemented In each selected band. When the auto-storage operation is finished, the radio executes the Preset scan.
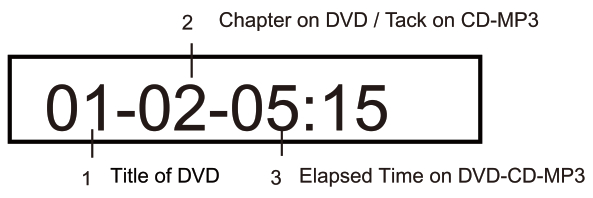
- 1-6 Number buttons[1].(2)….(6) number buttons are used to enter number,e.g.No.of track, DVD chapter No., time data, etc.
- EJECT Press to eject a Disc from your iRV63 built-in player.
- -21 SPEAKERS 1-2-3 Turns sound on or off in corresponding ZONE 1,2 and 3.
- MODE Select between TV audio/FR-audio/F-HDMI IN/TV audio 2.
- CLOCK Press this to see the time. This unit has a built-in clock that can display the time in any mode when the clock button is pressed. Press and hold the clock button the unit enters clock set mode.
- AM/FM Allows you to select FM1, FM2, FM3, AM1, or AM2. Each band can be auto programmed with 6 stations presets. 18 total preset stations for FM and 12 total preset stations for AM. (See FFWD or FRWD Radio Mode for auto-scan features.)
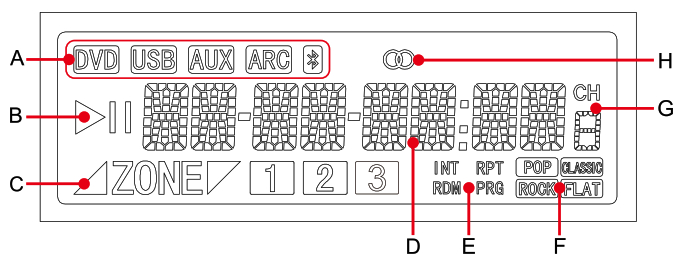
| A Status informationB Play/pauseC Zone speakerD Source, Track time, Frequency information Display | E Play modeF EQ settingG Radio channels presetH Stereo indicator |
RADIO OPERATION
Turns the power on and off. Make the device mute POWER

Push and hold for power “on and off” Quick push for power ‘mute”
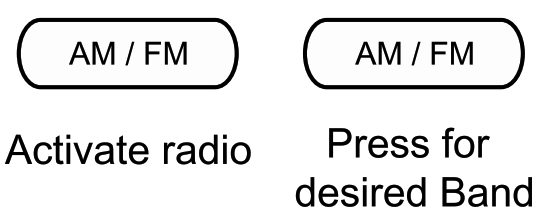
Radio Reception ModePress to access the radio.press to activate desired band:AM1,AM2,FM1,FM2,FM3.
Manual TuningSelect Band, Select a single arrowed button to move the channel down or up.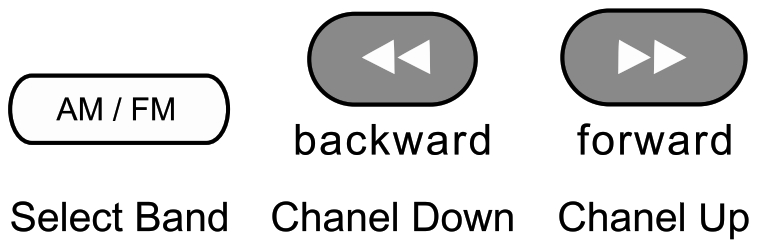
Auto-Search TuningPush to auto search for an available station at a higher or lower frequency When this function is selected the unit will stay at the selected station until another function is selected.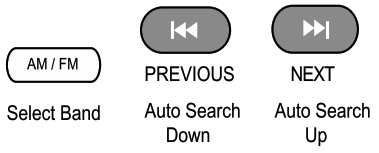 Manual Frequency PresetsSelect Band, Select desired frequency, Hold desired numeral for3 seconds.Frequency is set Repeat to change Frequency can be presetforAM1. AM2, FM1, FM2, FM3.
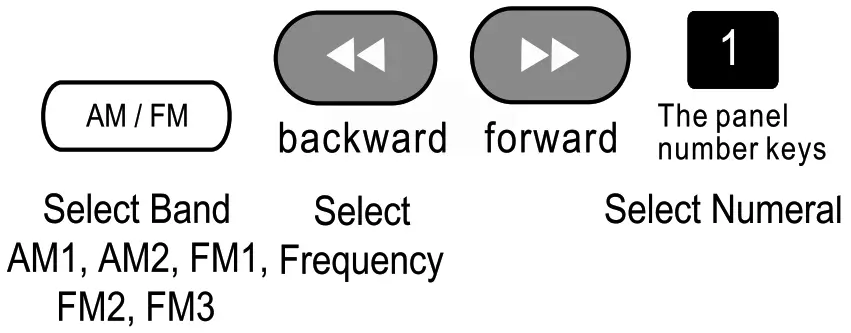
Recall Frequency PresetsSelect Band AM1, AM2, FM1, FM2, FM3, then select desired numeral

Automatic Store I Preset Scan![]() A. Automatic Scan & Store While listening to the Radio, Long press the
A. Automatic Scan & Store While listening to the Radio, Long press the![]() button, The receiver will automatically scan and save the station listening to. B. Scan Saved Stations Short press the
button, The receiver will automatically scan and save the station listening to. B. Scan Saved Stations Short press the ![]() button once to perform the scanning functions.
button once to perform the scanning functions.
Auto Best Station Memory
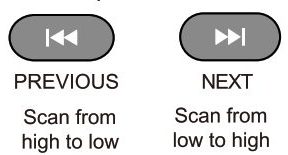
| Active radioPREVIEW frequencies | Press for the desired Band FM1 |
While in FM1 if you press the NEXT button the radio will start scanning from low to high frequencies.,or button the radio will start scanning from high to low Each strong station found will be stored in a preset button until all 18 FM presets are full. You can also do this with the AM band There are 12 presets available for the AM band.
Clock Setting the time
| HOURS | |
 |
 |
| Press for 3 seconds Hours will flash | Use the VOLUME KNOB to set correct hour |
Press and hold the CLOCK button for 3 seconds. Hour will flash. Use the SELECT VOLUME KNOB to set the correct hour. Press VOLUME button moves to minutes. Minutes will flash. Use the VOLUME KNOB to set correct minutes Press the CLOCK button to memorize
| MINUTES | ||
|
|
|
| Press VOLUME to minute | Use the VOLUME KNOB to set correct minute | Press to memorize |
 BT LinkConnect iRV63 with a BT deviceTurn on iRV63 power, enter BT Link in your cell.Search ‘iRV63’ BT ,then click connect. It’s successful to connect iRV63 BT if iRV63 screen shows BT LINK
DVD/CD/MP3/MP4 OPERATION
REMOTE CONTROL Guide
- PowerTurn the power on/off and make the device mute.
- EjectPush the button once, the disc will be ejected from the slot, press it again and the disc will be taken back into the slot.
- 0-9 NUMBERSRadio Mode: You can select one of the 9 stored stations on each band by pressing any one of the number buttons(1-9).Disc Mode: You can select any track directly by using the number buttons(0-10+). Example: If you want to track number 25. Consecutively press the number 2, then 5, and track number 25 will begin to play.
- FAST REVERSE / FORWARDPress to select different levels of Fast Reverse or Fast Forward. Press Play to resume selection.
- MENUDISC only. for DVD title menu and root menu.
- PLAY / PAUSEPress the PLAY/PAUSE button to suspend the playback of CD, MP3, MP4, VCD, and DVD media. Press it again to return to normal playback mode.
- SRCSelect between Radio/DVD/BT/TV audio/FR-audio/F-HDMI IN/TV audio 2.
- NAVIGAION BUTTONSPress the appropriate button to move around any menus that are selected on the screen. The Center button is the select / enter button.
- 0KUse to finalize the selection.
- AM/FMAllows you to select FM1, FM2, FM3, AM1, or AM2. Each band can be auto programmed with 6 stations presets. 18 total preset stations for FM and 12 total preset stations for AM. (See FFWD or FRWD Radio Mode for auto-scan features
- ZONE1,2,3Turns sound on or off in the corresponding ZONE 1,2 and 3.
- ZOOM – DVD OnlyDVD, VCD: Press the ZOOM button once to enable 2X zoom mode. Pressing the ZOOM button repeatedly moves the zoom mode through 3X, 4X, 1/2X, 1/3X, and 1/4X zoom levels. Press ZOOM again to exit the zoom mode.REMOTE CONTROL Guide
- SUBTITLE(SUB-T) – DVD OnlyReturns to previously selected tracks. Press to select language or to turn off subtitles. Press and hold for 3 seconds to return to the previous chapter.
- PREVIOUS / NEXTRadio Mode: Press to select higher or lower stations. Disc Mode: Press to select the previous or next track or chapter. Pushing the Previous button. the unit will play the disc from the beginning of the previous track. Pushing the Next button, the unit will play the disc from the beginning of the next track.
- REPEATDVD Mode: Press REPEAT to repeat the current track being played. Press it twice to repeat playing all of the tracks. CD, M P3, VCD Mode: Press REPEAT to repeat the current track being played. Press it twice to cancel the repeat function.
- STOPDVD, VCD, CD: Press STOP to suspend playback mode, STOP will display on the TV Screen. Pressing STOP a second time will end all disc playback.
- MUTEPress the MUTE button to turn off the sound in all ZONE 1, 2 and 3. Press it again to resume the previous sound levels.
- AUDIO – DVD OnlyAdjusts the surround sound mode as well as selects the language. Must be set before play.
- VOLUMEPress the VOLUME (+ or -) button to increase or decrease the volume level respectively.
- SETUPPress for DVD setup menu, Menu navigation screens will appear on Video Monitor.
- Z3 BUTTONQuick push the Z3 button to enter into Z3 independent state. In this state, quick push Z3 to enter into Z3 operation menu. Push and hold Z3 butt onto the exit from Z3 independent state.
APP OPERATION
On Your iPhone or iPad:
- Click on ‘App Store’
- Click ‘Search’ at the bottom of the screen
- In the search bar, type iRV
- If using iPad, make sure to click the ‘iPhone apps option

On Your Android Device:
- Click on ‘Google Play
- In the search bar, type iRV at the top of the screen


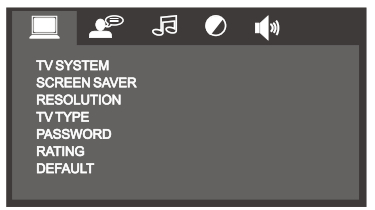
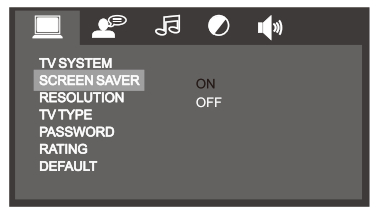
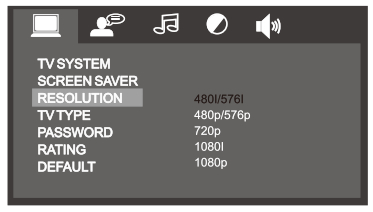
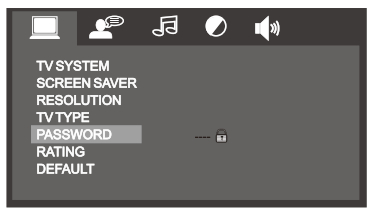
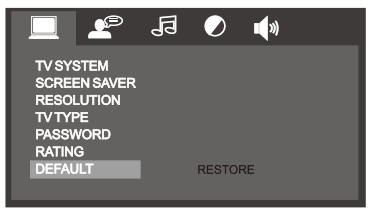
SYSTEM SETUP
 |
|
 |
 |
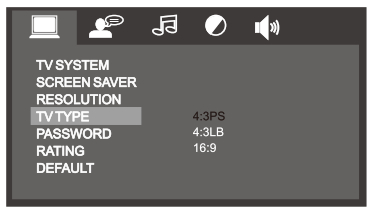 |
Press the “SETUP” button to activate the System Setup on-screen display Video Monitor Only menu.Use the NAVIGATION buttons to navigate the following OSD menu options.
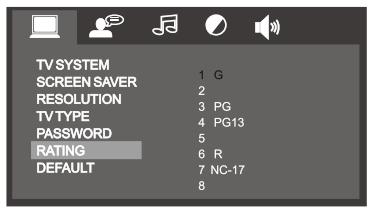
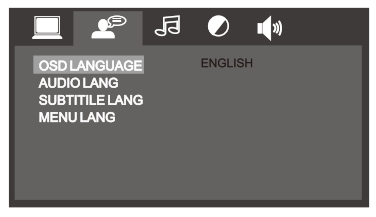
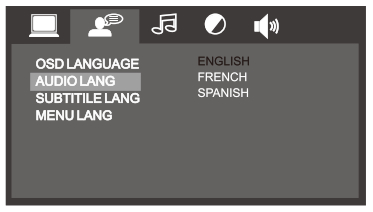
LANGUAGE SETUP
 |
 |
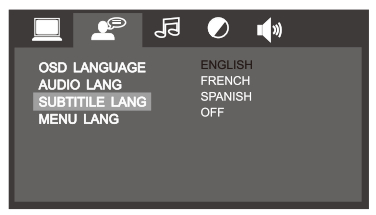 |
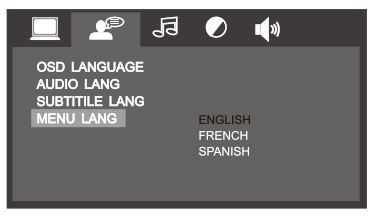 |
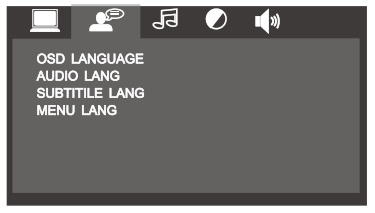 |
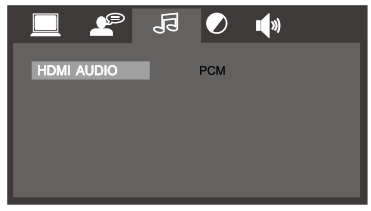
AUDIO SETUP

SPEAKER SETUP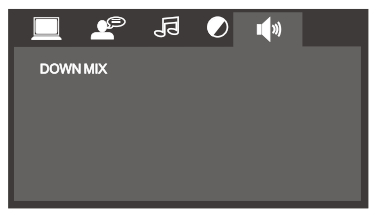
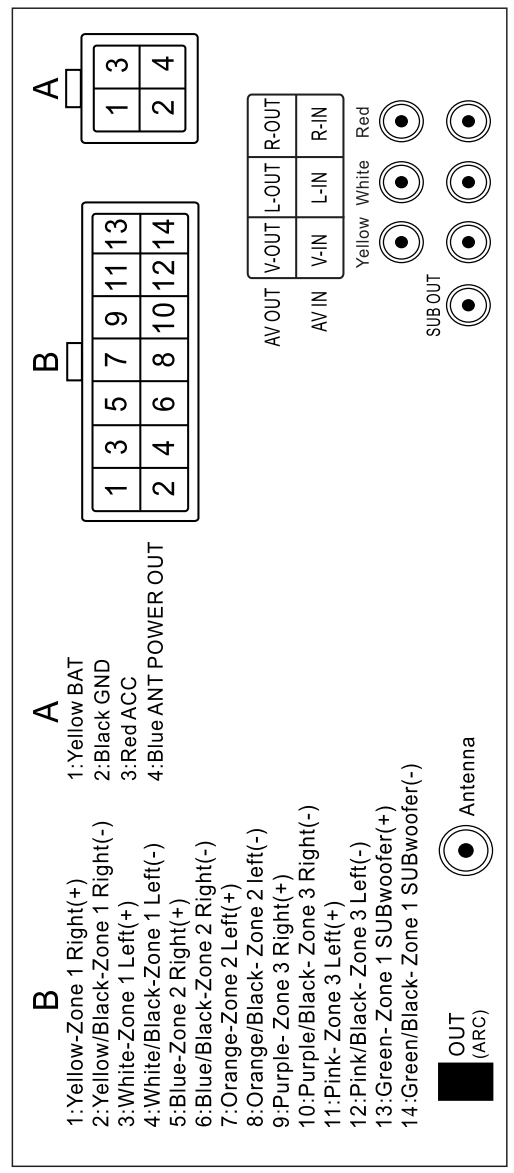
WIRING DIAGRAM
TROUBLESHOOTING
No PowerCheck and make sure whether the fuse is blown, replace the fuse with proper value if necessary.
Some errors occur in the LCD or no function when pressing the button.Turn off the unit and restart the unit again. Use Factory Default Restart.
Poor radio reception or static.Antenna may not be the proper length. Make sure the antenna is fully extended. Antenna may be broken. Replace antenna.The broadcast signal is too weak.The antenna is poorly grounded. Check and make sure the antenna is properly grounded at its mounting location.
Disc cannot be loadedDisc is loaded in the machine. Clear the disc by pressing eject
No Picture.The Video line from the main unit to the TV is not connected properly. Check connections. Improper setting of the TV SYSTEM. Set the TV SYSTEM to “NTSC”, according to the connected television.Disc error appears.The disc may be damaged or dirty. Clean disc and retry.When there is no color on video.Turn off the unit and restart the unit again. Use Factory Default Restart.
 report this ad
FACTORY DEFAULT RESTARTPress and hold POWER button for 5 seconds – Unit will shut off. Restart unit by pressing the ON button.Factory defaults will be reset with this type of restart.NOTE: If any of the problems persist after checklist has been made, consult your nearest service dealer.Never attempt to disassemble your unit by yourself.
IRV 63 SPECIFICATIONS
| Overall DimensionsMounting DimensionsNet WeightVoltageMaximum Current Consumption Total Continuous Power OutputLoad ImpedanceTotal harmonic distortionDVD Deck Section, Discs Played Video SystemVideo SectionVideo Output levelAM Tuner Section, Frequency Range FM Tuner Section, Frequency Range BluetoothAdvanced Audio Distribution | 8-1 /10″(W) X 4-2/8″(H) X 71D)6-4/5″(W) X 4-1/1611-1) X 7–1/4″(D)3.7Ibs (1.7Kgs)12V DC Negative Ground (11.0V – 15.0V allowable)8A50W40 (4-Bflallowable)Typical 0.02% Maximum 0.3%DVD, MP3, MP4, CD. CD-R, CD-RW. JPEG-CD AUTO / PAL /NTSC4:3 Letter Box and 4:3 Pan Scan, 16:91.0Vp-p +/-0.2V 75ohms 1710KHz (U.S.A.)87.5-107.9MHz (U.S.A).Version 4.1, Class IIA2DP, AVRCP |
[xyz-ips snippet=”download-snippet”]