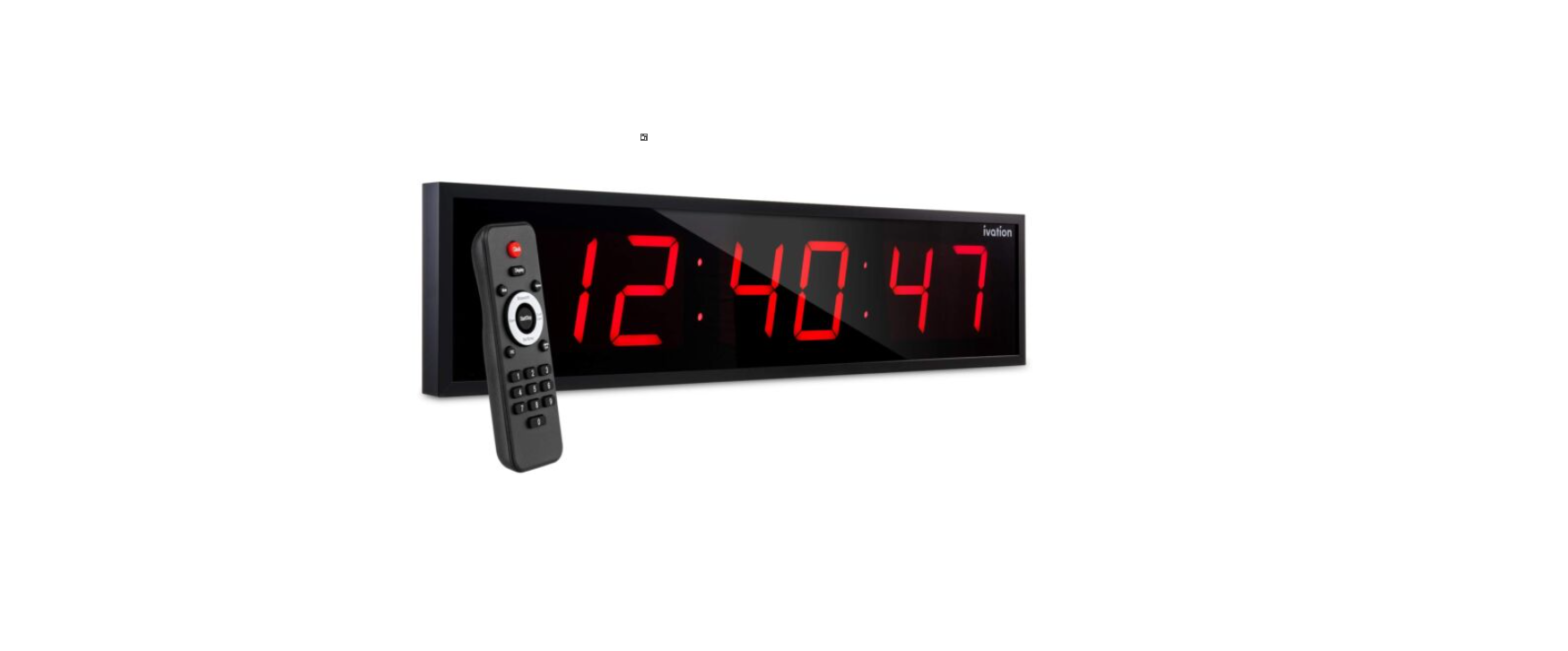
Ivation LED Digital Time Bar
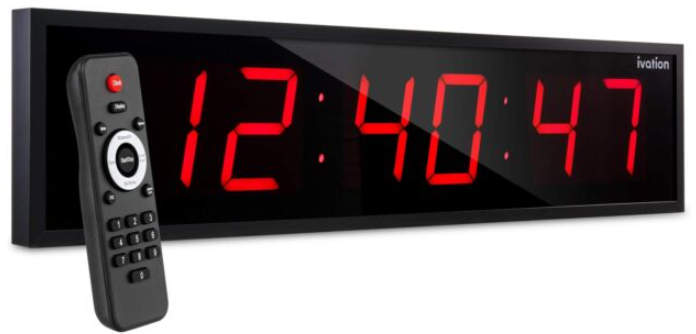
Ivation LED Digital Time Bar
INTRODUCTION
Thank you for purchasing the Ivation® LED Digital Time Bar. This User Guide is intended to provide you with guidelines to ensure that operation of this product is safe and does not pose risk to the user. Any use that does not conform to the guidelines described in this User Guide may void the limited warranty.
Please read all directions before using the product and retain this guide for reference. This product is intended for domestic use only. It is not intended for commercial use. This product is covered by a limited one-year warranty. Coverage is subject to limits and exclusions. See warranty for details.
SAFETY PRECAUTIONS
If damage is incurred as a result of non-compliance with the instructions laid out herein, this will void the manufacturer’s guarantee. Ivation assumes no liability for personal injury or damage to property caused by incorrect handling or non-observance of these safety instructions.
- Unauthorized conversion and/or modifications to this unit are not permitted.
- Do not expose this product to temperatures lower than 32°F (0°C) or higher than 122°F (50°C), strong vibrations, or heavy mechanical stress, as these could damage the time bar or reduce its efficacy.
- Never bring this product in contact with liquids, as this creates the risk of fire or fatal electric shock. If moisture or any other object enters the unit’s housing, disconnect the power cord immediately and contact a technician for service.
- Only connect this unit to a standard wall outlet that is rated to support its power input of 120 V AC. Do not connect this unit to an extension cord.
- Always disconnect the power cable when you are not using the time bar for a prolonged period of time, before cleaning the unit, and during thunderstorms.
- Never turn this device on immediately after moving it from a cold room to a warm room. This can cause water condensation to occur, resulting in damage to the unit that could ruin it. Always allow the unit to reach room temperature before turning it on.
- Never use this product in a bathroom, next to your bathtub, or near a body of water where it might be exposed to excess moisture/humidity.
- Never use this appliance in an unstable position. Always position it on a solid, stable surface out of direct sunlight, where it will not be exposed to moisture or humidity.
- The power supply cable provided should be used in a way that reduces the risk resulting from becoming entangled in or tripping over a power cable. Do not use an extension cord.
- This product has a polarized plug, meaning that one prong is wider than the other. To reduce the risk of electric shock, this plug will only fit into a polarized outlet one way. If the plug does not fit into the outlet, reverse its orientation and try again. If it still does not fit, contact a qualified electrician. Do not modify the plug in any way. Do not force the plug in any way.
- If the electrical circuit is overloaded with other appliances, this product may not operate properly. Make sure to operate it using a separate electrical circuit from other appliances.
PACKAGE CONTENTS
– LED digital time bar– Power cable– Remote control– User guide
PRODUCT OVERVIEW
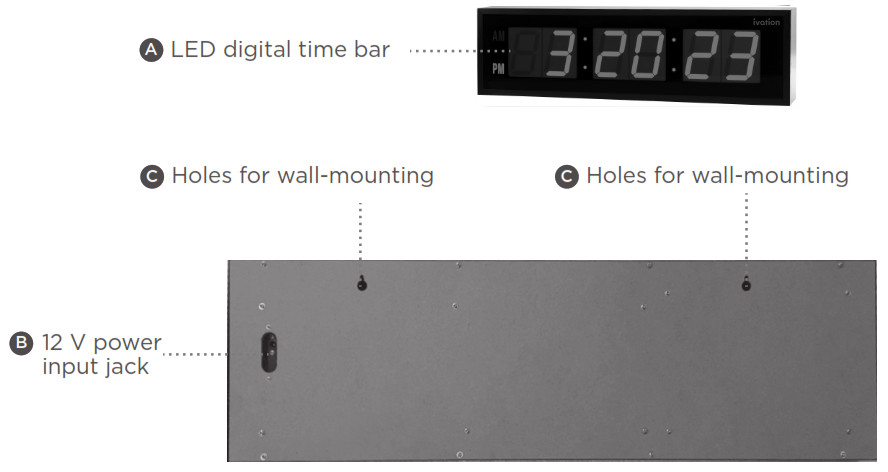
![]() LED Display
LED Display![]() 12 V power input jack
12 V power input jack![]() Holes for wall-mounting
Holes for wall-mounting
See page 6 for full details on the remote control buttons and functions.
BASIC OPERATION
- Follow these steps to insert the smaller end of the power cable into the 12 V power input jack on the rear of the clock.a. Position the cable end perpendicular to the backside of the clock.b. Push the cable end into the connection port, then slide the cable to the right.c. Turn the cable so that it lays flat against the backside of the clock.d. Thread the cable through the jagged groove to secure it.
- Plug the other end of the cable into a standard wall outlet socket.
- The display will automatically turn on and display the time and date.IMPORTANT: When disconnecting your time bar, make sure to disconnect the power cord from the input jack on the rear of the clock before disconnecting it from the wall socket.
Manually Setting the Date and TimeTo set the time on your digital time bar, follow these instructions:
- While in normal time display mode, press the SET/ENTER button to enter clock setting mode.
- Use the number pad to enter the date in MM/DD/YYYY format. Once you’ve finished entering the date, press SET/ENTER again.
- Use the number pad to enter the time in HH:MM format, and use the AM/PM button to switch between AM and PM if you’re using the 12-hour time format. Press the SET/ENTER button again to save and exit.
- To exit the clock setting mode without saving, press the CLOCK button at any time.
REMOTE CONTROL FUNCTIONS

- CLOCK buttona. While setting an alarm, press this button to exit and return to the time display without saving your settings.b. While auto-scrolling is on, press this button to display the time.c. While auto-scrolling is off, press this button to display the time.
- STOPWATCH buttona. While in normal time mode or countdown mode, press this button to initiate the Stopwatch function, which will either start from 00:00:00 or from the value at which you paused it most recently. Once you enter Stopwatch mode, use the START/STOP button in the center to start or pause the counter. Press the STOPWATCH button while the counter is paused to reset the stopwatch back to 00:00:00. b. The Stopwatch function can run in the background as well; simply press the CLOCK button while the stop watch is running to return to the time display mode. You will be able to see the current time, and the stopwatch will continue to run in the background. Press STOP WATCH again to return to the stopwatch display and start/stop the time.
- COUNTDOWN buttona. While in normal time mode or stopwatch mode, press this button to enter countdown mode. The clock will display the current countdown, the value set last time, or the default value. Use the START/STOP button to start or pause the countdown. While the countdown is paused, you can press COUNTDOWN to reset the value.b. Press the SET/ENTER button to adjust the value for the countdown using the number pad on the remote. The maximum countdown value is 99:59:59. (If you want to change the countdown while a countdown is in progress, press the START/ STOP button FIRST to pause the timer.) After setting the value, press the SET/ENTER button. If a timer was in progress, and you did not pause it, you will see the previous timer still counting down. Press the COUNTDOWN button again to replace the old value with the new value, and then press START/STOP to start the countdown. The Countdown function can run in the background as well; simply press the CLOCK button while the countdown is running to return to the time display mode. You will be able to see the current time, and the countdown will continue to run in the background. Press COUNTDOWN again to return to the stopwatch display and start/stop the time.c. When the countdown completes, the time bar will emit three (3) beeps to let you know the clock has run out.
- ALARM buttona. While in normal time mode, countdown, or stopwatch mode, press this button to enter alarm setting mode. This mode has several options to cycle through.i. First, use the number pad to cycle through the available alarm slots, and the clock will display “1 ON” or “1 –” to indicate whether you have that specific alarm enabled or not. (“ON” means the alarm is on, and “–” means the alarm is off.), then press the ALARM button again to proceed to the next option. You can have up to eight (8) alarms activated at one time.ii. Next, use START/STOP to toggle the alarm sound on or off. Press ALARM again to move to the next option.iii. Third, use the number pad to set the alarm time. If you’re using 12-hour time, you can also press the AM/PM button to choose whether the alarm is for the AM or PM.iv. When you finish setting the alarm, press SET/ENTER to save your alarm and exit, or press CLOCK to exit without saving and return to normal mode.v. When the alarm sounds, you can use the MUTE button to turn it off.
- START/STOP buttona. Press this button to toggle the automatic scrolling display on or off while in normal time mode.
- DISPLAY buttona. Press this button when the automatic scrolling display is off to cycle through the time, date, and temperature.
- MUTE buttona. Press this button to toggle alert sounds on or off. If you press it once and hear a beep, you have turned alert sounds on. If you press it and hear nothing, you have disabled the sounds.b. Alarms will still sound even if the alert sounds are muted. You will need to press MUTE again when the alarm goes off to disable it.
- BRIGHTNESS buttona. Press this button to cycle through the six (6) levels of brightness.
- AM/PM buttona. In normal time mode, press this button to switch between 12h and 24h time display formats.b. In alarm setting or time setting modes, use this button to switch between AM and PM settings.
- F/C buttona. Press this button to toggle the temperature display between Celsius and Fahrenheit temperature readings.
MOUNTING THE TIME BAR
Your Ivation® time bar can be mounted to the wall by fitting a nail or hook into the openings on the rear of the unit. Make sure that the unit is securely mounted to a wall that can support its weight. Improper mounting can lead to the unit falling and causing injury and/or property damage.
- Make sure that no power, gas, or water pipes are damaged in the process of mounting the clock on the wall.
- Use screws and dowels suitable for the wall’s material without damaging it.
- Do not position the time bar directly next to any sources of interference like computers, mobile devices, etc. Always keep at least 20″ (50 cm) of clearance between the time bar and other sources of interference.
- Use the wall-mounting holes on the rear of the unit as a drilling model. Drill a corresponding hole in the wall and insert a dowel/anchor if necessary. The screw will need to protrude at least 4 mm from the wall surface. To hang the unit, simply align the opening with the screw and slide it down.
CARE AND MAINTENANCE
Clean the outer surfaces of this time bar with a soft, slightly damp cloth or a dry brush. Do not use harsh cleaning agents or chemical solutions, as these can damage the unit or impair its functions. Make sure that when you dispose of this unit, you dispose of it in accordance with local regulations. Please note that electromagnetic discharge or interference can affect this clock’s performance. The clock display may show irregular characters or fail to function when this occurs. Simply unplug the unit, let it rest for at least 10 minutes, and then reconnect it.
SPECIFICATIONS
Dimensions: 8″ H x 1.75″ D x 24″ L (20.3 x 4.45 x 61 cm)(JID0124TBLU, JID0124TRED)8.75″ H x 1.75″ D x 36″ L (22.2 x 4.45 x 91 cm) (JID0136BLU, JID0136RED)
Digit Height: 3.25″ (JID0124TBLU, JID0124TRED)5.25″ (JID0136BLU, JID0136RED)
Weight: 3.09 lbs. (1.4 kg) (JID0124TBLU, JID0124TRED)4.96 lbs. (2.25 kg) (JID0136BLU, JID0136RED)
Rated Power Input: 12 V Brightness
Levels: 6
WARRANTY INFORMATION
WARRANTY INFORMATION LIMITED WARRANTY ON IVATION® LED DIGITAL TIME BARTHIS LIMITED WARRANTY GIVES YOU SPECIFIC LEGAL RIGHTS AND YOU MAY ALSO HAVE OTHER RIGHTS, WHICH VARY FROM STATE TO STATE.WE WARRANT THAT DURING THE WARRANTY PERIOD, THE PRODUCT WILL BE FREE FROM DEFECTS IN MATERIALS AND WORKMANSHIP.
LIMITATION OF LIABILITYTO THE EXTENT NOT PROHIBITED BY LAW, THIS WARRANTY IS EXCLUSIVE AND IN LIEU OF ALL OTHER WARRANTIES, ORAL, WRITTEN, STATUTORY, EXPRESS OR IMPLIED. EXCEPT FOR THE EXPRESS WARRANTIES CONTAINED IN THIS LIMITED WARRANTY STATEMENT AND TO THE EXTENT NOT PROHIBITED BY LAW, WE DISCLAIM ALL OTHER WARRANTIES, EXPRESSED OR IMPLIED, STATUTORY OR OTHERWISE, INCLUDING WITHOUT LIMITATION, THE WARRANTIES OF MERCHANTABILITY AND FITNESS FOR A PARTICULAR PURPOSE. SOME STATES DO NOT ALLOW DISCLAIMERS OF IMPLIED WARRANTIES, SO THIS DISCLAIMER MAY NOT APPLY TO YOU. TO THE EXTENT SUCH WARRANTIES CANNOT BE DISCLAIMED UNDER THE LAWS OF YOUR JURISDICTION, WE LIMIT THE DURATION AND REMEDIES OF SUCH WARRANTIES TO THE DURATION OF THIS EXPRESS LIMITED WARRANTY.OUR RESPONSIBILITY FOR DEFECTIVE GOODS IS LIMITED TO REPAIR, REPLACEMENT OR REFUND AS DESCRIBED BELOW IN THIS WARRANTY STATEMENT.
WHO MAY USE THIS WARRANTY? C&A Marketing, Inc. located at 114 Tived Lane East, Edison, NJ (“we”) extend this limited warranty only to the consumer who originally purchased the product (“you”). It does not extend to any subsequent owner or other transferee of the product.WHAT DOES THIS WARRANTY COVER? This limited warranty covers defects in materials and workmanship of the Ivation LED digital time bar (the “product”) for the Warranty Period as defined below.
WHAT DOES THIS WARRANTY NOT COVER? This limited warranty does not cover any damage due to: (a) transportation; (b) storage; (c) improper use; (d) failure to follow the product instructions or to perform any preventive maintenance; (e) modifications; (f) unauthorized repair; (g) normal wear and tear; or (h) external causes such as accidents, abuse, or other actions or events beyond our reasonable control.
WHAT IS THE PERIOD OF COVERAGE? This limited warranty starts on the date of your purchase and lasts for one year (the “Warranty Period”). The Warranty Period is not extended if we repair or replace the product. We may change the availability of this limited warranty at our discretion, but any changes will not be retroactive.
WHAT ARE YOUR REMEDIES UNDER THIS WARRANTY? With respect to any defective product during the Warranty Period, we will, at our sole discretion, either: (a) repair or replace such product (or the defective part) free of charge or (b) refund the purchase price of such product if an exchange unit cannot be provided.
HOW DO YOU OBTAIN WARRANTY SERVICE? To obtain warranty service, you must contact us at 1-866-849-3049 or by email at [email protected] during the Warranty Period to obtain a Defective Merchandise Authorization (“DMA”) number. No warranty service will be provided without a DMA number and return shipping costs to our facilities shall be assumed by you, the purchaser. Shipping costs of the replacement unit to you shall be assumed by us.
GET IN TOUCH!
![]() [email protected]
[email protected]![]() 1-866-849-3049
1-866-849-3049
IVATION is a trademark of C&A IP Holdings, LLC in the US, Canada, China and the EU.
All other products, brand names, company names, and logos are trademarks of their respective owners, used merely to identify their respective products, and are not meant to connote any sponsorship, endorsement or approval.
Distributed by C&A Marketing, Inc., 114 Tived Lane East, Edison, NJ 08837. Made in China.
© 2020. C&A IP Holdings, LLC. All Rights Reserved.
DOWNLOAD RESOURCES
- [pdf] User Guide LED Digital Time Bar, JID0124TBLU, JID0124TRED, JID0136TBLU, JID0136TRED
- Read more:
FAQ’S
The Ivation® LED Digital Time Bar is a unique product that can be used as a time bar, countdown timer, or stopwatch. Unlike other time bars, it has a digital readout. It has a countdown timer (count up) mode and a stopwatch (count down) mode. It also has a clock display function.
The Ivation® LED Digital Time Bar can be set by using the buttons on the front of the unit. Please refer to the instructions included in this User Guide for more information on setting the unit.
To reset the Ivation® LED Digital Time Bar, press and hold both of the “SET” buttons for 3 seconds until you hear two beeps. This will reset the unit to zero.
To use the Ivation® LED Digital Time Bar as a stopwatch, press and hold both of the “SET” buttons for 3 seconds until you hear two beeps. This will activate stopwatch mode. Pressing any button on the front of the unit will start or stop timing. The current time will be displayed on screen in hours, minutes, and seconds format (HH:MM:SS). When you have finished timing, press and hold both of the “SET” buttons for 3 seconds until you hear two beeps. This will return you to normal clock mode with current time displayed on screen in hours, minutes, and seconds format (HH:MM:SS). If you want to exit out of stopwatch mode without resetting to normal clock mode, simply press any button on front of unit except for “SET” buttons. This will return you to normal clock mode with current time displayed on screen in hours, minutes, and seconds format (HH:MM:SS).
Time to arm or disarm the alarm press the minus. Button when the alarm is armed an al icon will appear on the front display. At the designated. Time the alarm will. Sound.
Digital clocks operate using electronic power, either from a battery or from the AC power that a wall outlet supplies. Because they are portable, digital wristwatches use a battery, while a digital wall clock would generally use an outlet. A digital alarm clock can be powered with either type of source.
The most effective way to wind your clock would be to open the front door, insert the crank, hold the clock steady with your left hand, and turn the crank with your right hand. After winding the clock, set the correct time by moving the minute hand either clockwise or counterclockwise.
If the clock does not run, make sure that the power is on at the outlet and test the electrical cord. If the clock still does not run or keeps time poorly, disassemble the clock (see below) and remove any dirt or lint obstructing the motor or gears. Also, use a multimeter to test the field coil inside the clock.
You can go down to the bottom and there is a switch so tap on read time allowed switch to turn on or off.
Disadvantages. The biggest disadvantage of a digital alarm clock is that it can be difficult to read in the dark. Another potential problem with digital clocks is that they are more expensive than analog ones and don’t last as long before needing replacement batteries.
Press this button to cycle through the six (6) levels of brightness.
VIDEO
[xyz-ips snippet=”download-snippet”]