IVES Full Surface Continuous Hinges Installation Guide

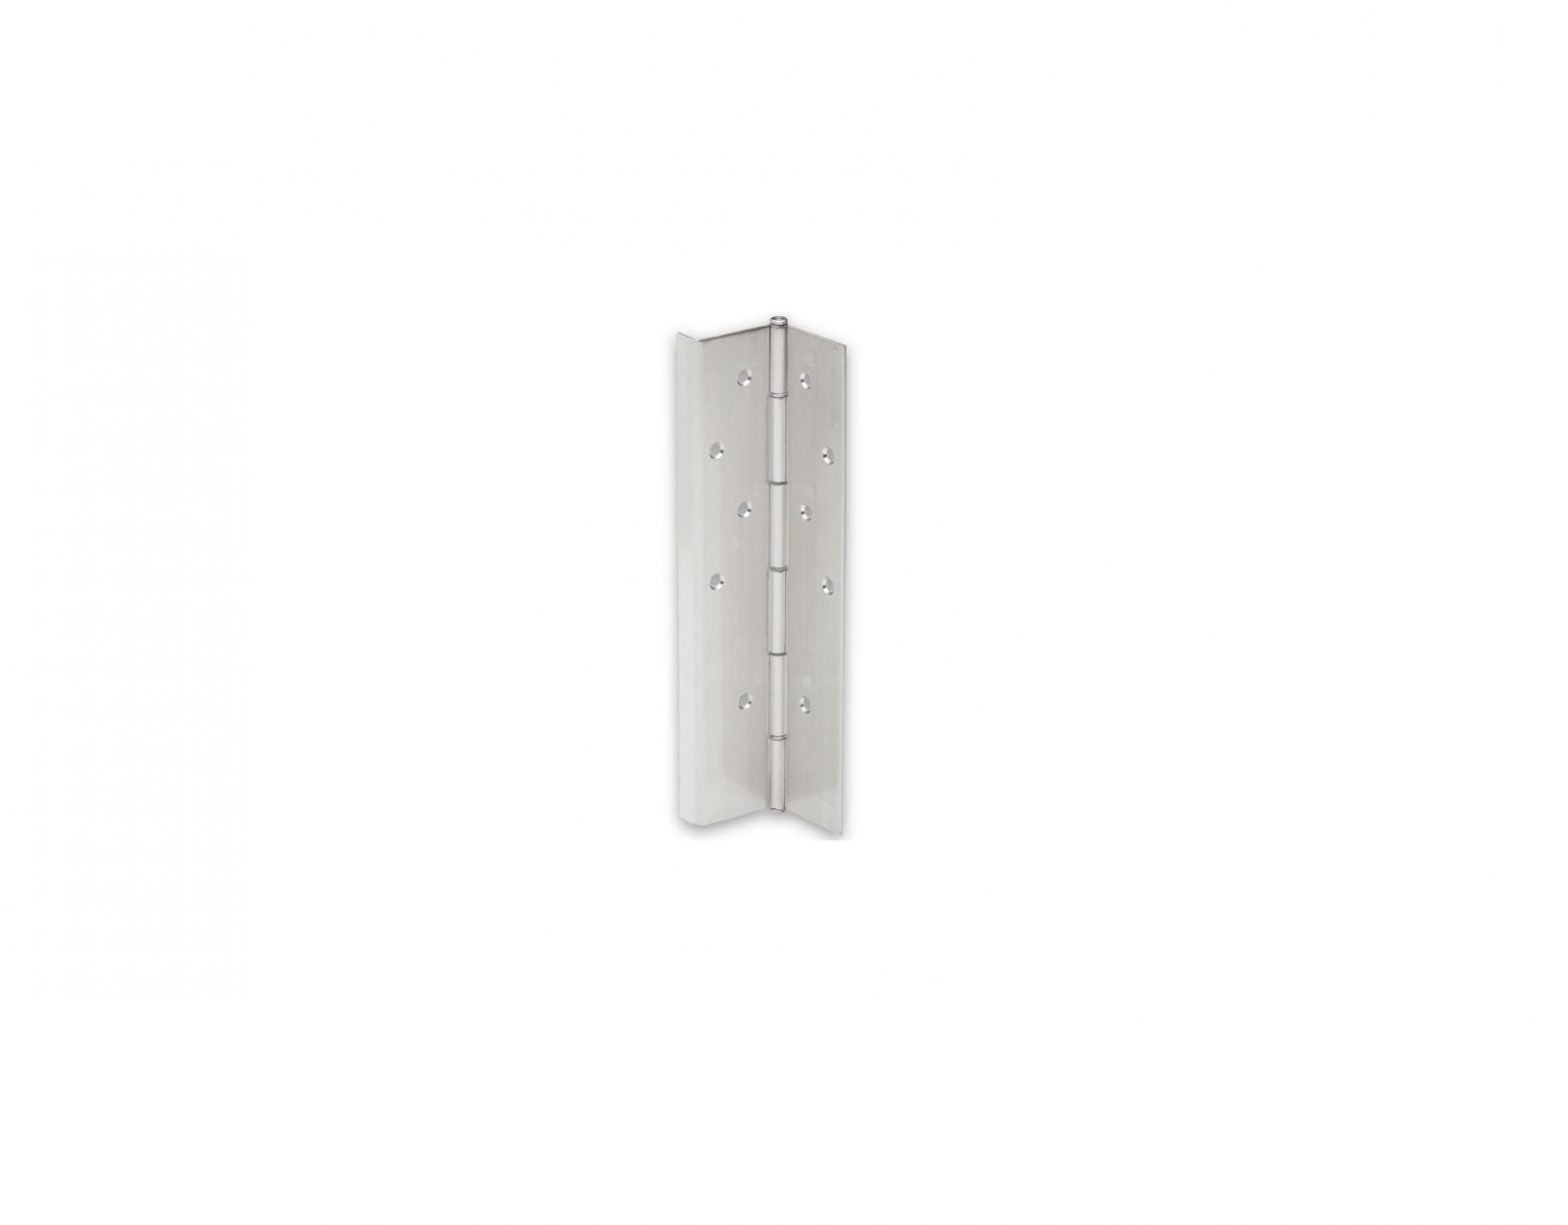
The 157XY and 210XY are high-quality, easy-to-install continuous hinges that allow all clearances to be adjusted after the door is secured to the frame. The hinges are available in lengths of 83″, 85″, 95″ and 119″. Before installing new hinge, check frame condition and make any necessary repairs at this time. If top of frame is not perfectly level, new hinge will allow for vertical adjustment so door will clear the lower of the top two corners of the frame.
![]() Please follow the installation instructions carefully. Not doing so may result in improper installation and void the manufacturer’s guarantee. Anodizing or painting the product in the field will void the guarantee.
Please follow the installation instructions carefully. Not doing so may result in improper installation and void the manufacturer’s guarantee. Anodizing or painting the product in the field will void the guarantee.
Installation Notes
Reinforcing and Rivet Nuts:No frame reinforcement is required for doors up to 200 lbs. For doors between 200 and 450 lbs., a 16 gauge channel in the frame is required. For doors greater than 450 lbs. (600 lb.. max.), rivet nuts are required in the frame in addition to the frame reinforcement.
Doors:For doors up to 200 lbs., no door reinforcement is required. For doors greater than 200 lbs. (up to 600 lbs.), a 16 gauge channel in the door is required. This is applicable for both TEK screw and through bolt installations.
Pair of Doors with Mullions:If the mullion is between the doors, treat as a single door installation. If the mullion is behind the doors, treat as a double door installation.
1 Determine hinge length.
- 1a Hinge must not be taller than door height, and can be up to 1″ shorter.
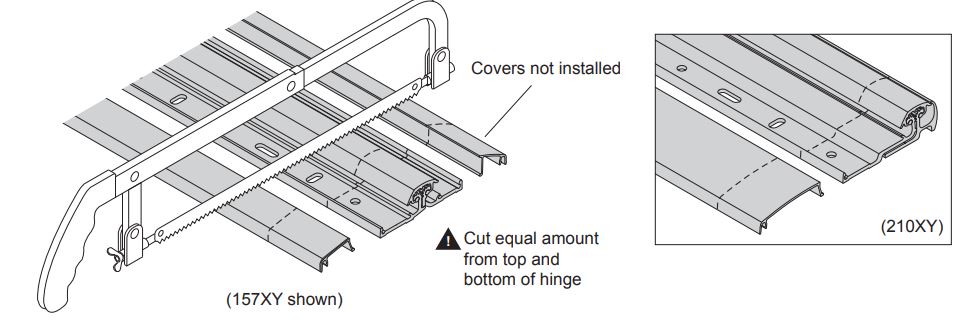
- 1b If cutting is required, mark covers and both ends of hinge with a line.
![]() Hinge should be cut equally from both ends to keep the bearings in the middle.
Hinge should be cut equally from both ends to keep the bearings in the middle.
2 Cut hinge (if necessary).
- 2a Fold hinge so channel is up.
- 2b From each end, cut along line through entire hinge.
- 2c Cut covers to same length as hinge.
- 2d Deburr all cut edges with file.
3 Remove old hinge hardware and detach closer arms.
![]() There is no need to take door completely out of frame. Lean door against frame stops, making sure it cannot fall if left unattended.
There is no need to take door completely out of frame. Lean door against frame stops, making sure it cannot fall if left unattended.
![]()
Customer Service1-877-671-7011
© Allegion 2021 24477424 Rev. 05/21-e
4 Position door.
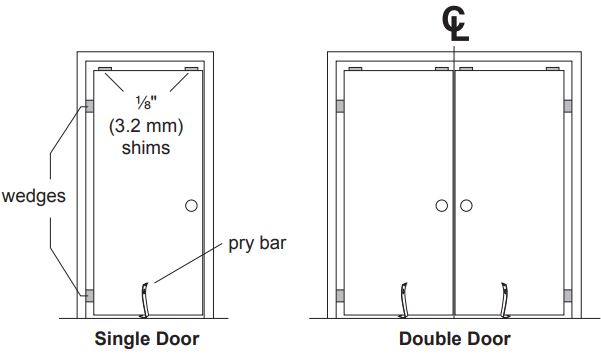
- 4a Tape ” shims to top edge of door at each corner for spacers.
- 4b Position door against stops and leave it resting on threshold, with a thin pry bar placed underneath. Shift door so lock side edge is wedged snugly against frame, top to bottom.
![]() If necessary, use shims between the door and hinge side of frame to keep door wedged safely in position.For double doors, mark exact middle of frame header, and push the two doors together at their meeting edges with the top corners directly under the mark. Wedge hinge sides as above.
If necessary, use shims between the door and hinge side of frame to keep door wedged safely in position.For double doors, mark exact middle of frame header, and push the two doors together at their meeting edges with the top corners directly under the mark. Wedge hinge sides as above.
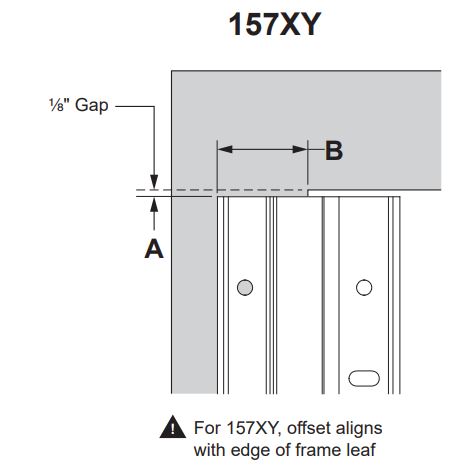
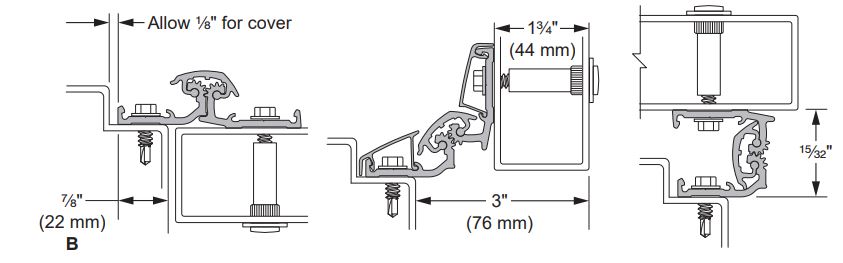
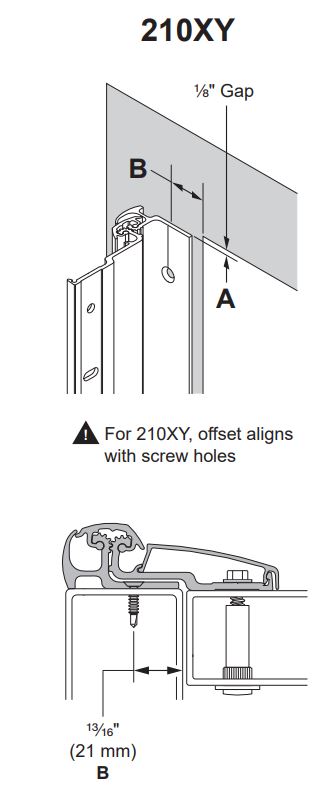
5 Mark hinge height and offset.
- 5a Refer to drawings below to mark hinge height (A) and offset (B) on face of frame. Through bolt application shown.
For Maximum Net Opening

OR
For Minimum Frame Width
210XY
![]() Model 210XY requires re-templating of existing overhead closers to match the pivot point of the hinge.
Model 210XY requires re-templating of existing overhead closers to match the pivot point of the hinge.
If the existing closer is not re-templated, the door will open to 70 degrees in a 90 degree opening.
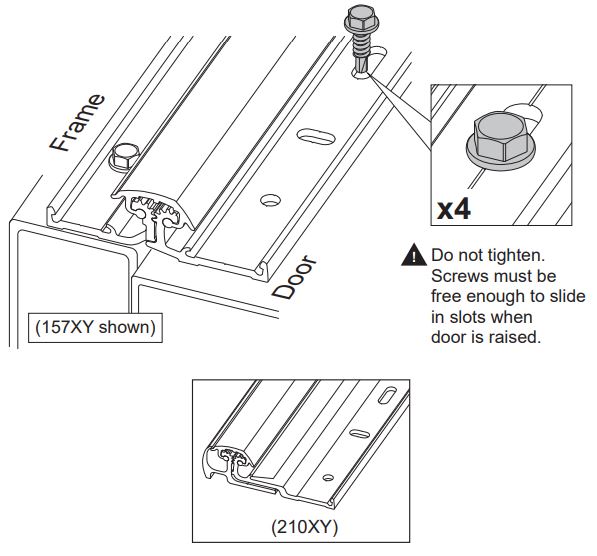
6 Mount hinge to frame.
- 6a Open hinge and place frame leaf flat against face of frame.
 For 157XY, the narrower leaf is the frame leaf.
 - 6b Align hinge to height and offset marked in previous step. Top of hinge should be ” below underside of frame header.
- 6c Mark frame through center of topmost hole using the transfer punch provided. Drill pilot hole, then hang hinge from the frame leaf.
![]() For 157XY, use one of the hex head screws and a /16″ (8 mm) hex socket driver. For 210XY, use a flat head screw.
For 157XY, use one of the hex head screws and a /16″ (8 mm) hex socket driver. For 210XY, use a flat head screw.

- 6d Plumb the hinge with a level and mark the hinge position at the bottom of the frame.
- 6e Use a transfer punch as before to set another screw near the bottom of the frame leaf.
- 6f Install the remaining screws in the frame leaf. Repeat sequence for double doors. Tighten all screws before proceeding.
![]() If door is located so close to an inside corner that it can only be opened 90°, refer to Step 8 and install the frame leaf cover at this time. Confirm you are satisfied with the frame leaf attachment before installing this cover. Covers are non-removable.
If door is located so close to an inside corner that it can only be opened 90°, refer to Step 8 and install the frame leaf cover at this time. Confirm you are satisfied with the frame leaf attachment before installing this cover. Covers are non-removable.
7 Mount door to hinge.

- 7a Fold door leaf of hinge against door. Install a hex screw at 7c Install screws into lock side end of each horizontal slot.
- 7b Use pry bar to raise door until tight against shims between the top of door and frame header.
![]()
- 7c Install screws into lock side end of each horizontal slot. Repeat for double doors.
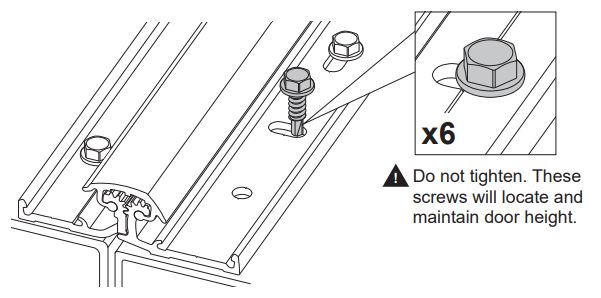
- 7d Remove shims from top of door(s) and remove screws from vertical slots.
![]()
- 7e Adjust lateral clearances of door by prying door from lock side of frame. For double doors, make sure they remain centered.
![]()
- 7f Install screws into two or three round holes at both top and bottom of hinge. Open and close door slowly, checking all edges for clearance. Repeat for double doors.
![]() For through bolt applications only, skip ahead to steps 7h – 7k.
For through bolt applications only, skip ahead to steps 7h – 7k.
If lock side clearance is satisfactory, insert remaining screws into round holes.
- 7g Tighten all screws on door leaf. Reconnect the closer and any other hardware.
For through bolt applications only
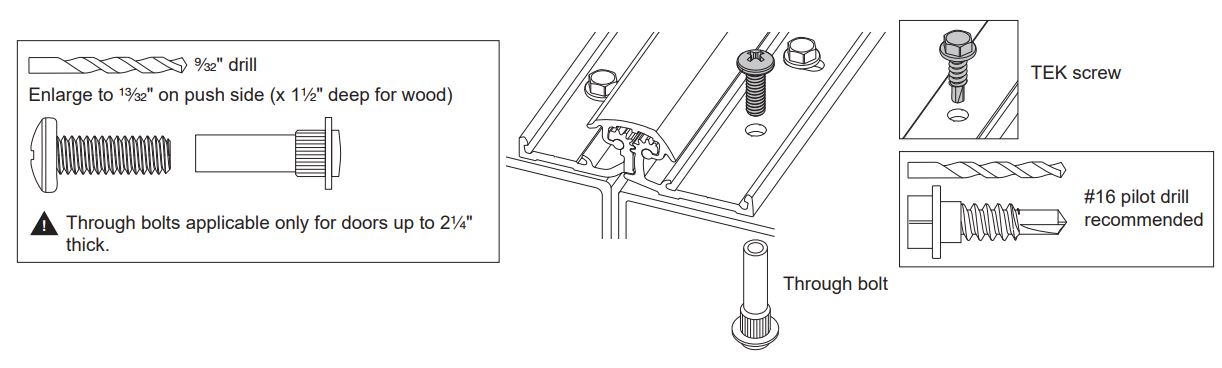
- 7h When door is aligned, mark all locations for through bolts in round holes on hinge. Eight through bolts are provided and it is recommended to install at least one on each end of hinge if choosing to use through bolt installation option.
- 7i With the hinge still mounted to the frame, remove the door from the opening and drill the through bolt holes all the way through the door with 9/32″ drill bit.
![]() For the remaining round holes, TEK screws will be used. A #16 bit is recommended to drill pilot holes.
For the remaining round holes, TEK screws will be used. A #16 bit is recommended to drill pilot holes.![]() DO NOT DRILL TEK SCREW HOLES THROUGH THE DOOR.
DO NOT DRILL TEK SCREW HOLES THROUGH THE DOOR.
- 7j On the push side of door only, enlarge the through bolt holes using a 13/32″ bit. For wood or composite doors, only drill the through bolt holes 1-1/2″ deep.
- 7k Secure door to hinge with 1/4″-20 screws and through bolts. Install TEK screws in pilot holes and tighten evenly.
- 7l Reconnect the closer and any other hardware.
Security Covers
Follow these instructions carefully to avoid denting the cover edges or surfaces.
![]() These covers are vandal resistant and non-removable, and should not be installed until the door is operating properly.
These covers are vandal resistant and non-removable, and should not be installed until the door is operating properly.
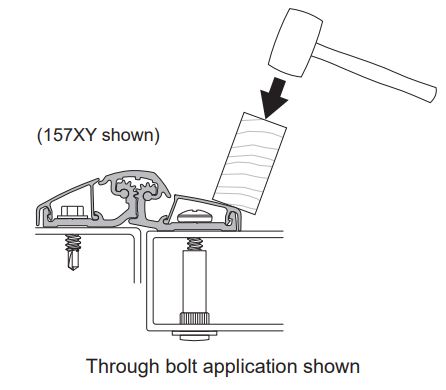
8 Install frame leaf cover.
![]() 157XY only
157XY only
- 8a Open the hinge.
- 8b Position inner lip under the curved hook near hinge joint of frame leaf, making sure it is in place from top to bottom.
- 8c Align cover with top of hinge and use cushioning wood block to snap it into place from top to bottom. For narrow frames, use a piece of dowel rod as a cushion.

9 Install door leaf cover.
- 9a Close the door.
- 9b As above, position lip under the curved hook near hinge joint of door leaf, making sure it is in place from top to bottom.
- 9c Install from top to bottom, using a light hammer tap against a wood block.
References
[xyz-ips snippet=”download-snippet”]