
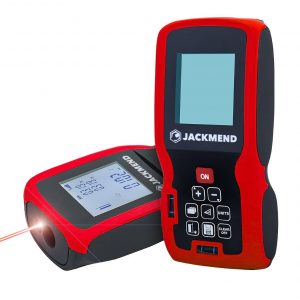
Jackmend LASER DISTANCE METER
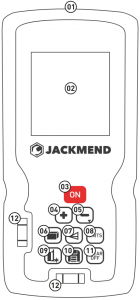
Product View
- Laser
- Display
- On / measure
- “+” / up
- “-“/down
- Area / volume measurement
- Indirect height/ double
- Indirect height/ indirect
- Length measurement
- Length unit
- Reference level/ backlight
- Last measurements
- Clear/ off
- Levels

SAFETY NOTES
All instructions must be read and observed in order to work safely with the measuring tool. The integrated protections in the measuring tool may be compromised if the measuring tool is not used in accordance with the instructions provided. Never make warning signs on the measuring tool unrecognizable.
Store these instructions in a safe place and include them with the measuring tool when giving it to a third party.
- Caution – the use of other operating or adjusting Equipment or the application of other processing Methods than those mentioned here can lead to Dangerous radiation exposure. 00 not direct the laser Beam at persons or animals and do not stare into the direct or reflected laser beam yourself, not even from a distance. You could blind somebody, cause accidents or damage your eyes.If laser radiation strikes your eye, you must deliberately close your eyes and immediately turn your Head away from the beam.
- Do not make any modifications to the laser equipment.
- Do not use the laser viewing glasses as safety Goggles. The laser viewing glasses are used for improved Visualization of the laser beam, but they do not protect Against laser radiation.
- Do not use the laser viewing glasses as sun glasses or In traffic. The laser viewing glasses do not afford Complete UVprotection and reduce colour perception.
- Have the measuring tool repaired only throughQualified specialists using original spare parts. This Ensures that the safety of the measuring tool is maintained.
- Do not allow children to use the laser measuring tool without supervision. They could unintentionally blind other persons or themselves.
- Do not operate the measuring tool in explosive Environments, such as in the presence of flammable Liquids, gases or ousts. Sparks can be created in the Measuring tool which may ignite the dust or fumes. Protect the measuring tool against heat, e.g., against Continuous intense sunlight, fire, water, and moisture. Danger of explosion.
- In case of damage and improper use of the battery, Vapours may be emitted. Ventilate the area and seek Medical help in case of complaints. The vapours can irritate the respiratory system.
INTENDED USE
The measuring tool is intended for measuring distances, Lengths, heights, clearances, grades and for the Calculation of areas and volumes. The measuring tool is Suitable for measuring indoors and outdoors.
TECHNICAL DATA
Measurement range, m …………………. 0,05-60Measurement accuracy, mm …………. + 1,5Laser classification ………………………… Klasse IILaser wavelength, nm ……………………..635Laser power, mw …………………………….. < 1
OPERATION
INITIAL OPERATION
Protect the measuring tool against moisture and direct sun light.Do not subject the measuring tool to extreme temperatures or variations in temperature. As an example, do not leave it in vehicles for a long time. In case of large variations in temperature, allow the measuring tool to adjust to the ambient temperature before putting it into operation. In case of extreme Temperatures or variations in temperature. As an example, do not leave it in vehicles for a long time. In case of large variations in temperature, allow the measuring tool to adjust to the ambient temperature before putting it into operation. In case of extreme temperatures or variations in temperature, the accuracy of the measuring tool can be impaired.Avoid heavy impact to or falling down of the measuring tool. After severe exterior effects to the measuring tool, it is recommended to carry out an accuracy check (see “Accuracy (heck of the distance measurement” Check down below) each time before continuing to work).
SWITCHING ON AND OFF
Do not leave the switched-on measuring tool unattended and switch the measuring tool off after use. Other Persons could be blinded by the laser beam.For switching on the measuring tool, the following possibilities are given:Press and hold the on / measure button “On” until you hear a signal tone: the measuring instrument is now switched on and is in Length measuring mode.►► The laser is activated immediately. press the on/ measure button “On” again: the measuring instrument will now take a measurement and then turn off the laser. The measuring instrument is in length measuring mode.Do not aim the laser beam at people or animals and do not look into the laser beam yourself, even from a great distance.Press the “Clear/ off” button for a few seconds to switch off the measuring instrument.
MEASURING PROCEDURE
The measuring instrument is always in the length measuring function after switching on by pressing the measuring button. Other measurement modes can be switched by pressing the appropriate function/ mode button.After switching on, the back of the measuring instrument is set as the reference level for the measurement. By pressing the reference level button (bottom left), the reference level can be changed.Place the measurement instrument with the selected reference flat against the desired starting point of the measurement (for example, a wall). Briefly press the measure button to turn on the laser. Point the laser beam at the target surface. Briefly press the measurement button again to start the measurement if the laser beam is switched on permanently, the measurement is already taken after the first actuation of the measurement button. In continuous measuring more, the measurement starts immediately upon switching on.The measured value usually appears after 0.5 seconds and at the latest after 4 seconds. The duration of the measurement depends on the distance, the lighting conditions and the reflection properties of the target surface.The end of the measurement is indicated by a signal tone. The laser beam is automatically turned off after the measurement is completed.If no measurement takes place after approx. 20 seconds, the measuring instrument switches off automatically to save the battery.
SELECTING THE REFERENCE LEVEL
You can choose from two reference levels for theMeasurement: The rear edge of the measuring tool, for when you place the measuring instrument against a wall, for example. The length of the measuring device is includedIn the measurement. The front edge of the measuring instrument (eg when measuring from a table edge). The measurement is taken from the front of the measuring instrument. To select the reference level, press the button at the bottom left until the desired reference level appears on the display. Each time, after turning on the gauge, the back of the gauge is preset as the reference level. Subsequent changes to the reference level for measurements that have already been carried out (eg when measured values are displayed in the measured value list) are not possible.
MEASURING FUNCTIONS
SIMPLE LENGTH MEASUREMENT
For length measurements, press the red “On” button when the gauge is off. When switched on, it is always set to length measurement.When the measuring instrument is in length measurement, only the bottom line is visible in the display. These are 4 dashes followed by the set length unit.Briefly press the measure button at a time to turn on the laser and measure.The measured value is displayed in the bottom result line. With several consecutive measurements, the previous measurements are moved up one place on the display. A maximum of 4 lines can be shown on theDisplay.To return from a surface, indirect or volume measurement, press the “(Clear/ off” key (repeatedly) until you only see the bottom line in the display.
AREA MEASUREMENT
For area measurements, press the button until the area measurement indicator appears on the display.Then measure the length and width one by one, in the same way as a length measurement. The laser beam remains on between both measurements.After completion of the second measurement, the area 15 automatically calculated and displayed in the bottom result line. The individual readings are displayed in the top 2 result lines.
VOLUME MEASUREMENT
For volume measurements, press the button until the volume measurement indicator appears on the display.Then measure the length, width and height one by one, in the same way as for a length measurement.The laser beam remains on between all three measurements. After completion of the third measurement, the volume 15 automatically calculated and displayed in the bottom result line. The individual readings are displayed in the top 3 result lines.Values above 999999 M3 cannot be declared; “Error” then shown on the display. Divide the volume to be measured into individual measurements; these values can then be calculated separately and then summarized.
CONTINUOUS MEASUREMENT (TRACKING) / MINIMUM/ MAXIMUM MEASUREMENT
For continuous measurements, the measurement tool can be moved relative to the target, updating the measurement value approximately every 0.5 seconds. In this way you can, for example, move a certain distance from a wall, while the actual distance can .Always be read.For continuous measurements, press and hold the red “On” button until the min-max indicator for continuous measurement appears on the display. To end the continuous measurement, press the measurement button again.
The minimum measurement is used to determine the shortest distance from a fixed reference point. It is used, for example, to determine plumb lines or horizontal partitions.
The maximum measurement is used to determine the greatest distance from a fixed reference point.It is used, for example, for determining diagonals.The current measured value is displayed in the result line c. T he maximum (“Max”) and the minimum (“Min”) measurement values are displayed in the top result lines. The values are always overwritten when the new length measurement value is less than the current minimum or greater than the current maximum value.The previous minimum and maximum values can be cleared by pressing the button to clear the internal memory “Clear/ off”.Continuous measurement is ended by pressing the measurement button.The last measured value is displayed in the bottom result line.Continuous measurement is automatically turned off after 5 minutes. The last measured value remains indicated in the bottom result line.
INDIRECT DISTANCE MEASUREMENT
The indirect distance measurement is used to measure distances that cannot be measured directly because an obstacle is obstructing the laser beam or when no target surface is available as a reflector. This measurement procedure can only be used in the vertical direction. Any deviation in the horizontal direction leads to measurement errors.The laser beam remains on between individual measurements. Three measurement modes are available for indirect length measurements. Each measurement mode can be used to determine different distances.
INDIRECT HEIGHT MEASUREMENT
Press the function mode button until the indirect height measurement indication appears on the display.Make sure that the measuring instrument is positioned at the same height as the lowest measuring point.Now tilt the measuring instrument up and measure distance “1”, the sloping side as shown on the display.Then measure the length distance “2” as shown on the display.When the measurement is completed, the result for the searched distance “X” is displayed in the bottom result line.The measurement values for distance “1” and distance “2” are displayed in the top result lines
DOUBLE INDIRECT HEIGHT MEASUREMENT
Press the function mode button until the double indirect height measurement indication appears on the display.Measure distances “1”, “2” and “3” in this order as shown on the display.When the measurement is completed, the result for the searched distance “X” is displayed in the bottom result line. The measured values for the distances “1”, “2” and “3” is displayed in the top result lines.Make sure that the measurement reference plane (e.g. The back of the measurement instrument) remains in exactly the same location for all individual measurements within a measurement series.
INDIRECT LENGTH MEASUREMENT
Press the function mode button until the indirect length measurement indication appears on the display.Make sure that the measuring instrument is positioned at the same height as the searched measuring point.Now tilt the measuring instrument around the reference plane and measure distances “1”, “2” and “3” as shown on the display. When the measurement is completed, the result for the searched distance “X” is displayed in the bottom result line. The measurement values for the distance “1”, “2” and “3” are displayed in the top result lines
LIST OF THE LAST MEASURING VALUES
The measuring instrument stores the last 20 readings and their calculations, and displays them in reverse order (last measured value first).Press the (save) button to recall the saved measurements. The result of the last measurement is shown on the display, along with the reference indicator used and the memory location of the displayed measurements.Use the”+” and”- ” buttons to navigate through the saved measurement results. To exit the list of measured values, press the “(Clear/ off” button.
ADDING MEASURED VALUES
To add measurements, measure the first distance, then press the”+” button; for confirmation, “+” appears on the display and measure the next distance. After this, the 2 distances are added together.
SUBTRACTING MEASURED VALUES
To subtract readings, measure the first distance, then press the “- ” key; for confirmation,”- ” appears on the display and measure the next distance. After this, the 2 distances are subtracted from each other.
WORKING ADVICE
GENERAL INFORMATION
The reception lens and the laser beam outlet must not be covered when taking a measurement.The measuring tool must not be moved while taking a measurement (with the exception of the continuous measurement).Therefore, place the measuring tool, as far as this is possible, against or on a firm stop or supporting surface.
INFLUENCE EFFECTS ON THE MEASURING RANGE
The measuring range depends upon the light conditions and the reflection properties of the target surface.For improved visibility of the laser beam when working outdoors and when the sunlight is intense, use the laser viewing glasses and the laser target plate, or shade off the target surface.
INFLUENCE EFFECTS ON THE MEASURING RESULT
Due to physical effects, faulty measurements cannot be excluded when measuring on different surfaces.Included here are:
- Transparent surfaces (e.g., glass, water),
- Reflecting surfaces (e.g., polished metal, glass),
- Porous surfaces (e.g. Insulation materials),
- Structured surfaces (e.g., roughcast, natural stone).
If required, use the laser target plate on these surfaces. Furthermore, faulty measurements are also possible when sighting inclined target surfaces. Also, air layers with varying temperatures or indirectly received reflections can affect the measured value.
ACCURACY CHECK OF THE DISTANCE MEASUREMENT
The accuracy of the distance measurement can be checked as follows:Select a permanently unchangeable measuring section with a length of approx. 1 to 10 meters; its length must be precisely known (e.g. The width of a room or a door opening). The measuring distance must be indoors; the target surface for the measurement must be smooth and reflect well. Measure the distance 10 times after another. The deviation of the individual measurements from the mean value must not exceed ±2 mm (max.).Log the measurements. So that you can compare their accuracy at a later point of time.
MAINTENANCE AND SERVICE
MAINTENANCE AND CLEANING
Store and transport the measuring tool only in the supplied protective pouch.Keep the measuring tool clean at all times. Do not immerse the measuring tool in water or other fluids.Wipe off debris using a moist and soft cloth. Do not use any cleaning agents or solvents. Maintain the reception lens in particular. With the same care as required for eye glasses or the lens of a camera. In case of repairs, send in the measuring tool packed in its protective pouch.
DISPOSAL
Measuring tools, accessories and packaging should be sorted for environmental- friendly recycling.Do not dispose of measuring tools and batteries/rechargeable batteries into household waste!
ONLY FOR EC COUNTRIES:
According to the European guideline 2012/19/EU, measuring tools that are no longer usable, and according to the European guideline 2006/66/EC, defective or used battery packs/ batteries, must be collected separately and disposed of in an environmentally correct manner.
BATTERY PACKS/ BATTERIES:
Do not dispose of battery packs/batteries into household waste, fire or water. Battery packs/batteries should, if possible, be discharged, collected, recycled or disposed of in an environmental-friendly manner.

References
[xyz-ips snippet=”download-snippet”]