![]() Sunrise Alarm ClockUser Manual[email protected]
Sunrise Alarm ClockUser Manual[email protected]

WARNING
To reduce the risk of Fire, Electric Shock, or Injury to Persons:
- This appliance is only intended for household use, including similar use in hotels.
- Place this appliance on a stable, level, and non-slippery surface.
- Do not use this appliance in wet surroundings (e.g. in the bathroom or near a shower or swimming pool).
- Make sure the adapter does not get wet.
- Do not let the water run into the appliance or spill water onto the appliance.
- Only use the original adapter. Do not use the other adapter if they are damaged.
- This appliance has no on/off switched to disconnect the appliance from the power source, remove the plug from the wall outlet.
- Do not use this appliance as a means to reduce your hours of sleep. The purpose of this appliance is to help you wake up more easily. It does not diminish your need for sleep.
- This appliance has a built-in backup button battery in the base to remember your settings of clock and alarm when the power goes off, but it does NOT support battery operation. AC power must be required for the clock and all functions to work. It supports AC 100-240V input.
STORAGE
- Clean the appliance with a soft cloth.
- Do not use abrasive cleaning agents, pads, or cleaning solvents like alcohol, acetone, etc., as this might damage the surface of the appliance.
- If the appliance will not be used for an extended period of time, remove the power cord from the wall outlet and store the appliance in safe, dry surroundings where it will not be crushed, banged, or subject to damage.
OVERVIEW

OPERATION GUIDE
First use – Setting the clock time:You have to set the clock time when you plug in the appliance for the first time.
- Hold the setting button (in the lower right corner) for 2 seconds to enter the time setting mode.
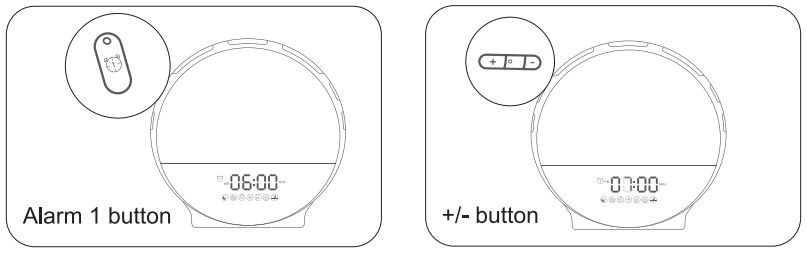
- Click the +/- button (in the upper left corner) to select “Hour”. For example, “6”. Click the setting button to confirm it.
- Click the +/- button (in the upper left corner) to select “Minute”. For example, “15”. Click the setting button to confirm it.
- Click the +/- button (in the upper left corner) to select “12H or 24H”. For example, “24H”. Click the setting button to confirm it.

Please note: When the 12-H time format is selected, AM or PM icon will be displayed.
OPERATION GUIDE
Setting the alarms for the clock:
- Press the alarm 1 button to turn the alarm 1 on. Hope the alarm 1 button for 2 seconds to enter the alarm 1 setting
- Press the +1- button to adjust “Hour”. For example, “6”. Press the alarm 1 button to confirm it.
- Press the +1- button to adjust “Minute”. For example, “30”. Press the alarm 1 button to confirm it.
- Press the +1- button to adjust “Ringtone”. You can choose between 7 pre-set sounds or FM radio as a wake-up sound. Press the alarm 1 button to confirm it.
- Press the +1- button to adjust “Volume”. Press the alarm 1 button to confirm it.
- Press the +1- button to adjust “Brightness”. Press the alarm 1 button to confirm it.
- Press the +1- button to adjust “Sunrise Simulation Time”. You can set it to 10 minutes. Press the alarm 1 button to confirm it.
You have set up the alarm 1. The sunrise light will be on gradually from 10% brightness to 100% by 10 minutes from 6:20 AM. 10 minutes later, the alarm will go off at 6:30 AM. You can get an extra 9 minutes of sleep time after pressing the snooze button (snooze up to 5 times). You can turn the alarm off by pressing the alarm 1 button. (Take alarm 1 as an example, alarm 2 is the same.)
Please note: When the alarm clock goes off, if there aren’t any operations within 15 minutes, it will turn off the light and sound automatically.
OPERATION GUIDE
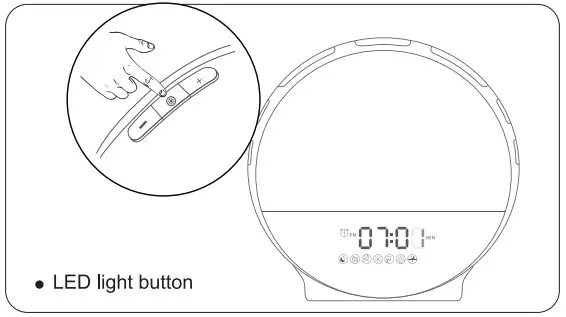
Setting the Colorful Light Mod
- Press the LED light button (in the upper left corner when you face the clock) to enter the manual color light mode.
- Press the +/- button to adjust the brightness of the light.
- Double click the LED light button to enter the auto color light mode, which means it will change the light color automatically. Please know that when the clock is in this mode, the light will maintain maximum brightness and you can’t adjust the brightness of the light.
- Press the +/- button to adjust different colors of lights manually, which means it will keep the color of the light until you press the +/- button again. There are 7 colors for you to choose from.
- Press the LED light button again to quit the colorful light mode.
OPERATION GUIDE
Setting the FM Radio for the Clock
- Hold the radio button down for 2 seconds, the clock will scan all the available stations automatically and save them as P-01/P-02/P-03 and so on (up to 10 channels). You don’t need to do anything until it finishes the process.
- After finishing, the clock radio will select the P-01 channel by
- Press the volume “+”/”-” button (near the radio button) to adjust the radio volume.
- Hold the volume “+”/”-” button for 2 seconds to select P-02/P-03 or another channel.
- Press the FM radio button again to quit the FM radio mode.


OPERATION GUIDE
Setting the Fall-asleep Mode for the Clock: (Simulated Sunset Mode)
- Press the fall-asleep button to enter the fall-asleep mode.
- Hold the fall-asleep button for 2 seconds to set the fall-asleep mode.
- Press the + / – button to adjust the Timer (up to 120 minutes). And then press the fall-asleep button to confirm it.
- Press the + / – button to adjust the Brightness. And then press the fall-asleep button to confirm it.
- Press the + / – button to adjust the sound. You can choose between 3 pre-set sounds or FM radio as a fall-asleep sound. And then press the fall-asleep button to confirm it.
- Press the + / – button to adjust the volume. And then press the fall-asleep button to confirm it.
- Now you are in fall-asleep mode. You can still press the + / – to adjust brightness and press the volume + / – button to adjust the volume at this point.
- Press the fall-asleep button again to quit the fall-asleep mode.
Please Note: After finish setting, the light will slowly turn on from the pre-set brightness level to dark, and the light will turn off at the end of the preset time.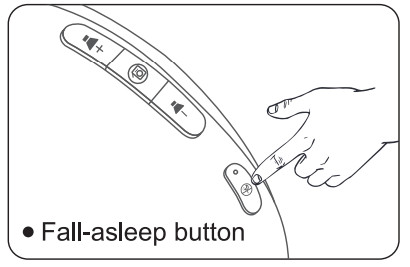
TROUBLESHOOTING
This part summarizes the most common problems you could encounter with the wake-up light. If you are unable to solve the problem with the information below, please feel free to contact [email protected] for further assistance.
Q 1: This appliance doesn’t work at all.
- Perhaps the adapter is not inserted properly in the wall outlet. Plug the adapter properly in the wall outlet. 2. Perhaps there is a power failure. Check if the power supply works by connecting another appliance.
Q 2: The radio produces a cracking sound.
- Perhaps the broadcast signal is weak, please fully unwind the antenna and move it around until you receive the best reception.
Q 3: Could I completely turn off the time display?
- Yes, you can adjust the brightness of the time display, or turn it off by clicking the setting button several times.
Q 4: Does this clock have a backup battery option in the event of a power outage?
- This clock has a built-in backup button battery in the base to remember your settings of clock and alarm when the power goes off, but it does NOT support battery operation. AC power must be required for the clock and all functions to work. It supports AC 100-240V input.Q 5: How can I turn the alarm sound off once it has gone off?
- You just need to press the corresponding alarm button. So if you set “Alarm 1” press the “Alarm 1” button on the side and it should shut off.
Q 6: Can I make it so that only the light comes on, not the alarm? ( Or can I set the alarm so there is only sound, no light?)
- You can set the volume to the lowest level when you set up an alarm. That means when the alarm goes off, the sound is almost invisible, and only the light is on.
- When setting an alarm, you can select the lowest light intensity, which means when the alarm clock goes off, there is almost no light.
For an EXTRA 365-DAY warranty, please contact [email protected] with your Amazon Order Number to register the product warranty.
![]() CUSTOMER SUPPORT[email protected]
CUSTOMER SUPPORT[email protected]
[xyz-ips snippet=”download-snippet”]