
JANAM GT2 Series Temperature Sensing Kiosk User Guide
Copyright 2020 Janam Technologies LLC. All rights reserved.
GT2 Series, Janam and the Janam logo are trademarks of Janam Technologies LLC. Other product and brand names may be trademarks or registered trademarks of their respective owners.
Janam Technologies LLC assumes no responsibility for any damage or loss resulting from the use of this guide. Janam Technologies LLC assumes no responsibility for any loss or claims by third parties which may arise throughthe use of this product. Janam Technologies LLC assumes no responsibility for any damage or loss caused by deletion of data as a result of malfunction, dead battery or repairs. To protect against data loss, be sure to make backup copies (on other media) of all important data.
Follow all usage, charging and maintenance guidelines in the Product User Guide. If you have questions, contact Janam. For a copy of the Product User Guide, visit www.janam.com.
Legal Disclaimer: This is not a medical device. The FDA has not evaluated any statements regarding this temperature device. This temperature device should not be primarily or solely relied upon to diagnose (or rule out a diagnosis of) COVID-19 or any other disease or health condition. Like any diagnostic measurement, elevated body temperature should be independently confirmed with alternate evaluation methods.
Content and Additional Resources
To help you get started with your GT2 Series mobile computer, this guide features:
- Hardware Overview
- Getting Started
- Wall-Mounted Installation
- Gate-Mount Installation
- Software Features
Contents of this guide are subject to change.
For software updates and information, visit www.janam.com/support
Hardware Overview
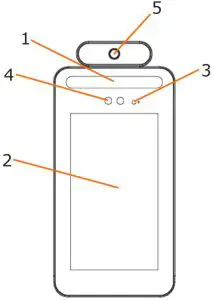
- Photo light
- Display
- Infrared Light
- Camera
- Camera
Wall-Mounted Installation
Important Note: GT2 is designed for indoor use. Avoid direct sunlight on the camera lens or display.
WALL-MOUNTED INSTALLATION
Installation Procedure:
- 1-2-3-4-5
Note:
- Drill holes into the wall
- Insert expansion screw
- Install hanging plate
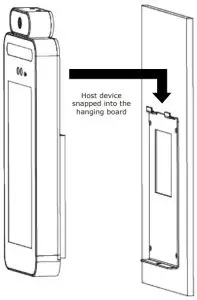
- Place GT2 kiosk up against hanging plate
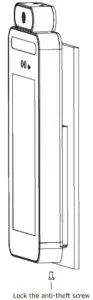
- Secure GT2 in place with anti-theft screw


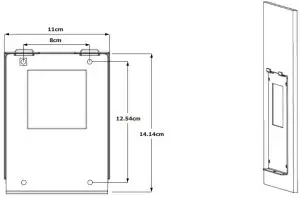
- Step 1:Drill four holes in the wall according to the following schematic size. Then insert screws into the dowel in the holeNote: Reserve space on the wall for wire connection.
- Step 2: Fix the hanging plate on the wall.
- Step 3: Attach GT2 to the plate.
- Step 4: Install anti-theft screws.
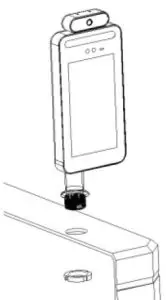
Gate-Mount Installation
- Drill hole in the surface to which GT2 will be installed.
- Diameter of the hole should be between 1.33~1.37 inches.
- Insert the vertical handle into GT2 and then insert into the drilled hole. Tighten the screws to secure GT2 in place.
Software Features
Notes:
- Connect a mouse to the USB port. Left click of a mouse is for confirmation and right click is for return.
- After connecting to network, the IP address will appear in the upper left corner of the main screen.
- The computer or mobile phone used to support GT2 will need to connect to the same IP.
Network Connection Settings
Using Wi-Fi network connection
- Power on GT2 and plug in mouse.
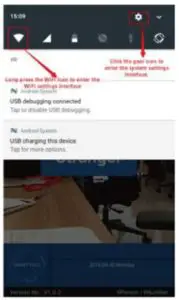
- Drag down top bar (move cursor to top bar, left click and drag down).
- Click the Wi-Fi icon to enter the Wi-Fi settings interface. (shown in FIG. 1)
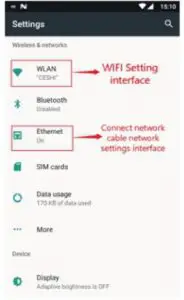
- Or click the Gear icon and enter the system interface as (shown in FIG. 2).
- Click to select WLAN (Wi-Fi network).
Using Wi-Fi network Connection
- Non-fixed IP address: After you are connected to the Internet, wait 2 minutes and the top left corner of the main screen will show the IP address of the device.
- Fixed IP address: Enter the Ethernet interface (as shown in FIG. 2). Click the Ethernet icon, then Ethernet configuration (FIG. 3) and select a static IP. Enter the correct IP address, subnet mask, DNS server and other information and then click to save.
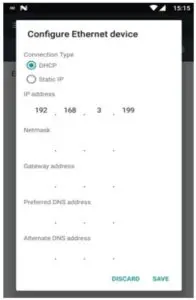
After successfully connected, the top left corner of the main interface devices will show IP address of the device (consistent with the IP address input setting).
Web Management Interface Operation
Use PC or smartphone to open a Chrome web browser.
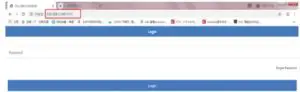
Web Interface Log
- Enter GT2’s IP address in the browser address bar and add post 8090. For example: 192.168.3.243: 8090.
- Default Password is 123456.
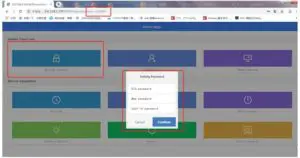
Web Management Interface Operation
For security purposes, it is recommended that you change the password. Password length cannot exceed 12 digits and cannot include special characters such as “@ # $ “
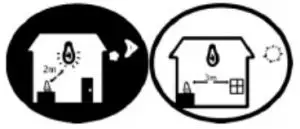
Appendix: Installation Environmental Reminders
- Installation ambient light value
- Candle: 10 Lux
- Lamp: 100~850 Lux
- Lamp: 100~850 LuxNote: Minimum illumination device support for 100 Lux.
- Mount GT2 at least 6 feet from the light source and at least 9 feet from windows and doors.
References
[xyz-ips snippet=”download-snippet”]