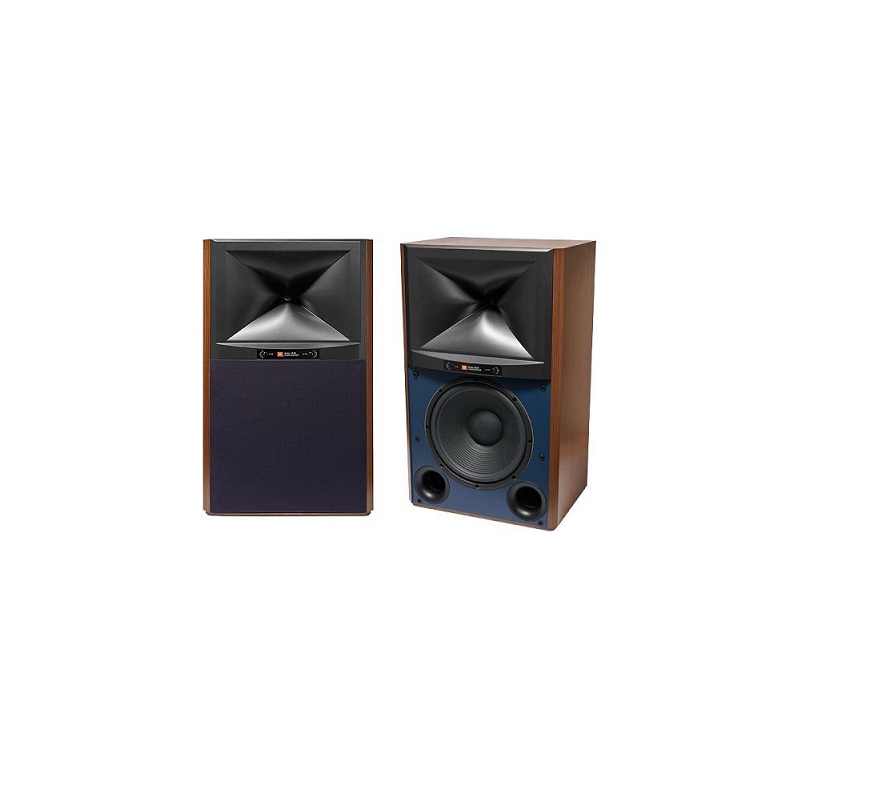
JBL 12 Inch 300mm 2-Way Studio Monitor Owner’s Manual

PACKAGE CONTENTS
EACH JBL 4349 BOX CONTAINS:
- 1 x Loudspeaker
- 1 x Grille(Pre-Installed)
- 1 x User ManualIf you suspect that there has been shipping damage, report it immediately to your dealer. We recommend that you keep the box and packing materials for future use.
PLACEMENT AND POSITIONING
CAUTION: The 4349 weighs 83 lb. (37.7 kg) each. We recommend that shelves, stands, or special construction be robust enough to support to 240 lb (108.9 kg). Before placing the speaker on a shelf or platform, be sure that it is sturdy enough to support the speaker’s weight.Before deciding where to place your speakers, survey your room and think about placement, using the illustration below as a guide.

Avoid placing the speakers near power amplifiers, heat registers or other objects that generate large amounts of heat.Do not place the speakers in very humid or dusty places. Do not place the speakers in direct sunlight or where they will be exposed to other strong light. For best results, place the speakers 6-8 feet (1.8-2.4m) apart. If you place the speakers farther apart than this, angle them toward the listening position. The speakers will produce the most accurate stereo soundstage when the angle at the listener between the speakers is from 40 and 60 degrees. Position each speaker so that its horn center is pointed approximately at ear level. Generally, bass output will increase as the speaker is moved closer to a wall or corner. For best performance, we recommend that you place the speakers at least 20 inches (50cm) away from the side was. The 4349 may be stand mounted with the optional JBL metal stands (model JBL JS-120, sold separately) that angle the speaker upward.
CONNECTIONS
CAUTION: Make sure that all of the system’s electrical components are turned OFF (and preferably unplugged from their AC outlets) before making any connections.Speakers and amplifiers have corresponding positive and negative (“+” and “—”) connection terminals. The 4349 has two sets of connection terminals: gold-plated jumper straps connect the terminals to each other. The terminals are marked “+” and “—.” Additionally, the “+” terminals have red rings, while the terminals have black rings. See the illustration below.
We have designed the 4349 so that a positive voltage at the “+” (red) terminal will cause the speaker transducers to move outward (toward the room). We recommend using a high-quality speaker wire with polarity coding. The side of the wire with a ridge or other coding is usual}, considered positive polarity (‘+”). To ensure proper polarity, connect the left- and right-channel “+” terminals on the back of the amplifier or receiver to their respective “+” (red) terminals on the speakers. Connect the “—” (black) terminals in a similar way. See the owner’s manual of your receiver or amplifier to confirm its connection procedures.BASIC SINGLE-WIRE CONNECTION:Connect the amplifier to each speaker as shown in the illustration below. You can use either set of terminals on the speaker. NOTE: Do not remove the jumper straps from between the two sets of terminals when connecting the speaker wires.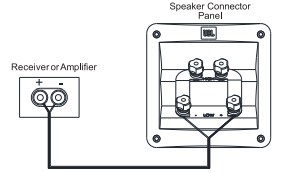
IMPORTANT: Do not reverse polarities (i.e.. “+” to “– or’—” to “+”) when making connections. Doing so will cause poor stereo imaging and diminished bass performance. The 4349’s gold-plated speaker terminals can accept a variety of wire-connector types: bare wire, spade connectors, pin connectors and banana connectors.
Using Bare Wire or Pin Connections:
- Unscrew Cap

- Insert Bare Wire or Pin Connector through Hole in Post
- Tighten Cap to Secure Wire

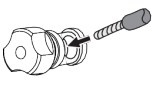

IMPORTANT: Make sure the (+) and (—) wires or pins do not touch each other or the other terminal. Touching wires can cause a short circuit that can damage your receiver or amplifier.NOTE: Bare wire can also be wrapped around the terminal shaft and then the cap tightened to secure the wire. CAUTION: Once the caps are tightened, make sure that the jumper straps are held firmly between the respective terminals. If they are loose, the speakers will not operate properly.
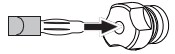
Using Spade Connectors:
- Unscrew Cap
- Insert Spade ConnectorTighten Cap Blades around Post

 Tighten Cap Blades around Post
IMPORTANT: Make sure the (+) and (—) spade connector blades do not touch each other or the other terminal. Touching blades can cause a short circuit that can damage your receiver or amplifier.CAUTION: Once the caps are tightened, make sure that the jumper straps are held firmly between the respective terminals. If they are loose, the speakers wit not operate properly.
Using Banana Connectors:
- Tighten Cap
- Insert Banana Connector Into Hole in Cap

CAUTION: Be sure to tighten the caps to make sure that the jumper straps are held firmly between the respective terminals. If they are loose, the speakers will not operate properly.
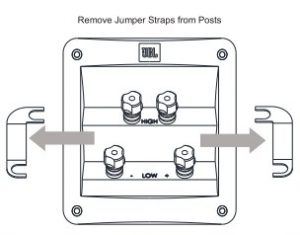
BI-WIRE AND 13I-AMP CONNECTION:For either bi-wire or bi-amp operation, remove the jumper straps from the terminal cup of the JBL 4349 Studio Monitor and store in a safe place. Note that removing the straps only disconnects the inputs of the low frequency and high frequency crossovers from each other, but keeps the full protections and frequency tailoring of the custom crossovers for the separate driver units.CAUTION: Do not connect to your speaker In bl-were fashion with the Jumper straps attached. Severe amplifier damage, personal Injury, or damage to other property may result.
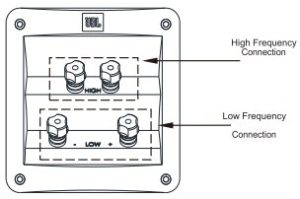
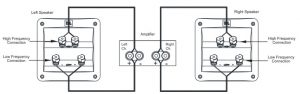
The 4349 connection assembly has two sets of input terminals that are connected by jumper straps. The upper set of terminals is for the compression driver, and the lower set of terminals is for the woofer.Bi-wiringAn amplifier and speaker system are bi-wired when the high frequency and low frequency inputs of the speaker are driven by two different wires from the same amplifier channel. Usually different types of wire are used for the connections: a high-current-capability wire or a wire that sounds better to the user for bass is typically used for low frequencies, and a low-inductance wire or a wire that sounds better for treble to the user is used for high frequencies. Both wires are connected to the same amplifier output. Some report moderate improvement with this wiring. To bi-wire the JBL 4349, connect the speakers according to the following illustration.
 Bi-Amplified WiringAn amplifier and speaker system are bi-amplified when one channel of an amplifier is used for high frequencies, and one channel of an amplifier is used for low frequencies. One 2-way speaker could use both channels from a stereo amplifier. Selecting amplifier channels and wires better suited for different bandwidths can produce very noticeable improvement.To wire the JBL 4349 for bi-amplification, connect the speakers according to the following illustration.
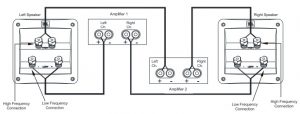
In either case, follow the instructions for the different connector types in Basic Single-Wire Connection.NOTE: For more information about various speaker-wire and connection options, contact your local JBL dealer.CONTROLS/ADJUSTMENTSAlthough the 4349 only has a woofer and a compression driver, the advanced crossover has stepped front-panel adjustments that let you balance the high-frequency (HF) range and ultra-high frequency (UHF) range relative to the woofer.
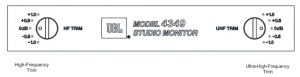
You can use these controls to adjust the speaker’s sound according to your room’s acoustics or your personal taste. If you want to return the speakers to their factory-shipped response, set the controls to “0 dB.”As with most speakers, the 4349 has transducers whose suspensions will take several weeks to “break in” and achieve optimum performance. During this period, the balance between woofer, HF trim level, and UHF trim level may change, so we recommend that you adjust the HF and UHF controls accordingly.CARING FOR YOUR SPEAKERS
- Wipe the cabinet with a clean, dry cloth to remove dust. A damp cloth may dull the cabinet’s finish. Do not use volatile liquids such as benzene, paint thinner or alcohol on the cabinet.
- Do not spray insecticide near the cabinet.
- To remove dust from the grille fabric, use a vacuum cleaner set to low suction.
- Do not wash the grille in water, as water may fade the grille’s color or make it uneven.
- If the surface of the woofer cone becomes dusty, you can carefully sweep it dean with a soft, dry calligraphy brush or paint brush. Do not use a damp cloth.
Specifications
JBL 4349 Studio Monitor
| Speaker Type | 2-way Large-size Bookshelf/Monitor |
| Low-Frequency Transducer | 12” (300mm) JW300PG-8 Pure Pulp, Low-distortion woofer |
| High Frequency Transducer | 1.5” (38mm) D2415 Dual-Diaphragm Compression Driver |
| Maximum Recommended Amplifier Power | 25-200 watts RMS |
| Frequency Response (-6 dB) | 32 Hz-25kHz |
| Sensitivity (2.83 V @ 1m) | 91 dB |
| Nominal Impedance | 8 Ohm |
| Crossover Impedance | 1.5 kHz |
| Enclosure Type | Bass-reflex via Dual Flared Front-Firing Ports |
| Inputs | Dual Gold-plated Five-way Binding Posts per crossover section |
| Dimensions (H x W x D) with grille | 29” x 17”-1/2” x 13-1/2” (737 mm x 445mm x 343 mm) |
| Weight | 83lb (37.7kg) |
| Finishes | Walnut or Black Walnut Wood grain Veneer |
Contact Details:
HARMAN international. Incorporated 8500 Balboa Boulevard, Northridge, CA 91329 USAIndustries, Incorporated, registered in the United States and/or other countries. www.jblsynthesis.com
References
[xyz-ips snippet=”download-snippet”]