
JBL 6.5 inch 165 mm 2-way Bookshelf Studio Monitor Loudspeaker Owner’s Manual

IMPORTANT SAFETY INSTRUCTIONS
- Read these instructions.
- Keep these instructions.
- Heed all warnings.
- Follow all instructions.
- Clean only with a dry cloth.
- Do not block any ventilation openings. Install this apparatus in accordance with the manufacturer’s instructions.
- Do not install this apparatus near any heat sources such as radiators, heat registers, stoves or other apparatus (including amplifiers) that produce heat.
- Use only attachments/accessories specified by the manufacturer.
- Use only with the cart, stand, tripod, bracket or table specified by the manufacturer or sold with the apparatus. When a cart is used, use caution when moving the cart/apparatus combination to avoid injury from tip-over.
- Refer all servicing to qualified service personnel. Servicing is required when the apparatus has been damaged in any way, such as when the power-supply cord or plug isdamaged, liquid has been spilled or objects have fallen into the apparatus, or the apparatus has been exposed to rain or moisture, does not operate normally or has been dropped.
Correct disposal of this product (Waste Electrical & Electronic Equipment) This symbol means the product must not be discarded as household waste, and should be delivered to an appropriate collection facility for recycling. Proper disposal and recycling helps protect natural resources, human health and the environment. For more information on disposal and recycling of this product, contact your local municipality, disposal service, or the shop where you bought this product.
RoHS
 RoHS
RoHSThis product is RoHS compliant. This product is in compliance with Directive 2011/65/EU, and its amendments, on the restriction of the use of certain hazardoussubstances in electrical and electronic equipment.
REACH
REACH (Regulation No 1907/2006) addresses the production and use of chemical substances and their potential impacts on human health and the environment. Article 33(1) of REACH Regulation requires suppliers to inform the recipients if an article contains more than 0.1 % (per weight per article) of any substance(s) on the Substances of Very High Concern (SVHC) Candidate List (‘REACH candidate list’). This product contains the substance “lead”(CASNo. 7439-92-1) in a concentration of more than 0.1% per weight.At the time of release of this product, except for the lead substance, no other substances of REACH candidate list are contained in a concentration of more than 0.1% per weight in this product.Note: On June 27, 2018, lead was added to the REACH candidate list. The inclusion of lead in the REACH candidate list does not mean that lead-containing materials pose an immediate risk or results in a restriction of permissibility of its use.
THAN K YOU FOR CHOOSING JBL®
For more than 70 years, JBL has been providing audio equipment for concert halls, recording studios and movie theaters around the world and has become the trusted choice of leading recording artists and sound engineers.The 4309 is a new small-size bookshelf/monitor of the JBL Studio Monitor family designed for home use. To get the best performance from your new loudspeakers, please read these instructions thoroughly.
PACKAGE CONTENTS
EACH JBL 4309 BOX CONTAINS: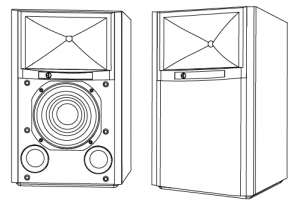
2 x Loudspeakers 2 x Grilles (Pre-Installed)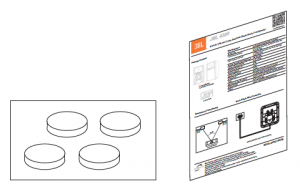
2 x 4 Feet Pads
If you suspect that there has been shipping damage, report it immediately to your dealer. We recommend that youkeep the box and packing materials for future use.
PLACEMENT AN D POSITIONING
Before deciding where to place your speakers, survey your room and think about placement, using the illustration below as a guide.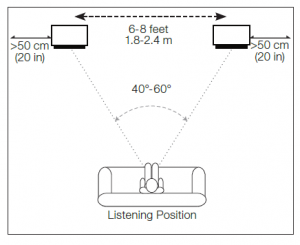
Avoid placing the speakers near power amplifiers, heat registers or other objects that generate large amounts of heat.Do not place the speakers in very humid or dusty places.Do not place the speakers in direct sunlight or where they will be exposed to other strong light.For best results, place the speakers 6–8 feet (1.8-2.4m) apart. If you place the speakers farther apart than this, angle them toward the listening position.The speakers will produce the most accurate stereo soundstage when the angle at the listener between the speakers is from 40 and 60 degrees. Position each speaker so that its horn center is pointed approximatelyat ear level. Generally, bass output will increase as the speaker is moved closer to a wall or corner. For best performance, we recommend that you place the speakers at least 20 inches (50cm) away from the side walls.
CONNE CTIONS
CAUTION: Make sure that all of the system’s electrical components are turned OFF (and preferably unplugged from their AC outlets) before making any connections. Speakers and amplifiers have corresponding positive and negative (“+” and “–”) connection terminals. The 4309 has two sets of connection terminals; gold-plated jumper straps connect the terminals to each other. The terminals are marked “+” and “–.” Additionally, the “+” terminals have red rings, while the “–” terminals have black rings. See theillustration below.
We have designed the 4309 so that a positive voltage at the “+” (red) terminal will cause the speaker transducers to move outward (toward the room).We recommend using a high-quality speaker wire with polarity coding. The side of the wire with a ridge or other coding is usually considered positive polarity (“+”).To ensure proper polarity, connect the left- and right-channel “+” terminals on the back of the amplifier or receiver to their respective “+” (red) terminals on the speakers. Connect the “–” (black) terminals in a similar way. See the owner’s manual of your receiver or amplifier to confirm its connection procedures.
BASIC SINGLE-WIRE CONNECTION:
Connect the amplifier to each speaker as shown in the illustration below. You can use either set of terminals on the speaker. NOTE: Do not remove the jumper straps from between the two sets of terminals when connecting the speaker wires.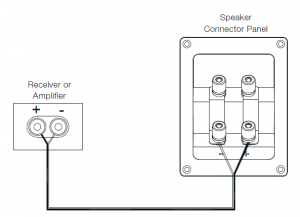
IMPORTANT: Do not reverse polarities (i.e., “+” to “–” or “–” to “+”) when making connections. Doing so will cause poor stereo imaging and diminished bass performance.The 4309’s gold-plated speaker terminals can accept a variety of wire-connector types: bare wire, spade connectors, pin connectors and banana connectors.
Using Bare Wire or Pin Connectors:
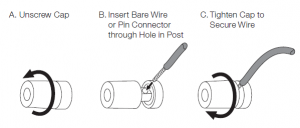
IMPORTANT: Make sure the (+) and (–) wires or pins do not touch each other or the other terminal. Touching wires can cause a short circuit that can damage your receiver or amplifier.NOTE: Bare wire can also be wrapped around the terminal shaft and then the cap tightened to secure the wire.CAUTION: Once the caps are tightened, make sure that the jumper straps are held firmly between the respective terminals. If they are loose, the speakers will not operate properly.
Using Spade Connectors:

IMPORTANT: Make sure the (+) and (–) spade connector blades do not touch each other or the other terminal. Touching blades can cause a short circuit that can damage your receiver or amplifier.CAUTION: Once the caps are tightened, make sure that the jumper straps are held firmly between the respective terminals. If they are loose, the speakers will not operate properly.
Using Banana Connectors:
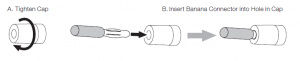
CAUTION: Be sure to tighten the caps to make sure that the jumper straps are held firmly between the respectiveterminals. If they are loose, the speakers will not operate properly.
BI-WIRE AND BI-AMP CONNECTION:
For either bi-wire or bi-amp operation, remove the jumper straps from the terminal cup of the JBL 4309 Studio Monitor and store in a safe place. Note that removing the straps only disconnects the inputs of the low frequency and high frequency crossovers from each other, but keeps the full protections and frequency tailoring of the custom crossoversfor the separate driver units.
CAUTION: Do not connect to your speaker in bi-wire or bi-amp fashion with the jumper straps attached. Severe amplifier damage, personal injury, or damage to other property may result.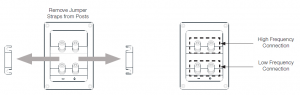
The 4309 connection assembly has two sets of input terminals that are connected by jumper straps. The upper set of terminals is for the compression driver, and the lower set of terminals is for the woofer.
BI-WIRING
An amplifier and speaker system are bi-wired when the high frequency and low frequency inputs of the speaker are driven by two different wires from the same amplifier channel. Usually different types of wire are used for the connections: a high-current-capability wire or a wire that sounds better to the user for bass is typically used for low frequencies, and a low-inductance wire or a wire that sounds better for treble to the user is used for high frequencies. Both wires are connected to the same amplifier output. Some report moderate improvement with this wiring.
To bi-wire the JBL 4309, connect the speakers according to the following illustration.
BI-WIRE AND BI-AMP CONNECTION (continued):
BI-AMPLIFIED WIRING
An amplifier and speaker system are bi-amplified when one channel of an amplifier is used for high frequencies, and one channel of an amplifier is used for low frequencies. One Bookshelf Studio Monitor Loudspeaker could use both channels from a stereo amplifier. Selecting amplifier channels and wires better suited for different bandwidths can produce very noticeable improvement.To wire the JBL 4309 for bi-amplification, connect the speakers according to the following illustration.
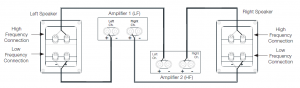
In either case, follow the instructions for the different connector types on page 5. NOTE: For more information about various speaker-wire and connection options, contact your local JBL dealer.
CONTR OLS/ADJUST MENTS
Although the 4309 only has a woofer and a compression driver, the advanced crossover has stepped front-paneladjustments that let you balance the ultra-high frequency (UHF) range relative to the woofer

You can use these controls to adjust the speaker’s sound according to your room’s acoustics or your personal taste. If you want to return the speakers to their factory-shipped response, set the controls to “0 dB.” As with most speakers, the 4309 has transducers whose suspensions will take several weeks to “break in” and achieve optimum performance. During this period, the balance between woofer, and UHF trim level may change, so we recommend that you adjust the UHF controls accordingly.
CAR ING FOR YOUR SPEA KERS
- Wipe the cabinet with a clean, dry cloth to remove dust. A damp cloth may dull the cabinet’s finish. Do not use volatile liquids such as benzene, paint thinner or alcohol on the cabinet.
- Do not spray insecticide near the cabinet.
- To remove dust from the grille fabric, use a vacuum cleaner set to low suction.
- Do not wash the grille in water, as water may fade the grille’s color or make it uneven.
- If the surface of the woofer cone becomes dusty, you can carefully sweep it clean with a soft, dry calligraphy brush or paint brush. Do not use a damp cloth.
SPECIFICAT IONS
JBL® 4309 STUDIO MONITOR
| Type: | 2-way bookshelf loudspeaker |
| Low Frequency Driver | 6.5″ (165 mm) Pure Pulp cone woofer |
| High Frequency Driv er: | 2410H-2 1-inch (25 mm) annular ring, Teonex® diaphragm compression driver withadvanced HDI™ geometry horn |
| Recommended Amplifier Power: | 25 – 150 WRMS |
| Impedance: | 4 Ohms |
| Loudspeaker Sensitivity | 87 dB/2.83 V/1 m |
| Frequency Response: | 42 Hz – 30 kHz (-6 dB) |
| Coverage Angle, -6 dB: | 100 Degrees Hor. x 80 Degrees Ver., from 2 kHz to 17 kHz |
| Crossover Frequency: | 1.6 kHz |
| Enclosure Type: | H-braced front-ported bookshelf |
| Grille Feature: | Monitor style to match horn mating features, supplied in dark blue (with walnut cabinet)and black (with black cabinet) |
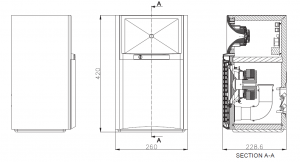
| Dimensions with grille: | 16.5″ H x 10.25″ W x 9.0″ D (420 mm H x 260 mm W x 228.6 mm D) |
| Controls: | UHF tone control |
| Input Type: | Dual sets of gold-plated binding posts with shorting straps |
| Product Weight (Each): | 24.2 lbs. (10.98 kg) |
| Shipping Weight: | 52.9 lbs. (24.0 kg) |
| Shipping Units of Measure: | Pair |
| Warranty: | 5 Years |
| Recommended stand height: | 24″ (609 mm) |
DIMENSIONS
Read More About This Manual & Download PDF:
References
[xyz-ips snippet=”download-snippet”]