
 BAR 2.1 DEEP BASS
 BAR 2.1 DEEP BASS
OWNER’S MANUAL
 IMPORTANT SAFETY INSTRUCTIONS
Verify Line Voltage Before UseThe JBL Bar 2.1 Deep Bass (soundbar and subwoofer) has been designed for use with 100-240 volt, 50/60 Hz AC current. Connection to a line voltage other than that for which your product is intended can create a safety and fire hazard and may damage the unit. If you have any questions about the voltage requirements for your specific model or about the line voltage in your area, contact your retailer or customer service representative before plugging the unit into a wall outlet.
Do Not Use Extension CordsTo avoid safety hazards, use only the power cord supplied with your unit. We do not recommend that extension cords be used with this product. As with all electrical devices, do not run power cords under rugs or carpets, or place heavy objects on them. Damaged power cords should be replaced immediately by an authorized service center with a cord that meets factory specifications.
Handle the AC Power Cord GentlyWhen disconnecting the power cord from an AC outlet, always pull the plug; never pull the cord. If you do not intend to use this speaker for any considerable length of time, disconnect the plug from the AC outlet.
Do Not Open the CabinetThere are no user-serviceable components inside this product. Opening the cabinet may present a shock hazard, and any modification to the product will void your warranty. If water accidentally falls inside the unit, disconnect it from the AC power source immediately, and consult an authorized service center.
1 INTRODUCTIONThank you for purchasing the JBL Bar 2.1 Deep Bass (soundbar and subwoofer) which is designed to bring an extraordinary sound experience to your home entertainment system. We encourage you to take a few minutes to read through this manual, which describes the product and includes step-by-step instructions for setting up and getting started.
To make the most of product features and support, you may need to update the product software through the USB connector in the future. Refer to the software update section in this manual to ensure that your product has the latest software.
Designs and specifications are subject to change without notice. If you have any questions about the soundbar, installation or operation, please contact your retailer or customer service representative, or visit our website: www.jbl.com.
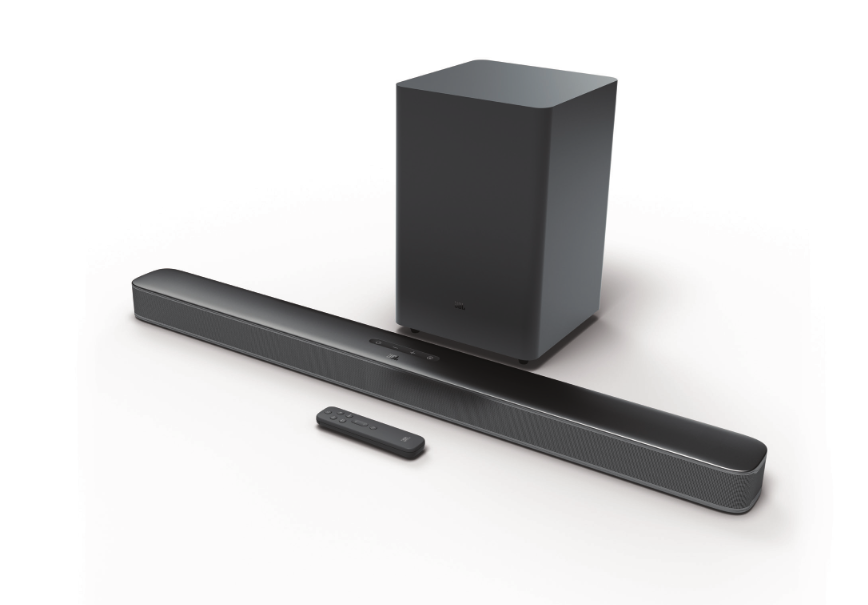
2 WHAT’S IN THE BOXUnpack the box carefully and ensure that the following parts are included. If any part is damaged or missing, do not use it and contact your retailer or customer service representative.
Soundbar

Subwoofer

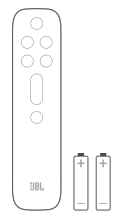
Remote control (with 2 AAA batteries)
Power cord*
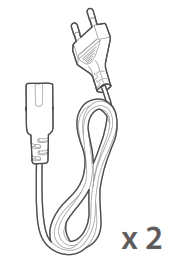
* Power cord and plug type vary region.
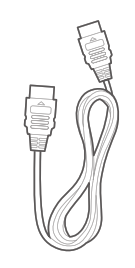
HDMI cable
Wall-mounting kit
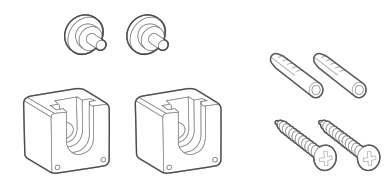
Product information quantity & wall-mounting template

3 PRODUCT OVERVIEW
3.1 Soundbar
Controls
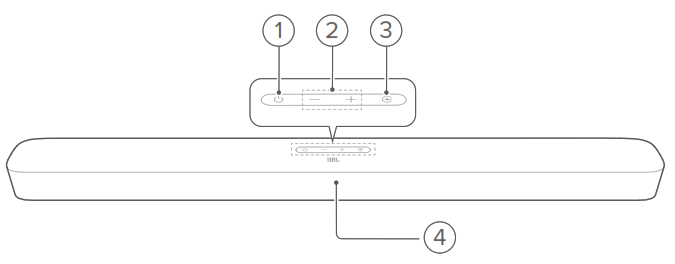
- (Power)• Switch on or to standby
- -/+ (Volume)• Decrease or increase the volume• Press and hold to decrease or increase the volume continuously• Press the two buttons together to mute or unmute
- (Source)• Select a sound source: TV (default), Bluetooth or HDMI IN
- Status display
Connectors
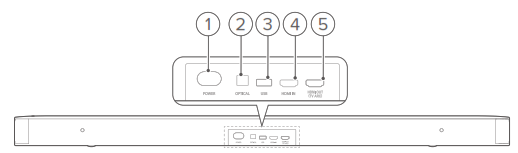
- POWER• Connect to power
- OPTICAL• Connect to the optical output on your TV or digital device
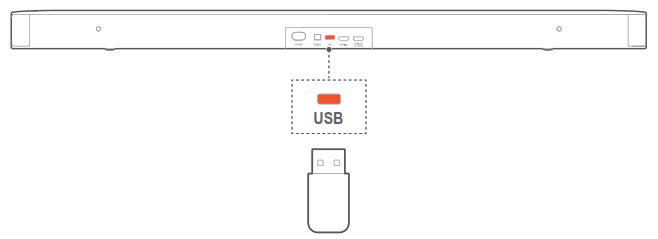
- USB• USB connector for software update• Connect to a USB storage device for audio play (for US version only)
- HDMI IN• Connect to the HDMI output on your digital device
- HDMI OUT (TV ARC)• Connect to the HDMI ARC input on your TV
3.2 Subwoofer
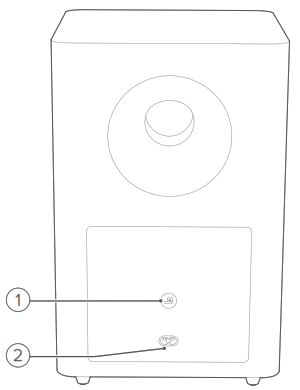
- • Connection status indicator

2. POWER
• Connect to power
3.3 Remote control
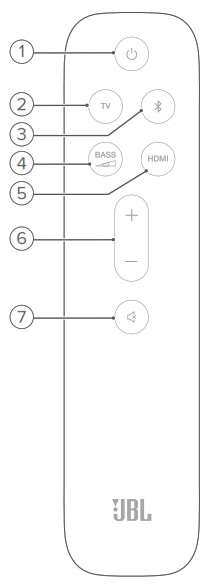
- • Switch on or to standby
- TV• Select the TV source
- (Bluetooth)• Select the Bluetooth source• Press and hold to connect another Bluetooth device
- • Select the bass level for subwoofer: low, middle, or high
- HDMI• Select the HDMI IN source
- + / –• Increase or decrease the volume• Press and hold to increase or decrease the volume continuously
- (Mute)• Mute/unmute
4 PLACE
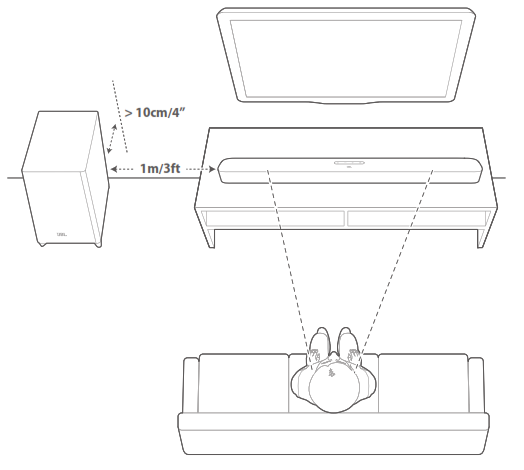
4.1 Desktop placementPlace the soundbar and subwoofer on a flat and stable surface. Make sure that the subwoofer is at least 3 ft (1 m) away from the soundbar, and 4” (10 cm) away from a wall.
NOTES:
− The power cord shall be properly connected to power.− Do not place any objects on the top of the soundbar or subwoofer.− Make sure that the distance between the subwoofer and the soundbar is less than 20 ft (6 m).
4.2 Wall-mounting
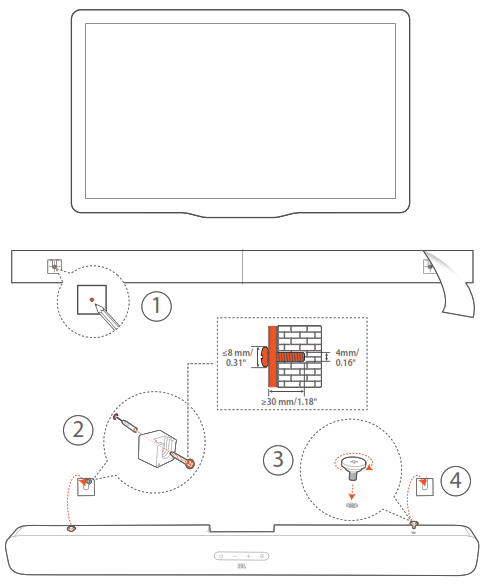
1. Preparation:
a) With a minimum distance of 2” (50mm) from your TV, stick the supplied wall-mounting template to a wall by using adhesive tapes.b) Use your ballpen tip to mark the screw holder location. Remove the template.c) On the marked location, drill a 4 mm/0.16” hole. Refer to Figure 1 for the screw size.
2. Install the wall-mounting bracket.3. Fasten the screw onto the back of the soundbar.4. Mount the soundbar.
NOTES:− Make sure that the wall can support the weight of the soundbar.− Install on a vertical wall only.− Avoid a location under high temperature or humidity.− Before wall-mounting, make sure that cables can be properly connected between the soundbar and external devices.− Before wall-mounting, make sure that the soundbar is unplugged from power. Otherwise, it may cause an electric shock.
5 CONNECT
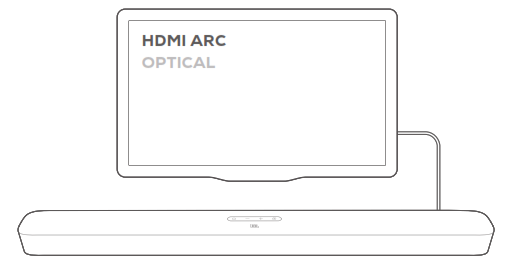
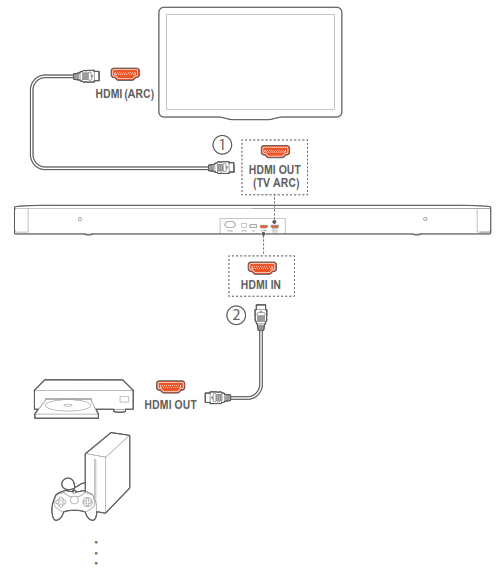
5.1 TV connectionConnect the soundbar with your TV through the supplied HDMI cable or an optical cable (sold separately).Through the supplied HDMI cableAn HDMI connection supports digital audio and video with a single connection. HDMI connectivity is the best option for your soundbar.
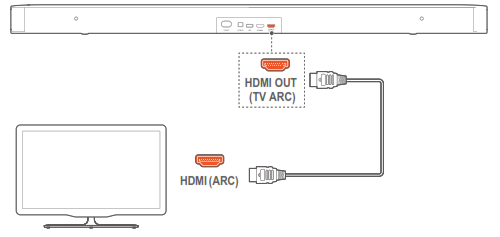
1. Connect the soundbar with your TV by using the supplied HDMI cable.2. On your TV, check that HDMI-CEC and HDMI ARC have been enabled. Refer to the owner’s manual of your TV for more information.
NOTES:− Full compatibility with all HDMI-CEC devices is not guaranteed.− Contact your TV manufacturer if you have problems with the HDMICEC compatibility of your TV.
Through an optical cable
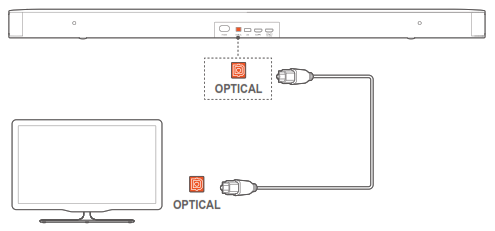
• Connect the soundbar with your TV by using an optical cable (sold separately).
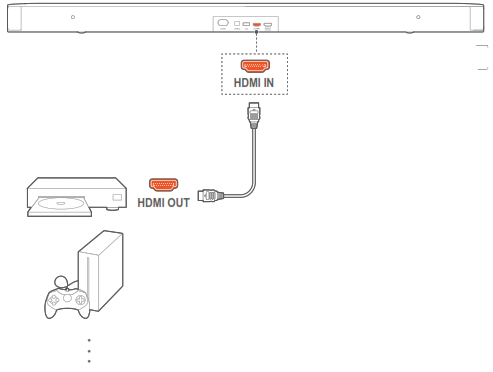
5.2 Digital device connection
- Make sure that you have connected your TV to the soundbar through the HDMI ARC connection (See “Through the supplied HDMI cable” under “TV connection” in the “CONNECT” chapter).
- Use an HDMI cable (V1.4 or later) to connect the soundbar with your digital device, such as a set-top box, DVD/Blu-ray player or game console.
- On your digital device, check that HDMI-CEC has been enabled. Refer to the owner’s manual of your digital device for more information.
NOTES:− Contact your digital device manufacturer if you have problems with the HDMI-CEC compatibility of your digital device.
5.3 Bluetooth connection
Through Bluetooth, connect the soundbar with your Bluetooth device, such as a smartphone, tablet and laptop.
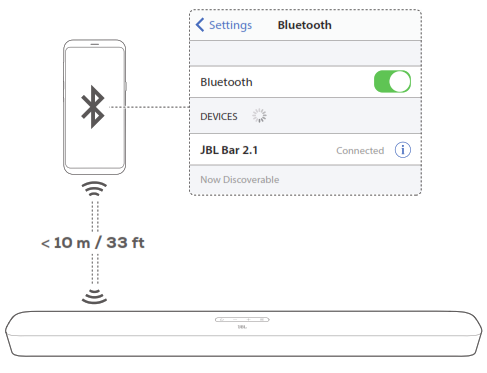
Connect a Bluetooth device
1. Press![]() to switch on (See “Power-on/Auto standby/Auto wakeup” in the “PLAY” chapter).
to switch on (See “Power-on/Auto standby/Auto wakeup” in the “PLAY” chapter).
2. To select Bluetooth source, press ![]() on the soundbar or
on the soundbar or ![]() on the remote control.→ “BT PAIRING”: Ready for BT pairing3. On your Bluetooth device, enable Bluetooth and search for “JBL Bar 2.1” within three minutes.→ The device name is displayed if your device is named in English. A confirmation tone is heard.
on the remote control.→ “BT PAIRING”: Ready for BT pairing3. On your Bluetooth device, enable Bluetooth and search for “JBL Bar 2.1” within three minutes.→ The device name is displayed if your device is named in English. A confirmation tone is heard.
To reconnect the last paired deviceYour Bluetooth device is retained as a paired device when the soundbar goes to standby mode. Next time you switch to the Bluetooth source, the soundbar reconnects the last paired device automatically.
To connect to another Bluetooth device
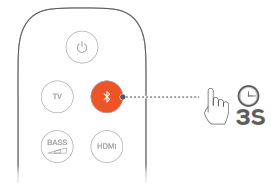
- In the Bluetooth source, press and hold on the soundbar or on the remote control until “BT PAIRING” is displayed.→ The previously paired device is cleared from the soundbar.→ The soundbar enters the Bluetooth pairing mode.
- Follow the Step 3 under “Connect a Bluetooth device”.• If the device has ever been paired with the soundbar, first unpair “JBL Bar 2.1” on the device.
NOTES:
− The Bluetooth connection will be lost if the distance between the soundbar and Bluetooth device exceeds 33 ft (10 m).− Electronic devices may cause radio interference. Devices that generate electromagnetic waves must be kept away from the Soundbar, such as microwaves and wireless LAN devices.
6 PLAY
6.1 Power-on/Auto standby/Auto wakeup
Switch on
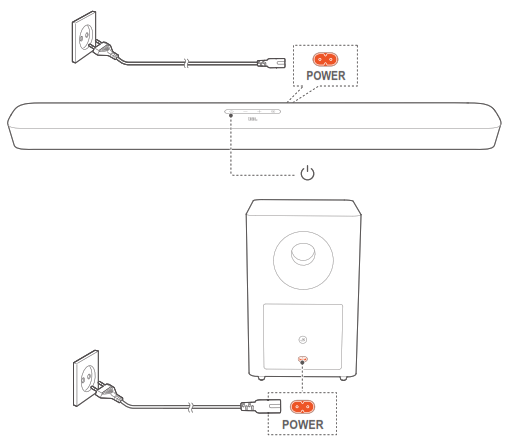
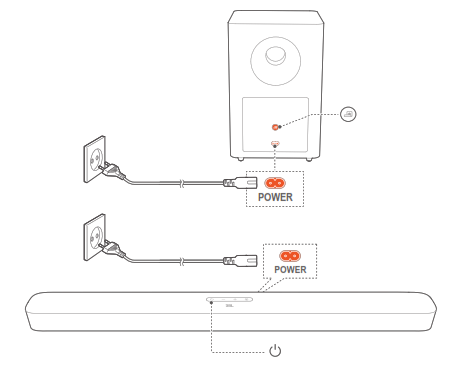
- Connect the soundbar and subwoofer to power by using the supplied power cords.
- On the soundbar, press to switch on.→ “HELLO” is displayed.→ The subwoofer is connected to the soundbar automatically. Connected: turns solid white.
NOTES:− Use the supplied power cord only.− Before switching on the soundbar, make sure that you have completed all other connections (See “TV connection” and “Digital device connection” in the “Connect” chapter).
Auto standbyIf the soundbar is inactive for more than 10 minutes, it will switch to standby mode automatically. “STDBY” is displayed. The subwoofer also goes to standby, ![]() and turns solid amber.
and turns solid amber.
Next time you switch on the soundbar, it returns to the last selected source.
Auto wakeupIn standby mode, the soundbar will wake up automatically when• the soundbar is connected to your TV through the HDMI ARC connection and your TV is switched on;• the soundbar is connected to your TV through an optical cable and audio signals are detected from the optical cable.
6.2 Play from the TV source
With the soundbar connected, you can enjoy TV audio from the soundbar speakers.
- Make sure that your TV is set to support external speakers and the built-in TV speakers are disabled. Refer to the owner’s manual of your TV for more information.
- Make sure that the soundbar has been properly connected to your TV (See “TV connection” in the “CONNECT” chapter).
- To select the TV source, press on the soundbar or TV on the remote control.→ “TV”: The TV source is selected.• In the factory settings, the TV source is selected by default.
NOTES:− If the soundbar is connected to your TV through both an HDMI cable and an optical cable, the HDMI cable is selected for the TV connection.
6.2.1 TV remote control setupTo use your TV remote control for both your TV and the soundbar, check that your TV supports HDMI-CEC. If your TV does not support HDMI-CEC, follow the steps under “TV remote control learning”.
HDMI-CECIf your TV supports HDMI-CEC, enable the functions as instructed in your TV user manual. You can control the volume +/-, mute/unmute, and power on/standby functions on your soundbar through the TV remote control.
TV remote control learning
-
- On the soundbar, press and hold and + until “LEARNING” is displayed.→ You enter the TV remote control learning mode.
- Within 15 seconds, do the following on the soundbar and your TV remote control:a) On the soundbar: press one of the following buttons +, -, + and – together (for the mute/unmute function), and .b) On your TV remote control: press the desired button. → “WAIT” is displayed on the soundbar.→ “DONE”: The function of the soundbar button is learnt by your TV remote control button.
- Repeat Step 2 to complete the button learning.
- To exit the TV remote control learning mode, press and hold and + on the soundbar until “EXIT LEARNING” is displayed.→ The soundbar returns to the last selected source.
6.3 Play from the HDMI IN source
With the soundbar connected as shown in the following diagram, your digital device can play video on your TV and audio from the soundbar speakers.
-
- Make sure that the soundbar has been properly connected to your TV and digital device (See “TV connection” and “Digital device connection” in the “CONNECT” chapter).
- Switch on your digital device.→ Your TV and the soundbar wake up from standby mode and switch to the input source automatically.• To select the HDMI IN source on the soundbar, press on the soundbar or HDMI on the remote control.
- Switch your TV to standby mode.→ The soundbar and source device are switched to standby mode.
NOTES:− Full compatibility with all HDMI-CEC devices is not guaranteed.
6.4 Play from the Bluetooth sourceThrough Bluetooth, stream audio play on your Bluetooth device to the soundbar.
-
- Check that the soundbar has been properly connected to your Bluetooth device (See “Bluetooth connection” in the “CONNECT” chapter).
- To select the Bluetooth source, press on the soundbar or on the remote control.
- Start audio play on your Bluetooth device.
- Adjust the volume on the soundbar or your Bluetooth device.
7 SOUND SETTINGS
Bass adjustment
-
- Check that the soundbar and subwoofer are properly connected (See the “INSTALL” chapter).
- On the remote control, press repeatedly to switch between bass levels.→ “LOW”, “MID” and “HIGH” are displayed.
Audio syncWith the audio sync function, you can synchronize audio and video to make sure that no delay is heard from your video content.
-
- On the remote control, press and hold TV until “SYNC” is displayed.
- Within five seconds, press + or – on the remote control to adjust the audio delay and match with video.→ The audio sync timing is displayed.
Smart modeWith the smart mode enabled by default, you can enjoy TV programs with rich sound effects. For TV programs such as news and weather forecasts, you can reduce sound effects by disabling the smart mode and switching to the standard mode.
Smart mode: EQ settings and JBL Surround Sound are applied for rich sound effects.Standard mode: The preset EQ settings are applied for standard sound effects.
To disable the smart mode, do the following:
• On the remote control, press and hold ![]() until “TOGGLE” is displayed. Press +.→ “OFF SMART MODE”: The smart mode is disabled.→ Next time you switch on the soundbar, the smart mode is enabled again automatically.
until “TOGGLE” is displayed. Press +.→ “OFF SMART MODE”: The smart mode is disabled.→ Next time you switch on the soundbar, the smart mode is enabled again automatically.
8 RESTORE FACTORY SETTINGS
By restoring the default settings defined at factories. you remove all your personalized settings from the soundbar.• On the soundbar, press and hold and for more than 10 seconds.→ “RESET” is displayed.→ The soundbar switches on and then, to standby mode.
9 SOFTWARE UPDATE
For optimal product performance and your best user experience, JBL may offer software updates for the soundbar system in the future. Please visit www.jbl.com or contact JBL call center to receive more information about downloading update files.
-
- To check current software version, press and hold and – on the soundbar until the software version is displayed.
- Check that you have saved the software update file to the root directory of a USB storage device. Connect the USB device to the soundbar.
- To check current software version, press and hold
 3. To enter the software update mode, press and hold
 ![]() and – on the soundbar for more than 10 seconds.→ “UPGRADING”: software updating underway.→ “DONE”: software updating completed. A confirmation tone is heard.→ The soundbar returns to the last selected source.
and – on the soundbar for more than 10 seconds.→ “UPGRADING”: software updating underway.→ “DONE”: software updating completed. A confirmation tone is heard.→ The soundbar returns to the last selected source.
NOTES:− Keep the soundbar powered on and the USB storage device mounted before software updating is complete.− “FAILED” is displayed if the software updating failed. Try the software updating again or return to the previous version.
10 RE-CONNECT THE SUBWOOFER
The soundbar and subwoofer are paired at factories. After poweron, they are paired and connected automatically. In some special cases, you may need to pair them again.
 To re-enter the subwoofer pairing mode
1. On the subwoofer, press and hold ![]() until
until ![]() flashes white.2. To enter the subwoofer pairing mode on the soundbar, press and hold
flashes white.2. To enter the subwoofer pairing mode on the soundbar, press and hold![]() on the remote control until “SUBWOOFER SPK” is displayed. Press – on the remote control.→ “SUBWOOFER CONNECTED”: The subwoofer is connected.
on the remote control until “SUBWOOFER SPK” is displayed. Press – on the remote control.→ “SUBWOOFER CONNECTED”: The subwoofer is connected.
NOTES:− The subwoofer will exit the pairing mode in three minutes if pairing and connection are not completed. ![]() turns from flashing white to solid amber.
turns from flashing white to solid amber.
11 PRODUCT SPECIFICATIONS
General specification:
-
- Model: Bar 2.1 Deep Bass CNTR (Soundbar Unit), Bar 2.1 Deep Bass SUB (Subwoofer Unit)
- Power supply: 100 – 240V AC, ~ 50/60 Hz
- Total speaker power output (Max. @THD 1%): 300 W
- Output power (Max. @THD 1%): 2 x 50 W (Soundbar)
- 200 W (Subwoofer)
- Transducer: 4 x racetrack drivers + 2 x 1” tweeter (Soundbar); 6.5” (subwoofer)
- Soundbar and Subwoofer standby power: <0.5 W
- Operating temperature: 0°C – 45 °C
Video specification:
-
- HDMI Video input: 1
- HDMI Video output (With Audio return channel): 1
- HDMI version: 1.4
Audio specification:
-
- Frequency response: 40 Hz – 20 KHz
- Audio inputs: 1 Optical, Bluetooth, USB (USB playback is available in US version. For other versions, USB is for Service only.)
USB specification (Audio playback is for US version only):
-
- USB port: Type A
- USB rating: 5 V DC / 0.5 A
- Supporting file format: mp3, wav
- MP3 Codec: MPEG 1 Layer 2/3, MPEG 2 Layer 3, MPEG 2.5 Layer 3
- MP3 sampling rate: 16 – 48 KHz
- MP3 bitrate: 80 – 320 kbps
- WAV sample rate: 16 – 48 KHz
- WAV bitrate: Up to 3000 kbps
Wireless specification:
-
- Bluetooth version: 4.2
- Bluetooth profile: A2DP V1.3, AVRCP V1.5
- Bluetooth frequency range: 2402 MHz – 2480 MHz
- Bluetooth Max. transmitting power: < 10 dBm (EIRP)
- Modulation Type: GFSK, π/4 DQPSK, 8DPSK
- 5G Wireless frequency range: 5736.35 – 5820.35 MHz
- 5G Max. transmitting power: < 9 dBm (EIRP)
- Modulation Type: π/4 DQPSK
Dimensions
-
- Dimensions (W x H x D): 965 x 58 x 85 mm / 38” x 2.28” x 3.35”(Soundbar);
- 240 x 240 x 379 (mm) /8.9” x 8.9” x 14.6” (Subwoofer)
- Weight: 2.16 kg (Soundbar); 5.67 kg (Subwoofer)
- Packaging dimensions (W x H x D): 1045 x 310 x 405 mm
- Packaging weight (Gross weight): 10.4 kg
12 TROUBLESHOOTING
Never try to repair the product yourself. If you have problems using this product, check the following points before you request services.
SystemThe unit will not turn on.
-
- Check if the power cord is plugged into power and the soundbar.
The soundbar has no response to button pressing.
-
- Restore the soundbar to factory settings (See the “RESTORE FACTORY SETTINGS” chapter).
SoundNo sound from the soundbar
-
- Make sure that the soundbar is not muted.
- Select the correct audio input source on the remote control.
- Connect the soundbar to your TV or other devices properly
- Restore the soundbar to its factory settings by pressing and holding and on the soundbar for more than 10 seconds.
Distorted sound or echo
-
- If you play audio from your TV through the soundbar, make sure that your TV is muted or the built-in TV speaker is disabled.
Audio and video are not synchronized.
-
- Enable the audio sync function to synchronize audio and video (See “Audio sync” in the “SOUND SETTINGS” chapter).
VideoDistorted pictures streamed through Apple TV
-
- The Apple TV 4K format requires HDMI V2.0 and is not supported by this product. As a result, a distorted picture or black TV screen may occur.
BluetoothA device cannot be connected with the soundbar.
-
- Check if you have enabled Bluetooth on the device.
- If the soundbar has been paired with another Bluetooth device, reset Bluetooth (see “To connect to another device” under “Bluetooth connection” in the “CONNECT” chapter).
- If your Bluetooth device has ever been paired with the soundbar, reset Bluetooth on the soundbar, unpair the soundbar on the Bluetooth device, and then, pair the Bluetooth device with the soundbar again (see “To connect to another device” under “Bluetooth connection” in the “CONNECT” chapter).
Poor audio quality from a connected Bluetooth device
-
- The Bluetooth reception is poor. Move the source device closer to the soundbar, or remove any obstacle between the source device and the soundbar.
- The connected Bluetooth device connects and disconnects constantly.
- The Bluetooth reception is poor. Move the source device closer to the soundbar, or remove any obstacle between the source device and the soundbar.
Remote controlThe remote control does not work.
• Check if the batteries are drained. If so, replace them with new ones.• Reduce the distance and angle between the remote control and the main unit.
13 TRADEMARKS
![]()
The Bluetooth® word mark and logos are registered trademarks owned by the Bluetooth SIG, Inc. and any use of such marks by HARMAN International Industries, Incorporated is under license. Other trademarks and trade names are those of their respective owners.
![]()
The terms HDMI, HDMI High-Definition Multimedia Interface, and the HDMI Logo are trademarks or registered trademarks of HDMI Licensing Administrator, Inc.
![]()
Manufactured under license from Dolby Laboratories. Dolby, Dolby Audio and the double-D symbol are trademarks of Dolby Laboratories.
14 OPEN SOURCE LICENSE NOTICE
This product contains open source software licensed under GPL. For your convenience, the source code and relevant build instruction are also available at http://www.jbl.com/opensource.html.Please feel free to contact us at:Harman Deutschland GmbHATT: Open Source, Gregor Krapf-Gunther, Parkring 385748 Garching bei Munchen, Germanyor if you have additional question regarding the open source software in the product.

HARMAN International Industries,Incorporated 8500 BalboaBoulevard, Northridge, CA 91329USAwww.jbl.com
© 2019 HARMAN International Industries, Incorporated.All rights reserved.JBL is a trademark of HARMAN International Industries, Incorporated, registered in the United States and/or other countries. Features, specifications and appearance are subject to change without notice.
JBL Bar 2.1 Deep Bass Manual – JBL Bar 2.1 Deep Bass Manual –