

JBL CINEMA SB110

1. INTRODUCTION
Thank you for purchasing the JBL CINEMA SB110.The JBL CINEMA SB110 is designed to bring an extraordinary sound experience to your home entertainment system. We urge you to take a few minutes to read through this manual, which describes the product and includes step-by-step instructions to help you set up and get started.
CONTACT US: If you have any questions about JBL CINEMA SB110, its installation or its operation, please contact your retailer or custom installer, or visit our website at www.JBL.com.
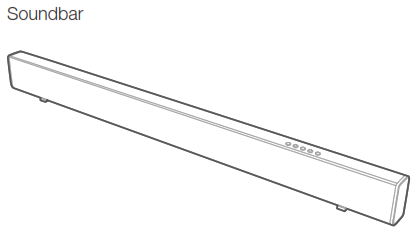
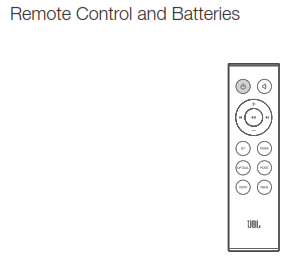
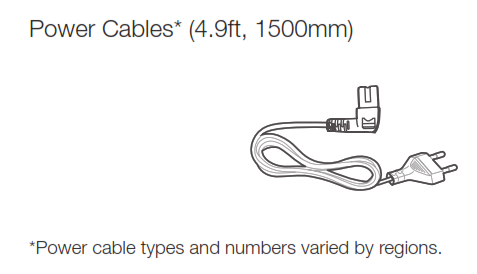
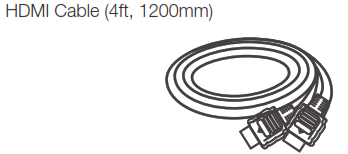
2. WHAT’S IN THE BOX


3. CONNECT YOUR SOUNDBAR
This section helps you connect your soundbar to a TV and other devices, and set up the whole system.
Connect to HDMI (ARC) SocketAn HDMI connection supports digital audio and is the best option to connect to your soundbar. If your TV supports HDMI ARC, you can hear the TV audio through your soundbar by using a single HDMI cable.
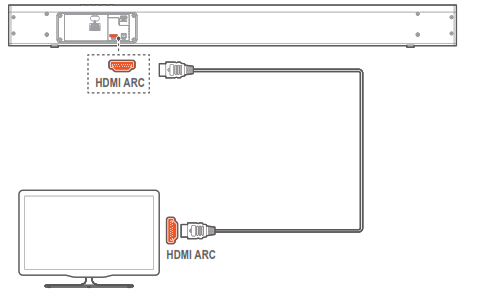
- Using a High Speed HDMI cable, connect the HDMI OUT (ARC)to TV connector on your soundbar to the HDMI ARC connector on the TV.• The HDMI ARC connector on the TV might be labeled differently. For details, see the TV user manual.
- On your TV, turn on HDMI-CEC operations. For details, see the TV user manual.
Note:
- Do confirm if HDMI CEC function on your TV is turned on.
- Your TV must support the HDMI-CEC and ARC function. HDMICEC and ARC must be set to On.
- The setting method of HDMI-CEC and ARC may differ depending on the TV. For details about ARC function, please refer to your TV owner’s manual.
- Only HDMI 1.4 cables can support the ARC function.
Connect to Optical Socket
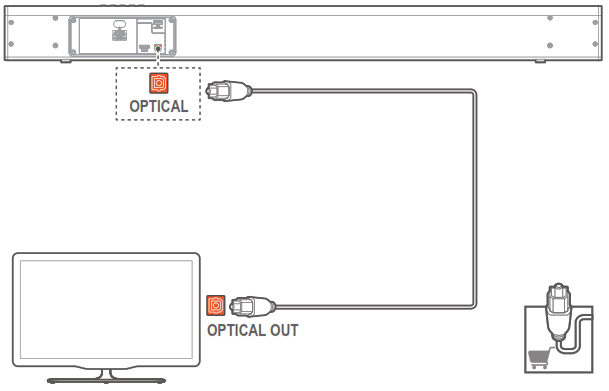
- Remove the protective cap of the OPTICAL socket. Using an optical cable, connect the OPTICAL connector on your soundbar to the OPTICAL OUT connector on the TV or other device.• The digital optical connector might be labeled SPDIF or SPDIF OUT.
Note: While in OPTICAL/HDMI ARC mode, if there’s no sound output from the unit and the status Indicator flashes, you may need to activate PCM or Dolby Digital Signal output on your source device (e.g. TV, DVD or Blu-ray player).
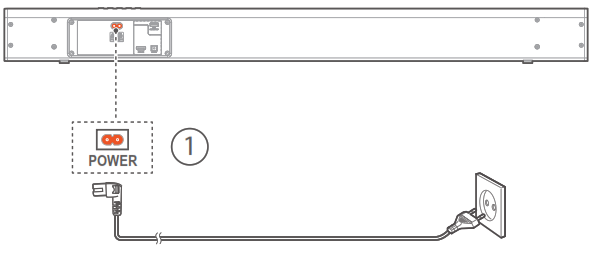
Connect to Power
- Before connecting the AC power cord, ensure you have completed all other connections.
- Risk of product damage! Ensure that the power supply voltage corresponds to the voltage printed on the back or the underside of the unit.
- Connect the mains cable to the AC~ Socket of the unit and then into a mains socket
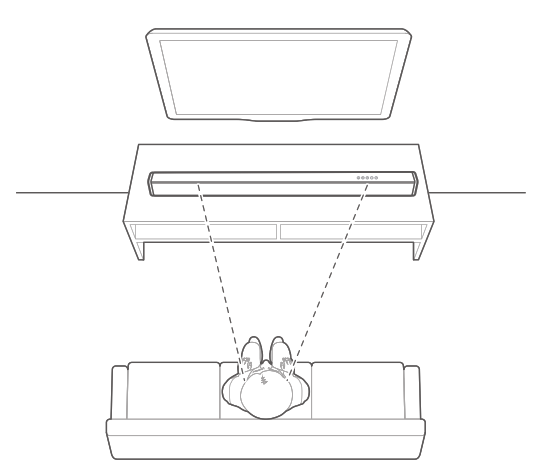
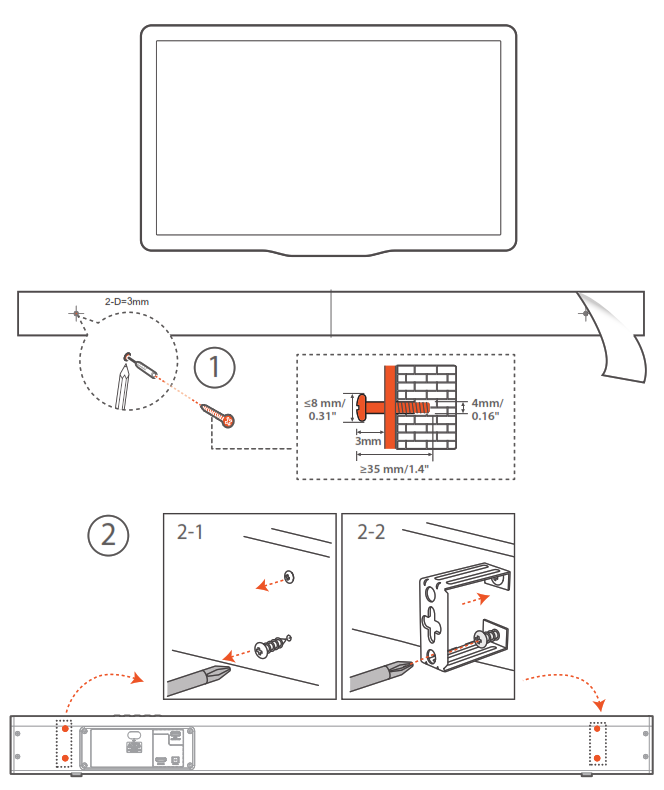
4. PLACE YOUR SOUNDBAR
4a. Place the Soundbar on the table
4b. Wall mount the Soundbar
Use tape to stick the wall-mounted paper guide on the wall, push a pen tip through the center of each mounting hole to mark the wall-mounted bracket location, and remove the paper.
Screw the wall mount brackets on the pen mark; screw the threaded mounting post into the back of the soundbar; then hook the soundbar on the wall.
5. PREPARATIONS
Prepare the Remote Control
The provided Remote Control allows the unit to be operated from a distance.
- Even if the Remote Control is operated within the effective range 19.7 feet (6m), remote control operation may be impossible if there are any obstacles between the unit and the remote control.
- If the Remote Control is operated near other products that generate infrared rays, or if other remote control devices using infra-red rays are used near the unit, it may operate incorrectly. Conversely, the other products may operate incorrectly.
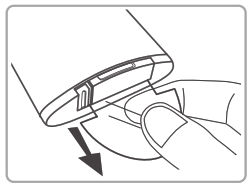
First-time use:The unit has a pre-installed lithium CR2025 battery. Remove the protective tab to activate the remote control battery.
Replace the Remote Control Battery
– The remote control requires a CR2025, 3V Lithium battery.
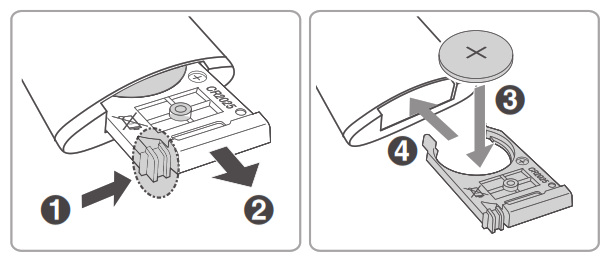
- Push the tab on the side of the battery tray towards the tray.
- Now slide the battery tray out of the remote control.
- Remove the old battery. Place a new CR2025 battery into the battery tray with the correct polarity (+/-) as indicated.
- Slide the battery tray back into the slot in the remote control.
Precautions Concerning Batteries
- When the Remote Control is not to be used for a long time (more than a month), remove the battery from the Remote Control to prevent it from leaking.
- If the batteries leak, wipe away the leakage inside the battery compartment and replace the batteries with new ones.
- Do not use any batteries other than those specified.
- Do not heat or disassemble batteries.
- Never throw them in fire or water.
- Do not carry or store batteries with other metallic objects. Doing so could cause batteries to short circuit, leak or explode.
- Never recharge a battery unless it is confirmed to be a rechargeable type.
6. USE YOUR SOUNDBAR SYSTEM
- To Controla. Top panel
 b. Remote Control
 - To use Bluetooth2a. Press the button repeatedly on the unit or press the BT button on the remote control to start Bluetooth pairing2b. Select “JBL CINEMA SB110” to connectRemark: Press and hold Bluetooth (BT) button on your remote control for 3 seconds if you want to pair another mobile device.NOTES– If asked for a PIN code when connecting a Bluetooth device, enter <0000>.– In Bluetooth connection mode, the Bluetooth connection will be lost if the distance between the Soundbar and the Bluetooth device exceeds 27 ft/ 8m.– The Soundbar automatically turns off after 10 minutes in the Ready state.– Electronic devices may cause radio interference. Devices that generate electromagnetic waves must be kept away from the Soundbar main unit – e.g., microwaves, wireless LAN devices, etc.2c. Listen to Music from Bluetooth Device– If the connected Bluetooth device supports Advanced Audio Distribution Profile (A2DP), you can listen to the music stored on the device through the player.– If the device also supports Audio Video Remote Control Profile (AVRCP), you can use the player’s remote control to play music stored on the device.1. Pair your device with the player.2. Play music via your device (if it supports A2DP).3. Use supplied remote control to control play (if it supports AVRCP).– To pause/resume play, press the button on the remote control.– To skip to a track, press the buttons on the remote control.
-
To use OPTICAL / HDMI ARC mode
 b. Remote Control
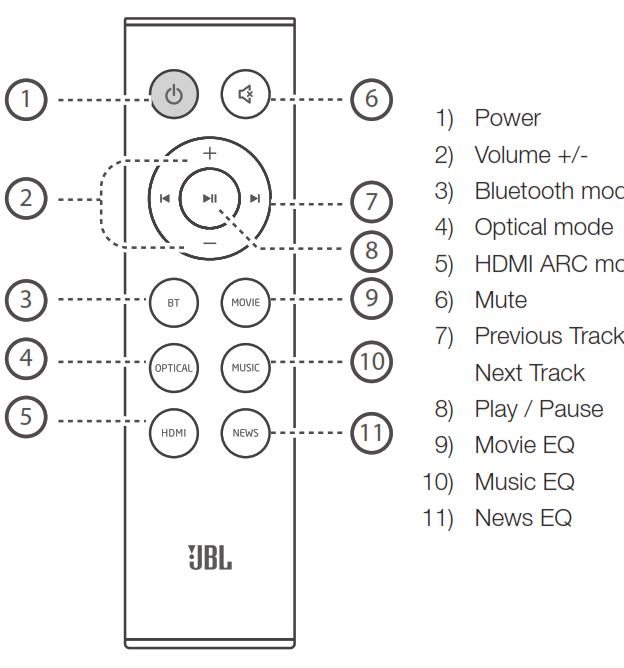
 Remark: Press and hold Bluetooth (BT) button on your remote control for 3 seconds if you want to pair another mobile device.NOTES– If asked for a PIN code when connecting a Bluetooth device, enter <0000>.– In Bluetooth connection mode, the Bluetooth connection will be lost if the distance between the Soundbar and the Bluetooth device exceeds 27 ft/ 8m.– The Soundbar automatically turns off after 10 minutes in the Ready state.– Electronic devices may cause radio interference. Devices that generate electromagnetic waves must be kept away from the Soundbar main unit – e.g., microwaves, wireless LAN devices, etc.2c. Listen to Music from Bluetooth Device– If the connected Bluetooth device supports Advanced Audio Distribution Profile (A2DP), you can listen to the music stored on the device through the player.– If the device also supports Audio Video Remote Control Profile (AVRCP), you can use the player’s remote control to play music stored on the device.1. Pair your device with the player.2. Play music via your device (if it supports A2DP).3. Use supplied remote control to control play (if it supports AVRCP).– To pause/resume play, press the
 Ensure that the unit is connected to the TV or audio device.
- Press the button repeatedly on the unit or press the OPTICAL, HDMI buttons on the remote control to select the desired mode.
- Operate your audio device directly for playback features.
- Press the VOL +/– buttons to adjust the volume to your desired level.
Tip: While in OPTICAL/HDMI ARC mode, if there’s no sound output from the unit and the status Indicator flashes, you may need to activate PCM or Dolby Digital Signal output on your source device (e.g. TV, DVD or Blu-ray player).
7. Respond to Your TV Remote Control
Use your own TV remote control to control your soundbar
7a. For other TVs, do IR remote learning
To program the soundbar to respond to your TV remote control,follow these steps in Standby mode.
1. Press and hold VOL+ and SOURCE button for 5 seconds onsoundbar to enter learning mode.
• The Orange indicator will flash quickly.

Learning POWER button2. Press and hold the POWER button for 5 seconds on thesoundbar.3. Press the POWER button twice on the TV remote control.

Follow the same procedure (2-3) for VOL- and VOL+. For mute, press both VOL+ and VOL- button on soundbar and press MUTE button twice on TV remote control.
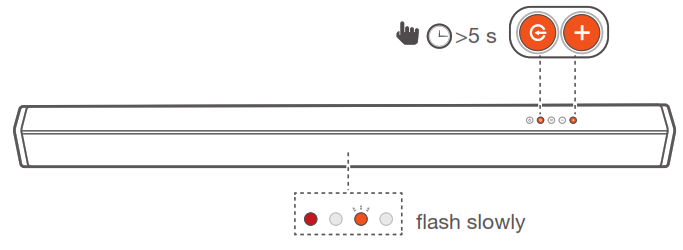
4. Press and hold VOL+ and SOURCE button for 5 seconds on soundbar again and now your soundbar respond to your TV remote control.
- The Orange indicator will flash slowly.
8. SOUND SETTING
This section helps you choose the ideal sound for your video or music.
Before you start• Make the necessary connections described in the user manual.• On the soundbar, switch to corresponding source for other devices.
Adjust the volume
- Press VOL+/- button to increase or decrease a volume level.
- To mute sound, press (MUTE) button.
- To restore the sound, press (MUTE) button again or press VOL+/- button.
Note: While adjusting the volume, the status LED indicator will flash quickly. When the volume has hit maximum/minimum value level, the status LED indicator will flashes once.
Select Equalizer (EQ) Effect
Select predefined sound modes to suit your video or music. Press the (EQ) button on the unit or press the MOVIE / MUSIC / NEWS button on remote control to select your desired preset equalizer effects:
- MOVIE: recommended for viewing movies
- MUSIC: recommended for listening to music
- NEWS: recommended for listening to news
9. SYSTEM
1. Auto standby
This soundbar automatically switches to standby after 10 minutes of button inactivity and no audio/video play from a connected device.
2. Auto wake up
The soundbar is powered on whenever a sound signal is received. This is most useful when connecting to the TV using the optical cable, as most HDMI™ ARC connections enable this feature by default.
3. Select Modes
Press the button repeatedly on the unit or press the BT, OPTICAL, HDMI buttons on the remote control to select the desired mode. The indicator light on the front of the main unit will show which mode is currently in use.
• Blue: Bluetooth mode.• Orange: OPTICAL mode.• White: HDMI ARC mode.
4. Software Update
JBL may offer updates for soundbar’s system firmware in the future. If an update is offered, you can update the firmware by connecting a USB device with the firmware update stored on it to the USB port on your soundbar.Please visit www.JBL.com or contact JBL call center to receive more information about downloading update files.
10. PRODUCT SPECIFICATIONS

10. TROUBLESHOOTING
If you have problems using this product, check the following points before you request service.
SystemThe unit will not turn on.• Check if power cord is plugged into the outlet and the soundbar
Sound
No sound from Soundbar.• Make sure that the soundbar is not muted.• On the remote control, select the correct audio input source• Connect the audio cable from your soundbar to your TV or other devices.• However, you do not need a separate audio connection when:– the soundbar and TV are connected through HDMI ARC connection.Distorted sound or echo.• If you connect your TV to soundbar via optical cable, make sure the TV is set to volume ‘0’.
Bluetooth
A device cannot connect with the Soundbar.
- You have not enabled the Bluetooth function of the device. See the user manual of the device on how to enable the function.
- The soundbar is already connected with another Bluetooth device. Press and hold BT button on your remote control to disconnect the connected device, then try again.
- Turn off and turn off your Bluetooth device and try to connect again.
- The device is not correctly connected. Connect the device correctly.
Quality of audio play from a connected Bluetooth device is poor.
- The Bluetooth reception is poor. Move the device closer to the soundbar, or remove any obstacle between the device and the soundbar.
The connected Bluetooth device connects and disconnects constantly.
- The Bluetooth reception is poor. Move your Bluetooth device closer to the soundbar, or remove any obstacle between the device and the soundbar.
- For some Bluetooth device, the Bluetooth connection can be deactivated automatically to save power. This does not indicate any malfunction of the soundbar.
Remote ControlThe remote control does not work.
- Check if the batteries are drained and replace with new batteries.
- If the distance between the remote control and the main unit is too far, move it closer to the unit.

HARMAN International Industries,Incorporated 8500 BalboaBoulevard, Northridge, CA 91329USAwww.jbl.com
© 2019 HARMAN International Industries, Incorporated. All rights reserved. JBL is a trademark of HARMAN International Industries, Incorporated, registered in the United States and/or other countries. Features, specifications and appearance are subject to change without notice. The Bluetooth word mark and logos are registered trademarks owned by the Bluetooth SIG, Inc. and any use of such marks by HARMAN International Industries, Incorporated is under license. Other trademarks and trade names are those of their respective owners. The terms HDMI, HDMI High-Definition Multimedia Interface, and the HDMI Logo are trademarks or registered trademarks of HDMI Licensing Administrator, Inc. Manufactured under license from Dolby Laboratories. Dolby, Dolby Audio and he double-D symbol are trademarks of Dolby Laboratories..
JBL Cinema SB110 Manual – JBL Cinema SB110 Manual –