JBL OnBeat Manual
Important Safety Instructions
Please READ The Following Precautions Before Use:
- Read these instructions, heed all warnings and keep for future reference.
- Do not use this apparatus near water.
- Clean only with a dry cloth.
- Do not block any ventilation openings; a minimum distance of 10mm around the entire apparatus is required for sufficient ventilation.
- No naked flame sources, such as lighted candles, should be placed on or near the apparatus.
- Attention should be drawn to the environmental aspects of battery disposal.
- The apparatus is to be used in moderate climates only.
- Do not install near any heat sources such as radiators, heat registers, stoves or other apparatuses (including amplifiers) that produce heat.
- Protect the power cord from being walked on or pinched, particularly at the plugs and convenience receptacles, and at the point where they exit from the apparatus.
- Only use attachments/accessories specified by the manufacturer.
- Unplug this apparatus during lightning storms or when unused for long periods of time.
- Refer all servicing to qualified service Servicing is required when the apparatus has been damaged in any way, such as the power supply cord or plug is damaged, liquid has been spilled or objects have fallen into the apparatus, or the apparatus has been exposed to rain or moisture, does not operate normally, or has been dropped.
- To be completely disconnected from the power input, the main plug of the AC/DC adapter shall be disconnected from the main.
- The main plug of the AC/DC adapter should not be obstructed OR should be easily accessed during intended use.
- The marking information is located at the bottom of the apparatus.
- The battery shall not be exposed to excessive heat such as sunshine, fire or the like.
- The apparatus and AC/DC adapter shall not be exposed to dripping or splashing, and no objects filled with liquids, such as vases, shall be placed on the apparatus and AC/DC adapter.
- TO PREVENT THE RISK OF ELECTRIC SHOCK, DO NOT REMOVE THE COVER (OR BACK). THERE ARE NO USER-SERVICEABLE PARTS INSIDE THIS PLEASEREFER SERVICING TO QUALIFIED HARMAN CONSUMER GROUP, INC., SERVICE PERSONNEL.
- Never remove grille covers in order to service the speaker The speaker system does not contain any user-serviceable parts.
Important Note For All Electronic Products:
Before inserting or unplugging audio cables from the source device’s headphones or line-level output jacks, it is good practice to turn off the device first. This will prolong the life of your unit, help protect your device from static electricity and prevent potential damage.
FCC STATEMENT AND WARNING
This device complies with Part 15 of the FCC Rules. Operation is subject to the following two conditions:
- this device may not cause harmful interference, and
- this device must accept any interference received, including interference that may cause undesired
This equipment has been tested and found to comply with the limits for a Class B digital device, pursuant to Part 15 of the FCC Rules. These limits are designed to provide reasonable protection against harmful interference in a residential installation. This equipment generates, uses and can radiate radio frequency energy and, if not installed and used in accordance with the instructions, may cause harmful interference to radio communications. However, there is no guarantee that interference will not occur in a particular installation. If this equipment does cause harmful interference to radio or television reception, which can be determined by turning the equipment off and on, the user is encouraged to try to correct the interference by one or more of the following measures:
- Reorient the receiving antenna.
- Increase the separation between the equipment and receiver.
- Connect the equipment into an outlet on a circuit different from that to which the receiver is connected.
- Consult the dealer or an experienced radio/TV technician for help.
Any special accessories needed for compliance must be specified in the instruction manual.
MODIFICATIONS NOT EXPRESSLY APPROVED BY THE MANUFACTURER COULD VOID THE USER’S AUTHORITY TO OPERATE THE EQUIPMENT UNDER FCC RULES.
The normal function of the product may be disturbed by strong electromagnetic interference. If so, simply reset the product to resume normal operation by following the instruction manual. In case the function could not resume, please use the product in another location.
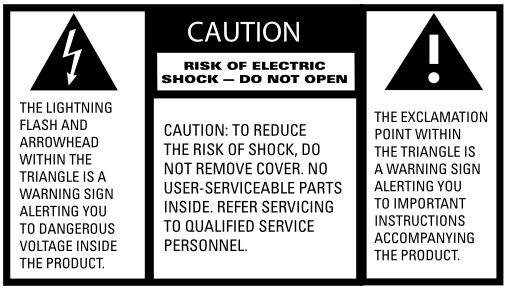
WARNING: TO PREVENT FIRE OR ELECTRICAL SHOCK HAZARD, DO NOT EXPOSE THIS PRODUCT TO RAIN OR MOISTURE.
WARNING: THE APPARATUS SHOULD NOT BE EXPOSED TO DRIPPING OR SPLASHING AND NO OBJECTS FILLED WITH LIQUID, SUCH AS VASES, SHOULD BE PLACED ON THE APPARATUS.
IMPORTANT: THE APPROPRIATE ADAPTER MUST BE INSTALLED BEFORE INSERTING YOUR iPod/iPhone INTO THE JBL® PRODUCT. MAKE SURE THAT THE CONNECTOR FOR THE iPod/iPhone IS PROPERLY ALIGNED WITH THE JBL PRODUCT’S CONNECTOR WHEN INSTALLING YOUR iPod/iPhone. FAILURE TO DO SO MAY CAUSE PERMANENT DAMAGE TO THE CONNECTOR FOR THE iPod/iPhone, RENDERING THE iPod/iPhone INOPERABLE.
JBL ON TIME™ 200p
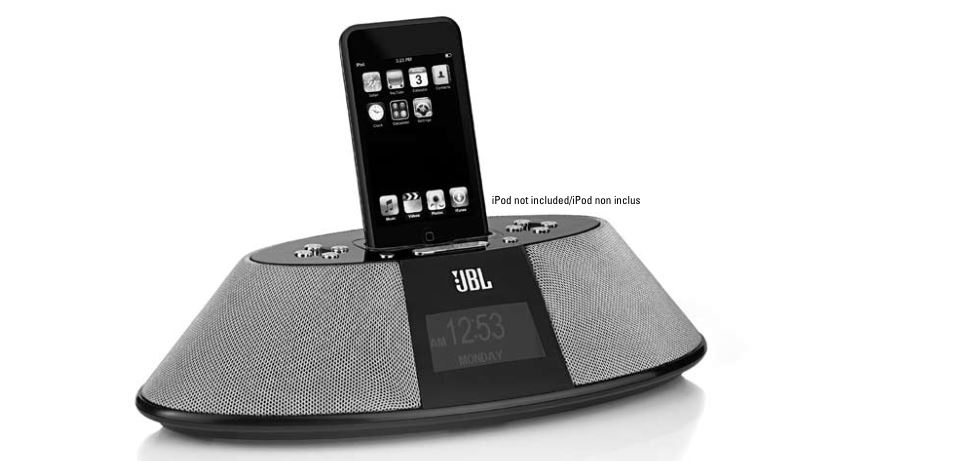
The JBL On Time™ 200P high-performance loudspeaker dock and clock radio for iPod/iPhone will revolutionize the way you listen to your radio, use your iPod/iPhone, and wake from a good night’s sleep.
The JBL On Time 200P system is a revolution in time travel. Imagine waking up to music on your favorite station or your iPod/iPhone, with no more buzzer or bad radio reception. The compact time machine and sound center, when connected to your iPod/iPhone, MP3 player or other music source, produces clean, powerful sound while providing time-keeping, alarm and radio features. The system is the world’s first time machine with an intuitive user interface that is easier than ever to navigate.
The JBL On Time 200P loudspeaker dock has full ability to navigate your iPod via IR remote. Also, not only can you wake up to your favorite radio station or song on your iPod/iPhone, but with the multiple alarm setting option, you can set up to seven different alarms for “His” and “Hers,” at whatever day or frequency needed.
Evercharge Topology
The JBL On Time 200P speaker dock charges your iPod/iPhone, even when it’s not connected to the computer or the system is off. The system’s memory is maintained by a backup battery. Even with the power out, it will provide the alarm function.
Coe (Computer-Optimized Equalization)
The JBL On Time 200P system equalization is computer-optimized to provide a rich, complete soundstage.
Oct (Optimized Compression Topology)
The JBL On Time 200P radio and loudspeaker dock utilizes a proprietary compression technology to ensure clean, accurate sound at high output levels.
Display
The large, backlit LCD enables easy viewing and menu navigation. Automatic dimming sets the correct brightness level in any room environment.
Unpacking Your JBL On TIME™ 200p

- Choose the appropriate adapter for iPod/iPhone and place it into the docking Then place your iPod/iPhone into the adapter.
- For backup memory, install three AAA batteries in the battery compartment underneath the unit.
- Connect the external AM antenna for better reception.
- Unwind the FM antenna and straighten the wire for the best reception.
- Plug the power adapter into the “DC In” jack and then plug the adapter into a wall outlet.
- If an additional audio source is used, connect the source to the “Aux In” jack.

CONTROLS
Setting the Clock
- Press Menu/Up Level at any screen to display Top Menu (may require repeated presses, depending on which menu state the unit was previously in).
- Use Up/Down arrows to highlight Press Enter to confirm.
- Use Up/Down arrows to highlight 12-hour or 24-hour Press Enter to confirm.
- Use Up/Down arrows to set Press Enter to confirm. Minute field becomes highlighted.
- Use Up/Down arrows to set Press Enter to confirm. AM/PM field becomes highlighted.
- Use Up/Down arrows to set Day of Press Enter to confirm. The clock is set!
Note: During clock-setting, if there is no user input for 2 seconds, display will return to the Now Playing screen. Press any one of the Enter, Up/Down arrows, or Menu/Up Level to return to setting selection.

Playing Music
- Press Source button to select the source (iPod/iPhone, AM, FM, Aux).
- Press “+” button to increase volume.
- Press “–” button to decrease volume.

Languages/Region
- Press the Menu/Up Level button until you reach the Top Menu
- Use Up/Down arrows to select Region and press
- Use Up/Down arrows to select Press Enter.
- Use Up/Down arrows to select radio band region Press Enter.
Radio Tuning
- If AM or FM radio is already selected and playing, use Up/Down arrows to tune frequency; hold either button and release to scan for the next station.
- Otherwise, press Source until FM or AM is selected.
- Tune to the desired frequency using Up/Down arrows; hold either button and release to scan for the next station.
Setting Presets
- While listening to AM/FM radio, press and hold Preset for 2 seconds. The Radio Preset screen will be displayed.
- Use Up/Down arrows to select slot to store preset. Press Enter to confirm. Preset is stored !
To Select a Preset for Listening
- Press Preset once at any screen to display the Preset list.
- Use Up/Down arrows to highlight Press Enter to confirm. Preset station will begin playing!
Alarm Setting†
- Press Menu/Up Level at any screen to display Top Menu (may require repeated presses, depending on which menu state the unit was previously in).
- Use Up/Down arrows to highlight Press Enter to confirm; or press Alarm to go directly to the Alarm menu.
- Use Up/Down arrows to select an Alarm slot to Press Enter to confirm. Hour field becomes highlighted.
- Use Up/Down arrows to set Press Enter to confirm. Minute field becomes highlighted.
- Use Up/Down arrows to set Press Enter to confirm. AM/PM field becomes highlighted.
- Use Up/Down arrows to set AM/PM. Press Enter to confirm.
- Use Up/Down arrows to set Day of Week, Weekdays, Weekends, Everyday or One-Time. Press Enter to confirm.
- Use Up/Down arrows to set Alarm Press Enter to confirm. Alarm is set!
Note: During alarm-setting, if there is no user input for 2 seconds, display will return to the Now Playing screen. Press any one of the Enter, Up/Down arrows, or Menu/Up Level to return to setting selection.
† Use this same procedure to modify a previously set Alarm. 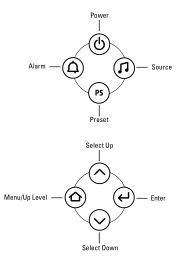
To Enable/Disable a Set Alarm
- Press Menu/Up Level at any screen to display the Top Menu (may require repeated presses, depending on which menu state the unit was previously in).
- Use Up/Down arrows to highlight Press Enter to confirm; or press Alarm to go directly to the Alarm menu.
- Use Up/Down arrows to highlight Press Alarm to enable/disable the alarm. An icon will be displayed on the left when the alarm is enabled, and the alarm will sound at the set time.
Waking to the iPod/iPhone
- Use the steps under Alarm Setting and choose “iPod” as the source.
- On your iPod/iPhone, choose the song you would like to awaken to and press Play.
- Set the volume level on the JBL On Time™200P unit.
- Put your iPod/iPhone to sleep by holding down the Play/Pause button (older iPod models may vary).
- The JBL On Time 200P system can be put to sleep by pressing the Power button.
Note: If you choose the last song on your iPod/iPhone, please place the iPod/iPhone in repeat mode, which will ensure that the iPod/iPhone will continue playing past the last song.
Screen Contrast/Brightness
- Press the Menu/Up Level button until you reach the Top Menu screen.
- Use Up/Down arrows to select Display and press Enter.
- Use Up/Down arrows to select Brightness or Press Enter.
- Adjust settings using Up/Down arrows.
Note: To set brightness to Auto, press the Down arrow until Auto is highlighted.
Sleep Timer
- Press the Menu/Up Level button until you reach the Top Menu screen.
- Use Up/Down arrows to select Sleep and press Enter.
- Use Up/Down arrows to select minutes and press Enter.
- The sleep timer is started and the unit will power off when the timer reaches zero.
Snooze Timer Set
- Press and hold the Snooze button for 3 seconds until you reach the Set Snooze Timer screen.
- Use Up/Down arrows to select minutes and press Enter.
- Snooze feature will use this value the next time it is activated.

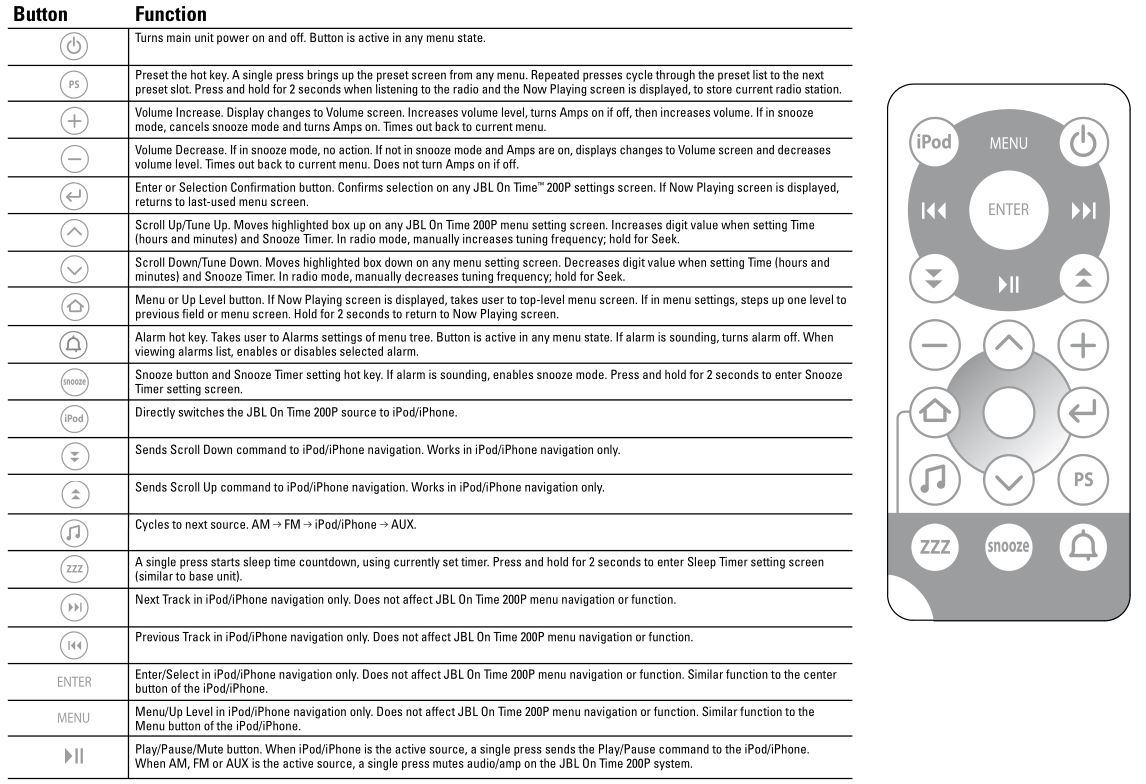


SPECIFICATIONS
JBL ON TIME™ 200p
- Frequency Response: 70Hz – 20kHz
- Power Consumption: 30 Watts maximum
- JBL On Time™ 200P Transducer: Phoenix SE 1-3/4″ (45mm) x 2 (full range per channel)
- Power: 2 x 6 Watts
- Input Impedance: >5k Ohms Signal-to-Noise Ratio: >80dB
- Input Sensitivity: 350mV RMS for rated power output Power (USA/Canada): 120 Volts, 60Hz AC
- Power (Europe/UK): 220 – 230 Volts, 50Hz or 60Hz AC Power (Japan): 100 Volts, 50Hz or 60Hz AC
- Power (Australia): 240 Volts, 50Hz or 60Hz AC UL/CUL/CE-Approved
- Dimensions: 11-3/16″ x 5-3/4″ x 2-3/4″ (W x D x H) (284mm x 146mm x 70mm)
- Weight: 1.8 lb (0.8kg) Remote Battery: CR2025
![]()
Do not dispose of electrical appliances as unsorted municipal waste; use separate collection facilities:
Contact your local government for information regarding the collection systems available. If electrical appliances are disposed of in landfills or dumps, hazardous substances can leak into the groundwater and get into the food chain, damaging your health and well-being.
IMPORTANT: Use UM4/AAA/LR03 alkaline-type non rechargeable batteries only.
TROUBLESHOOTING
Sound Quality

Charging AND Syncing

Clock Set And Clock Memory


JBL is a trademark of Harman International Industries, Incorporated, registered in the United States and/or other countries. JBL On Time is a trademark of Harman International Industries, Incorporated.
iPod is a trademark of Apple Inc., registered in the U.S. and other countries. “Made for iPod” means that an electronic accessory has been designed to connect specifically to iPod and has been certified by the developer to meet Apple performance standards. “Works with iPhone” means that an electronic accessory has been designed to connect specifically to iPhone and has been certified by the developer to meet Apple performance standards. Apple is not responsible for the operation of this device or its compliance with safety and regulatory standards.
Harman Consumer Group, Inc.
8500 Balboa Boulevard, Northridge, CA 91329 USA 516.255.4525 (USA only)
© 2008 Harman International Industries, Incorporated. All rights reserved.
Document Number: 950-0264-001 REV. A
JBL OnBeat Manual – JBL OnBeat Manual –

