![]()
![]()

OPERATION MANUALOther languages can be downloaded from:WWVV.1B-SYSTEMS.EU
 |
Version: 1.1 |
Thank you for buying this JB Systems® product. To take full advantage of all possibilities, please read these operating instructions very carefully.
FEATURES
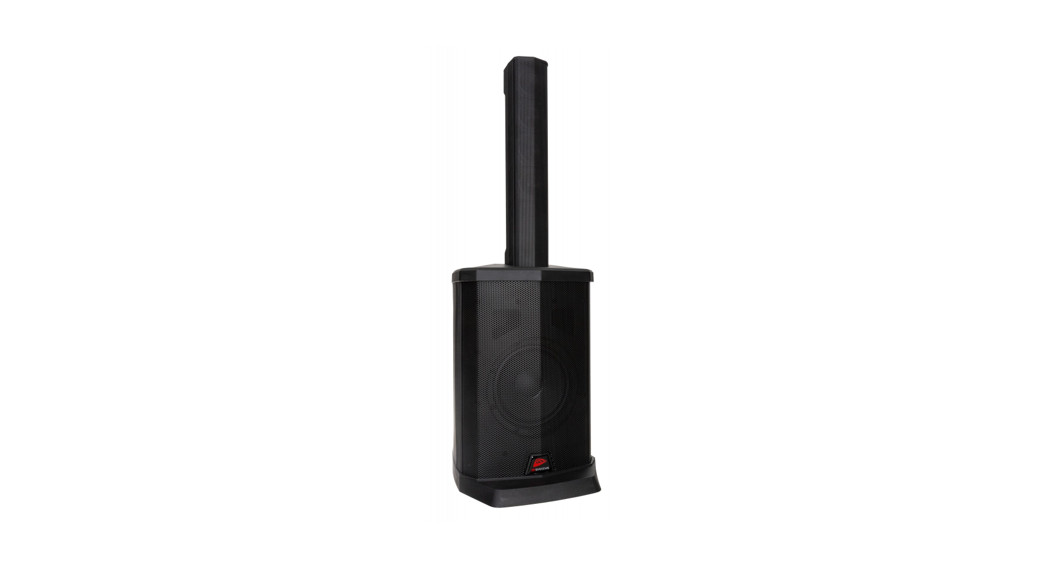
- A compact portable column speaker system with an internal media player + BluetoothTM
- The PPC-082B has a battery onboard for mobile use. (battery included)
- 8″ woofer with a surprisingly deep bass sound and separate bass level control
- 2 Extra microphone inputs with individual level control + build-in sound effect control
- Both microphone inputs can also be used as mono Line inputs
- Stereo mini-jack input to connect an external player
- The media player accepts both USB sticks and SD-HC memory cards up to 32GB
- Plays MP3, WAV, WMA, APE, and FLAC files.
- Modulable column speaker for 3 different heights.
- No more speaker stand is needed !
- Balanced line output to connect extra speakers.
- Bluetooth TWS function for wireless stereo when 2 speakers are used.
- Transport bag sets are optionally available.
BEFORE USE
- Before you start using this unit, please check if there’s no transportation damage. Should there be any, do not use the device and consult your dealer first.
- Important: This device left our factory in perfect condition and well packaged. It is absolutely necessary for the user to strictly follow the safety instructions and warnings in this user manual. Any damage caused by mishandling is not subject to warranty. The dealer will not accept responsibility for any resulting defects or problems caused by disregarding this user manual.
- Keep this booklet in a safe place for future consultation. If you sell the fixture, be sure to add this user manual.
- To protect the environment, please try to recycle the packing material as much as possible.
Check the contents:Check that the carton contains the following items:
- User manual
- 1 Bass speaker
- 1 Column speaker
- 2 Column extension modules
- Power cable
- The PPC-082B has a Battery already installed in the unit
VERY IMPORTANT: RECHARGING THE BATTERY –To extend the lifetime of the battery it is very important to NEVER store the unit with an empty battery! So keep in mind to ALWAYS store the unit with a fully charged battery. If the unit is stored for a long time, recharge it every 3 months! NO guarantee is offered on the rechargeable battery!
SAFETY INSTRUCTIONS:
 |
CAUTION:risk of electric shock, do not open |  |
CAUTION: To reduce the risk of electric shock, do not open. No user-serviceable parts inside. Refer servicing to qualified service personnel only.The lightning flash with the arrowhead symbol within the equilateral triangle is intended to alert the use or the presence of un-insulated “dangerous voltage” within the product’s enclosure that may be of sufficient magnitude to constitute a risk of electric shock.The exclamation point within the equilateral triangle is intended to alert the user to the presence of important operation and maintenance (servicing) instructions in the literature accompanying this appliance.![]() This symbol means: indoor use only
This symbol means: indoor use only
![]() This symbol means: Read instructions
This symbol means: Read instructions
 This speaker can easily reproduce sound pressure levels (SPL) sufficient enough to cause severe and permanent hearing damage. Always protect your ears when you are exposed for a longer period to SPL in excess of 85dB!
- Even if the speaker cabinet is made of water-resistant material, the woofer and tweeter are not protected against humidity and rain. Therefore this speaker is intended for indoor use only, use of this product outdoors, in humid conditions, voids all warranties.
- Always mount this speaker in a safe and stable matter.
- Take special care when the cabinets are suspended. This is potentially dangerous and should only be carried out by technicians who have knowledge of the techniques and regulations of rigging speakers!
- To prevent fire or shock hazards, do not expose this appliance to rain or moisture.
- To avoid condensation to be formed inside, allow the unit to adapt to the surrounding temperatures when bringing it into a warm room after transport. Condense sometimes prevents the unit from working at a full performance or may even cause damages.
- Don’t place metal objects or spill liquid inside the unit. No objects filled with liquids, such as vases, shall be placed on this appliance. Electric shock or malfunction may result. If a foreign object enters the unit, immediately disconnect the mains power.
- No naked flame sources, such as lighted candles, should be placed on the appliance.
- Don’t cover any ventilation openings as this may result in overheating.
- Prevent use in dusty environments and clean the unit regularly.
- Keep the unit away from children.
- Inexperienced persons should not operate this device.
- The maximum saves ambient temperature is 40°C. Don’t use this unit at higher ambient temperatures.
- Always unplug the unit when it is not used for a longer time or before you start servicing.
- The electrical installation should be carried out by qualified personal only, according to the regulations for electrical and mechanical safety in your country.
- Check that the available voltage is not higher than the one stated on the rear panel of the unit.
- The socket inlet shall remain operable for disconnection from the mains.
- The power cord should always be in perfect condition. Switch the unit immediately off when the power cord is squashed or damaged. It must be replaced by the manufacturer, its service agent, or similarly qualified persons in order to avoid a hazard.
- Never let the power cord come into contact with other cables!
- When the power switch is in the OFF position, this unit is not completely disconnected from the mains!
- This appliance must be earthed to in order to comply with safety regulations.
- In order to prevent electric shock, do not open. There are no user-serviceable parts inside.
- Never repair a fuse or bypass the fuse holder. Always replace a damaged fuse with a fuse of the same type and electrical specifications!
- In the event of serious operating problems, stop using the appliance and contact your dealer immediately.
- Please use the original packing when the device is to be transported.
- Due to safety reasons, it is prohibited to make unauthorized modifications to the unit.
![]()
![]()

FUNCTIONS
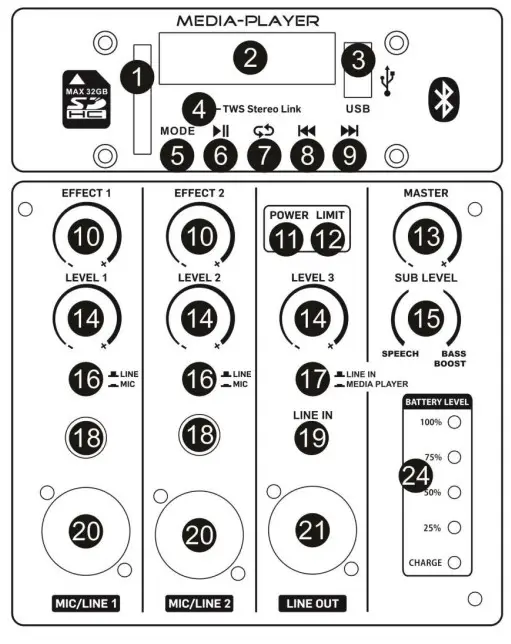
- SD-CARD input: here you can insert an SD-card. Insert the card gently with the upper side (printed side) facing to the left. As soon as the memory device is inserted, the music starts playing.Important note: the SD card should be formatted in FAT32. If a new SD-card is not detected, please format it first using a Windows PC.
- LCD DISPLAY: shows valuable information about the functions and the tracking number of the music.
- USB-input: here you can connect a USB stick. As soon as the memory device is inserted, the music starts playing.Important note: the USB memory should be formatted in FAT32. If a new USB stick is not detected, please format it first using a Windows PC.DON’T USE THIS CONNECTOR TO CHARGE YOUR MOBILE DEVICES
- TWS STEREO LINK: use this button to activate the TWS function and link this unit to a second one.When linked, you can stream music from your mobile device via Bluetooth in Stereo. (check the section THE USE OF BLUETOOTH below)
- MODE button: press this button shortly to toggle between MP3-player, Bluetooth™ or LINE IN (19). Press the button for a long period to switch the media player ON or OFF
- PLAY/PAUSE button: Press shortly to start/pause the current audio track.
- LOOP button: press this button to choose one of the different loop modes:• ONE: repeat only the current track.• RANDOM: play all tracks in random order.• FOLDER: repeat all tracks of the current folder.• ALL: repeat all tracks on the memory device.
- PREVIOUS TRACK button:• Press shortly to select the previous track.• Press longer to navigate backward in the song.
- NEXT TRACK button:• Press shortly to select the next track.• Press longer to navigate forwards in the song.
- EFFECT: use this button to set the level of delay effect that you want to add to this microphone channel.
- POWER: this LED will be lit when the power is switched ON
- LIMIT: when the LED flashes in green color, it simply means that a sound signal is detected and playing at an acceptable level. However, when the LED starts to flash in red color, it means the peak level is reached. NEVER put the music so loud that the LED is almost continuously Red !Important note for numbers 13 and 14: To prevent damage to the speakers of your speaker cabinet, please set all input levels always to zero before you switch the device on or connect a microphone/audio source. After this, you can turn the level up to the desired level.
- MASTER: is used to set the overall sound level of the unit.
- LEVEL 1-2-3: use these knobs to set the desired audio level for each individual channel. The LEVEL 3 button is used to adjust the volume of the internal player or the stereo mini-jack input LINE IN (19).
- SUB LEVEL: with this knob, you can adjust the amount of bass (coming from the bass cabinet) that is added to the sound.• For speech, it is better to lower the bass (turn anti-clockwise) so the voice becomes clearer and more intelligible. It will also attenuate disturbing ‘pop’ noises• The standard setting for music is the center position. Use also this position when you play the music loud.• When music is played at a lower level, the bass can be boosted a little bit (turn clockwise) to create a warmer and deeper sound.
- MIC/LINE: use this switch to adjust the input level, depending on the strength of your input signal.Warning: always turn down the channel volume when you use this switch!
- LINE IN / MEDIA PLAYER: use this switch to toggle between the LINE IN input signal (19) and thebuilt-in media player. Warning: always turn down the channel volume when you use this switch!
- JACK INPUT: for line and microphone signals. Don’t forget to adapt the MIC/LINE switch (16)
- LINE INPUT: stereo mini-jack to connect an external sound source (tablet, pc, etc. )
- XLR INPUT: for line and microphone signals. Don’t forget to adapt the MIC/LINE switch (16)
- LINE OUT: This can be used to send the audio signal to another powered speaker or amplifier.
- POWER SWITCH: used to switch the unit ON/OFF
- MAINS SOCKET: with integrated fuse holder. Connect the supplied mains cable here.Important: always replace a broken fuse with a fuse that has the exact same specifications. If a fuse would blow up several times, stop using the unit and bring it in for a check-up and/or repair.
- BATTERY LEVEL INDICATOR: (only on the PPC-082B) Shows the power status of the battery.Charging the battery: When the unit is connected to the mains and the power of the unit is switched off, the CHARGE Led will be lit when the battery is charging. Once the battery is fully charged, the CHARGE Led will go out.
THE USE OF BLUETOOTH™:
Connect your mobile device via Bluetooth to stream music from your mobile device to the speaker:
- Switch on the speaker
- Select Bluetooth [bt] in the menu by pressing the [MODE] button. (if no SD card or USB stick is connected, the menu will automatically be in this mode [bt] )
- Scan the available Bluetooth units with your mobile device.
- The unit can be found under the name “Bluetooth”.
- Make the connection and wait till your mobile device is connected to the speaker (a sound signal can be heard when both devices are connected.
- You can now stream music from your mobile device to the speaker.
- Adjust [LEVEL 3] and the [MASTER] levels on the speaker. (don’t forget to open also the sound of your mobile device)
THE USE OF BLUETOOTH TWS:
When you have 2 units of the speaker or a PPC-081 and a PPC-082B it is possible to stream audio from your mobile device to both units in STEREO!To do this you have to activate the TWS function.
- Switch OFF the Bluetooth of your mobile device (phone, tablet, …)
- Switch on both speakers
- Select Bluetooth [bt] in the menu of both units by pressing the [MODE] button. (if no SD card or A USB stick is connected, the menu will automatically be in this mode)
- Now press the [TWS Stereo Link] button (4) on one unit. (not on both units)
- The unit will automatically connect itself to the second speaker.
- When both units are linked to each other a sound signal can be heard and [bt.bt] appears on both speaker systems.
Now you have to connect your mobile device to the first speaker (the one where you pressed the TWS button) When you will be connected, the speaker will receive the stereo signal from your mobile device, and it will send one channel to the other speaker
- Switch on the Bluetooth of your mobile device (phone, tablet, …)
- Scan the available Bluetooth units with your mobile device.
- The unit can be found under the name “Bluetooth”.
- Make the connection and wait till your mobile device is connected to the speaker.
- When your mobile device is connected to the speaker, a sound signal will be heard from both speakers.
- You can now stream music from your mobile device to the speakers in stereo.
BATTERY REPLACEMENT (PPC-082B only):
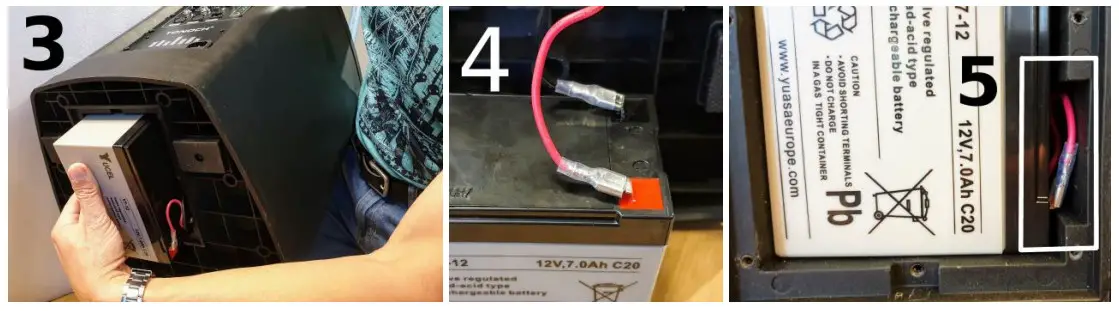
- Switch the unit off and disconnect the mains cable
- Remove the column speakers
- Put the speaker in a horizontal position, not upside-down!
- Take out the 6 screws (picture 1) to remove the battery cover
- Take out the 2 screws (picture 2) to remove the metal battery holder bar.
- Don’t use a tool to try to remove the battery out of the housing. Just put your had under the battery and lift up a little bit the top of the speaker. The battery will fall out of the housing in your hand (picture 3)
- Disconnect both connectors from the battery and connect them to the new battery. Take care to respect the colors of the connections: Red wire = + (positive pole), Black wire = -* (negative pole) (picture 4)
- Slide the new battery gently into the housing of the speaker.Important: The connectors and wires should fit in the wider opening of the compartment (see picture 5). Take care to don’t squeeze the wires between the battery and the housing of the speaker. The battery should slide in smoothly without that you have to use any effort or force. If this is not the case it means something is wrong. Remove the battery again and check what happens.
- Put back the metal battery holder with both screws (picture 2)
- Put back the battery cover with the 6 screws
SPECIFICATIONS
report this adThis unit is radio-interference suppressed. This appliance meets the requirements of the current European and national guidelines. Conformity has been established and the relevant statements and documents have been deposited by the manufacturer.
| PLAYER | |
| USB-memory: | <32GB – formatted FAT32 |
| SD-card: | SD + SDHC <32GB – formatted FAT32 |
| Accepted audio files: | MP3, WAV, WMA, APE and FLAC |
| AMPLIFIER | |
| Amplifier Power: | 100Wrms |
| Freq. Resp. (+/-3dB) | 45 – 18.000Hz |
| Cooling | natural air cooling |
| Mic/Line input | 2 x Balanced XLR/Jack |
| Line input | 1x Mini-Jack (stereo) |
| Line output | Balanced XLR |
| Fuse (5x20mm) | F3,15A / 250V |
| Power supply | 100-240Vac – 50/60Hz |
| Max Power Consumption: | 100W |
| Weight | PPC-081 = 15 kg, PPC-082B = 17 kg |
| Dimensions carton box HxWxD | 590 x 499 x 353 mm |
Every information is subject to change without prior noticeYou can download the latest version of this user manual on our website: www.jb-systems.eu
 DISPOSAL OF THE DEVICEDispose of the unit and used batteries in an environment-friendly manner according to your country’s regulations.
![]() MAILING LISTEN: Subscribe today to our mailing list for the latest product news!WWW.JB-SYSTEMS.EUCopyright © 2021 by BEGLEC NV‘t Hofveld 20 – B1702 Groot-Bijgaarden – BelgiumReproduction or publication of the content in any manner, without the express permission of the publisher, is prohibited.
MAILING LISTEN: Subscribe today to our mailing list for the latest product news!WWW.JB-SYSTEMS.EUCopyright © 2021 by BEGLEC NV‘t Hofveld 20 – B1702 Groot-Bijgaarden – BelgiumReproduction or publication of the content in any manner, without the express permission of the publisher, is prohibited.
[xyz-ips snippet=”download-snippet”]