Odyssey Clarinet Outfit Assembly Instructions
Thank you for purchasing this Odyssey Clarinet Outfit.
To enable you to use and enjoy playing this instrument we offer the following advice.
The instrument must first be assembled. Please carefully read and follow these instructions.
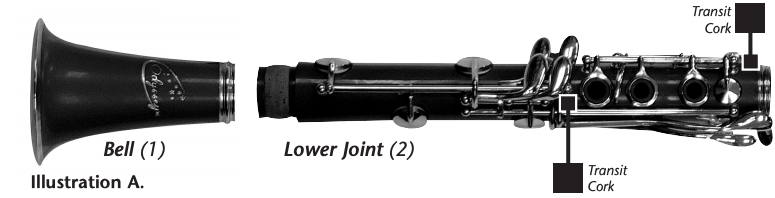

- From the Lower and Upper Joints carefully remove the small pieces of loose cube shaped cork (usually positioned as indicated
 on illustration A) that have been placed to prevent the keywork from moving in transit, usually about three pieces in total. DO NOT REMOVE CORK GLUED TO THE KEYWORK OR GLUED TO THE JOINT ENDS.
 - Smear grease from the small tub provided on to the joint and mouthpiece ends fitted with with a cork ring. This allows the sections to more easily slide together when assembled.
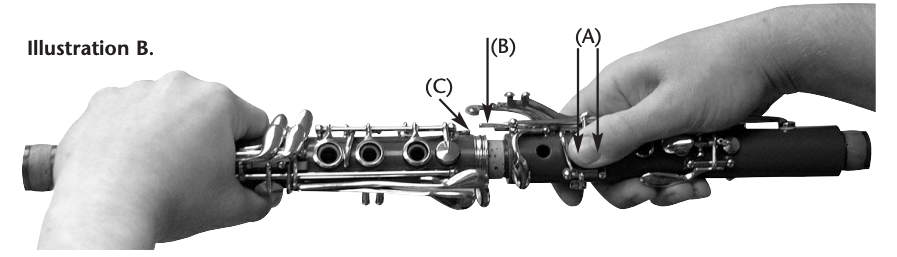
- Take joint sections 2 and 3 and join these together. To do this, hold down the A/D keys (A) on the upper joint section which raises lever (B). Keep holding down key (A) as you slide (slightly twisting as you go) the upper and lower joint sections together. When the lever (B) is located over the keywork (C) only then release the keys (A).
- Bell and Barrel Joints. Now join these to the already assembled upper and lower section by again slightly twisting them together.
- The Mouthpiece section comprises of four separate parts.Remove the Mouthpiece Cap, Ligature and Reed. When removing the ligature be careful not to damage the reed. Now join the mouthpiece to the rest of the assembled Clarinet, again using a twisting motion. The mouthpiece section must be aligned with the other parts in the correct position (see illustration A).To play the Clarinet the cane reed must be moistened, then carefully positioned and clamped on to the mouthpiece using the ligature (see illustration E). Do not overtighten the ligature.Note: If the edge of the reed is damaged in any way then replace it.
- There are many tutor books and videos available from musical instrument or sheet music stores to help you teach yourself to play the clarinet. We would also recommend you take lessons with a clarinet teacher. Have fun and enjoy playing your clarinet.If you remain uncertain after reading these guidlines, how to assemble your Odyssey Clarinet, seek advice at your local music store or from a music teacher.Damage caused by incorrect assembly and/or inappropriate handling will not be covered by the warranty. This does not affect your statutory rights.Useful Information.Keywork: This allows for the opening and closing of the tone holes. Regularly check that the pads are air tight and the springs that operate the mechanism have not become loose. Any retail music store will assist. It is essential the mechanism functions correctly to ensure the clarinet plays properly.Reeds: Reeds need to be treated with care. Reeds which become worn need replacing regularly to maintain a good musical sound. Reeds are available from all good music stores. We recommend you always have at least 2 or 3 reeds safely stored in your Odyssey Clarinet case.

 Remove the Mouthpiece Cap, Ligature and Reed. When removing the ligature be careful not to damage the reed. Now join the mouthpiece to the rest of the assembled Clarinet, again using a twisting motion. The mouthpiece section must be aligned with the other parts in the correct position (see illustration A).To play the Clarinet the cane reed must be moistened, then carefully positioned and clamped on to the mouthpiece using the ligature (see illustration E). Do not overtighten the ligature.
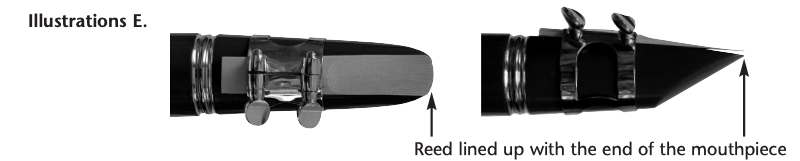 Note: If the edge of the reed is damaged in any way then replace it.
MAINTENANCE OF YOUR INSTRUMENT
It is important to disassemble and thoroughly clean the instrument after playing. Follow the routine below to ensure that the instrument is kept in peak condition.
- To prevent the reed from being damaged after playing, carefully remove it from the mouthpiece, replace the ligature and store the reed in a reedguard (not provided) until you next play.
- Use the swab enclosed in your outfit to clean any moisture from the mouthpiece.
- The barrel joint – must also be swabbed out, to remove any moisture.
- It is important to remove all moisture, from the upper and lower joints – this will prevent the keywork from tarnishing and prevent the pads from swelling.
- Always pass the swab through the instrument from top to bottom.
- Periodically the cleaning swab should be replaced.
TEMPERATURE AND PITCH ADJUSTMENTS
- Sudden changes in temperature can affect the tone and fundamental pitch of your instrument.
- Playing the instrument at room temperature is advisable for the best tone and pitch of the instrument.
- Slight adjustment to the connection between the barrel and top joint generally lowers the pitch of the instrument in the top joint.
- By adjusting the connection between the top and bottom joint at the middle on the instrument, will in turn lower the pitch in the bottom joint.
DAILY CARE
- Before playing the instrument always apply cork grease to the cork joints.
- An approved soft impregnated polishing cloth is useful to keep the key work free of dust and grease. Under no circumstances use oil, solvents or anti-corrosive products to clean your instrument.
Your instrument is a valuable item and should be treated with respect, by following the guidelines above, your instrument should provide you and your listeners with hours of pleasure.
![]()
Keep your instrument and tone in tip-top condition!Ask your stockist for Odyssey cleaning/maintenance kits and Rico reeds when purchasing accessories.
Odyssey Instruments are exclusively distributed throughout the world byJOHN HORNBY SKEWES & CO. LTD.Salem House, Parkinson Approach, Garforth, Leeds LS25 2HR.www.jhs.co.uk
References
[xyz-ips snippet=”download-snippet”]