JLF Carbon Infrared Heater Instructions

WARNING:THESE INSTRUCTIONS SHOULD BE READ CAREFULLY AND RETAINED FOR FUTURE REFERENCE.We cannot be liable for any damages caused by failure to observe these instructions.
IMPORTANT SAFETY INSTRUCTIONS
READ CAREFULLY – The infrared heater is designed for safe operation. Nevertheless, installation, maintenance and operation of the heater can be dangerous. Observing the following procedures will reduce the risk of fire, electric shock, injury to persons and keep installation time to a minimum. Save these instructions for future used.
- Read all instruction before using this heater.
- Remove the unit from its packaging and check to make sure it is in good condition before using.
- Do not let children play with parts of package (such as plastic bags).
- Check the household voltage to ensure it matches the heater’s rated specification. with a soft cloth moistened with mentholated spirit or alcohol.
- Check the power cord and plug carefully before used, to make sure that they are not damaged.
- Before unplugging the power cord, be sure to turn off the power, when energizing the unit, be sure your hands are dry to prevent from electric shock.
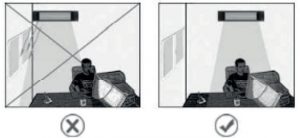
- Do not use flammable objects near or point the heater like furniture, pillows. bedding, paper, clothes and curtains at least 3 feet (1 meter) from the front of the heater and keep them always the sides and rear.
- Do not use near or in the immediate vicinity of a bath or swimming pool or any source of liquid.
- To protect against electric shock, do not immerse cord or plug in water or any other liquid.
- Do not insert or allow foreign objects to enter any ventilation or exhaust opening, as this may cause an electric shock, fire or damage to the heater.
- Always unplug the heater when not in use.
- Do not allow cord to overhang the counter top where it can be easily pulled by children.
- Do not put fingers or foreign objects into the grill while in operation.
- Do not leave the appliance unattended when in use.
- This heater is not intended for use in bathrooms, laundry and similar indoor locations, never located heater where it may fall into a bathtub or another water container.
- No liability can be accepted for any damage caused by non compliance with these instructions or any other improper use or mishandling.
- This appliance is not intended for use by persons (including children) with reduces physical, sensory or mental capabilities or lack of experience and knowledge unless they have been given supervision or instruction concerning the use of the appliance by a person responsible for their safety. Children and vulnerable people should be supervised to ensure they do not play with the appliance.
- If the supply cord is damaged in any way, it must be replaced by the manufacturer or its service agent or a similarly qualified person in order to avoid a hazard.
- To prevent overheating of this appliance, keep the air inlets and outlets clean and free of anything that may cause blockage. Check all inlets and outlets from time to time to ensure it is clear of any dirt or dust accumulation. DO NOT COVER.
- Parts of the heater may exceed 200oC, contact with the heating tube, reflector, or mental parts near the heating tube, may cause severe BURNS. To avoid burns, do not let bare skin touch hot surface.
- NEVER place hands under the heating elements. ALWAYS allow heating element to cool at least 10 minutes before touching the heating tube or adjacent parts.
- This product contains recyclable materials. Do not dispose this product as unsorted municipal waste. Please contact your local municipality for the nearest collection point.
INTRODUCTION
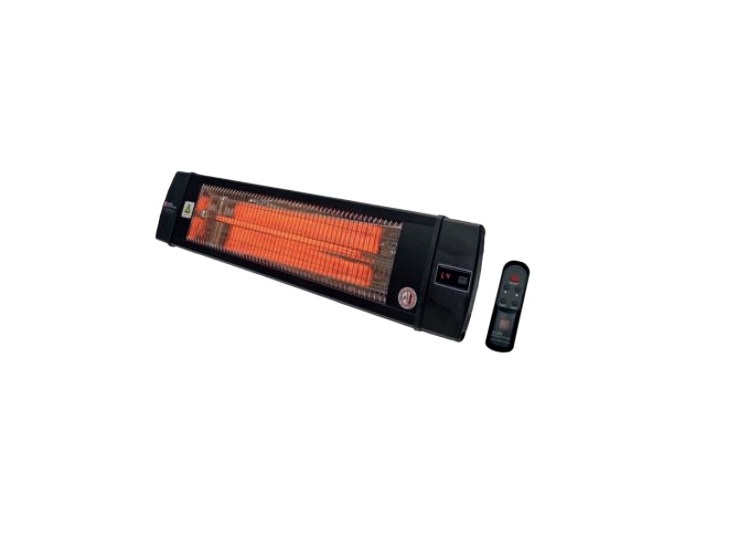
The SUNRAD RAINBOW carbon infrared heaters produce instant and comfortable heat like the sun. These robust and weatherproof heaters are designed for domestic and commercial heating applications within indoor and outdoor areas.
| MODEL | SUNRAD RAINBOW |
| Voltage(V) | 220-240VAC |
| Wattage(W) | 2000 |
| Amps(A) | 8.3-9.0 |
| Btu(HR) | 6825 |
| Dimensions W×H×D(mm) | 879×195.3×84.7 |
| Weight (KG) | 3.0 |
INSTALLATION
Tools Needed:
- Pencil
- Hammer
- Level
- Screw Driver
- Power Drill and drill bits
A wall mounting bracket is provide with the heater which has been specifically designed to allow this product to be fitted to a wall or ceiling before drilling the holders for the wall/ceiling is solid and that there are no hidden water pipes or electric wires. The heater must be installed no less than 16” from side walls and no less than 6″‘ off the floor.
ATTENTION! The appliance must be installed on the solid surfaces like concrete, wood or metal etc.
Important: Ensure that the supply cables are well mounted and that it does not come into contact with reflector of the heater or that does not trail into heated area, the supply cable can be fixed to the metal mounting bracket behind heater with plastic zip ties.
- This heater should be installed by a competent person, i.e. a qualified electrician.
- Always disconnected the heater from the electricity supply and allow it to cool before installation.
- This heater can be mounted in a horizontal or vertical manner, but for a higher efficiency we recommend horizontal usage.
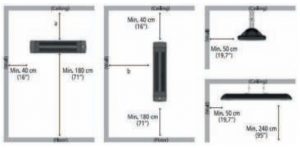
- For both wall and ceiling mounting, the lowest part of the heater must be located at or above a minimum height of 1.8m from ground level, so that the heater can not be touched when in operation.
- For wall mounting, there must be a 1.8m distance from your appliance to the ground. For ceiling mounting, there must be a 2.4m distance from your appliance to the ground.
- For both horizontal and vertical mounting on the wall, there must be a min. distance of 0.4m between the appliance and the ceiling.
- The distance from your appliance from the corners should be min. 0.4m for vertical use and min. 0.5m for horizontal use.
- When installed to the ceiling, there must be a distance of 0.5m between corners and the appliance.
- The distance of your appliance from the living beings is to be min 1m.
- The distance from the front side of the heater to materials such as wood, carton, cloth etc., must be min 1m.
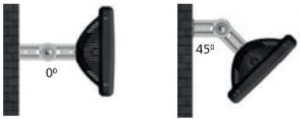
- When mounting horizontally or to a ceiling, do not position the heater at an angle more than 90°and less than 45°.
- The supply cable must be at the lower end of the heater if the heater is installed at an angle or vertically.
- Keep the supply cord away from the body of the heater which will get hot during use.
- Do not install the heater on an inflammable surface.
- Observe the minimum safe distance between the heater body and the inflammable surfaces when mounted.
- The heater should always have a minimum clearance of 0.5m from a ceiling and adjacent walls.
- If the heater is to be used outside, a weatherproof outlet is recommended.
- Before drilling ensure that there are no wires or water pipes in the area where the heater is to be installed.
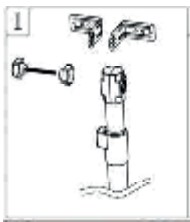
- The heater must be installed on the mounting brackets provided.
- Fasten the brackets securely to the mounting surface and the backside of the heater using the nuts and screws supplied.
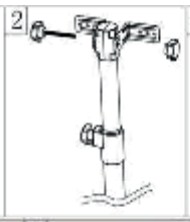
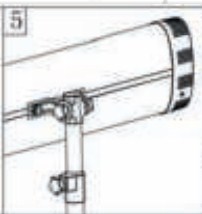
- Fasten the heater securely on the brackets using the nuts and bolts supplied.
- The brackets can be used to adjust the direction of the heater, adjust the heater angle by loosening the two bolts on the wall mounting bracket, tighten the bolts again when the desired angle is reached.
WALL/CEILING INSTALLATION
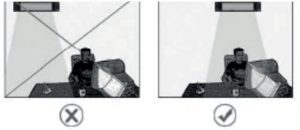
INSTALLATION WITH STAND
Noted: The heater with tip over function, with 45oC angle, once heater over the angle, the heater will be automatically stop working.


REMOTE CONTROL INSTRUCTIONS
| REMOTE CONTROL FUNCTIONS & HEATER LED RESPONSE | |||
|
Button |
Function (Heater Power ON) |
Function (Heater Power OFF) |
Heater LED Display |
|
1 |
Turn Heater OFF | ||
|
2 |
Mode dependant decrease for level, temperature & sleep time |
Turn heater ON Level 1 (min) |
L1 Changing up to L4 |
|
3 |
Mode dependant decrease for level, temperature & sleep time |
Turn heater ON Level 4 (min) |
L4 Changing Down to L1 |
|
4 |
Enable level setting mode (default start to last level used) |
L value |
|
|
5 |
Sleep timer in hours T0(off) – T9(max) |
T value |
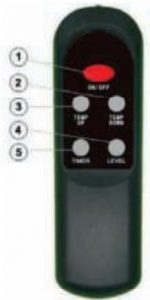
- POWER BUTTON: Turn the heater off.
- DOWN BUTTON: Decrease temperature, timer and level.
- UP BUTTON: Increase temperature, timer and level.
- LEVEL BUTTON: Use to adjust the 4P heat levels(P1-P4). Press the Level button then use the up and down buttons (buttons 2 and 3) to increase or decrease the heating level.
- TIMER BUTTON: To set the timer from T0-T9, which is the number of hours it will run. T0 will display and then adjust to the number of hours you would like to set, using the up and down buttons (2 and 3).
NOTED: All SUNRAD RAINBOW heaters and their remote controls have the same frequency, so it is possible to control several heaters with just one remote.
INSERTING BATTERY
Insert 2 AAA/ Alkaline type batteries into your remote control
- Flip the backside of your remote control and pull out battery cover. Insert the batteries in accordance with the instructions and polarity the batteries.
- Change the batteries in the same way depicted above.
NOTICE:
- Replace the old batteries with the same type batteries. Otherwise, your heater may not function well.
- Pull out the batteries in case of long terms of disuse to prevent leakage which may impair your remote control.
- Do not allow water or liquid to get into the remote control.
CAUTION: When the appliance is not operated for a long period of time, cleaning or maintenance is conducted or when the location of the heater is changed, the heater should be turned to OFF and unplugged from the electrical connection. Periodic inspection and removal of dirt and contaminants will ensure that equipment can be operated safely.
TROUBLESHOOTING
- Check if the power cord is plugged into an electrical outlet, if not, plug in.
- Check if electricity to the main fuse is working
- Check to see it the thermostat knob to the ON position.
- Check the thermostat setting, the heater may be off because it has reached the desired temperature setting.
MAINTENANCE
Attention! Careful and regular maintenance of your heater considering our instructions assume great importance so as to attain a long efficient operation of your appliance.
- Check the filthiness of the Reflector and IR Filament at least once a month. If necessary, apply cleaning and maintenance instructions.
- The number of checks may be increased considering the amount of the dust in the environment.
- Check the deformation of the Reflector, Wire and Frame visually while cleaning the appliance. In case of deformation, consult to your technical service.
- Check the Power Cord and Plug visually while cleaning the appliance. In case of deformation, consult to your technical service.
CLEANING
Regular and careful cleaning helps your infrared heater operate efficiently for many trouble free years. To clean your heater, follow steps below:
- Unplug the power cord for your safety before cleaning your appliance.
- Make sure the heater is cool before continuing.
- To keep the heater clean, the outer shell maybe cleaned with a soft, damp cloth. You may use a mild detergent if necessary.After cleaning, dry the unit with a soft cloth. (CAUTION: DO NOT let liquids enter the heater).
- DO NOT use alcohol, gasoline, abrasive powders, furniture polish or rough brushes to clean the heater. This may cause damage ordeterioration to the surface of the heater.
- DO NOT immerse the heater in water
- Wait until the heater is completely dry before use. Storage: Store the heater in a cool, dry location when not in use to prevent dust and dirt build up. Use packaging carton to store.
ATTENTION:
- Always disconnect the heater from the electricity supply and allow it to cool before attempting to work on it.
- If the heater has collected dust or dirt inside the unit or around the heating element, have to unit cleaned by a qualified service agent. Do not operate the heater in this condition.
- The only maintenance required is cleaning of the external surfaces of the heater.
- Do not touch the heating element with bare fingers, as residue from your hand could affect the life of the lamp. If it is accidentally touched, remove the finger marks with a soft cloth moistened with mentholated spirit or alcohol.
- Do not attempt to repair or adjust any electrical or mechanical functions on this heater.
- The heater contains no user serviceable parts. Should the product suffer damage or breakdown, it must be returned to the manufacturer or its service agent.
- Damaged supply cords to be replaced by the manufacturer, service agent or similarly qualified person in order to avoid hazard.
RECYCLINGAt the end of the electrical products useful life it should not be disposed of with household waste. Please recycle where facilities exist. Check with your Local Authority or retailer for recycling advice in your country.
References
[xyz-ips snippet=”download-snippet”]