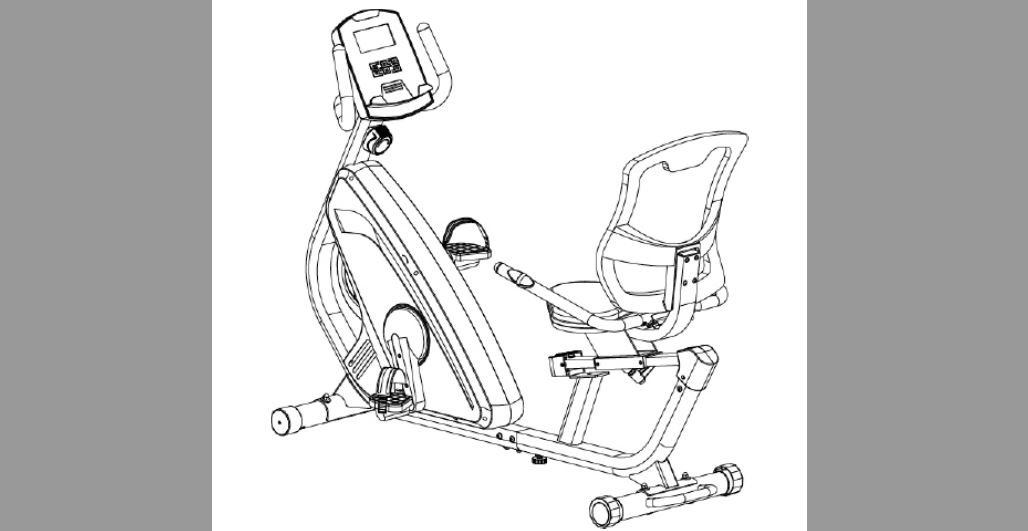
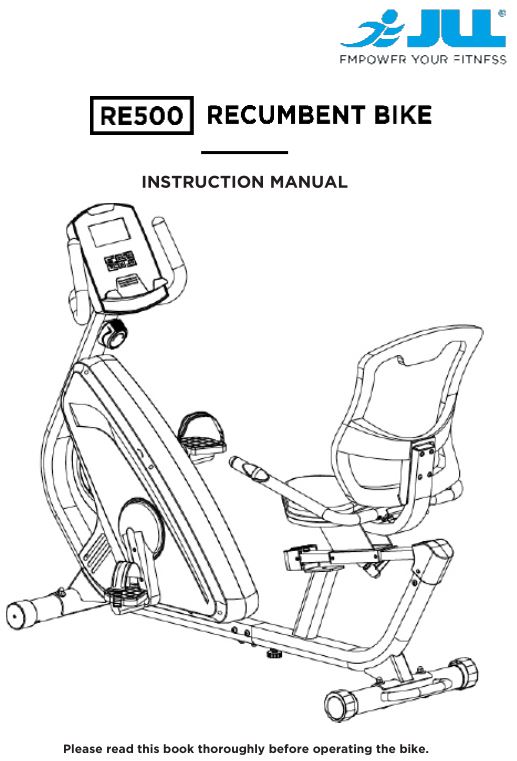
JLL Fitness Recumbent Bike
Instruction Manual
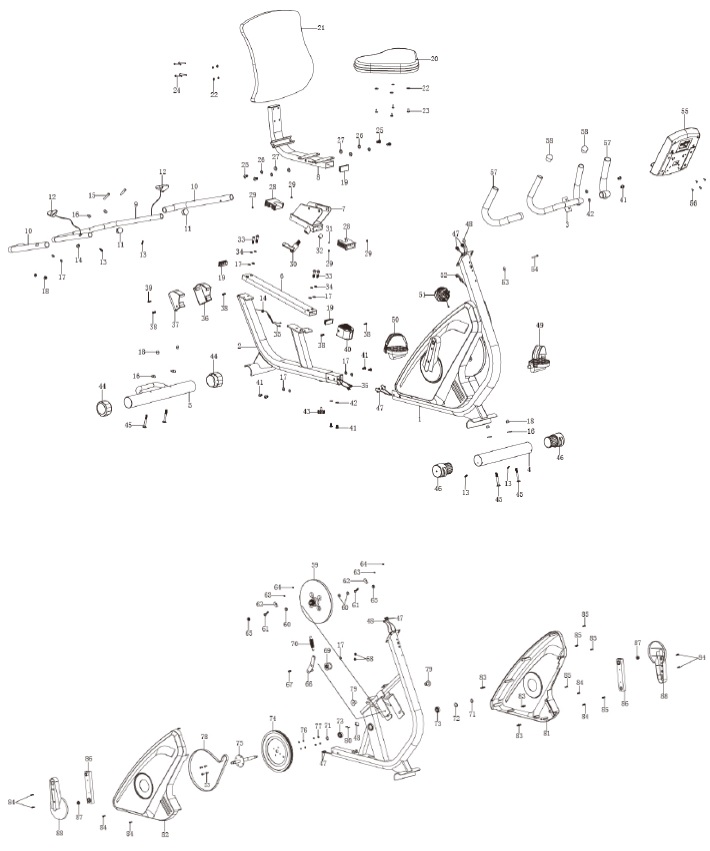
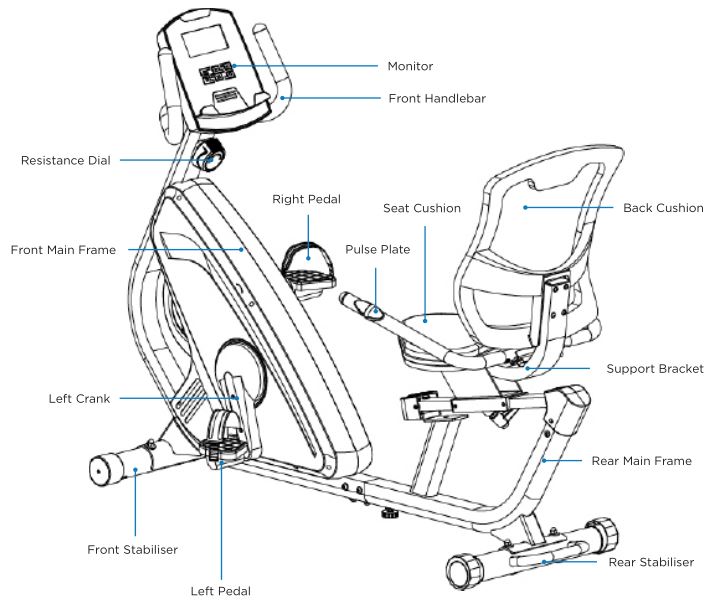
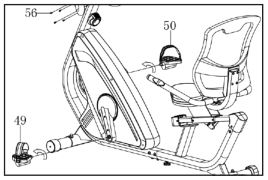
EXPLODED DIAGRAM
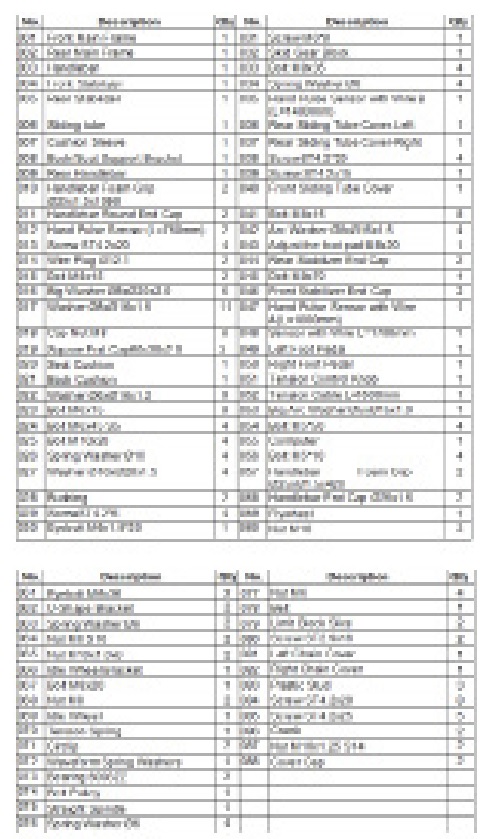
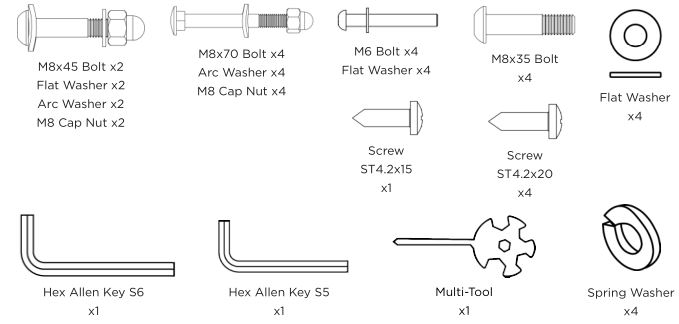
PARTS LIST
Safety Instructions
Please pay attention to the following instructions before operating this bike.
IMPORTANT SAFETY INFORMATION
Thank you for choosing our product. To ensure your health and safety, please use this equipment as advised. It is important to read this entire manual before assembling and using the equipment. Safe and effective use can only be achieved if the equipment is assembled, maintained and used in accordance to the manual. It is your responsibility to ensure that all users of the equipment are informed of all warnings and precautions.
1. Before starting any exercise program, you should consult a health professional to determine if you have any medical or physical conditions that could put your health and safety at risk or prevent you from using the equipment properly. A health professional’s advice is essential if you are taking medication that affects your heart rate, blood pressure or cholesterol level.
2. Be aware of your body’s signals. Incorrect or excessive exercise can damage your health. Stop exercising if you experience any of the following symptoms: pain, tightness in your chest, irregular heartbeat, lightheadedness, dizziness or feelings of nausea. If you do experience any of these conditions, you should consult a health professional before continuing with your exercise program.
3. Keep children and pets away from the equipment. The equipment is designed for adult use only.
4. Use the equipment on a solid, flat level surface with a protective cover for your floor or carpet. To ensure safety, the equipment should have at least 2 feet (61 cm) of free space all around it.
5. Ensure that all nuts and bolts are securely tightened before using the equipment. The safety of the equipment can only be maintained if it is regularly examined for damage and/or wear and tear.
6. Always use the equipment as indicated. If you find any defective components while assembling or checking the equipment, or if you hear any unusual noises coming from the equipment during exercise, discontinue use of the equipment immediately. Please contact JLL Fitness on 0800 6123 988 for advice on how to resolve the issue.
7. Wear suitable clothing while using the equipment. Avoid wearing loose clothing that may become entangled in the equipment.
8. Do not place fingers or objects into the moving parts of the equipment.
9. To avoid bodily injury and/or damage to the product or property, ensure to follow safe procedures for lifting and moving the item.
10. Your product is intended for use in cool, dry conditions. You should avoid storage in extreme cold, hot or damp areas as this may lead to corrosion and other related problems.
USER SAFETY PRECAUTIONS
PRIOR TO USE
- Assemble the bike according to the instruction manual.
- Consult your doctor before beginning any exercise program.
- Read instructions.
- Read warning labels.
- Read emergency stop procedures.
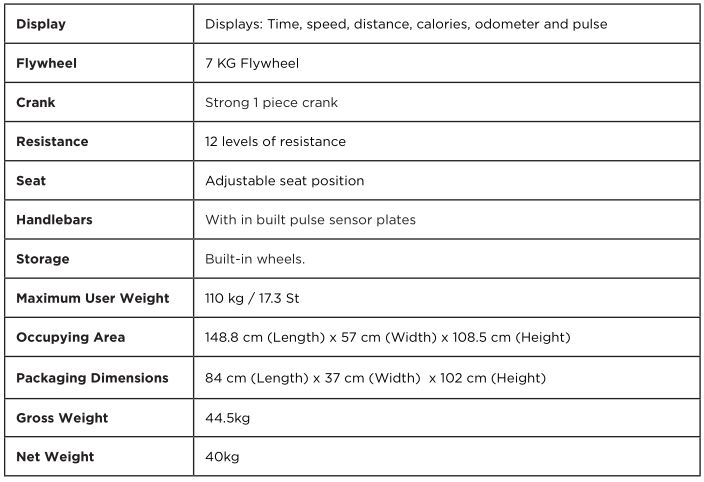
- Maximum user weight is 110kg/ 17.3 St.
- Inspect unit. If damaged, DO NOT USE.
- Ensure every bolt and screw is securely tightened.
DURING USE
- DO NOT use for stretching and DO NOT attach straps or other devices.
- DO NOT allow children aged 12 or younger to be on or near the machine.
- Stop exercising if you feel faint, dizzy, or encounter pain.
- Keep all clothing and accessories clear of moving parts.
EXERCISE SAFETY PRECAUTIONS
- Use sports clothes and gym shoes.
- DO NOT use with bare feet.
- This model has been designed for domestic purposes only.
FACILITY SAFETY PRECAUTIONS
- DO NOT operate in damp or wet locations.
- Use caution when getting on or off the bike.
- Check the bike for worn or loose components before each use. DO NOT use until worn or damaged parts are replaced.
- Maintain regularly. Refer to Preventive Maintenance chapter.
- DO NOT use the bike if: (1) the bike is not working adequately or (2) the bike has been dropped or damaged.
- DO NOT use the bike outdoors.
- Read the instruction manual completely before using the bike.
- Ensure all users wear appropriate footwear on JLL® equipment.
- As far as possible provide the following clearances: 0.5 m at each side and 2 m at the back. Be sure your bike is clear of walls, equipment and other hard surfaces.
- DO NOT modify the bike in any way. Any modifications will void the warranty.
- All the data displayed by the monitor is for reference purposes only.
WARNING STICKERS
Warning stickers indicate a potentially hazardous situation which, if not avoided, could result in death or serious injury. Carefully read the following caution and warning labels before using the unit.
![]() WARNINGIt is strictly forbidden to touch any moving parts of the bike.
WARNINGIt is strictly forbidden to touch any moving parts of the bike.
![]() WARNINGKeep small children and pets a safe distance from bike when in use.
WARNINGKeep small children and pets a safe distance from bike when in use.
Assembly
PREPARING SITE
To find the ideal location to set up this bike, ensure that:
- Area is well illuminated and well ventilated.
- Surface is level.
- There is enough space to access the unit and emergency dismount. If it is possible, keep the following clearances: 0.5 m at each side and 2 m at the back.
- The bike is placed in an environment with a relative humidity range of 30-50%. Please ensure the temperature is kept constant. Do not use in a moist or damp environment as this may impact on the integrity and performance of the machine.
DIAGRAM
CONTENT LISTING
See diagram (left) and content listing (below) for exercise bike box contents. See Customer Service chapter for contact information if any parts are missing.
BOX CONTENTS

TOOLS PACK
RE500 ASSEMBLY
The bike has been assembled and tested at the factory, so you shouldn’t have any problems putting all the parts together. Components are designed to fit together, and only basic tools are required for the assembly process. Inside the box you will find a Tools Pack (Hex Allen Key, Multi-Tool, Washers and Bolts). See previous page.
To assemble your JLL RE500 please follow these easy steps:
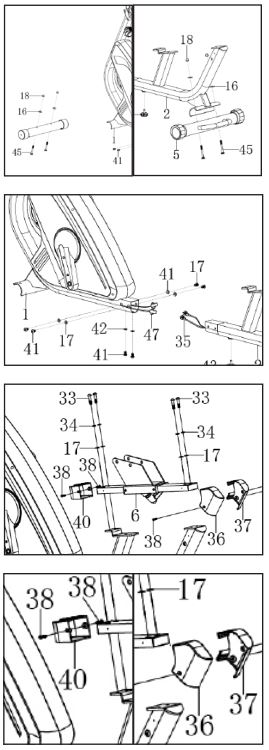 STEP 1Attach the front and rear stabilizers to the main frames using four M8x70 bolts, four arc washers and four M8 cap nuts. Tighten using the multi-tool.NOTE: The rear stabilizer will be the one with the handlebar attached.
STEP 2Next, remove the six M8 bolts and flat washers from the front main frame and connect the sensor wires from the front to the rear main frame.Connect the front and rear main frames using the six bolts and washers removed from before.
STEP 3Attach the sliding tube to the rear main frame using four M8x35 bolts, four flat washers and four spring washers.
STEP 4Attach the front tube cover using two ST4.2×20 screws. Attach the rear tube cover using two ST4.2×20 screws and one ST4.2×15 screw.
STEP 5Secure the support bracket to the cushion sleeve using the four M10 bolts and 8 washers found already in the support bracket.
STEP 6Attach the seat and back cushions to the support bracket using the four M6 bolts and four washers found in the back of the seat and within your tools pack.
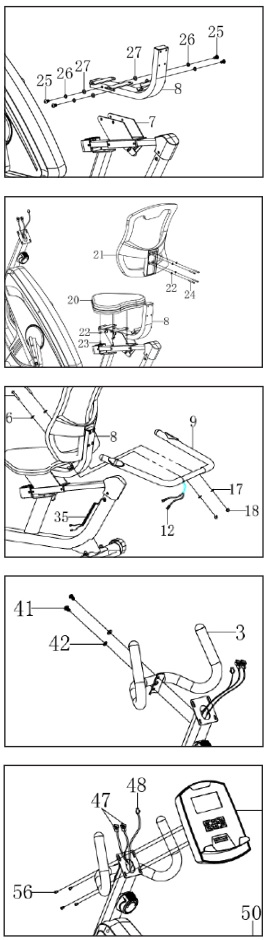
STEP 7Attach the rear handlebar to the back of the support bracket using two M8x45 bolts, two arc washers and two flat washers. Then connect the pulse wires from the handlebar to the rear main frame.
STEP 8Secure the front handlebar to the front main frame using the two M8 bolts and two arc washers found in the frame.
STEP 9Connect the three wires from the front main frame to the monitor and secure it to the frame using the four screws found in the back of the monitor.
STEP 10Attach the pedals to the corresponding cranks. Each crank and pedal will be marked with an R or L. Turn the right pedal clockwise and left pedal anti-clockwise.
MONITOR CONFIGURATION
TESTING THE BIKE OPERATION
Use the following instructions to test the full resistance of the bike and to check the machine for proper operation.
- Sit on the bike and start pedaling, change the levels of resistance and check to make sure you feel a difference in difficulty.
- As you are pedaling make sure you don’t feel any wobble in your machine, if so you may need relocate the bike to a more level surface.
- As you pedal on your bike check that there are no unusual noises. 4. Finally check the monitor to make sure the digits are changing on each setting to record your workout correctly.
SPECIFICATIONS
Operation
Read all instructions, warnings and safety procedures located in the Safety chapter before using the bike.
HEART-RATE SENSORS
Hold the sensor plates on the handlebars ensuring that your hands are clean. A heart- rate reading will show on the display. Factors that interfere with pulse signal are:
- Hand lotions, oils or body powder.
- Excessive dirt.
- Excessive movement.
NOTE: Heart-rate is calculated by BPM (beats per minute).
DATA READOUTS
As you exercise, the bike keeps track of the following data:
- Time: The total time you have been working out or time remaining. Display time as hours: minutes.
- Speed: Your current speed, displayed in kilometres per hour (km/h).
- Distance: The total accumulated distance, in kilometres during your workout.
- Calories: The total accumulated calories burned during your workout.
- Heart-rate: Your current heart-rate. Heart-rate will appear when a pulse signal is detected. Measured in BPM (Beats Per Minute).
- Odometer: The total accumulated distance, in kilometers since the bike has been first used.
- Scan: Automatically scans through each mode in sequence every six seconds.
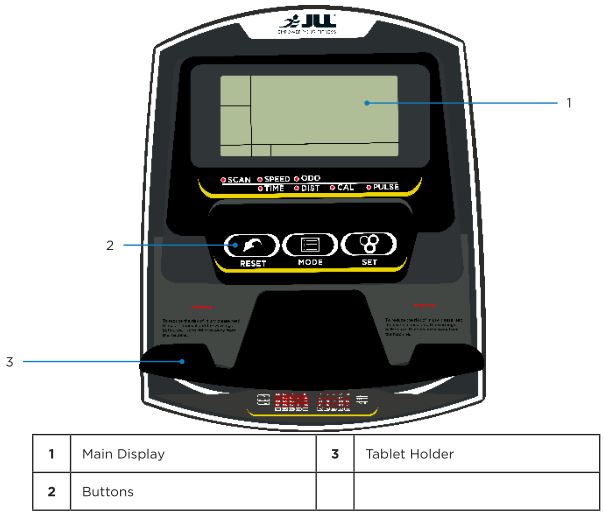
MONITOR INSTRUCTIONS
SCAN MODEWhen you first power on the monitor it will be set in a scan mode, displaying all your data every few seconds. There will be a scan graphic in the top left corner to indicate this, to exit scan mode press the mode button.
MAIN DISPLAYOut of scan mode, continually press the mode button to change what function is displayed in the large display box.
TARGET PROGRAMSWith the RE500 monitor you are able to set a target time, distance, calories and pulse. Press the mode button until the function you want to set is showing, then press the set button continually to increase the digits. Once you’ve set your target, you can either set another by pressing the mode button to move onto the next setting or start pedalling to begin your workout.
RESETTING YOUR MONITORTo reset the digits on your monitor press and hold the reset button, this will return everything to zero.
Maintenance
Maintenance must be performed on a regular basis. Performing maintenance actions can aid in providing safe and trouble-free operation of all JLL® equipment.
JLL® are not responsible for performing regular inspection and maintenance actions for your machine. JLL® representatives are available to answer any questions that you may have on +44 (0)800 6123 988.
PREVENTIVE MAINTENANCE ACTIVITIES
Every JLL® bike that comes from the factory is already maintained, however, you just need to follow simple steps to keep it in fully working condition. Keeping the bike in a clean state will help to prolong its life. Perform regular preventive maintenance to ensure normal operation of the unit. Keep a log of all maintenance actions to assist in staying current with all preventive maintenance activities. JLL® is not responsible for performing regular inspection or maintenance.
Read all instructions and warnings listed both in this chapter and in the Safety chapter. During maintenance, disconnect the power cable. Contact JLL® Customer Service on +44 (0)800 6123 988 for any maintenance or service concerns.
Requirements:
- Water
- Dry cloth
- Vacuum
![]() WARNING
WARNING
- Only use water to clean and dust. Do not use any cleaning product because they may damage the bike.
- Be careful not to spill or get excessive moisture between the edge of the monitor, as this might create an electrical hazard or cause failure of the electronics.
![]() WARNING
WARNING
- Use only JLL® replacement parts.
- If you allow your machine to become rusty, this will affect your warranty.
Depending on where the bike is placed, you may experience dry air, causing a common experience of static electricity. You can notice that by walking across a carpet and then touching a metal object. On your bike you may experience a shock due to the build-up of static electricity on your body and the discharge path of the bike. If you experience this type of situation, you may want to increase the humidity to a comfortable level through the use of a humidifier.
Check your machine regularly for rust. If rust starts to appear on the screws it means the item is not housed in the correct environment and will need to be moved to a more suitable room. Any rust will indicate there may be moisture in the air and as a result this could impact on the integrity and performance of your machine.
EXERCISE BIKE CLEANING
After every workout use a neat, dry cloth for cleaning the bike and the handlebars to prevent the machine of corrosion. Wipe away any sweat that may have dripped onto the monitor or handlebars. Avoid scratching the display by using a soft cloth.
Contaminants, such as hand lotions, oils or body powder, may come off on the sensor plates. These can reduce sensitivity and interfere with the pulse signal. It is recommended that the user has clean hands when making contact with the sensor plates. Clean the handles using a cloth dampened with water. Do not use abrasive or chemical cleaning agents.
Vacuum or sweep the floor underneath and around the bike to prevent any dust going into the machine. A treadmill mat can help to reduce dust.
![]() WARNING: EQUIPMENT HAZARDTo avoid serious injury or death:
WARNING: EQUIPMENT HAZARDTo avoid serious injury or death:
- Replace worn or damaged components immediately and do not use until repair is completed.
Additional Information
CONTACT INFORMATION
In case any issues arise, please do not hesitate to contact our Customer Service team on +44 (0)800 6123 988 or email us at [email protected]
You can also visit our support centre at SUPPORT.JLLFITNESS.CO.UK for maintenance and assembly articles & videos.
DISCLAIMER
- You should consult your physician, doctor or other health care professional before starting or taking part in any of our workout guides. It is your responsibility to evaluate your own health before taking part or performing any physical activity you may see associated with JLL Fitness Ltd.
- Always seek professional advice before changing your diet or starting any exercise program.
- JLL Fitness Ltd is not liable for any injuries or damages that may occur when assembling or using this exercise bike.
- By reading this you assume full responsibility for any injuries or changes to your physical well-being. You waive all rights and release JLL Fitness Ltd of blame from any injuries or damages to property that may occur whilst following our advice.
- This manual offers specific instructions on how to assemble and maintain your exercise bike. Failure to follow these directions may result in your warranty being void.
WWW.JLLFITNESS.COMFollow us on Facebook and Twitter @JLLFitness© JLL Fitness Ltd . All Rights Reserved.
References
[xyz-ips snippet=”download-snippet”]